The tibia and fibula are approximately equal in length but are different in structure and function. The tibia is large, transmits most of the stress of walking, and has a broad, accessible subcutaneous surface. The fibula is slender and plays an important role in ankle stability as well as taking one sixth of the load. It is surrounded by muscles, except at its ends. Surgical approaches to the fibula are more complex than are those to the tibia, because of both the depth of the bone and the presence of the common peroneal nerve, which winds around its upper third.
There are two main tibial approaches. The anterior approach is used most often because it affords easy access to the subcutaneous surface of the bone. The posterolateral approaches is rarely used but can save the limb when skin breakdown has made anterior approaches impossible. This approach is commonly used for bone grafting for nonunited fractures.
Three surgical approaches are described for access to the tibial plateau. The anterolateral and posteromedial approaches are often used together to treat complex proximal tibial fractures. The minimal access anterolateral approach to the tibial plateau utilizes two windows of the anterolateral approach.
The minimal access approach to the distal tibia is used for percutaneous plating of multifragmentary fractures of the distal tibial metaphysis.
The majority of tibial shaft fractures treated operatively are treated by the insertion of intramedullary nails. The minimal access approach for tibial nailing is used in this technique.
Anterolateral Approach to the Lateral Tibial Plateau
The anterolateral approach to the lateral tibial plateau offers safe access to the lateral tibial plateau for:
Open reduction and internal fixation of fractures of the lateral tibial plateau
Bone grafting for delayed union and nonunion of fractures
Treatment of osteomyelitis
Excision and biopsy of tumors
Proximal tibial osteotomy
Harvesting of bone graft
The soft-tissue covering of the proximal tibia is thin and delicate, consisting of skin and underlying fascia only. Problems with soft tissue in this area are frequent and massive swelling or blistering can occur, particularly following high-velocity trauma. Careful assessment of the soft tissues is critical before surgery, and definitive treatment of fractures in this area is frequently delayed to allow swelling to subside and the soft tissues to recover. The anterolateral approach is preferred to a direct anterior approach to the tibia because the skin in the anterolateral approach does not directly overlay the bone.
Position of the Patient
Place the patient supine on a radiolucent table. Place a firm wedge beneath the knee to flex the joint to approximately 60º (Fig. 11-1). Place a small bag underneath the buttock to correct the normal external rotation of the lower limb. This will ensure that the patella is facing directly anteriorly. Exsanguinate the limb either by elevating it for 3 to 5 minutes or by applying a soft rubber bandage. Then inflate a tourniquet.
Landmarks and Incision
Landmarks
Palpate the shaft of the proximal tibia along its anterior border. Identify the position of the lateral joint line of the knee by flexing and extending the joint. Palpate Gerdy’s tubercle just lateral to the patella tendon. All these landmarks are easily palpable, even in an obese patient.
Incision
Make an S-shaped incision. Start approximately 3 to 5 cm proximal to the joint line, staying just lateral to the border of the patella tendon. Curve the incision anteriorly over Gerdy’s tubercle and then extend it distally, staying about 1 cm lateral to the anterior border of the tibia (Fig. 11-2). The exact length of the incision depends on the pathology to be treated and the implant to be used.
Internervous Plane
There is no internervous plane in this approach. The dissection is essentially epi-periosteal and does not disturb the nerve supply to the extensor compartment.
P.587
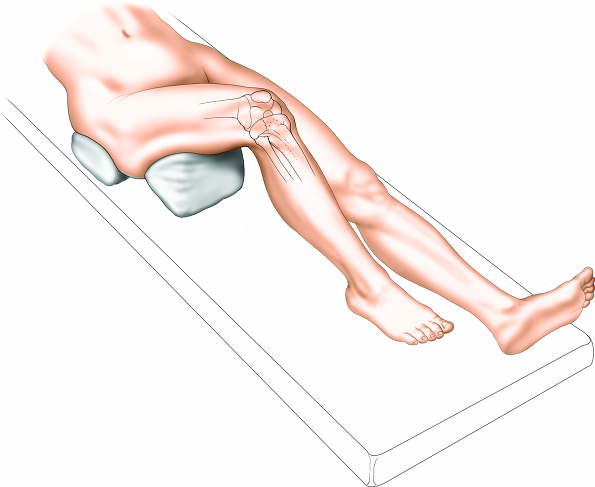 |
Figure 11-1 Place the patient supine on a radiolucent table, with a firm wedge beneath the knee to flex the joint to approximately 60°. |
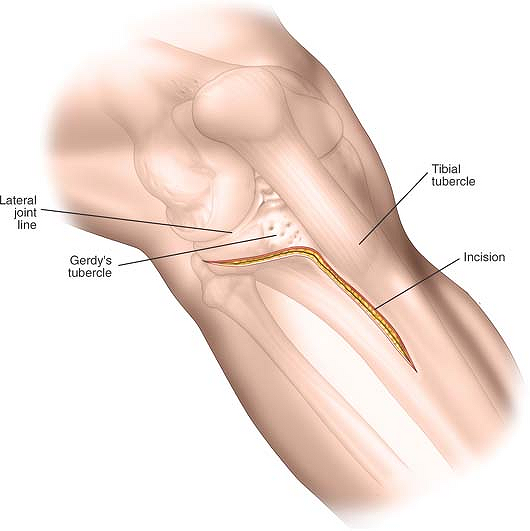 |
Figure 11-2 Make an S-shaped incision. Start approximately 3 to 5 cm proximal to the joint line, staying just lateral to the border of the patella tendon. Curve the incision anteriorly over Gerdy’s tubercle and extend it distally, staying about 1 cm lateral to the anterior border of the tibia. |
P.588
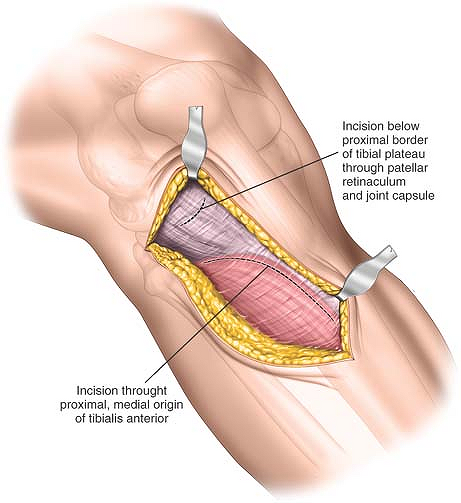 |
Figure 11-3 Deepen the incision proximally through subcutaneous tissue to expose the lateral aspect of the knee joint capsule. Incise the knee joint capsule longitudinally down to the superior border of the lateral meniscus. Take care not to divide the lateral meniscus inadvertently. Below the joint line, deepen the incision through subcutaneous tissue to expose the fascia overlying the tibialis anterior muscle. |
Superficial Surgical Dissection
Deepen the incision proximally through subcutaneous tissue to expose the lateral aspect of the knee joint capsule. Incise the knee joint capsule longitudinally down to the superior border of the lateral meniscus. Take care not to divide the lateral meniscus inadvertently. Below the joint line, deepen the incision through subcutaneous tissue and incise the fascia overlying the tibialis anterior muscle (Fig. 11-3).
Deep Surgical Dissection
Proximally enter the knee joint by dividing the synovium. Carefully detach the lateral meniscus from its soft-tissue attachments inferiorly and develop a plane between the undersurface of the lateral meniscus and the underlying tibial plateau. Insert stay sutures to the periphery of the meniscus to facilitate reattachment during closure. Ensure that the anterior attachment of the meniscus remains intact. Detach a sufficient amount of the meniscus to allow adequate visualization of the superior surface of the lateral tibial plateau. Using an elevator, inferiorly detach some of the origin of tibialis anterior from the proximal tibia. Try to work in a plane between the periosteum and the muscle (Fig. 11-4).
Dangers
Nerves
The superficial branch of the peroneal nerve has a variable course. Normally, it lies well posterior to the area of dissection and it should not be injured.
The lateral meniscus has to be detached from some of its soft-tissue attachments inferiorly to allow adequate visualization of the articular surface of the tibia. Take care not to completely detach it, preserving anterior and posterior attachments, however. It is at most risk during the incision of the knee joint synovium.
How to Enlarge the Approach
Local Measures
Application of a distractor or external fixator to the lateral aspect of the knee between the femur and the tibia allows a varus distraction force to be applied to the knee joint, thereby opening up the lateral compartment.
Extensile Measures
Proximal Extension. To extend the approach proximally, continue the skin incision along the lateral aspect of the patella, then curve posteriorly over the
lateral aspect of the distal femur. Deepen the incision through the lateral joint capsule to gain access to the knee joint and the distal femur proximally.
P.589
lateral aspect of the distal femur. Deepen the incision through the lateral joint capsule to gain access to the knee joint and the distal femur proximally.
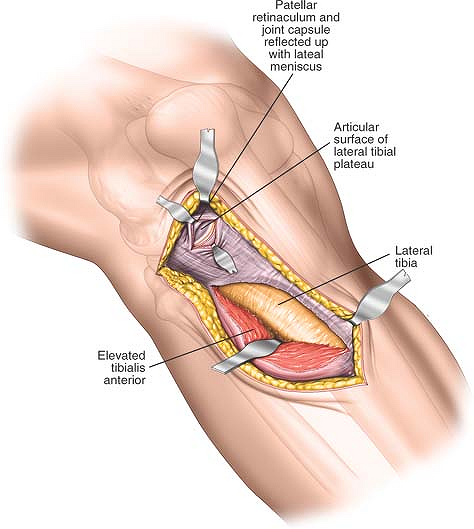 |
Figure 11-4 Proximally enter the knee joint by dividing the synovium. Carefully detach the lateral meniscus from its soft-tissue attachments inferiorly and develop a plane between the undersurface of the lateral meniscus and the underlying tibial plateau. Distally incise the fascia overlying the tibialis anterior muscle. Mobilize the muscle belly from the lateral aspect of the tibial shaft. |
Distal Extension. To extend the approach distally, continue the incision in a longitudinal fashion, remaining 1 cm lateral to the anterior border of the tibia. Extend it all the way down to the ankle proximally. Deep dissection, either by splitting the tibialis anterior muscle or by detaching it from the lateral aspect of the tibia, allows access to the tibial shaft down to its proximal quarter.
Minimal Access Anterolateral Approach to the Proximal Tibia
The minimal access anterolateral approach offers safe access for open reduction and internal fixation of proximal tibial fractures. The approach is of most use in treating fractures, which do not involve the joint surface, or where reduction and fixation of the intra-articular element of the fracture can be carried out without formal exposure of the joint surface.
Precontoured plates are easy to use along the lateral aspect of the proximal tibia and can be applied percutaneously. As with the anterolateral approach to the proximal tibia, the soft tissues in this area are critical, and massive swelling or blistering are contraindications to immediate surgery.
Position of Patient
Place the patient supine on a radiolucent table, as for the anterolateral approach, to the lateral tibial plateau (see Fig. 11-1).
Landmarks
Palpate the shaft of the proximal tibia up to the joint line and identify Gerdy’s tubercle just lateral to the
patella tendon. Confirm the position of the joint line by flexing and extending the knee.
P.590
patella tendon. Confirm the position of the joint line by flexing and extending the knee.
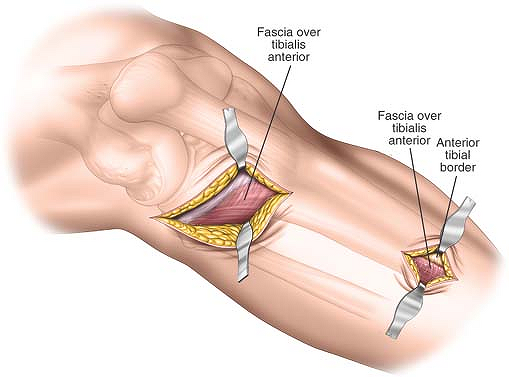 |
Figure 11-5 Distally make a 5- to 6-cm longitudinal incision approximately 2 cm lateral to the tibial crest and parallel with it. The size and length of the distal window depends on the pathology to be treated and the implants to be used. |
Incision
Two incisions are made. Proximally, begin the incision just proximal and lateral to Gerdy’s tubercle and extend it distally in a curvilinear fashion for approximately 5 cm to 6 cm.
Distally make a 5- to 6-cm longitudinal incision approximately 2 cm lateral to the tibial crest and parallel with it. The size and length of the distal window depends on the pathology to be treated and the implants to be used. The position of the incision often can only be assessed using the image intensifier control (Fig. 11-5).
Internervous Plane
There is no internervous plane in this approach. The dissection is epi-periosteal and submuscular and does not disturb the nerve supply to the extensor compartment (superficial peroneal nerve).
Superficial Surgical Dissection
Proximally incise the deep fascia in the line of the skin incision to access the proximal tibia. Retract the tibialis anterior muscle laterally and distally, preserving as much soft tissue as possible.
Distally deepen the approach in the line of the skin incision through subcutaneous tissue, then incise the deep fascia in the line of the skin incision (Fig. 11-6).
Deep Surgical Dissection
Proximally strip the soft tissues off the proximal tibia to allow adequate visualization of the pathology and placement of implants. Try to preserve as much soft-tissue attachments to the bone as possible.
Distally develop a plane between the tibialis anterior muscle and the lateral border of the tibia. This can easily be achieved with blunt dissection using the Cobb elevator.
Finally, develop an epi-periosteal plane to connect the two incisions running along the lateral border of the tibia by using a blunt elevator (Fig. 11-7).
Dangers
The superficial branch of the peroneal nerve should be posterior to the proximal dissection. The course of the nerve is variable, thus care must be taken during the superficial surgical dissection to ensure that the nerve is not damaged.
How to Enlarge the Approach
Locally
The two windows can be connected, and further dissection of the origin of tibialis anterior from the lateral aspect of the tibia allows visualization of the lateral aspect of the whole proximal third of the tibia.
P.591
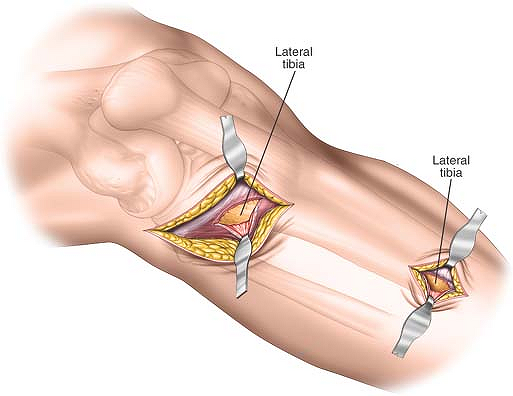 |
Figure 11-6 Distally deepen the approach in the line of the skin incision through subcutaneous tissue, then incise the deep fascia in the line of the skin incision to expose the periosteum overlying the lateral aspect of the lateral tibial plateau. Distally incise the subcutaneous tissues and the fascia covering the tibialis anterior muscle in the line of the skin incision. Finally, split the fibers of the tibialis anterior muscle to reveal the periosteum covering the lateral aspect of the tibial shaft. |
 |
Figure 11-7 Develop an epi-periosteal plane to connect the two incisions running along the lateral border of the tibia by using a blunt elevator. |
P.592
Posteromedial Approach to the Proximal Tibia
Complex fractures of the proximal tibia often involve a large posteromedial fragment. Accurate reduction of this fragment onto the tibial shaft is critical to allow reconstruction of the joint. Plates applied to the posteromedial aspect of the tibia prevent varus deformity, the most common deformity of the proximal tibia after fracture. Biomechanically, these plates are on the compression side of the bone. Another potential advantage of the incision is that the skin and soft tissues on the posteromedial aspect of the tibia are usually free from blisters that commonly occur on the anterior portion of the tibia. However, if the soft tissues on the posteromedial aspect of the proximal tibia are poor, surgery must be delayed until the soft-tissue conditions have improved.
The indications for this approach include:
Open reduction and internal fixation of fractures of the medial tibial plateau
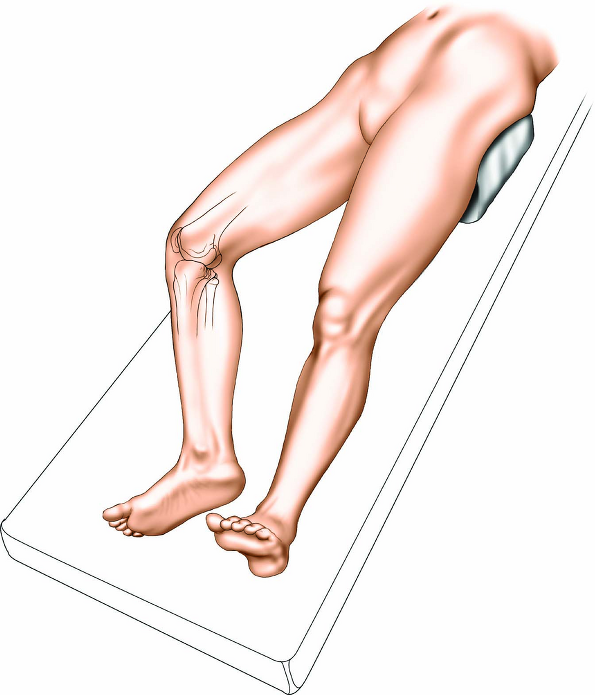
Figure 11-8 Place the patient supine on a radiolucent table. Position a sandbag beneath the contralateral hip to roll the patient approximately 20°.
Open reduction and internal fixation of complex bicondylar tibial plateau fractures
Upper tibial osteotomy
Drainage of abscess
Biopsy of tumors
Position of the Patient
Place the patient supine on a radiolucent table and ensure that adequate visualization of the fracture can be obtained using an image intensifier. Position a sandbag beneath the contralateral hip to roll the patient approximately 20° (Fig. 11-8). This will increase the external rotation of the affected limb, bringing the posteromedial corner of the tibia forward. Ease of access is also improved if the surgeon stands on the opposite side of the table from the approach. Exsanguinate the limb by elevating it for 3 to 5 minutes or by applying a soft rubber bandage. Inflate a tourniquet.
P.593
Landmarks and Incision
Landmarks
The upper end of the tibia is triangular and the posteromedial surface where the tibia flares is easily palpated, even in very obese individuals.
Incisions
Make a 6-cm longitudinal incision overlying the posteromedial border of the proximal tibia. The exact length of the incision will depend on the pathology to be treated and the implant to be used (Fig. 11-9).
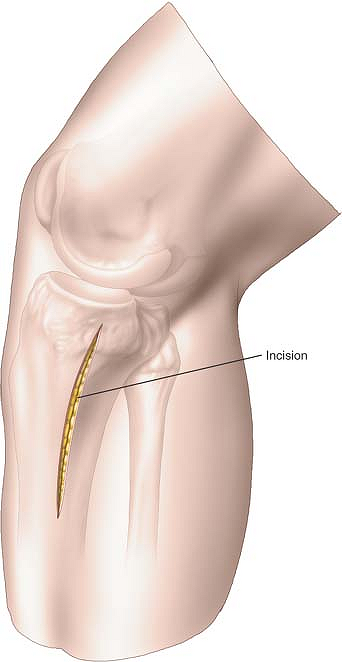 |
Figure 11-9 Make a 6-cm longitudinal incision overlying the posteromedial border of the proximal tibia. The exact length of the incision will depend on the pathology to be treated and the implant to be used. |
Internervous Plane
There is no internervous plane in this approach. The plane between the bone and the gastrocnemius muscle is utilized.
Superficial Surgical Dissection
Deepen the incision through the subcutaneous fat. The long saphenous vein and the saphenous nerve will be just anterior to your surgical approach; these structures should be identified and preserved. Identify the pes anserinus expansion overlying the tibia (Fig. 11-10A).
To approach the tibia, either divide the pes anserinus longitudinally in the line of the skin incision or identify the anterior border of the pes and partially resect it from its insertion into the tibia, reflecting it posteriorly (Fig. 11-10B).
Deep Surgical Dissection
Develop an epi-periosteal plane between the pes anserinus and the medial head of the gastrocnemius at the posteromedial border of the tibia. The muscle can be gently freed from the bone by blunt dissection (Fig. 11-11).
Dangers
Vessels
The saphenous nerve and vein are encountered during the superficial surgical dissection and should be preserved and protected.
How to Enlarge the Approach
Proximal Extension
To reach the posteromedial corner of the knee, the incision may be extended proximally around the medial border of the tibia. Access to the popliteal artery and vein for vascular surgery is also possible through this extension.
Distal Extension
To extend the approach distally, continue down along the medial side of the posteromedial tibia. Not only will this give you access to the posteromedial border of the tibia, but it also provides access to both the superficial and deep posterior compartments of the leg for compartment release.
P.594
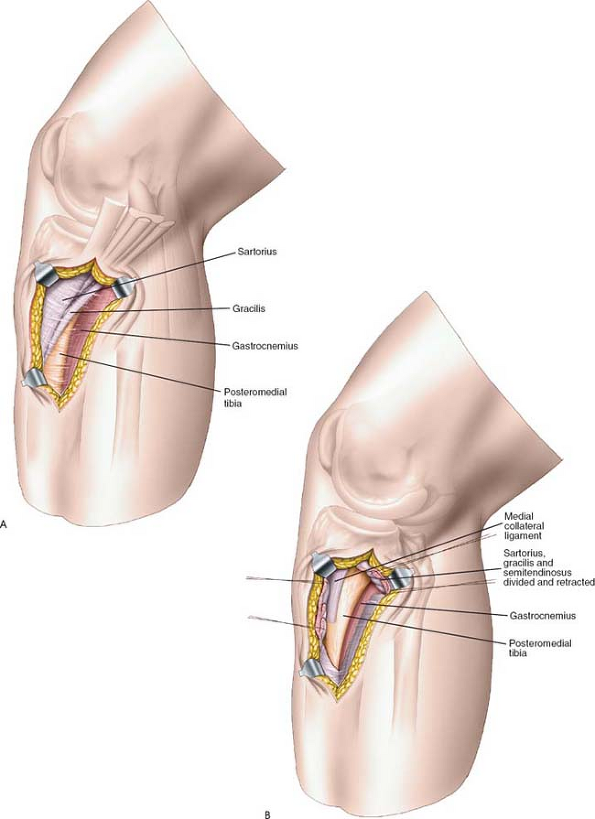 |
Figure 11-10 (A) Deepen the incision through the subcutaneous fat. The long saphenous vein and the saphenous nerve will be just anterior to the surgical approach; these structures should be identified and preserved. Identify the pes anserinus expansion overlying the tibia. (B) To approach the tibia, either divide the pes anserinus longitudinally in the line of the skin incision or identify the anterior border of the pes and partially resect it from its insertion into the tibia, reflecting it posteriorly. |
P.595
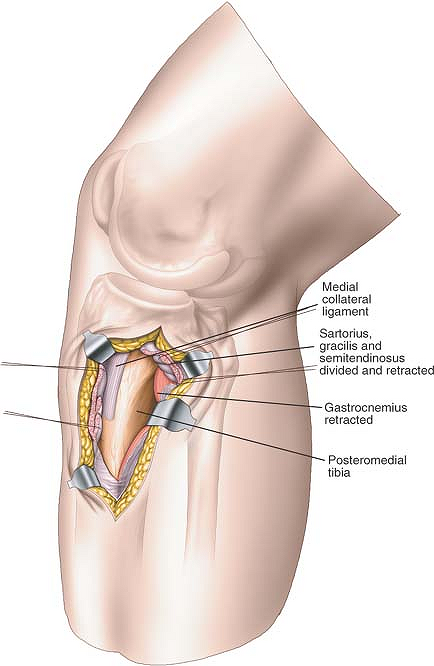 |
Figure 11-11 Develop an epi-periosteal plane between the pes anserinus and the medial head of the gastrocnemius at the posteromedial border of the tibia. The muscle can be gently freed from the bone by blunt dissection. |
Anterior Approach to the Tibia
The anterior approach offers safe, easy access to the medial (subcutaneous) and lateral (extensor) surfaces of the tibia. It is used for the following:
Open reduction and internal fixation of tibial fractures1
Bone grafting for delayed union or nonunion of fractures2
Implantation of electrical stimulators3
Excision of sequestra or saucerization in patients with osteomyelitis
Excision and biopsy of tumors
Osteotomy
Plates applied to the subcutaneous surface of the tibia are placed correctly biomechanically on the medial (tensile) side of the bone; they also are easier to contour there. Some surgeons prefer to use the lateral surface for plating, however, to avoid the problems of subcutaneous placement.
The anterior approach is the preferred approach to the tibia except when the skin is scarred or has draining sinuses in it.
Position of the Patient
Place the patient supine on the operating table. The use of a tourniquet is optional. Tourniquets should not be
used if this approach is to be used in conjunction with the exploration of an open wound. If you wish to use a tourniquet, exsanguinate the limb by elevating it for 3 to 5 minutes, then inflate a tourniquet (Fig. 11-12).
P.596
used if this approach is to be used in conjunction with the exploration of an open wound. If you wish to use a tourniquet, exsanguinate the limb by elevating it for 3 to 5 minutes, then inflate a tourniquet (Fig. 11-12).
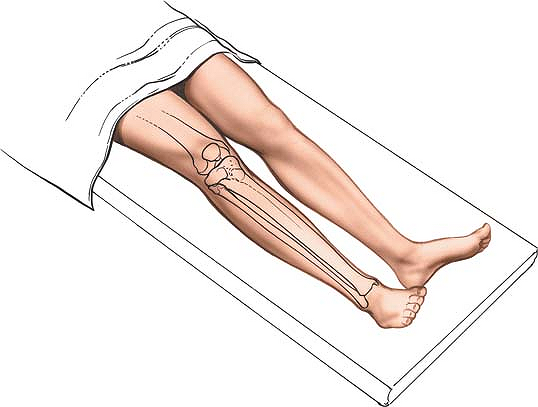 |
Figure 11-12 Position for the anterior approach to the tibia. |
Landmarks and Incision
Landmarks
The shaft of the tibia is roughly triangular when viewed in cross section. It has three borders, one anterior, one medial, and one interosseous (posterolateral). These borders define three distinct surfaces: (1) a medial subcutaneous surface between the anterior and medial borders, (2) a lateral (extensor) surface between the anterior and interosseous borders, and (3) a posterior (flexor) surface between the medial and interosseous (posterolateral) borders. The anterior and medial borders and the subcutaneous surface are easily palpable.
Incision
Make a longitudinal incision on the anterior surface of the leg parallel to the anterior border of the tibia and about 1 cm lateral to it. The length of the incision depends on the requirements of the procedure because of the poor vascularity of the skin. It is safer to make a longer incision than to retract skin edges forcibly to obtain access. The tibia can be exposed along its entire length (Fig. 11-13).
Related posts:

Stay updated, free articles. Join our Telegram channel

Full access? Get Clinical Tree


