The Hip
Operations on the hip joint are among the most common surgical procedures performed in orthopaedics. Total joint replacement for degenerative joint disease has revolutionized the lives of millions of patients. Open approaches to the hip joint are also required for hemiarthroplasties, tumor surgery, and for the treatment of infection around the hip joint.
Four basic approaches expose the entire hip. The anterior approach, less common for total joint replacements, allows good access to the pelvis as well as to the hip joint. The anterolateral approach, the most common approach for total hip replacement, has many variations because of the different requirements of the several prosthetic designs that can be inserted. The standard anterolateral approach is described; readers are advised to consult the original papers of the designers of the arthroplasty before performing a particular joint replacement. The posterior approach, which is used extensively for hemiarthroplasty as well as for total hip joint replacement, is probably the most common approach performed around the hip joint. It is both safe and easy to perform with only one assistant. The medial approach is rarely used, and then mainly for local procedures on the lesser trochanter and surrounding bone.
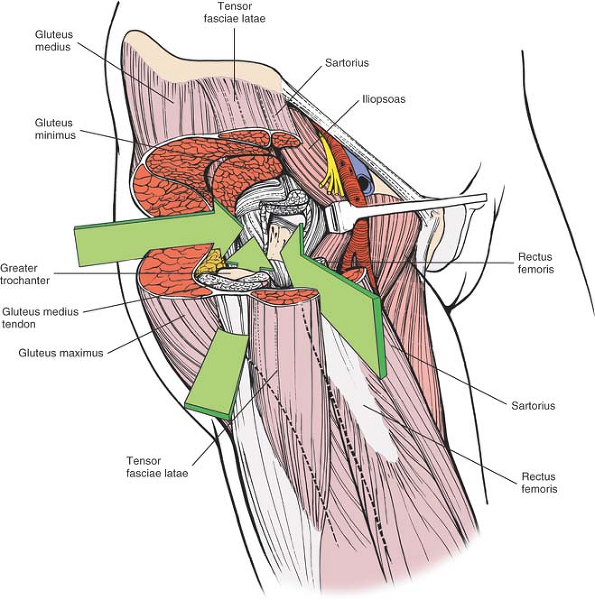 |
Figure 8-1 The intermuscular intervals used in the anterior, anterolateral, and posterior approaches to the hip. |
P.405
Minimal access surgical approaches to the hip have increased in popularity. Most of these techniques utilize the classical approaches described in this book. The length of the skin incision and the underlying dissection is reduced. Minimal access surgery can create less soft-tissue damage, but the visualization of the structures is necessarily less. The techniques, therefore, are potentially more hazardous, and an understanding of the underlying anatomy is important. In addition, imaging may be indicated to ensure correct implant position.
These four basic approaches to the hip take advantage of the muscular intervals that surround the joint. The anterior approach uses the interval between the sartorius and the tensor fasciae latae; the anterolateral approach uses the interval between the tensor fasciae latae and the gluteus medius; the posterior approach gains access either through the interval between the gluteus medius and the gluteus maximus or by splitting the gluteus maximus; and the medial approach exploits the interval between the adductor longus and the gracilis (Fig. 8-1).
Three anatomical sections augment the description of the approaches. Because the anterior and anterolateral approaches share so much anatomy, they are grouped together. The anatomy for the posterior and medial approaches follows the appropriate approach.
Anterior Approach to the Hip
The anterior approach, also known as the Smith-Petersen5,6 approach, gives safe access to the hip joint and ilium. It exploits the internervous plane between the sartorius (femoral nerve) and the tensor fasciae latae (superior gluteal nerve) to penetrate the outer layer of the joint musculature. Its uses include the following:
Open reduction of congenital dislocations of the hip when the dislocated femoral head lies anterosuperior to the true acetabulum7
Synovial biopsies
Intraarticular fusions
Total hip replacement
Hemiarthroplasty
Excision of tumors, especially of the pelvis
The upper part of the approach may also be used for the following:
Pelvic osteotomies
The approach does not expose the acetabulum as completely as other incisions unless muscles are extensively stripped off the pelvis.
Position of the Patient
Place the patient supine on the operating table. If the approach is to be used for pelvic osteotomy, place a small sandbag under the affected buttock to push the affected hemipelvis forward (Fig. 8-2).
Landmarks and Incision
Landmarks
The anterior superior iliac spine is subcutaneous and is easily palpable in thin patients. In obese patients, it is covered by adipose tissue and is more difficult to find. You can locate it most easily if you bring your thumbs up from beneath the bony protuberance.
The iliac crest is subcutaneous and serves as a point of origin and insertion for various muscles. However, none of these muscles cross the bony crest; it remains available for palpation (Fig. 8-3).
Incision
Make a long incision following the anterior half of the iliac crest to the anterior superior iliac spine. From there, curve the incision down so that it runs vertically for some 8 to 10 cm, heading toward the lateral side of the patella (see Fig. 8-3).
Internervous Plane
Two internervous planes are used: the superficial plane lies between the sartorius (femoral nerve) and the tensor fasciae latae (superior gluteal nerve); the deep plane lies between the rectus femoris (femoral nerve) and the gluteus medius (superior gluteal nerve) (Fig. 8-4A,B).
Superficial Surgical Dissection
Externally rotate the leg to stretch the sartorius muscle, making it more prominent. Identify the gap between the tensor fasciae latae and the sartorius by palpation (Fig. 8-6). The best place to find it is some 2 to 3 inches below the anterior superior iliac spine, since the fascia that covers both muscles just below the spine makes the interval difficult to define at its highest point. With scissors, carefully dissect down through the subcutaneous fat along the intermuscular
interval. Avoid cutting the lateral femoral cutaneous nerve (lateral cutaneous nerve of the thigh), which pierces the deep fascia of the thigh close to the intermuscular interval (Fig. 8-5).
P.406
P.407
P.408
P.409
interval. Avoid cutting the lateral femoral cutaneous nerve (lateral cutaneous nerve of the thigh), which pierces the deep fascia of the thigh close to the intermuscular interval (Fig. 8-5).
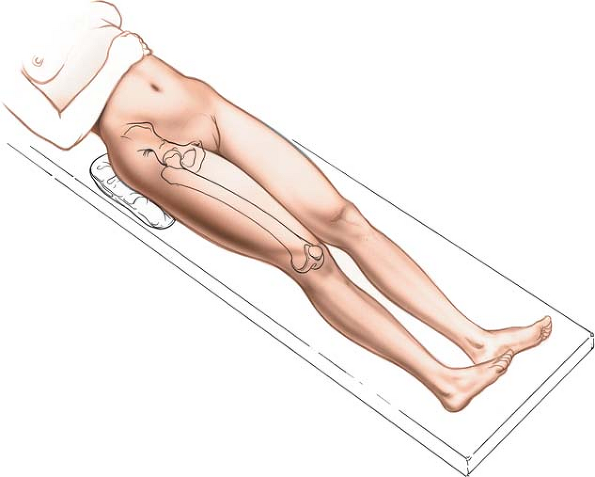 |
Figure 8-2 Position of the patient on the operating table for the anterior approach to the hip. |
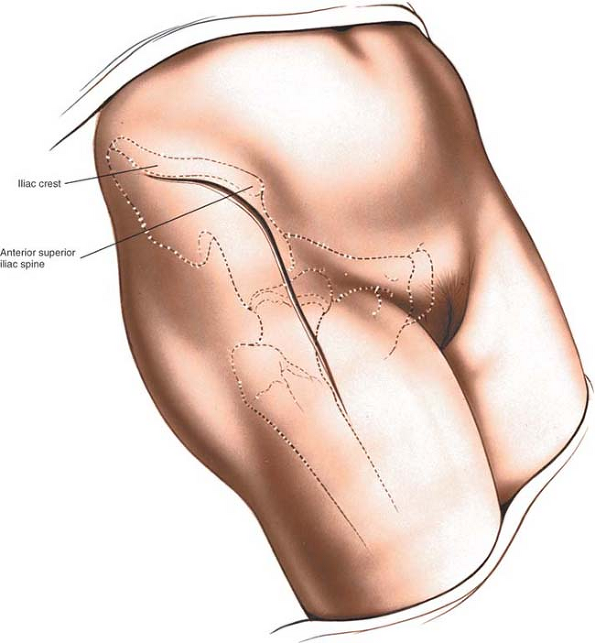 |
Figure 8-3 Make a longitudinal incision along the anterior half of the iliac crest to the anterior superior iliac spine. From there, curve the incision down so that it runs vertically for some 8 to 10 cm. |
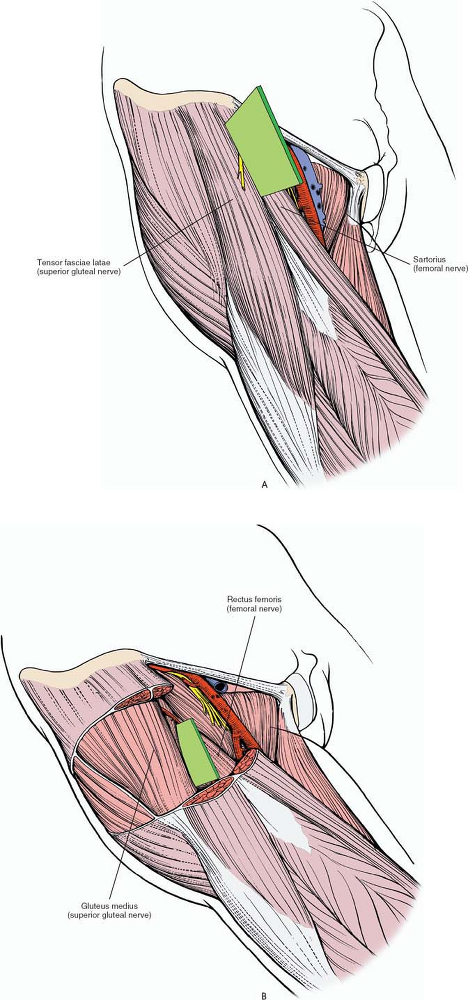 |
Figure 8-4 (A) The internervous plane lies between the sartorius (femoral nerve) and the tensor fasciae latae (superior gluteal nerve). (B) The deeper internervous plane lies between the rectus femoris (femoral nerve) and the gluteus medius (superior gluteal nerve). |
Incise the deep fascia on the medial side of the tensor fascia latae. Staying within the fascial sheath of this muscle will protect you from damaging the lateral femoral cutaneous nerve because the nerve runs over the fascia of the sartorius. Retract the sartorius upward and medially and the tensor fascia latae downward and laterally (Fig. 8-7).
Detach the iliac origin of the tensor fasciae latae to develop the internervous plane. The large ascending branch of the lateral femoral circumflex artery crosses the gap between the two muscles below the anterior superior iliac spine. It must be ligated or coagulated.
Deep Surgical Dissection
Retracting the tensor fasciae latae and the sartorius brings you on to two muscles of the deep layer of the hip musculature, the rectus femoris (femoral nerve)
and the gluteus medius (superior gluteal nerve) (Fig. 8-8).
P.410
P.411
and the gluteus medius (superior gluteal nerve) (Fig. 8-8).
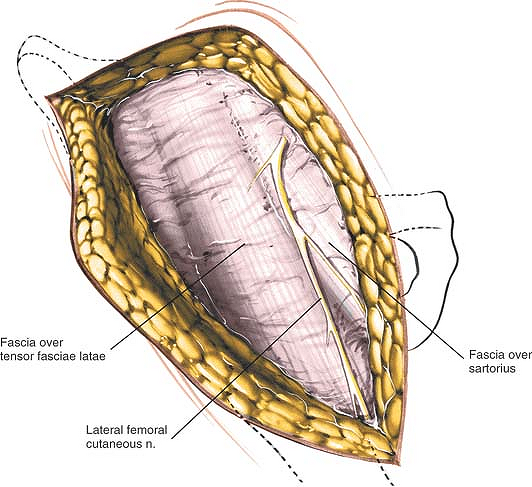 |
Figure 8-5 The lateral femoral cutaneous nerve (lateral cutaneous nerve of the thigh) pierces the deep fascia close to the intermuscular interval between the tensor fasciae latae and the sartorius. |
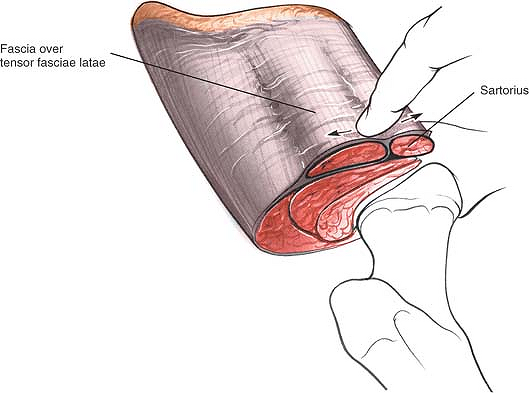 |
Figure 8-6 Identify the gap between the tensor fasciae latae and the sartorius by palpation. |
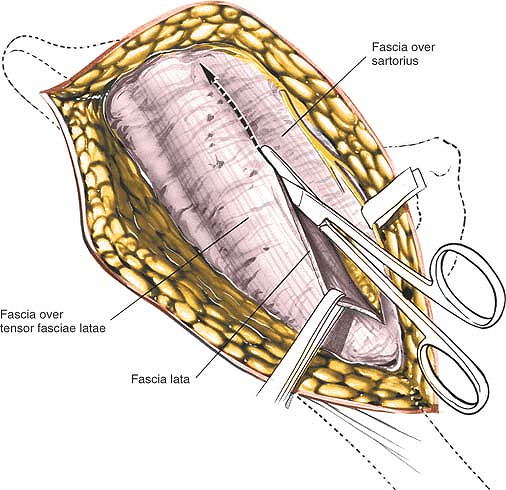 |
Figure 8-7 Incise the deep fascia on the medial side of the tensor fasciae latae. Retract the sartorius upward and medially and the tensor fascia downward and laterally. |
The rectus femoris originates from two heads: the direct head, from the anterior inferior iliac spine, and the reflected head, from the superior lip of the acetabulum. The reflected head also takes origin from the anterior capsule of the hip joint. It is intimate with the capsule, making dissection between the two structures difficult.
If you have difficulty identifying the plane between the rectus femoris and the gluteus medius, palpate the femoral artery. The femoral pulse is well medial to the intermuscular interval; if you dissect near it, you are out of plane. Detach the rectus femoris from both its origins and retract it medially. Retract the gluteus medius laterally (Fig. 8-9).
The capsule of the hip joint is now exposed. Inferomedially, you can see the iliopsoas as it approaches the lesser trochanter: Retract it medially (Figs. 8-10 and 8-11). The iliopsoas is often partly attached to the inferior aspect of the hip joint capsule and must be released from it. Inferolaterally, the shaft of the femur lies under cover of the vastus lateralis.
Adduct and fully externally rotate the leg to put the capsule on stretch; define the capsule with blunt dissection. Incise the hip joint capsule as the surgery requires, with either a longitudinal or a T-shaped capsular incision (Fig. 8-12). Dislocate the hip by external rotation after the capsulotomy.
Dangers
Nerves
The lateral femoral cutaneous nerve (lateral cutaneous nerve of the thigh) reaches the thigh by passing over, behind, or through—usually over—the sartorius muscle, about 2½ cm below the anterior superior iliac spine. The nerve must be preserved when you incise the fascia between the sartorius and the tensor fasciae latae; cutting it may lead to the formation of a painful neuroma and may produce an area of diminished sensation on the lateral aspect of the thigh (Fig. 8-14; see Fig. 8-5).
The femoral nerve lies almost directly anterior to the hip joint itself, within the femoral triangle. Because
the nerve is well medial to the rectus femoris, it is not really in danger unless you stray far out of plane to the wrong side of the sartorius and the rectus femoris. If you lose the correct plane during deep dissection, locate the femoral pulse by palpation. Within the femoral triangle, the artery lies medial to the nerve (Figs. 8-15 and 8-16).
P.412
P.413
P.414
P.415
P.416
P.417
the nerve is well medial to the rectus femoris, it is not really in danger unless you stray far out of plane to the wrong side of the sartorius and the rectus femoris. If you lose the correct plane during deep dissection, locate the femoral pulse by palpation. Within the femoral triangle, the artery lies medial to the nerve (Figs. 8-15 and 8-16).
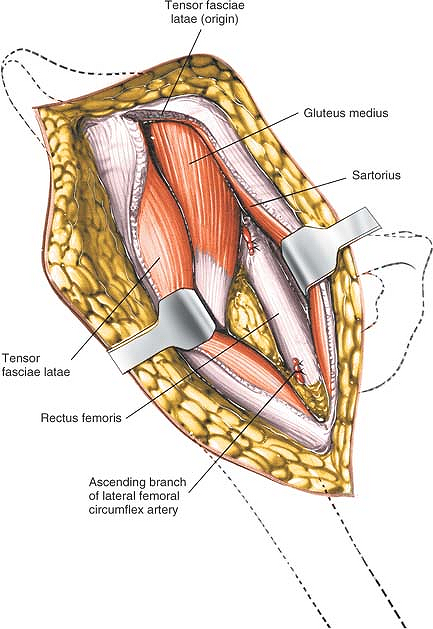 |
Figure 8-8 The deep layer of musculature, consisting of the rectus femoris and the gluteus medius, is now visible. The ascending branch of the lateral femoral circumflex artery must be ligated. |
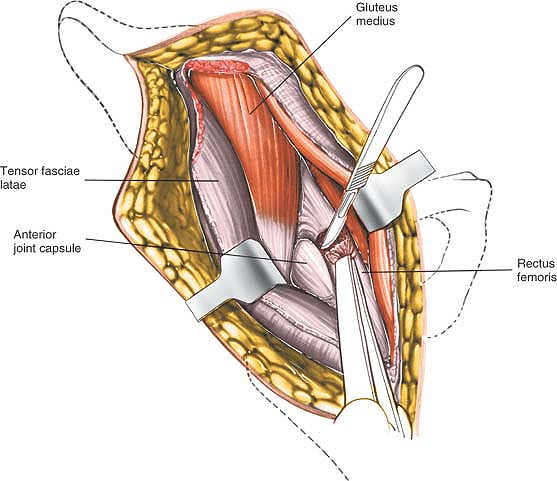 |
Figure 8-9 Detach the rectus femoris from both its origins, the anterior inferior iliac spine and the superior lip of the acetabulum. |
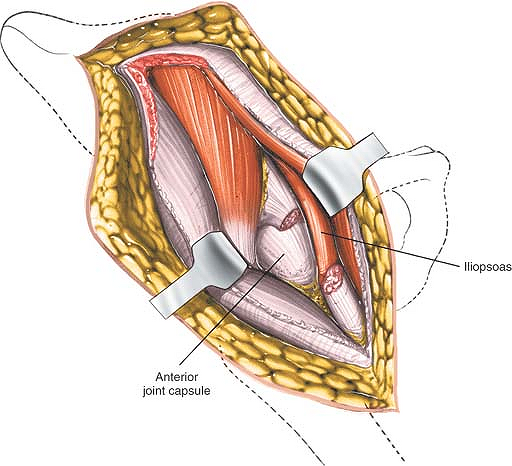 |
Figure 8-10 The hip joint capsule is now partly exposed. Retract the iliopsoas tendon medially. |
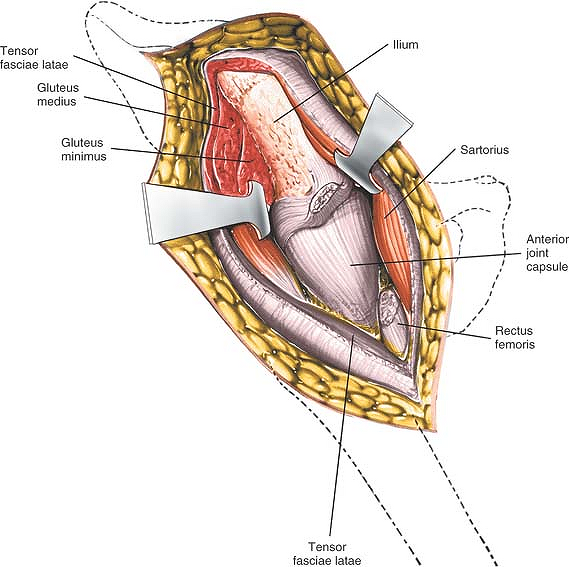 |
Figure 8-11 The hip joint capsule is fully exposed. Detach the muscles of the ilium if further exposure is needed. |
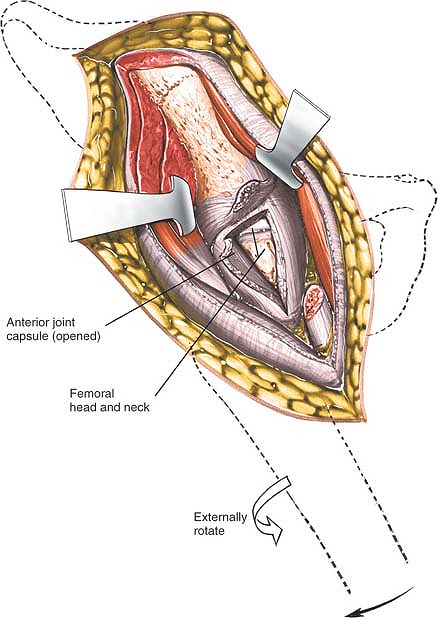 |
Figure 8-12 Incise the hip joint capsule. |
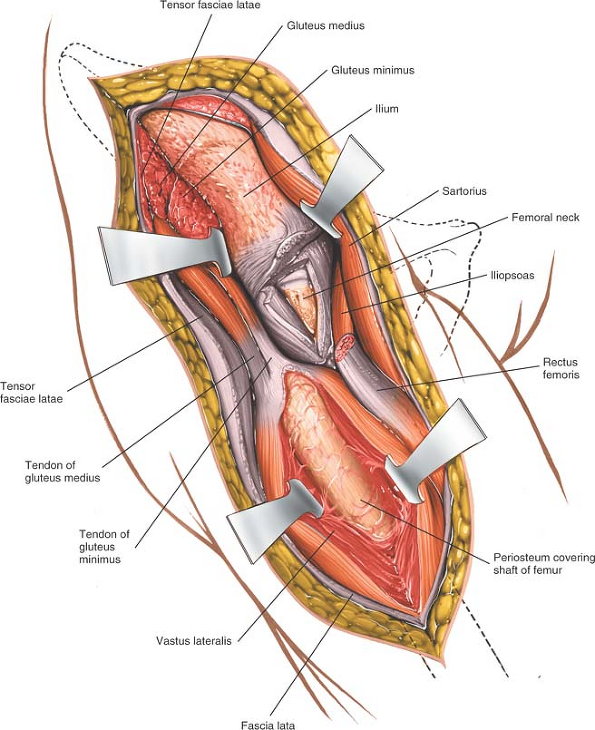 |
Figure 8-13 Proximal extension of the wound exposes the ilium. Distal extension of the incision exposes the anterior aspect of the femur in the interval between the vastus lateralis and the rectus femoris. It may be necessary to split muscle fibers to actually expose the lateral aspect of the femur. |
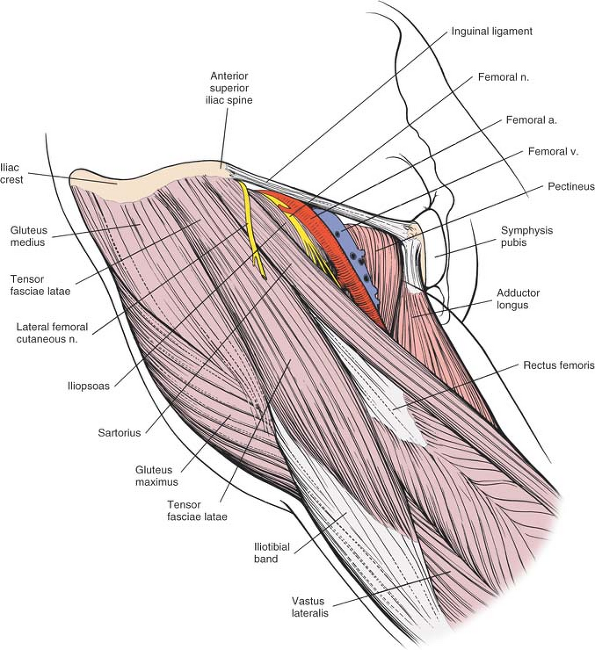 |
Figure 8-14 Superficial view of the muscles of the anterior region of the hip, including the femoral triangle and its contents. Sartorius. Origin. Anterior superior iliac spine and upper half of iliac notch. Insertion. Upper end of subcutaneous surface of tibia. Action. Flexor of thigh and knee and external rotator of hip. Nerve supply. Femoral nerve (L2-L4). Tensor Fasciae Latae. Origin. From outer aspect of iliac crest between the anterior superior iliac spine and the tubercle of the iliac crest. Insertion. By iliotibial tract into Gerdy’s tubercle of the tibia. Action. Maintains stability of extended knee and extended hip. Nerve supply. Superior gluteal nerve. |
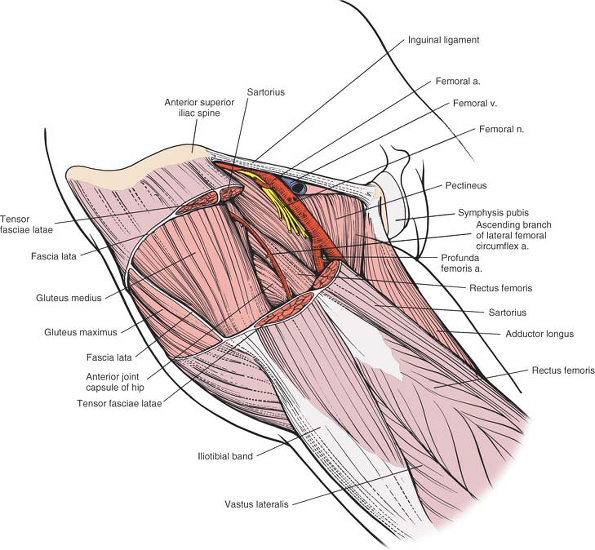 |
Figure 8-15 The tensor fasciae latae, the sartorius, and the fascia lata have been resected on the anterior aspect of the hip to reveal the gluteus medius, the rectus femoris, and the ascending branch of the lateral femoral circumflex artery. The hip joint capsule is visible between these two muscles. Medially, note the relationship between the iliopsoas and the rectus femoris. |
Vessels
The ascending branch of the lateral femoral circumflex artery crosses the operative field, running proximally in the internervous plane between the tensor fasciae latae and the sartorius.
Ligate or coagulate it when you separate the two muscles (see Figs. 8-8, 8-15, 8-16, 8-17, and 8-18).
P.418
Ligate or coagulate it when you separate the two muscles (see Figs. 8-8, 8-15, 8-16, 8-17, and 8-18).
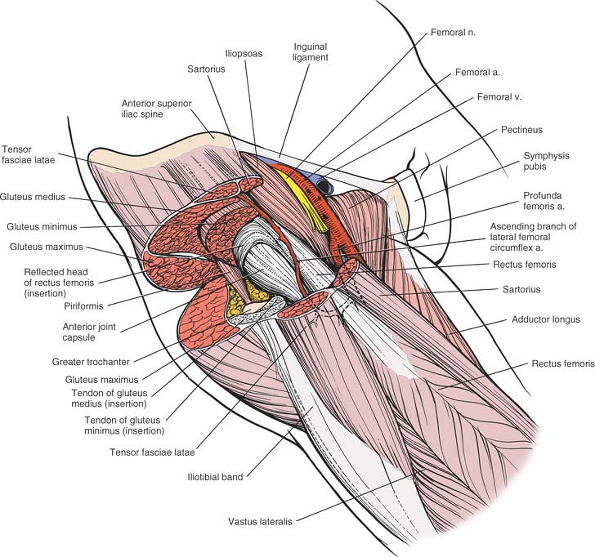 |
Figure 8-16 The gluteus minimus, medius, and maximus have been resected to reveal the hip joint capsule and the reflected head of the rectus femoris. |
How to Enlarge the Approach
Local Measures
Superficial Surgical Dissection. Detach the origins of the tensor fasciae latae and the sartorius.
Deep Surgical Dissection. Detach the origins of the gluteus medius and minimus from the outer wing of the ilium by blunt dissection. (This procedure is always necessary during pelvic osteotomies.) Bleeding from the raw exposed surface of the ilium can be controlled if you pack the wound with gauze sponges. Individual bleeding points can be controlled by the application of bone wax. There is no other way to stop bleeding.
Extensile Measures
The skin incision may be extended posteriorly along the iliac crest to expose that bone. In theory, the extension allows the taking of bone graft, but it is rarely used.
To extend the approach distally, lengthen the skin incision downward along the anterolateral aspect of the thigh. Incise the fascia lata in line with the skin incision; underneath it lies the interval between the vastus lateralis and the rectus femoris. Try to stay in the interval; you will have to split muscle fibers to expose the anterior aspect of the femur. This extension gives excellent exposure of the entire shaft of the femur (see Fig. 8-13).
The approach can be extended to allow visualization of both the inner and outer walls of the pelvis at
the level of the hip joint to allow pelvis osteotomy. To obtain visualization of the outer part of the ilium, gently strip the muscular coverings from the bone at the level of the origin of the reflected head of rectus. Using blunt instruments stay in contact with bone. This dissection will lead you into the sciatic notch. Take great care that any instrument inserted into the notch remains firmly on the bone, since the sciatic nerve is also emerging through the notch. Detach the straight head of the rectus femoris from the anterior inferior iliac spine, and carefully lift off the iliacus muscle from the inside of the pelvis, again sticking very carefully to the bone. A blunt instrument will gradually lead you into the greater sciatic notch. At this stage, both instruments should be in contact with each other and with the bone of the sciatic notch. Retraction on both instruments will allow visualization of the entire thickness of the pelvis at the level of the top of the acetabulum, permitting an accurate osteotomy to be carried out.
P.419
the level of the hip joint to allow pelvis osteotomy. To obtain visualization of the outer part of the ilium, gently strip the muscular coverings from the bone at the level of the origin of the reflected head of rectus. Using blunt instruments stay in contact with bone. This dissection will lead you into the sciatic notch. Take great care that any instrument inserted into the notch remains firmly on the bone, since the sciatic nerve is also emerging through the notch. Detach the straight head of the rectus femoris from the anterior inferior iliac spine, and carefully lift off the iliacus muscle from the inside of the pelvis, again sticking very carefully to the bone. A blunt instrument will gradually lead you into the greater sciatic notch. At this stage, both instruments should be in contact with each other and with the bone of the sciatic notch. Retraction on both instruments will allow visualization of the entire thickness of the pelvis at the level of the top of the acetabulum, permitting an accurate osteotomy to be carried out.
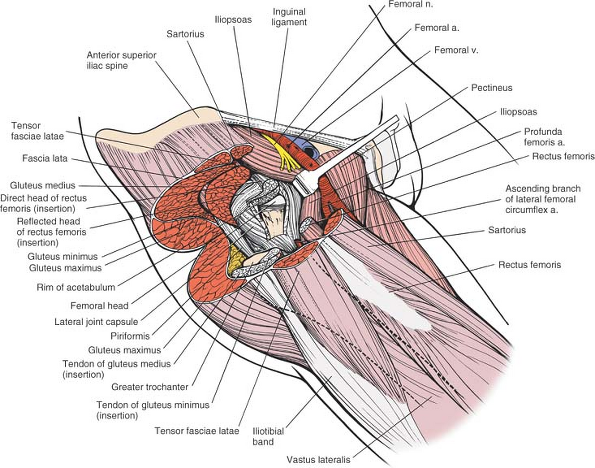 |
Figure 8-17 The iliopsoas tendon has been retracted medially; the rectus femoris has been resected and the joint capsule opened to reveal the joint. |
P.420
Anterolateral Approach to the Hip
The anterolateral approach is the approach most commonly used for total joint replacements. It combines an excellent exposure of the acetabulum with safety during reaming of the femoral shaft. Popularized by Watson-Jones (D. Hirsh, personal communication, 1981) and modified by Charnley,8 Harris,9 and Müller,10 it exploits the intermuscular plane between the tensor fasciae latae and the gluteus medius. It also involves partial or complete detachment of some or all of the abductor mechanism so that the hip can be adducted during reaming of the femoral shaft and so that the acetabulum can be more fully exposed (Fig. 8-19).
The abductor mechanism can be released either by a trochanteric osteotomy11 or by cutting the anterior part of the gluteus medius and the whole gluteus minimus off the trochanter.10 The two methods seem to offer different approaches, but they are actually variations on a theme. The differences should not obscure the fundamental fact that all anterolateral approaches exploit the same intermuscular plane, between the tensor fasciae latae and the gluteus medius.
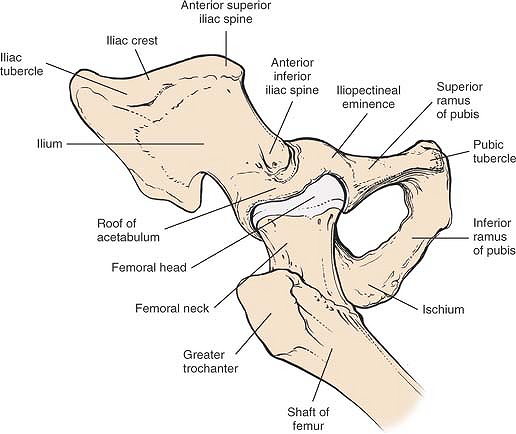 |
Figure 8-18 Osteology of the hip. |
The uses of the anterolateral approach include the following:
Total hip replacement10,11
Hemiarthroplasty
Open reduction and internal fixation of femoral neck fractures
Synovial biopsy of the hip
Biopsy of the femoral neck
Position of the Patient
Place the patient supine on the operating table, so close to the edge that the buttock of the affected side hangs over (Fig. 8-20). Tilt the table away from you as the patient lies flat. Both maneuvers allow the buttock skin and fat to fall posteriorly, away from the operative plane, and lift the skin incision clear of the table, making it easier to drape the patient. You must take this into account when you insert the acetabular portion of a total joint replacement because the guides used to position the acetabular prosthesis usually take the ground as their reference plane.
P.421
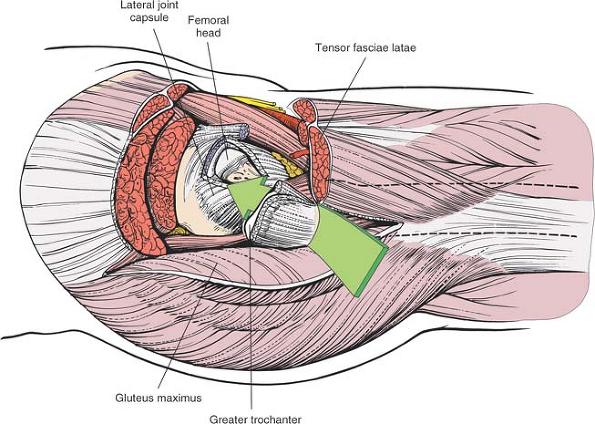 |
Figure 8-19 The route of the anterolateral approach to the hip joint. |
 |
Figure 8-20 Position of the patient on the operating table for the anterolateral approach to the hip. Bring the greater trochanter to the edge of the table, and allow the buttocks, skin, and fat to fall posteriorly, away from the operative plane. |
P.422
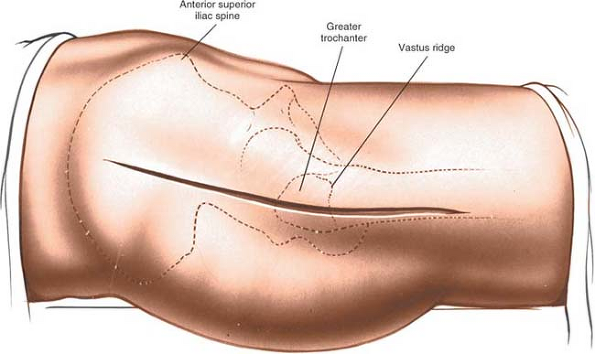 |
Figure 8-21 Incision for the anterolateral approach to the hip. |
Drape the patient so that the limb can be moved during surgery.
Landmarks and Incision
Landmarks
The anterior superior iliac spine is subcutaneous. It is easy to palpate in all but the most obese patients, who have a thick layer of adipose tissue covering it. To palpate it, bring your thumbs up from beneath the bony protuberance.
The greater trochanter is a large mass of bone that projects up and back from the junction of the shaft of the femur and its neck (Fig. 8-21).
The shaft of the femur can be felt as a resistance through the massive vastus lateralis on the lateral side of the thigh (see Fig. 8-11).
The vastus lateralis ridge, a rough line that marks the fusion site of the greater trochanter to the lateral surface of the shaft of the femur, is easiest to palpate from distal to proximal. It is not palpable in obese patients.
Incision
Flex the leg about 30°, and adduct it so that it is lying across the opposite knee both to bring the trochanter into greater relief and to move the tensor fasciae latae anteriorly. Make an 8- to 15-cm straight longitudinal incision centered on the tip of the greater trochanter. The length of the incision relates to the size and obesity of the patient as well as the surgeon’s experience. The incision crosses the posterior third of the trochanter before running down the shaft of the femur (see Fig. 8-21).
Internervous Plane
There is no true internervous plane for this approach, since the gluteus medius and the tensor fasciae latae have a common nerve supply, the superior gluteal nerve. However, the superior gluteal nerve enters the tensor fasciae latae very close to its origin at the iliac crest; therefore, the nerve remains intact as long as the plane between the gluteus medius and the tensor fasciae latae is not developed up to the origins of both muscles from the ilium (see Fig. 8-19).
Superficial Surgical Dissection
Incise the fat in the line of the skin incision to reach the deep fascia of the thigh. Using a sponge, gently push back subcutaneous fat off the fascia lata until you can reach the fascia at the posterior margin of the greater trochanter. Incise the fascia lata at this point, entering the bursa that underlies it (Fig. 8-22). Now, divide the fascia lata in the line of its fibers superiorly, heading
proximally and anteriorly in the direction of the anterior superior iliac spine. Finally, complete the fascial incision by extending the cut distally and slightly anteriorly to expose the underlying vastus lateralis muscle. Elevate this flap anteriorly by getting your assistant to retract it forward, using a tissue-holding forcep. Now, detach the few fibers of gluteus medius that arise from the deep surface of this fascial flap and locate the interval between the tensor fasciae latae (which is being lifted anteriorly by the assistant) and the gluteus medius. This is best done by blunt dissection using your fingers. A series of vessels cross the interval between the tensor fasciae latae and the gluteus medius. These act as a guide to the interval, but require ligation (Fig. 8-23).
P.423
proximally and anteriorly in the direction of the anterior superior iliac spine. Finally, complete the fascial incision by extending the cut distally and slightly anteriorly to expose the underlying vastus lateralis muscle. Elevate this flap anteriorly by getting your assistant to retract it forward, using a tissue-holding forcep. Now, detach the few fibers of gluteus medius that arise from the deep surface of this fascial flap and locate the interval between the tensor fasciae latae (which is being lifted anteriorly by the assistant) and the gluteus medius. This is best done by blunt dissection using your fingers. A series of vessels cross the interval between the tensor fasciae latae and the gluteus medius. These act as a guide to the interval, but require ligation (Fig. 8-23).
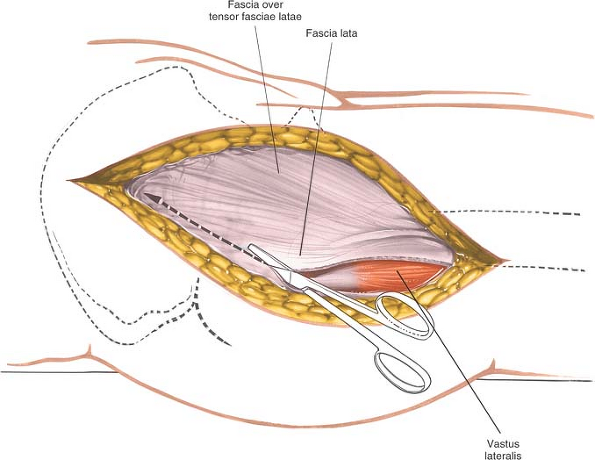 |
Figure 8-22 Incise the fascia lata posterior to the tensor fasciae latae. |
Now, place a right-angled retractor deep to the gluteus medius and minimus, and retract these muscles proximally and laterally away from the superior margin of the joint capsule that covers the femoral neck (Fig. 8-24).
Fully externally rotate the hip to put the capsule on stretch. Identify the origin of the vastus lateralis at the vastus lateralis ridge. Incise the origin using a cautery knife, and reflect the muscle inferiorly for about 1 cm. Under it is the anterior aspect of the joint capsule, at the junction of the femoral neck and shaft. Bluntly dissect up the anterior part of the joint capsule, lifting off the fat pad that covers it. The fat pad can reduce postoperative scarring and adhesions and should be preserved even though it intrudes into the operative field (Fig. 8-25).
Deep Surgical Dissection
Deep surgical dissection consists in detaching part or all of the abductor mechanism and then dissecting up the femoral neck superficial to the capsule of the joint until a suitable retractor can be placed over the anterior lip of the acetabulum.
Two techniques improve exposure of the acetabulum by neutralizing the abductor mechanism, allowing the femur to fall posteriorly. They also permit adduction of the leg for safe femoral reaming and accurate positioning of prosthetic stems within the femoral shaft. The technique chosen depends on the prosthesis to be used.
P.424
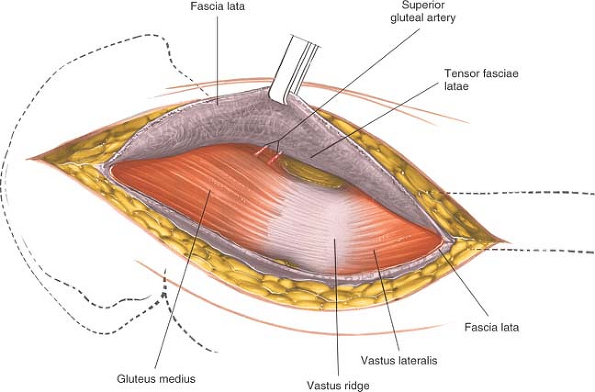 |
Figure 8-23 Retract the fascia lata and the tensor fasciae latae muscle, which it envelopes, anteriorly, revealing the gluteus medius and a series of vessels that cross the interval between the tensor fasciae latae and the gluteus medius. |
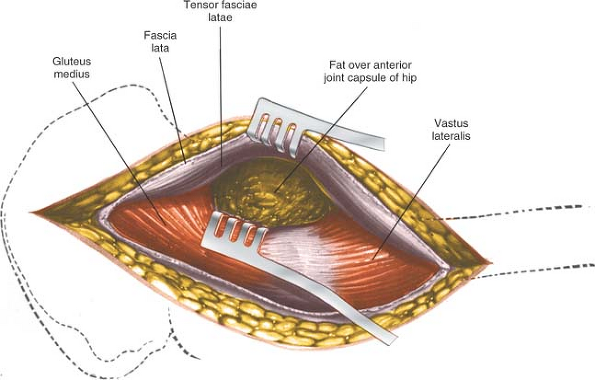 |
Figure 8-24 Retract the gluteus medius posteriorly and the tensor fasciae latae anteriorly, uncovering the fatty layer directly over the joint capsule. |
P.425
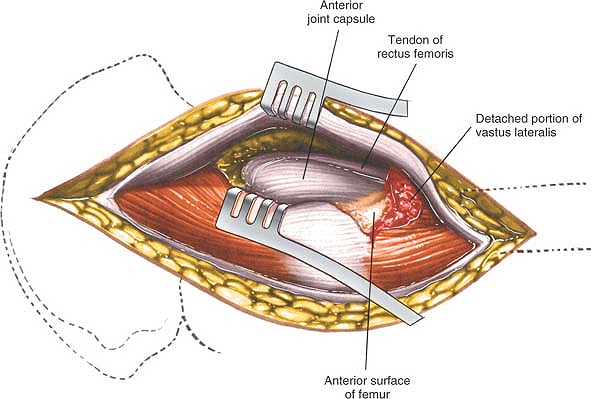 |
Figure 8-25 Bluntly dissect the fat pad off the anterior portion of the joint capsule to expose it and the rectus femoris tendon. |
Trochanteric osteotomy. Performing a trochanteric osteotomy allows complete mobilization of the gluteus medius and minimus muscles, which in turn allows excellent exposure of the shaft of the femur during femoral reaming. Palpate the vastus lateralis ridge on the lateral border of the femur, from distal to proximal. Osteotomize the trochanter, using either an oscillating saw or a Gigli saw, and reflect it upward with the attached gluteus medius and minimus muscles. The base of the osteotomy should be at the base of the vastus lateralis ridge. The upper end of the osteotomy may be either intracapsular or extracapsular; the thickness of the osteotomized portion of bone varies considerably, depending on the prosthesis you intend to use. Alternatively, detach the trochanter using two cuts at right angles to one another. This will leave the trochanter looking like the roof of a Swiss chalet. This technique maximizes the bone-to-bone contact surface area and, because of its shape, also is inherently more stable after fixation than a straight osteotomy.
Reflect the osteotomized trochanter upward. To free it completely, release some soft tissues (including the tendon of the piriformis muscle) from its posterior aspect (Figs. 8-26 and 8-27).
Partial detachment of the abductor mechanism. Place a stay suture in the anterior portion of the gluteus medius just above its insertion into the greater trochanter. Cut the insertion of this anterior portion off the trochanter. Identify the thick white tendon of the gluteus minimus as it inserts onto the anterior aspect of the trochanter and incise it. The exact amount of the gluteus medius that must be detached varies considerably from case to case (Fig. 8-28). In thin, nonmuscular people, you may even be able to preserve the whole of the gluteus medius attachment.
Bluntly dissect up the anterior surface of the hip joint capsule in line with the femoral neck and head. Detach the reflected head of the rectus femoris from the joint capsule to expose the anterior rim of the acetabulum (Fig. 8-29, and inset). (This plane is easier to open up if the leg is partly flexed, since the rectus femoris remains relaxed. Flexing the leg also keeps the femoral nerves and vessels off the stretch and farther from the operative field.) Elevate part of the psoas tendon from the capsule. Because both the rectus femoris and the psoas may insert into the capsule, the plane between muscle and capsule is often difficult to establish.
Place a Homan retractor on the anterior rim of the acetabulum. Make certain that the dissection and the insertion of retractors remain beneath the rectus femoris and iliopsoas, because the neurovascular bundle lies anterior to the psoas. If you cannot develop a plane between the psoas and the capsule, incise the capsule and insert a retractor around the femoral head so that you can see the joint better.
P.426
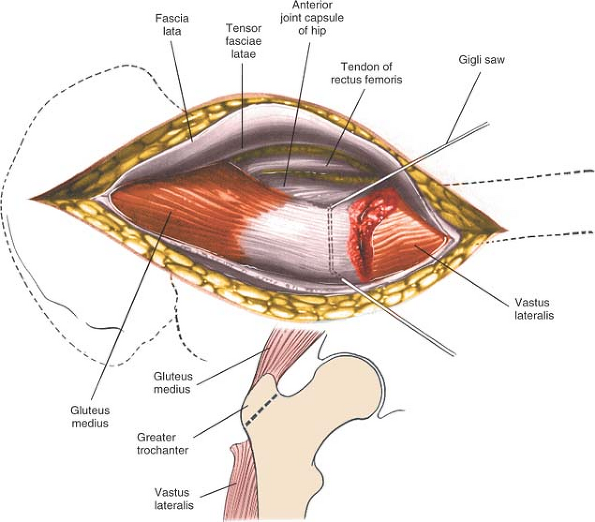 |
Figure 8-26 Osteotomize the greater trochanter. |
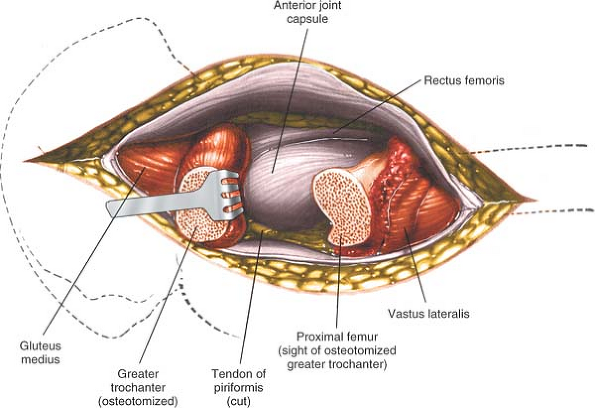 |
Figure 8-27 Reflect the osteotomized portion of the trochanter superiorly (with the attached gluteus medius) to reveal the joint capsule. |
P.427
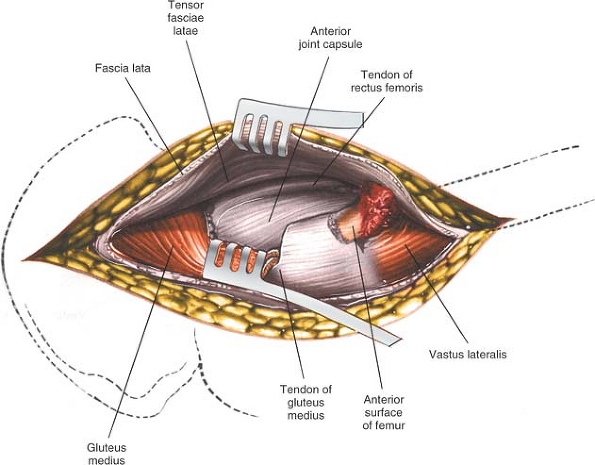 |
Figure 8-28 The joint capsule may also be exposed by partial resection of the gluteus medius tendon from the anterior portion of the trochanter. |
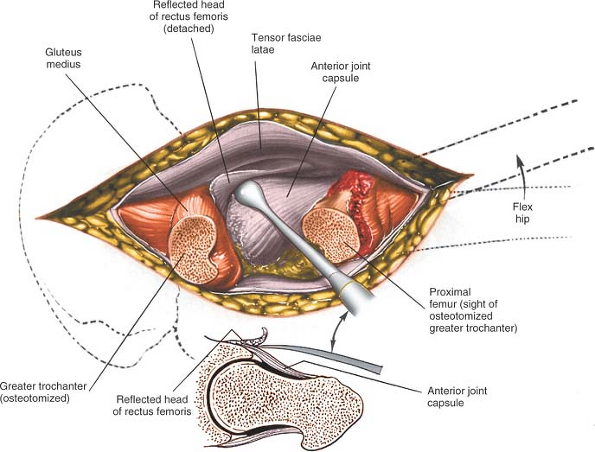 |
Figure 8-29 Reflect the head of the rectus femoris from the anterior portion of the joint capsule. |
P.428
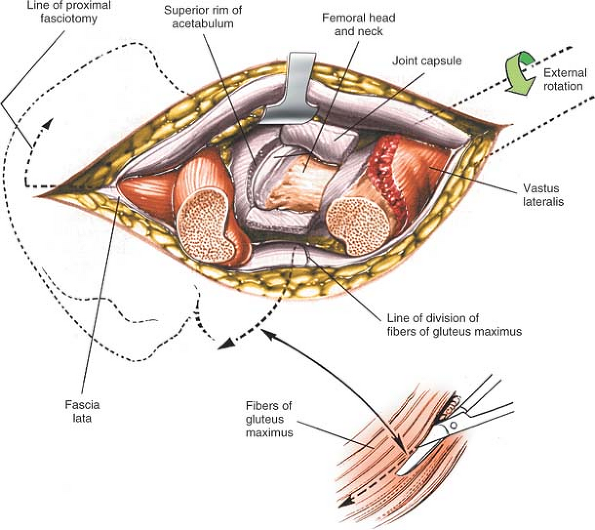 |
Figure 8-30 Incise the anterior joint capsule to reveal the femoral head and neck and the acetabular rim. If further proximal exposure is needed, incise the fascia lata proximally toward the iliac crest and along the iliac crest anteriorly. To facilitate dislocation of the hip, incise the tight fascia lata and the fibers of the gluteus maximus (inset). |
Incise the anterior capsule of the hip joint with a longitudinal incision. Develop this into a T-shaped incision by cutting the attachment of the capsule to the acetabulum as far around as you can reach. Now incise the capsule transversely at the base of the neck to convert the T-shaped incision into an H-shaped one (Fig. 8-30, and inset). Dislocate the hip by externally rotating it after you have performed an adequate capsulotomy (Fig. 8-31).
Dangers
Nerves
The femoral nerve is the most laterally placed structure in the neurovascular bundle in the femoral triangle, thus the structure closest to the operative field and most at risk. The most common problem is compression neurapraxia, caused by overexuberant medial retraction of the anterior covering structures of the hip joint. Less frequently, the nerve is directly injured by retractors placed in the substance of the iliopsoas (see Figs. 8-41 and 8-42).
Vessels
The femoral artery and vein may be damaged by incorrectly placed acetabular retractors that penetrate the iliopsoas, piercing the vessels as they lie on the surface of the muscle. You can avoid this complication by making sure that the tip of the retractor is placed firmly on bone, with no intervening tissue. The anterior retractor should be placed in the 1-o’clock position for the right hip and in the 11-o’clock position for the left hip. Finding the correct plane between the rectus femoris and the anterior part of the hip joint capsule is easier if the limb is in about 30° of flexion.
The profunda femoris artery lies on the psoas muscle, deep to the femoral artery. It has also been damaged by poorly placed retractors.
P.429
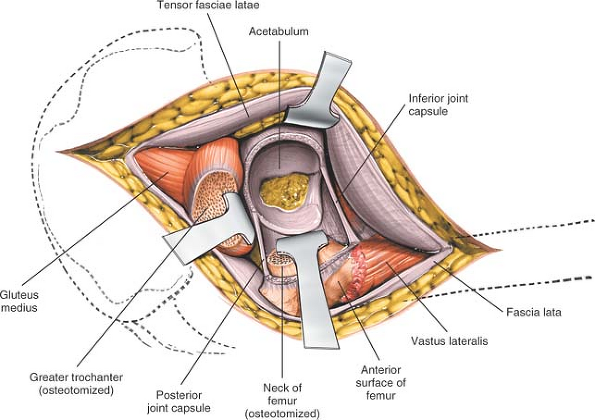 |
Figure 8-31 To expose the acetabulum, dislocate and resect the femoral head. Placing three or four Homan-type retractors around the lip of the acetabulum provides excellent exposure. |
Fractures of the Femoral Shaft
Femoral shafts have been known to fracture while hips are being dislocated. For that reason, it is critical that you do an adequate capsular release before attempting dislocation. To dislocate the joint, lever the femoral head out of the acetabulum with a skid (such as a Watson-Jones) while your assistant gently externally rotates the limb. Your assistant has a considerable lever arm during this procedure—if rotating the leg too forcibly, a spiral fracture of the femur can result.
In severe protrusion of the hip, you may have to osteotomize the rim of the acetabulum, which often has an osteophyte, to achieve dislocation.
If you cannot dislocate the hip without resorting to extreme force, it is safer to perform a double osteotomy of the femoral neck, excising a 1-cm portion of it: then remove the femoral head (which is lying free) with a corkscrew.
Fractures of the femoral shaft also can occur when the limb is placed in full adduction and external rotation for reaming of this femoral shaft. In order for the operator to gain a good enough view of the cut surface of the femur, the femoral shaft must be adducted. If the incision in the fascia lata has been placed too far anteriorly, then the fascia lata will resist adduction and enthusiastic assistants may cause femoral shaft fracture. This is the reason why the fascia lata should be incised initially at the posterior border of the greater trochanter. If the fascia lata gets in your way when attempting to adduct the leg, it is safest to incise it along the lines of fibers of gluteus maximus (see Fig. 8-30).
Related posts:

Stay updated, free articles. Join our Telegram channel

Full access? Get Clinical Tree


