The elbow is a hinged joint supported by strong collateral ligaments. The key neurovascular structures running down the arm pass anterior and posterior to the joint. The medial and lateral approaches, therefore, avoid the obvious neurovascular dangers, but provide limited access to the elbow because of its bony configuration. Anterior and posterior approaches provide better access to the joint, but may endanger the key neurovascular structures.
Of the five surgical approaches that are described in this chapter, the posterior approach provides the best possible exposure to all surfaces of the elbow and is the approach used most often for the internal fixation of complex fractures of this joint. The medial approach provides good access to the medial side of the joint, but requires an osteotomy of the medial epicondyle for best exposure. This osteotomy does not involve any part of the articular surface, however. Although the approach is extensile to the distal humerus, it is most useful in dealing with local pathologies of the medial side of the joint. The anterolateral approach exposes the lateral side of the joint; in addition, it can be extended both proximally and distally to expose both the humerus and the radius from the shoulder to the wrist. The anterior approach to the cubital fossa is designed primarily for exploration of the critical neurovascular structures that pass in front of the elbow joint. The posterolateral approach to the radial head is designed exclusively for surgery on that structure.
The applied anatomy of the elbow is discussed in a single section of this chapter after the various surgical approaches are described, mainly because the keys to the surgical anatomy are the neurovascular bundles that pass across the elbow joint; their positions are important in all the approaches. Separate subsections outline the anatomy that applies to each particular approach.
Posterior Approach
The posterior approach provides the best possible view of the bones that comprise the elbow joint.1,2 Although it is basically a safe and reliable operative technique, it does have one major drawback: it usually requires an osteotomy of the olecranon on its articular surface, creating another “fracture” that must be internally fixed. The uses of the posterior approach include the following:
Open reduction and internal fixation of fractures of the distal humerus3,4
Removal of loose bodies within the elbow joint
Treatment of nonunions of the distal humerus
Extension contractures of the elbow can be treated by using some portions of this approach to lengthen the triceps muscle, without performing an olecranon osteotomy.
Position of the Patient
Place the intubated patient prone on the operating table, ensuring adequate padding for the chest and pelvis to allow free movement of the abdomen during respiration. Exsanguinate the limb by elevating it for 3 to 5 minutes and then apply a tourniquet as high up on the arm as possible. Abduct the arm about 90° and place a small sandbag underneath the tourniquet, elevating the upper arm from the operating table. Allow
the elbow to flex and the forearm to hang over the side of the table (Fig. 3-1).
P.113
the elbow to flex and the forearm to hang over the side of the table (Fig. 3-1).
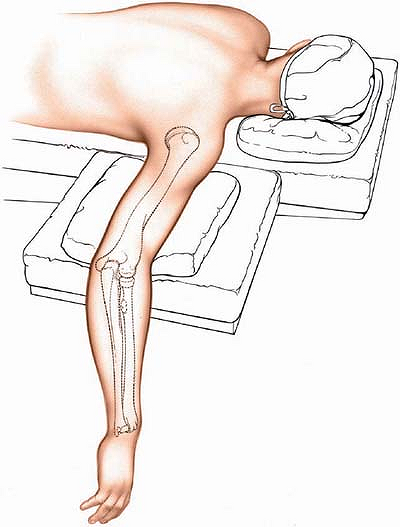 |
Figure 3-1 Position of the patient on the operating table. |
Landmarks and Incision
Landmark
Palpate the large, bony olecranon process at the upper end of the ulna. It is conical and has a relatively sharp apex.
Incision
Make a longitudinal incision on the posterior aspect of the elbow. Begin 5 cm above the olecranon in the midline of the posterior aspect of the arm. Just above the tip of the olecranon, curve the incision laterally so that it runs down the lateral side of the process. To complete the incision, curve it medially again so that it overlies the middle of the subcutaneous surface of the ulna. Running the incision around the tip of the olecranon moves the suture line away from devices that are used to fix the olecranon osteotomy and away from the weight-bearing tip of the elbow (Fig. 3-2).
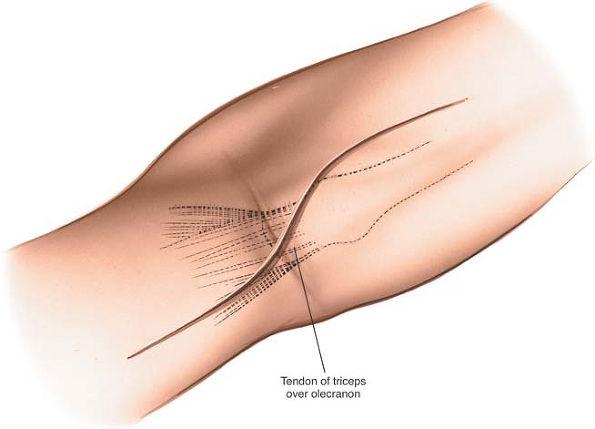 |
Figure 3-2 Incision for the posterior approach to the elbow. |
Internervous Plane
There is no true internervous plane, because the approach involves little more than detaching the extensor mechanism of the elbow. The nerve supply of the triceps muscle (the radial nerve) enters the muscle well proximal to the dissection.
Superficial Surgical Dissection
Incise the deep fascia in the midline. Palpate the ulnar nerve as it lies in the bony groove on the back of the medial epicondyle and incise the fascia overlying the nerve to expose it. Fully dissect out the ulnar nerve and pass tapes around it so that it can be identified at all times (Fig. 3-3). Do not use these tapes for retraction as this can create a traction lesion to the nerve.
If a screw is going to be used to fix the olecranon osteotomy, drill and tap the olecranon before the osteotomy is performed. Score the bone longitudinally with an osteotome so that the pieces can be aligned correctly when the osteotomy is repaired (see Fig. 3-3, inset).
P.114
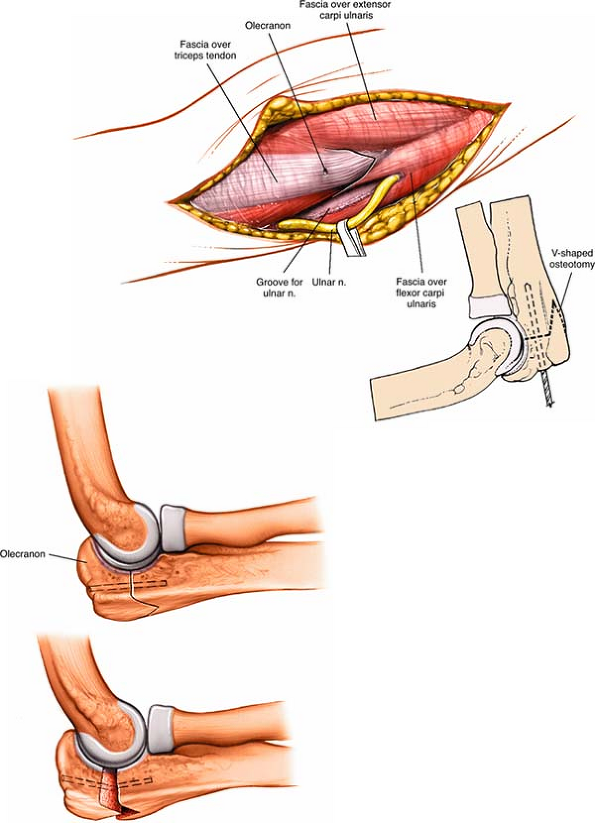 |
Figure 3-3 Dissect the ulnar nerve from its bed and hold it free with tape. Predrill the olecranon before performing an osteotomy for easy reattachment. A V-shaped osteotomy is inherently more stable than a transverse osteotomy. |
P.115
Make a V-shaped osteotomy of the olecranon about 2 cm from its tip using an oscillating saw. The apex of the V is directed distally. A V-shaped osteotomy gives greater stability than a transverse osteotomy after fixation. Divide the bone until it is cut through almost entirely. Snap the remaining cortex by wedging the two cut surfaces apart with an osteotome. This will cause an irregularity in the osteotomy, allowing it to key together better during reconstruction (see Fig. 3-3, inset).
Deep Surgical Dissection
Strip the soft-tissue attachments off the medial and lateral sides of the portion of the olecranon that has been subjected to osteotomy and retract it proximally, elevating the triceps from the back of the humerus (Fig. 3-4). The posterior aspect of the distal end of the humerus is directly underneath; subperiosteal dissection around the medial and lateral borders of the bone allows exposure of all surfaces of the distal fourth of the humerus (Fig. 3-5). Note that full exposure seldom will be needed. All the soft-tissue attachments to bone that can be preserved should be, particularly in reductions of fractures. Stripping excessive soft-tissue attachments off the bone leaves the bone fragments without a vascular supply and jeopardizes healing.
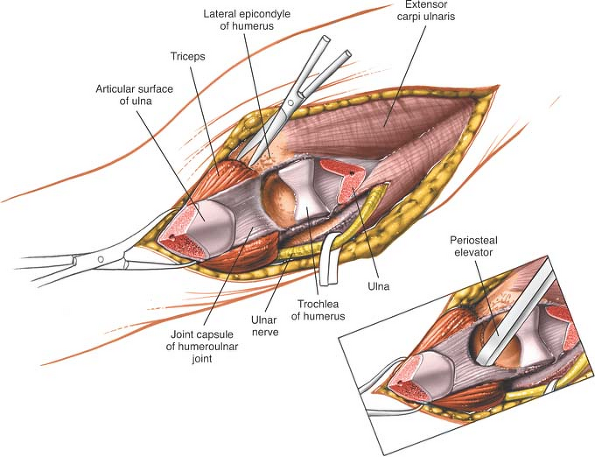 |
Figure 3-4 Perform a V-shaped osteotomy of the olecranon and retract it proximally, with the triceps muscle attached. Strip a portion of the joint capsule with an osteotome. |
Be careful not to extend the dissection proximally above the distal fourth of the humerus, because the radial nerve, which passes from the posterior to the anterior compartment of the arm through the lateral intermuscular septum, may be damaged. Flex the elbow to relax the anterior structures if they need to be elevated off the front of the humerus (see Figs. 2-36 and 2-37).
The ulnar nerve must be kept clear of the operative field during all stages of the dissection. Some surgeons advise routine anterior transposition of the nerve during closure, especially if implant removal is anticipated in the future.
P.116
 |
Figure 3-5 Dissect around the medial and lateral borders of the bone to expose all the surfaces of the distal fourth of the humerus. |
Dangers
Nerves
The ulnar nerve is in no danger as long as it is identified early and protected, and excessive traction is not placed on it.
The median nerve lies anterior to the distal humerus. It may be endangered if the anterior structures are not stripped off the distal humerus. In cases of fracture, this dissection has usually been done for you. In the treatment of nonunions or when the approach is used for osteotomies, a strictly subperiosteal plane must be used to avoid damage to the nerve (see Fig. 3-5, inset).
The radial nerve is at risk if the dissection ventures farther proximally than the distal third of the humerus, one handbreadth above the lateral epicondyle (see Fig. 2-36).
Vessels
The brachial artery lies with the median nerve in front of the elbow. It should be afforded the same protection as is the nerve (see Fig. 3-5, inset).
Special Points
Great care must be taken to realign the olecranon correctly during closure. Alignment after fractures is easy, because the uneven ends of the bone usually fit snugly, like a jigsaw puzzle. Osteotomies may result in flat surfaces, however, and can make accurate reattachment difficult (see Fig. 3-3).
How to Enlarge the Approach
Extensile Measures
Proximal Extension. The posterior approach cannot be extended more proximally than the distal third of the humerus because of the danger to the radial nerve (see Fig. 2-36).
Distal Extension. The incision can be continued along the subcutaneous border of the ulna, exposing the entire length of that bone (see Applied Surgical Anatomy of the Approach to the Ulna in Chapter 4).
P.117
Medial Approach
The medial approach gives good exposure of the medial compartment of the joint.5,6 It also can be enlarged to expose the anterior surface of the distal fourth of the humerus. The ulnar nerve (which runs across the operative field), median nerve, and brachial artery may be at risk in this exposure. The uses of the medial approach include the following:
Removal of loose bodies (now more commonly removed arthroscopically)
Open reduction and internal fixation of fractures of the coronoid process of the ulna (rarely indicated)
Open reduction and internal fixation of fractures of the medial humeral condyle and epicondyle
The medial approach provides poor access to the lateral side of the joint and should not be used for routine exploration of the elbow. The joint may be dislocated during the procedure, however, to gain access to the lateral side of the elbow, if necessary.
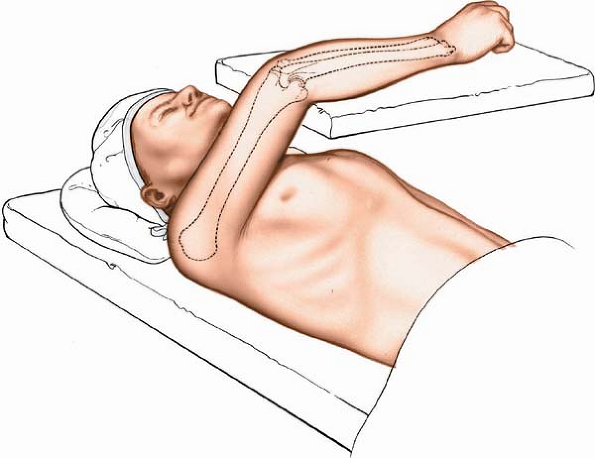 |
Figure 3-6 Position of the patient on the operating table. |
Position of the Patient
Place the patient supine on the operating table, with the arm supported on an arm board or table. Abduct the arm and rotate the shoulder fully externally so that the medial epicondyle of the humerus faces anteriorly. Flex the elbow 90° (Fig. 3-6). Alternatively, flex the patient’s shoulder and elbow such that the forearm comes to lie over the front of the face. This allows easier exposure of the medial side of the elbow, but requires an assistant to hold the forearm to provide adequate exposure.
Exsanguinate the limb either by elevating it for 5 minutes or by applying a soft rubber bandage (or exsanguinator). Then, inflate a tourniquet.
P.118
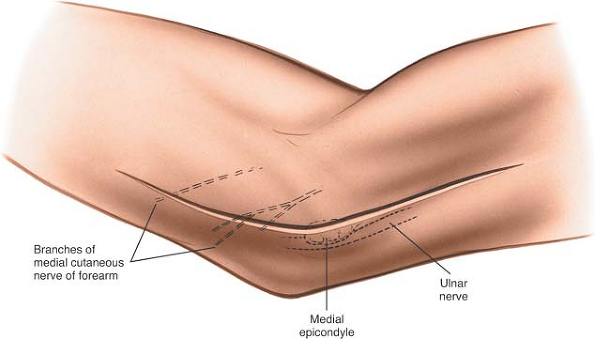 |
Figure 3-7 Incision for the medial approach to the elbow, centered on the medial epicondyle. |
Landmarks and Incision
Landmarks
Palpate the medial epicondyle of the humerus, the large subcutaneous bony mass that stands out on the medial side of the distal end of the humerus.
Incision
Make a curved incision 8 to 10 cm long on the medial aspect of the elbow, centering the incision on the medial epicondyle (Fig. 3-7).
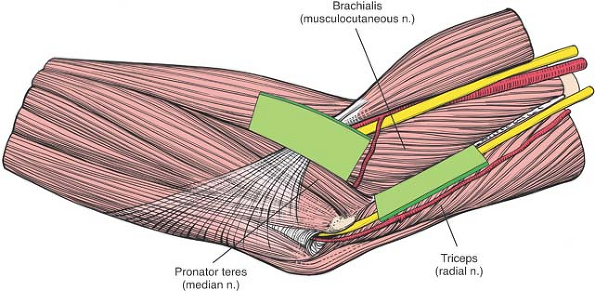 |
Figure 3-8 Internervous plane. Proximally, the plane is between the brachialis (musculocutaneous nerve) and the triceps (radial nerve); distally, it is between the brachialis and the pronator teres (median nerve). |
Internervous Plane
Proximally, the internervous plane lies between the brachialis muscle (which is supplied by the musculocutaneous nerve) and the triceps muscle (which is supplied by the radial nerve) (Fig. 3-8).
Distally, the plane lies between the brachialis muscle (which is supplied by the musculocutaneous nerve) and the pronator teres muscle (which is supplied by the median nerve; see Fig. 3-8).
P.119
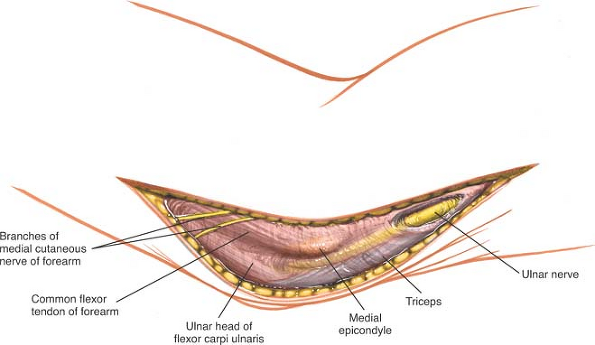 |
Figure 3-9 Superficial surgical dissection. Isolate the ulnar nerve along the length of the incision. |
Superficial Surgical Dissection
Palpate the ulnar nerve as it runs in its groove behind the medial condyle of the humerus. Incise the fascia over the nerve, starting proximal to the medial epicondyle; then, isolate the nerve along the length of the incision (Fig. 3-9).
Retract the anterior skin flap, together with the fascia overlying the pronator teres. The superficial flexor muscles of the forearm now are visible as they pass directly from their common origin on the medial epicondyle of the humerus (Fig. 3-10).
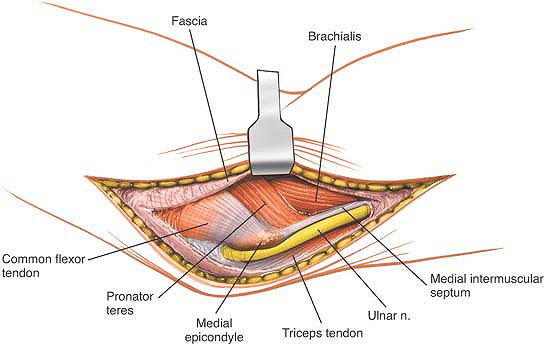 |
Figure 3-10 Retract the skin anteriorly with the fascia to uncover the common origin of the superficial flexor muscles from the medial epicondyle. |
Define the interval between the pronator teres and brachialis muscles, taking care not to damage the median nerve, which enters the pronator teres near the midline. Gently retract the pronator teres medially, lifting it off the brachialis (Fig. 3-11). Make sure that
the ulnar nerve is retracted inferiorly; then, perform osteotomy of the medial epicondyle. Place a periosteal elevator beneath the medial collateral ligament in order to be certain that when the medial epicondyle is osteotomized the ligament remains attached to the medial epicondyle. Reflect the epicondyle with its attached flexors distally, avoiding traction that might damage the median or anterior interosseous nerves. Superiorly, continue the dissection between the brachialis, retracting it anteriorly, and the triceps, retracting it posteriorly (Fig. 3-12). The medial collateral ligaments must be preserved during osteotomy of the medial epicondyle. Division of this ligament will result in valgus instability of the elbow.
P.120
P.121
the ulnar nerve is retracted inferiorly; then, perform osteotomy of the medial epicondyle. Place a periosteal elevator beneath the medial collateral ligament in order to be certain that when the medial epicondyle is osteotomized the ligament remains attached to the medial epicondyle. Reflect the epicondyle with its attached flexors distally, avoiding traction that might damage the median or anterior interosseous nerves. Superiorly, continue the dissection between the brachialis, retracting it anteriorly, and the triceps, retracting it posteriorly (Fig. 3-12). The medial collateral ligaments must be preserved during osteotomy of the medial epicondyle. Division of this ligament will result in valgus instability of the elbow.
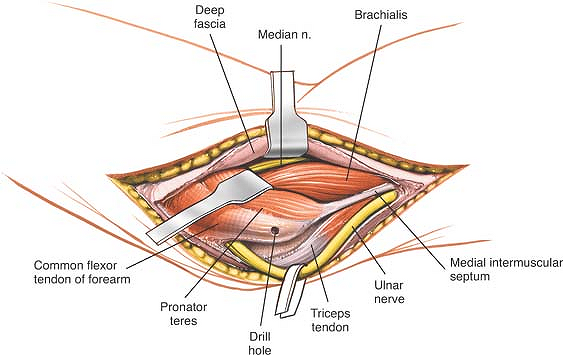 |
Figure 3-11 Enter the interval between the pronator teres and the brachialis. Retract the pronator teres medially. |
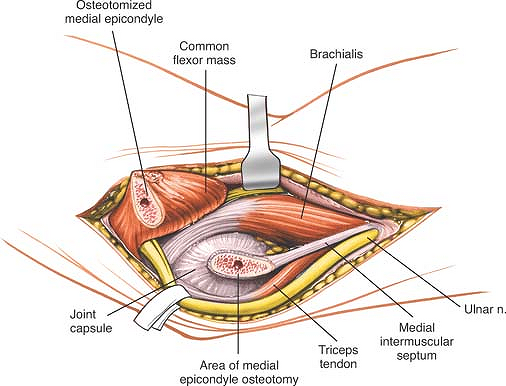 |
Figure 3-12 Subject the medial epicondyle to osteotomy and retract it (gently) with its attached flexors. Vigorous retraction of the epicondyle and its attached muscles may stretch the branch of the median nerve to the flexors. |
Deep Surgical Dissection
The medial side of the joint now can be seen. Incise the capsule and the medial collateral ligament to expose the joint (Fig. 3-13).
Nerves
The ulnar nerve must be dissected out and isolated before the medial epicondyle undergoes osteotomy (see Fig. 3-11).
The median nerve can suffer a traction lesion, with special damage to its multiple branches to the pronator teres muscle, if the medial epicondyle and its superficial flexor muscles are retracted too vigorously in a distal direction. Its major branch, the anterior interosseous nerve, also may suffer a traction lesion (see Fig. 3-12).
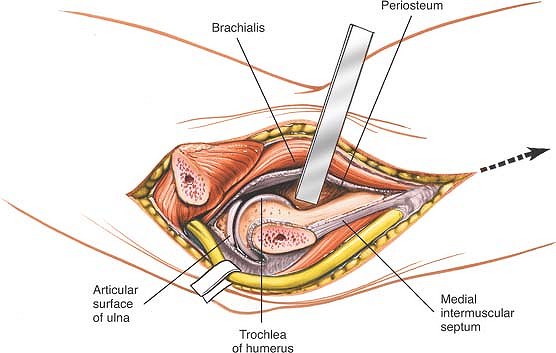 |
Figure 3-13 Incise the joint capsule and the medial collateral ligament to expose the joint. |
How to Enlarge the Approach
Local Measures
If a better view of the joint is required, the forearm can be abducted to open its medial side. To dislocate the elbow, the joint capsule and periosteum should be stripped off the distal humerus, working from within the joint. By this means, the mobility of the proximal ulna will be increased significantly. This increased mobility then will allow dislocation of the joint laterally, thereby opening all the surfaces of the joint to inspection.
Extensile Measures
Proximal Extension. Enlarge the exposure proximally by developing the plane between the triceps and brachialis muscles. Subperiosteal dissection and elevation of the brachialis expose the anterior surface of the distal fourth of the humerus (see Figs. 3-13 and 3-39).
Distal Extension. The medial epicondyle of the humerus, with its attached flexor muscles, can be retracted only as far as the branches from the median nerve allow. Thus, although the exposure provides an adequate view of the brachialis inserting into the coronoid, it cannot offer a more distal exposure of the ulna.
P.122
Anterolateral Approach
The anterolateral approach exposes the lateral half of the elbow joint, especially the capitulum and the proximal third of the anterior aspect of the radius. Its uses include the following:
Open reduction and internal fixation of fractures of the capitulum
Excision of tumors of the proximal radius
Treatment of aseptic necrosis of the capitulum
Drainage of infection from the elbow joint
Treatment of neural compression lesions of the proximal half of the posterior interosseous nerve and of the proximal part of the superficial radial nerve—access to the arcade of Frohse, as well as treatment of radial head fractures with paralysis of this nerve
Treatment of biceps avulsion from the radial tuberosity
Total elbow replacements
This approach is a distal extension of the anterolateral approach to the humerus and a proximal extension of the anterior approach to the radius. Theoretically, the approach can link the two together to expose the entire upper extremity from shoulder to wrist.
Position of the Patient
Place the patient supine on the operating table, with the arm on an arm board. Exsanguinate the limb either by elevating it for 3 to 5 minutes or by applying a soft rubber bandage or exsanguinator. Then, inflate a tourniquet (Fig. 3-14).
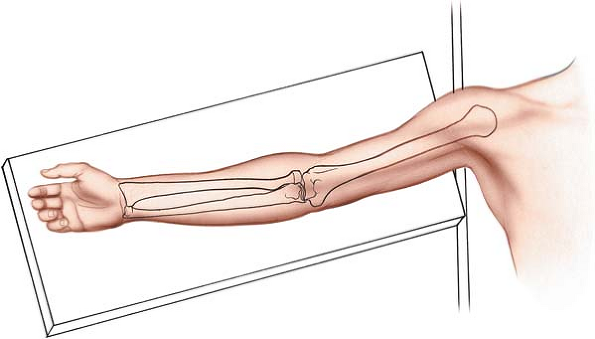 |
Figure 3-14 Position of the patient on the operating table. |
Landmarks and Incision
Landmarks
The brachioradialis is palpable as part of a thick wad of muscle on the anterolateral aspect of the forearm. This “mobile wad” consists of three muscles; the brachioradialis forms the medial border of the wad.
The biceps tendon is a taut band that is palpable on the anterior aspect of the elbow.
Incision
Make a curved incision along the anterior aspect of the elbow joint. Begin 5 cm above the flexion crease of the elbow, over the lateral border of the biceps muscle. Follow the lateral border of the biceps distally, but curve the incision laterally at the level of the elbow joint to avoid crossing a flexion crease at 90°. Then, continue the incision inferiorly, curving medially and following the medial border of the brachioradialis muscle. The lower limit of the extension depends on the amount of the radius that must be exposed (Fig. 3-15).
Related posts:

Stay updated, free articles. Join our Telegram channel

Full access? Get Clinical Tree


