Pelvis
The pelvis is a complex bony structure with interconnecting ligaments. It consists of the two innominate bones, which articulate anteriorly with each other at the pubic symphysis and posteriorly with the body of the sacrum at the sacroiliac joint. The bones are covered on each side by muscles, and the intraabdominal contents make surgical exposure potentially complex. The presence of a large subcutaneous surface (the iliac crest), however, allows safe access to the ilium.
Five approaches to the pelvis are described in this chapter, all of which provide access to the bone via its subcutaneous portion. The anterior and posterior approaches to the iliac crest are used almost exclusively for bone grafting. The anterior approach to the pubic symphysis, and the anterior and posterior approaches to the sacroiliac joints are performed rarely; their use is associated almost exclusively with the open reduction and internal fixation of pelvic ring fractures.
Acetabulum
Approaches to the acetabulum are the most complex and demanding approaches a surgeon can be asked to perform. They are nearly always used for the reconstruction of the acetabulum following fractures. Because each approach only gives access to a limited part of the acetabulum, it is critically important that the correct approach is used for each fracture pattern (Fig. 7-1). This requires accurate assessment of the anatomy of the fracture, using radiographic techniques, including computerized tomography.1,2,3 The
use of a bone model is invaluable, especially when a surgeon is inexperienced.
P.361
use of a bone model is invaluable, especially when a surgeon is inexperienced.
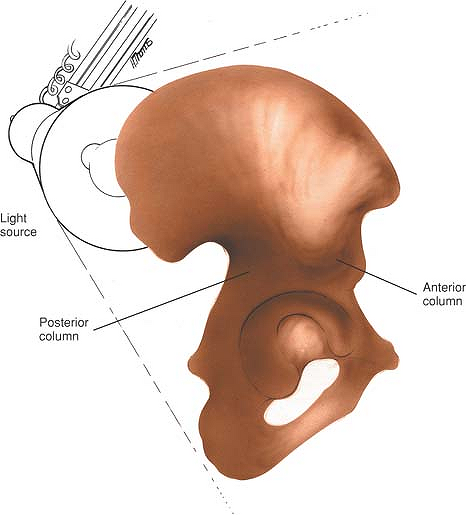 |
Figure 7-1 To appreciate the anatomy of the anterior and posterior columns of the acetabulum, hold a hemipelvis up against a light source. These two massive columns can then be appreciated in contrast to the thin central area of the wing of the ilium. |
The ilioinguinal approach to the acetabulum allows access to the anterior column and medial aspect of the acetabulum. It also allows visualization of the inner aspect of the pelvis from the sacroiliac joint to the symphysis pubis. It does not allow access to the posterior column or posterior lip (see Fig. 7-21).
The posterior approach to the acetabulum allows access to the posterior column, posterior lip, and dome segment of the acetabulum. It allows very limited access to the anterior column of the acetabulum and no access to the medial aspect of the acetabulum (see Fig 7-37).
The applied surgical anatomy of the ilioinguinal approach is to be found immediately after the description of the surgical approach. The applied surgical anatomy of the posterior approach is found in Chapter 8 (see page 450).
Because each approach only provides limited access to the acetabulum, complex fractures may require the use of more than one approach.
Most acetabular fractures occur as a result of extremely violent trauma. The tissues therefore are contused, and muscle planes are often difficult to develop. The fractures themselves are difficult to reduce, and control and specialized instruments are necessary to ensure anatomical reduction and stable fixation. There is rarely, if ever, indication to perform these approaches in an emergency situation. Acetabular fractures are rare. Understanding of the anatomy of the fracture is difficult, and surgical approaches are technically demanding. The results of acetabular reconstruction depend largely on the accuracy of the reduction of the fracture. For these reasons, acetabular surgery, if at all possible, should be performed by experienced surgeons working in centers large enough to attract a sufficient volume of patients.
Anterior Approach to the Iliac Crest for Bone Graft
Anterior iliac crest bone grafts are the most commonly used grafts in orthopaedic surgery. The iliac crest is subcutaneous, and cortical or corticocancellous grafts can be taken from it with ease and safety for grafting in all parts of the body, including the spine. It also is possible to remove pieces of the iliac crest, including both cortices, for major bone reconstructions, especially in the head and neck. For posterior spinal fusion work on conditions such as scoliosis, the bone graft usually is taken from the posterior aspect of the iliac crest.
Position of the Patient
Place the patient supine on the operating table. Because the graft usually is taken in conjunction with other procedures, the iliac crest should be draped as a separate unit. There is much to be said for preparing this area routinely in all cases of open reduction and internal fixation of long-bone fractures. Place a small sandbag under the gluteal (cluneal) area of the side from which the graft will be taken to elevate the crest and rotate it internally, making it more accessible.
Landmarks and Incision
Landmarks
The subcutaneous anterior superior iliac spine, the most important landmark, is easily palpable. Continue palpating along the crest of the ilium until its widest portion is reached, at the iliac tubercle. The iliac tubercle marks the anterior portion of the ilium, the area containing the largest amount of cortical cancellous bone for graft material.
Incision
The length of incision depends on the amount of bone graft that is required. For an extensive bone graft make an 8-cm incision parallel to the iliac crest and centered over the iliac tubercle (Fig. 7-2).
Internervous Plane
Muscles either take origin from or insert onto the iliac crest, but do not cross it. Therefore, the crest offers a truly internervous plane.
The tensor fasciae latae, gluteus minimus, and gluteus medius are the muscles affected most directly by grafts taken from the anterior portion of the crest, because they originate from the outer portion of the ilium and are supplied by the superior gluteal nerve. The abdominal muscles take their origin directly from the iliac crest and are supplied segmentally.
Superficial Surgical Dissection
Retract the skin and identify the iliac crest. Cut down onto the iliac crest with a scalpel (Fig. 7-3). In children,
the crest still may be an avascular apophysis. If so, incise it and remove the muscle through the crest in either direction with a Cobb elevator. No apophysis will be present in adults.
P.362
the crest still may be an avascular apophysis. If so, incise it and remove the muscle through the crest in either direction with a Cobb elevator. No apophysis will be present in adults.
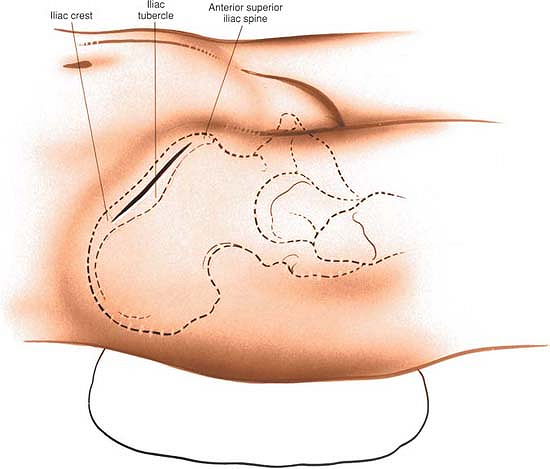 |
Figure 7-2 Make an 8-cm incision parallel to the iliac crest and centered over the iliac tubercle. |
Take care not to carry the incision from the apophysis or iliac crest onto the anterior superior iliac spine itself; if this occurs, the origin of the inguinal ligament may be detached and an inguinal hernia may result.
Deep Surgical Dissection
The muscles may be stripped off either the inner or the outer wall of the ilium. Initially, cut down onto the bone using a scalpel. Follow the contour of the bone, sticking to it rigidly (Fig. 7-4). Below the crest itself, the ilium narrows considerably, so the sharp dissection will need to follow the contour of the bone carefully to avoid straying out of plane and into trouble. After coming around the corner of the crest onto the ilium, continue the dissection using blunt instruments such as a Cobb elevator. The muscles will come away from the bone easily. Alternatively, push a swab into the plane between the iliac wing and the overlying muscles. Using a blunt instrument, introduce more and more of the swab into the plane. The swab will act as a tissue expander, pushing the muscle away from the bone, while at the same time protecting the soft tissues. Corticocancellous strips may be taken from either side of the bone, or a complete block of the ilium can be removed. Pure cancellous bone can be taken by elevating a small piece of the cortex of the crest. Be aware that the largest supply of cancellous bone is directly underneath the subcutaneous surface of the crest.
Dangers
Both the crest of the ilium and the anterior superior iliac spine should be left intact to preserve the normal appearance of the pelvis. If the anterior superior iliac
spine is taken as graft material, the inguinal ligament might retract, causing an inguinal hernia.
P.363
P.364
spine is taken as graft material, the inguinal ligament might retract, causing an inguinal hernia.
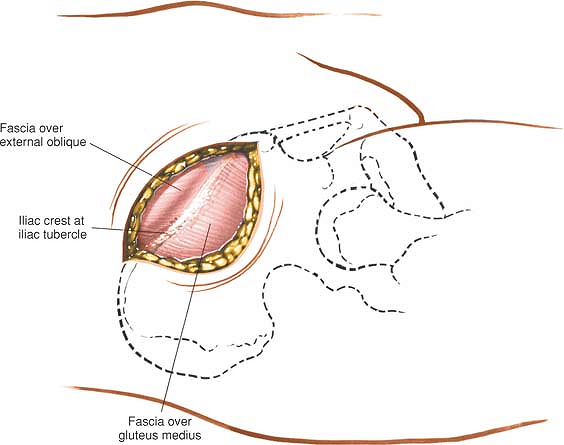 |
Figure 7-3 Retract the skin, identify the iliac crest, and incise the soft tissues overlying the iliac crest down to bone. |
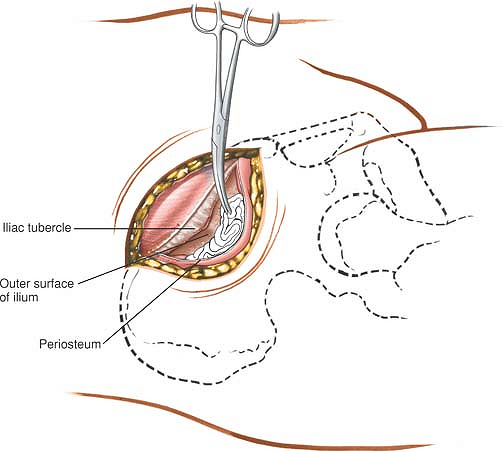 |
Figure 7-4 Remove the origins of the gluteus minimus and medius muscles subperiosteally from the outer cortex of the ilium. |
How to Enlarge the Approach
Local Measures
Place a sharp-tipped retractor onto the bone to retract either the gluteal muscles from the outer cortex or the iliacus muscle from the inner cortex. Placing a swab between the retractor and the muscles creates a bloodless field and prevents little pieces of bone graft from being lost in the depth of the wound. Great care must be taken, however, to remove this swab before undertaking closure. The incision may have to be lengthened on the iliac crest and additional amounts of gluteus medius or iliacus stripped off to provide a better view of the outer or inner cortex of the anterior portion of the ilium.
Extensile Measures
This approach is not classically extensile. The approach has been described in this section merely as a means of obtaining bone graft.
Posterior Approach to the Iliac Crest for Bone Graft
Posterior iliac crest bone grafts usually are taken during any posterior spine surgery that requires additional autogenous bone to supplement the area to be fused. The grafts also may be used as corticocancellous grafts for any part of the skeleton that needs fusion or refusion.
Position of the Patient
Place the patient prone on the operating table, with bolsters running longitudinally to support the chest wall and pelvis, allowing the chest wall and abdomen to expand without touching the table. Place drapes distally enough so that the beginning of the gluteal cleft and the posterior superior iliac spine can be seen (see Fig. 6-83).
Landmarks and Incision
Landmarks
Palpate the posterior superior iliac spine under the dimpling of the skin above the buttock. The subcutaneous posterior part of the iliac crest also is palpable.
Incision
Make an 8-cm oblique incision, centered over the posterior superior iliac spine and in line with the iliac crest (Fig. 7-5, inset).
If scoliosis surgery or lumbar surgery is being performed, the midline incision can be extended distally to the sacrum. Then, the skin and a thick, fatty, subcutaneous layer can be retracted laterally. Using a Hibbs retractor, the flap should be dissected free from the underlying lumbodorsal fascia until the posterior superior iliac spine and crest can be palpated and seen (see Fig. 7-5).
Internervous Plane
Muscles insert into or take origin from the iliac crest, but do not cross it. Therefore, the outer border of the iliac crest is truly an internervous plane. The gluteus medius, minimus, and maximus muscles take their origins from the outer surface of the ilium (the gluteus medius and minimus are supplied by the superior gluteal nerve and the gluteus maximus is supplied by the inferior gluteal nerve). The segmentally supplied paraspinal muscles take their origin from the iliac crest itself, as does the latissimus dorsi, which is supplied proximally by the long thoracic nerve. Thus, an incision into the iliac crest does not denervate muscles, even if it is not placed exactly on the outer lip of the crest.
Superficial Surgical Dissection
The subcutaneous tissues should be dissected until the iliac crest is reached. In children, the iliac apophysis is white and quite visible; it may be incised or split in line with the iliac crest, using it as an avascular plane. In adults, the apophysis is ossified and fused to the crest; the incision lands directly on the crest itself.
The Cobb elevator should be used to remove the apophysis or muscles from the iliac crest both medially and laterally, to bare the surface of the posterior portion of the crest.
P.365
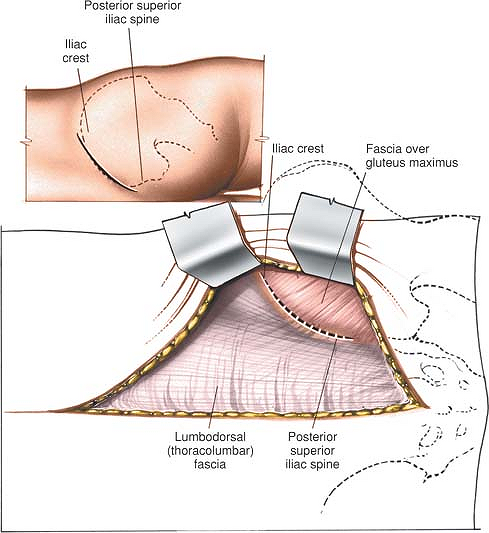 |
Figure 7-5 If lumbar spine surgery is being performed, extend the midline incision distally, retracting the skin laterally until the posterior superior iliac spine and crest can be palpated and seen. Incise the soft tissues overlying the crest down to bone. Make an 8-cm oblique incision, centered over the posterior superior iliac spine and in line with the iliac crest (inset). |
Dangers
Nerves
The cluneal nerves cross the iliac crest. They can be avoided by placing the incision no more than 8 cm anterolateral to the posterior superior iliac spine. The nerves supply sensation to the skin over the cluneal (gluteal) area. They are composed of the posterior primary rami of L1, L2, and L3. Their loss does not cause problems for the patient.
Deep Surgical Dissection
Strip the musculature completely off the posterior portion of the lateral surface of the ilium so that a large enough graft can be obtained. Take care to stay in a subperiosteal plane while passing from the iliac crest to the outer cortex of the ilium. Proceeding 1.5 cm down the ilium in the area of the posterior superior spine, the elevated posterior gluteal line can be seen and felt; pass subperiosteally up over the line and then down its other side. Do not err by letting the line direct the incision outward from bone into muscle. A Taylor retractor will help the exposure by holding the muscles laterally. Note that the posterior gluteal line separates the origins of the gluteus maximus (posterior) from the gluteus medius (anterior; Fig. 7-6).
Dangers
Nerves
It is remotely possible that an osteotome will hit the sciatic nerve, which runs close to the distal end of the wound deep to the sciatic notch; however, if an imaginary line is drawn from the posterior superior iliac spine perpendicular to the operating table, and all work is performed cephalad to it, both the notch and the nerve will be avoided completely. If a larger graft is necessary, palpate the sciatic notch itself before taking the graft (see Fig. 7-6B).
Vessels
The superior gluteal vessel, a branch of the internal iliac (hypogastric) artery, leaves the pelvis via the sciatic notch, staying against the bone and proximal
to the piriformis muscle. If a graft is taken too close to the sciatic notch, the vessel may be cut and may retract into the pelvis. Nutrient vessels from the artery supply the iliac crest bone along the midportion of the anterior gluteal line, and the vessel may become an osseous bleeder as it enters bone via the nutrient foramen. To control bone bleeding, use bone wax on the raw cancellous surface of the pelvis after the graft has been removed.
P.366
to the piriformis muscle. If a graft is taken too close to the sciatic notch, the vessel may be cut and may retract into the pelvis. Nutrient vessels from the artery supply the iliac crest bone along the midportion of the anterior gluteal line, and the vessel may become an osseous bleeder as it enters bone via the nutrient foramen. To control bone bleeding, use bone wax on the raw cancellous surface of the pelvis after the graft has been removed.
 |
Figure 7-6 (A) Subperiosteally, strip the musculature off the posterior portion of the lateral surface of the ilium. (B) Proceeding down the outer surface of the ilium in the area of the posterior superior spine, the elevated posterior gluteal line can be seen and felt; pass subperiosteally up and over the line and then down its other side. Do not err by letting the line direct you outward from bone to muscle. If you draw an imaginary line from the posterior superior iliac spine perpendicular to the operating table and stay cephalad to it, you will avoid the sciatic notch and its contents. |
Bone
Avoid the sciatic notch. Breaking through the thick portion of the bone that forms the notch disrupts the stability of the pelvis. Removal of bone from the false pelvis proximal to the notch does not cause loss of stability (see Fig. 7-6B).
How to Enlarge the Approach
Local Measures
Place a sharp-tipped, right-angled Taylor retractor into the bone to retract the gluteal muscles away from the bone and increase the exposure. To increase the exposure further, lengthen the iliac crest incision and strip more of the gluteal muscles from the outer cortex to avoid working through a “keyhole.”
Extensile Measures
This incision cannot be extended. It is designed specifically for removing bone for graft material from the posterior outer cortex of the ilium. Inner cortex also may be taken, but soft tissues should not be stripped off the anterior (deep) aspect of the ilium.
P.367
Anterior Approach to the Pubic Symphysis
The anterior approach to the pubic symphysis is a direct approach that is used almost exclusively for the open reduction and internal fixation of a ruptured symphysis or internal fixation of a displaced fracture of the superior pubic ramus. Other uses include biopsy of tumors and treatment of chronic osteomyelitis.
Because widely displaced symphysis injuries often are associated with urologic damage, obtaining a urologic assessment is advisable before undertaking open surgery, which often includes a retrograde urethrogram. A urethral catheter must be inserted before surgery. A full bladder will seriously interfere with the surgical approach.
Position of the Patient
Place the patient supine on the operating table.
Landmarks and Incision
Landmarks
The superior pubic ramus and pubic tubercles are easily palpable in all but the most obese patients. The pubic symphysis will be palpable (as a gap) only in cases of rupture.
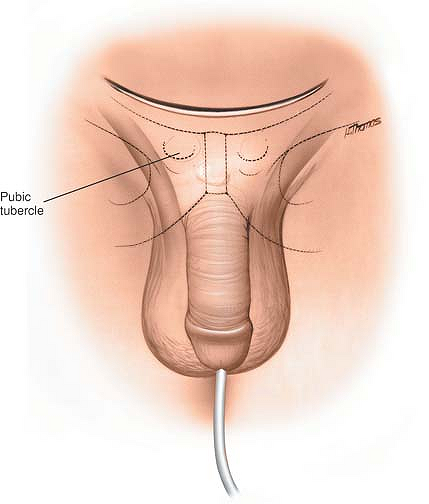 |
Figure 7-7 Palpate the pubic tubercles. Make a curved incision in the line of the skin crease, centering it 1 cm above the pubic symphysis. |
Incision
Make a 15-cm curved incision in the line of the skin crease, centering it about 1 cm above the pubic symphysis (Fig. 7-7). The patient should have an indwelling catheter in place.
Internervous Plane
An internervous plane is not available for use in this approach. Because the rectus abdominis muscles receive a segmental nerve supply, they are not denervated, even though they are divided by this approach.
Superficial Surgical Dissection
Incise the subcutaneous fat in the line of the skin incision, deepening the incision down to the anterior portion of the rectus sheath (Fig. 7-8). Identify, ligate, and divide the superficial epigastric artery and vein that run up from below across the operative field. Then, divide the rectus sheath transversely,
about 1 cm above the symphysis pubis. The two rectus abdominal muscles now are visible (Fig 7-9). In most cases of rupture of the symphysis pubis, one of these muscles will have been detached from its insertion into the pubic symphysis. Divide the remaining muscle a few millimeters above its insertion into the bone.
P.368
about 1 cm above the symphysis pubis. The two rectus abdominal muscles now are visible (Fig 7-9). In most cases of rupture of the symphysis pubis, one of these muscles will have been detached from its insertion into the pubic symphysis. Divide the remaining muscle a few millimeters above its insertion into the bone.
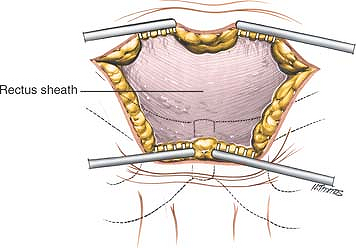 |
Figure 7-8 Incise the fat in the line of the skin incision and retract the skin edges to reveal the anterior portion of the rectus sheath. |
Deep Surgical Dissection
Retract the cut edges of the rectus abdominal muscles superiorly to reveal the symphysis and pubic crest (Fig. 7-10). If access to the back of the symphysis is required, use the fingers or a swab to push the bladder gently off the back of the bone. Palpation of the posterior surface of the body of the pubis is useful to identify the correct direction for the insertion of screws. This dissection is very easy to perform unless adhesions have formed due to damage to the bladder. Such adhesions make it difficult to open up this potential space (the preperitoneal space of Retzius) (Fig. 7-11). The pubic symphysis and superior pubic rami now are exposed adequately for internal fixation.
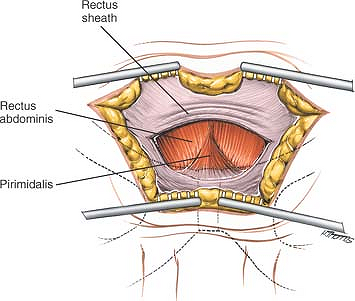 |
Figure 7-9 Divide the rectus sheath transversely 1 cm above the symphysis pubis to reveal the rectus abdominis muscles and pyramidalis. |
Dangers
Bladder
The bladder may have been damaged during the trauma. If so, adhesions will have developed between the damaged bladder and the back of the pubis. Mobilization of the space of Retzius, therefore, may lead to inadvertent bladder rupture. If fixation is considered in
the presence of urologic damage, it is best to operate in conjunction with an experienced urologic surgeon.
P.369
the presence of urologic damage, it is best to operate in conjunction with an experienced urologic surgeon.
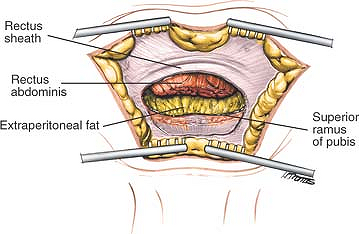 |
Figure 7-10 Divide the rectus muscles 1 cm above their insertion and retract their cut edges superiorly to reveal the superior ramus of the pubis. |
How to Enlarge the Approach
Local Measures
Because of the considerable amount of subcutaneous fat in this area, it may be necessary to extend the skin incision and superficial dissection in both directions to allow better visualization of the deep structures in obese patients.
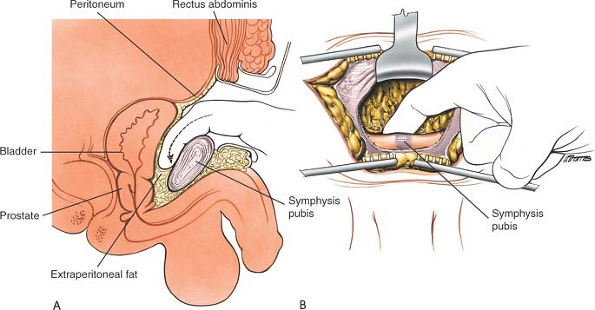 |
Figure 7-11 (A) Open the plane behind the symphysis pubis, using your finger as a blunt dissector. (B) The pubic symphysis and superior pubic rami now are exposed. |
Extensile Measures
The approach can be extended laterally to expose the entire anterior column of the acetabulum and the inner wall of the ilium.
P.370
Anterior Approach to the Sacroiliac Joint
The anterior approach to the sacroiliac joint offers safe, reliable access to that structure and allows anterior plates to be positioned accurately across the joint. It also permits the exposure of the inner wall of the ala of the ilium, allowing fixation of associated iliac fractures. Paradoxically, although the sacroiliac joint is one of the most posterior structures in the entire pelvic ring, the anterior approach allows greater exposure and control than does the seemingly more logical posterior approach, because of the shape of the joint. Anteriorly, the joint is flat and directly available, whereas posteriorly it is overhung by the posterior iliac crest.
Position of the Patient
Place the patient in a supine position on the operating table and put a large sandbag under the buttock. The iliac crest should be pushed up toward the surgeon. Support the opposite iliac wing with a support attached to the operating table and then tilt the table 20° away, allowing the mobile contents of the pelvis to fall away.
Landmarks and Incision
Landmarks
The anterior superior iliac spine and the anterior third of the iliac crest are subcutaneous and easy to palpate.
Incision
Make a long, curved incision over the iliac crest, beginning 7 cm posterior to the anterior superior iliac spine (at about the level of the iliac tubercle). Curve the incision forward until the anterior superior iliac spine is reached. Continue the incision anteriorly and medially along the line of the inguinal ligament for an additional 4 to 5 cm (Fig. 7-12).
Internervous Plane
No true internervous plane is available for use. The approach consists simply of stripping muscles off the pelvis; because the bone is being approached via its subcutaneous surface, no muscle is denervated.
Superficial Surgical Dissection
Deepen the skin incision through the subcutaneous fat. Expose the deep fascia overlying the glutei and tensor fasciae latae muscles at the point where it attaches to the outer lip of the iliac crest. Next, incise the periosteum of the entire anterior third of the iliac crest and gently strip the muscles off the outer wall of the pelvis to expose about 1 cm of the outer surface below the crest of the ilium. Predrill the iliac crest for easy reattachment. Using an oscillating saw, transect the wing of the ilium at this level, cutting only the outer cortex and the cancellous bone underneath (Fig. 7-13). Next, crack the inner cortex with an osteotome. This allows the anterior superior iliac spine to be detached along with the transected portion of the iliac wing (Fig. 7-14).
Related posts:

Stay updated, free articles. Join our Telegram channel

Full access? Get Clinical Tree


