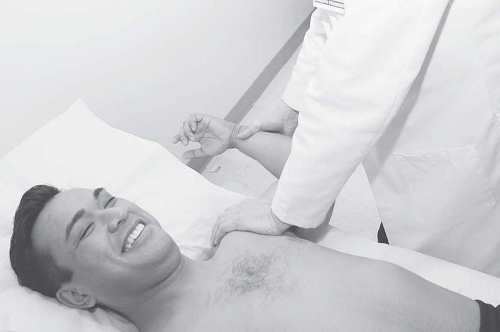
The Physical Examination
Joseph H. Feinberg
Peter J. Moley
The hallmark of medicine has always been the physical examination. Perhaps more than the actual diagnosis, the process by which the physician arrives at his or her conclusion has defined the “art” of medicine. Much has been written about the techniques by which this art is performed, and much more will continue to be written. Each generation will take from the past and apply these techniques to the future of medicine.
The physical examination is an extension of the history and extends the doctor-patient relationship initially established during the history. The skill with which the examination is performed instills a sense of confidence in the patient that the examiner knows what he or she is doing. This confidence in the physician has a positive outcome on the patient’s ability to recover. Finally, the physical examination serves to narrow the list of diagnostic possibilities.
In a specialty like physiatry, in which the whole person is evaluated in terms of function, there is no adjunct more important than the physical examination. The examination provides the foundation to formulate a plan to improve a person’s function. Importantly, though, in looking at function, each piece must be applied to the whole person. The examination of one joint must be applied to the whole picture of the patient, and an understanding of functional biomechanics will enable the physician to include in the physical examination other structures that may indirectly contribute to the impairment.
The focus on function and application to the whole person in physiatry can be best seen in understanding the concept of the kinetic chain. No one joint, bone, or muscle acts alone in the body. An ankle sprain can lead to low-back pain. Low-back pain can affect the serve of a tennis professional. Lateral epicondylitis can alter shoulder mechanics and lead to rotator cuff impingement. It is because of these relationships that the physiatrist must perform a thorough examination. It is this comprehensive manner that sets apart the physiatric approach from others. A thorough knowledge of the neuromuscular system and an understanding of functional biomechanics will narrow the focus of the examination so it can be done in a time-efficient manner. The relationship between the different joints and regions must be understood. In addition, a complete understanding of the muscles and their innervation is required.
An understanding of the muscle kinesiology and biomechanics is very important in the physical examination. Each muscle functions across one or more joints to provide motion or stabilization. One example would be the hamstrings. When the foot is planted, the hamstrings act in their primary function as powerful hip extensors. However, with the foot off the ground, they can become knee flexors. With a patient prone and the knee bent at 90 degrees, the gluteus maximus acts as the primary extensor because of the shortened hamstrings. Place the knee in full extension, and the hamstrings will once again act as hip extensors. We will look further into these types of relationships in the physical examination.
In today’s medicine, there exists a tremendous amount of information to digest. The number of articles indexed in MEDLINE has grown in size from 1,098,000 citations in 1970 to 11,761,000 in 2000. The modern physician must have an understanding of the body down to a microcellular level. In addition, access to modern tests like magnetic resonance imaging (MRI) is achieved by a greater number of patients. Any test has its limitations, and in the example of the MRI, these can be multiple false-positive findings (1). The MRI should be used to confirm not make a diagnosis. Many physician referrals are generated from a radiologist’s interpretation of a study, often without physical examination findings consistent with the results of the study. It is at this point that the well-trained physiatrist can be the link using evidence-based medicine as it applies to diagnosis, history, and physical examination.
Whole texts are dedicated to the physical exam. Due to the limits of one chapter, this will be an introduction to the physical examination and kinesiology of the cervical spine, shoulder, lumbar spine, and knee. That said, the reader should be able to approach any joint in the manner laid out here to aid in his or her diagnosis. Examination of any joint should be performed in a systematic approach. As the examination begins, the clinician should make sure that the area to be examined is properly exposed for evaluation and the patient appropriately draped. We have focused on the major joints seen in our practice—the cervical and lumbar regions of the spine, the shoulder, and the knee. Other joints will be addressed in chapters in this text. We will now address the physical examination, and the kinesiology of the muscles and joints will be explained. For reference, the dermatomes, myotomes, and sclerotomes are illustrated in Chapter 21.
It is the task of the physiatrist to perform a thorough physical examination to confirm his or her diagnosis derived from the history and additional information. It even is more important today, because of the additional tests modern technology has advanced, to understand physical examination maneuvers and their diagnostic relevance.
EXAMINATION OF THE CERVICAL SPINE
Inspection
Inspection of the neck begins upon meeting the patient. Look to see if the patient moves the shoulders when he or she turns the neck, a sign of decreased range of motion, or if he or she winces with certain motions. Take note of the patient’s relaxed posture as changes to improve poor posture can be easily addressed in therapy. As the examination proceeds, the clinician should make sure that the neck is properly exposed for evaluation. Look at the muscle bulk and symmetry of the neck, upper back, and shoulders. Also look at the skin for scarring or discoloration. You will be surprised at the details left out by patients. It is not uncommon to learn about a patient’s previous surgery during the exam.
Palpation
The next step involves palpation of the neck and upper thoracic region. Begin in a systematic fashion, either starting from the front or back. From the back, the paraspinal muscles and the nuchal ligament can be palpated. Working down, the upper and middle trapezius muscles should also be palpated for tender or trigger points (2). Palpate for the spinous process of the seventh cervical vertebrae, which should be larger than the superior segments in a neutral position of the cervical spine.
Place the patient in the supine position with the patient’s head near the end of the table. Sit with your stool directly behind the patient’s head, and continue palpation. Rotate the patient’s neck 45 degrees, palpate each zygapophyseal joint, and note whether the patient feels discomfort at a joint that is greater than the opposite corresponding zygapophyseal joint. From this position, the anterior muscles, most notably the sternocleidomastoid and more laterally the scalenes, can be palpated. Palpate the sternocleidomastoid muscle from its origin at the sternoclavicular joint to the insertion on the mastoid process. Rotate the neck from side to side to make the muscle more prominent if it is initially difficult to find. Look for symmetry and bulk.
Range of Motion
Range of motion should be tested both actively and passively. Both are important in the evaluation of the neck. Guarding due to pain, muscle tightness, and muscle imbalances can reduce range of motion to one side during active testing, but the motion may often be full when tested passively. Osteophytes and zygapophyseal joint arthritis can also lead to fixed restrictions. This would be confirmed when the same loss of range of motion found actively is also demonstrated passively.
TABLE 2.1 Manual Muscle Testing of the Cervical Spinea | ||||||||||||||
|---|---|---|---|---|---|---|---|---|---|---|---|---|---|---|
| ||||||||||||||
TABLE 2.2 Reflex Testing of the Cervical Spine | ||||||||||
|---|---|---|---|---|---|---|---|---|---|---|
| ||||||||||
Range of motion should be checked in flexion, extension, rotation, and lateral or side bending. Motion is not divided equally between the vertebrae. Approximately 50% of flexion and extension come from the atlanto-occipital joint. At the atlantoaxial joint, approximately 50% of the rotation takes place (3).
Guidelines for normal motion are as follows: Normal flexion allows the patient to touch his chin to his chest, and extension allows the patient to look up at the ceiling. In normal rotation, the patient should be able to bring her chin over the acromion. Side bending done toward the ipsilateral shoulder should be approximately 45 degrees. Always begin with active range of motion, particularly in the injured patient. The patient may guard, and this will reduce the range. Forcing motion may make the patient uncomfortable and can injure a patient with zygapophyseal joint dysfunction (4).
Neurological
Included in any examination of the neck is a full neurologic examination of the upper limbs. Radiculopathies can be very subtle, and all components of the examination, manual muscle testing, sensory examination, and reflexes must be addressed to find these subtle changes. The order to proceed is examiner dependent. Manual muscle testing should also be confirmed with additional muscles when subtleties exist, as the muscles of the upper limb have two or more levels of innervation. Table 2-1 shows what should be included in manual muscle testing.
Reflexes can be addressed next. Table 2-2 shows what should be included in reflex testing.
Finally, sensation can be tested for both pinprick (lateral spinothalamic tract) and light touch (dorsal columns). If there is a concern about carpal tunnel or double crush, two-point discrimination may be more sensitive (5). Table 2-3 shows what should be included in sensation testing.
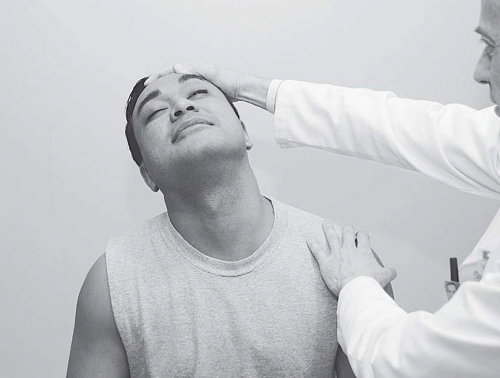
Examination of the neck should also include a compression test or Spurling’s maneuver (6) (Fig. 2-1). The test assesses the
mechanical neuroforaminal narrowing of the C4-5, C5-6, and C6-7 with ipsilateral oblique extension (7). The objective of the test is to compress an irritated nerve with the following motion: The neck is brought into slight extension and side bending followed by an axial compression. A positive result reproduces pain along a dermatome below the shoulder. Finally, as with the joints, it is always important to examine the adjacent joints. In the case of the cervical spine, a full examination of the shoulder should be performed to rule out underlying or contributing shoulder pathology.
mechanical neuroforaminal narrowing of the C4-5, C5-6, and C6-7 with ipsilateral oblique extension (7). The objective of the test is to compress an irritated nerve with the following motion: The neck is brought into slight extension and side bending followed by an axial compression. A positive result reproduces pain along a dermatome below the shoulder. Finally, as with the joints, it is always important to examine the adjacent joints. In the case of the cervical spine, a full examination of the shoulder should be performed to rule out underlying or contributing shoulder pathology.
TABLE 2.3 Sensation Testing of the Cervical Spine | ||||||||||||||
|---|---|---|---|---|---|---|---|---|---|---|---|---|---|---|
| ||||||||||||||
EXAMINATION OF THE SHOULDER
Inspection
Inspection of the shoulder requires that the shoulder be exposed and the patient appropriately draped. The shoulder “joint” actually consists of four different joints: sternoclavicular, acromioclavicular, glenohumeral, and scapulothoracic. Three of the joints are true joints, while the scapulothoracic joint is not a true articulating joint lined with cartilage. It is important to visualize each of the joints. Begin by inspecting the normal bony prominences and muscle bulk. The most obvious changes can be seen in the acromioclavicular joint. Comparison to the other shoulder is essential.
Palpation
Palpation can be done either from in front of the patient or from behind the patient. Begin by palpating from the sternoclavicular joint along the clavicle to the acromioclavicular joint. Palpate the coracoid process and the coracoclavicular ligament. Move laterally, and palpate the tendon of the long head of the biceps. Continue palpation medially to the lesser tuberosity and laterally to the greater tuberosity. Next, palpate the scapula along the acromion and medially along the spine of the scapula. Find the superior and inferior angles of the scapula.
The muscles should also be palpated for tender points and evaluation of their bulk. The supraspinatus, infraspinatus, and teres minor can be palpated by bringing the upper limb into extension at the shoulder and palpating anteriorly (3).
Range of Motion
The motion of the joints should be observed. Watch the different joints and their symmetry of motion. This should be done from in front of and behind the patient.
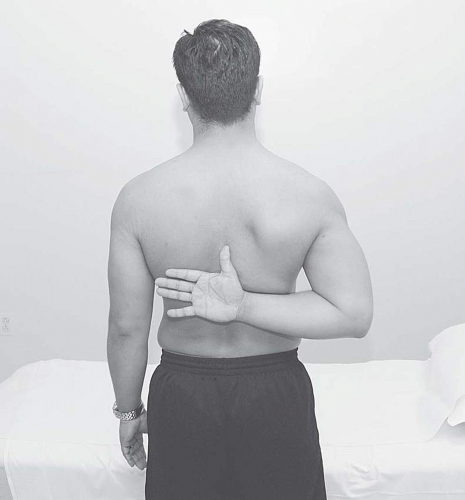
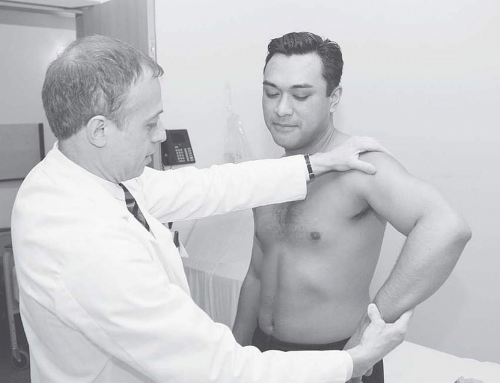
The shoulder has the greatest range of motion of any joint. Subtle changes must be assessed and asymmetries noted during the physical examination. Active and passive motions should be assessed. To begin, check the patient’s active range of motion. There are six directions of motion: abduction, adduction, extension, flexion, internal rotation, and external rotation. Active abduction should allow the patient to touch the dorsal surface of his hands with the arms straight above the head. Adduction will allow the patient to bring her arm into the plane of the torso. Each of these can be tested in conjunction with the testing for internal and external rotations or alone. Functional internal rotation can be demonstrated by having the patient touch his midback (Fig. 2-2). Record the level that the thumb touches, and repeat on the opposite side. Have the patient reach over the head and touch the upper back to test external rotation. As with internal rotation, record both sides. Finally, have the patient bring the straight upper limb forward to test flexion and backward to test extension.
The shoulder should then be checked for passive range of motion. The importance of checking the passive range can be seen in a patient with adhesive capsulitis. Although there may appear to be both internal and external rotations, the motion often comes from the scapular thoracic joint. By isolating the glenohumeral motion, both can be assessed, and there is increased reliability in the assessment of the glenohumeral motion (8).
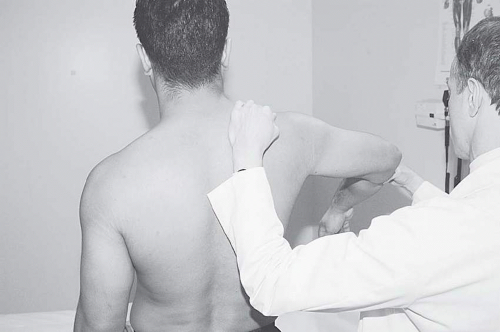
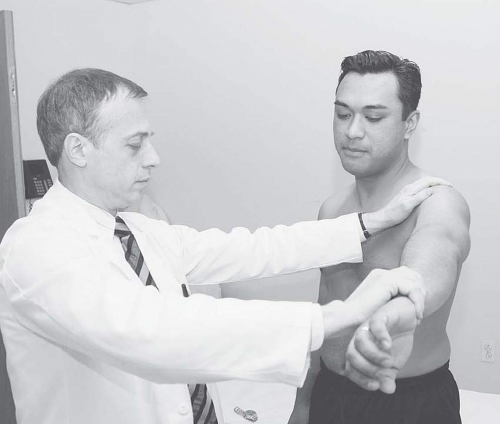
Passive internal and external rotations can be tested by bringing the shoulder into 90 degrees of abduction while holding
the elbow to 90 degrees of flexion. Stabilizing the scapula with one hand to truly evaluate glenohumeral motion, internally and externally rotate the shoulder (Fig. 2-3). For some examiners, placing the patient in the supine position with a posteriorly directed force on the coracoid process might be easier and has been found to be reliable (9). Note the motion, compare it to the other side, and repeat with the scapula free to see the scapulothoracic motion. Table 2-4 shows the normal range of motion.
the elbow to 90 degrees of flexion. Stabilizing the scapula with one hand to truly evaluate glenohumeral motion, internally and externally rotate the shoulder (Fig. 2-3). For some examiners, placing the patient in the supine position with a posteriorly directed force on the coracoid process might be easier and has been found to be reliable (9). Note the motion, compare it to the other side, and repeat with the scapula free to see the scapulothoracic motion. Table 2-4 shows the normal range of motion.
Neurological
Motor testing of the shoulder should follow the examination of the range of motion. Each motion should be tested for strength. The major muscles used to move the shoulder are the deltoid, pectoralis major, latissimus dorsi, biceps, and triceps. In addition, there are smaller stabilizing muscles, including the rotator cuff muscles. Additionally, the scapular position and control are coordinated by the trapezius, levator scapulae, rhomboids, and serratus anterior. Test the major movers with one hand stabilizing the shoulder and the other providing resistance.
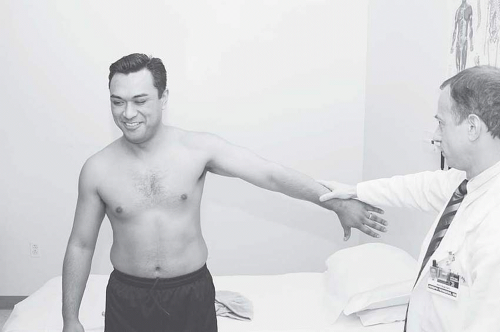
After testing the larger movers of the shoulder, it is important that the smaller stabilizers are addressed, as these are often involved in the pathology of the shoulder. The supraspinatus is tested with the upper limb abducted 90 degrees, internally rotated with the thumb down and in the plane of the scapula. Apply steady pressure while asking the patient to abduct the limb (Fig. 2-4). Next, the external rotators can be assessed. Have the patient adduct the limb and flex the elbow at 90 degrees. The examiner stabilizes the elbow against the torso with one hand and places the other hand on the distal forearm. The patient then rotates the forearm away from the body against resistance.
TABLE 2.4 Normal Range of Motion of the Shoulder | ||||||||||||||
|---|---|---|---|---|---|---|---|---|---|---|---|---|---|---|
|
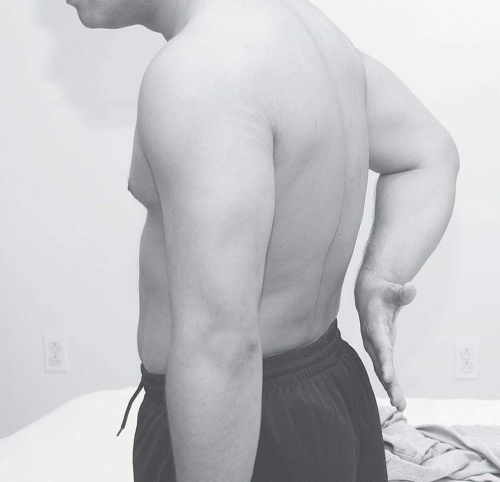
Finally, the subscapularis should be assessed. This is the most difficult to check for subtle changes. The classically described maneuver is the “lift-off test.” This is done by the patient placing the dorsum of his hand on his back while the elbow is flexed at 90 degrees. The examiner then holds the hand off the back and instructs the patient to hold his hand in that position once the hand is released. If the patient is able to maintain the hand position, the subscapularis is intact. If the hand falls to the back, there is some deficiency in the muscle (Fig. 2-5).
Sensory testing of the shoulder should be done in conjunction with the neck. Of importance for the shoulder, the dermatome for the axillary nerve should be tested. This is a silver dollar-sized area over the deltoid on the lateral upper arm. This is especially important after dislocations, as the axillary nerve can be injured.
Additional Tests
Impingement Tests
There are many tests for impingement of the rotator cuff muscles. We will address two of the more common tests. The first is the Hawkins’ maneuver (10). With the arm abducted to 90 degrees, elbow flexed at 90 degrees, and the humerus in the plane of the scapula, the examiner stabilizes the scapula and internally rotates the shoulder (Fig. 2-6). Pain with this maneuver is caused by impingement of the greater tuberosity on the coracoacromial ligament.
Labral Tests
Another test of importance to the shoulder exam is the active compression test. The test is used to assess for anterior labral tears and acromioclavicular injuries. With the patient standing, the examiner stands on the affected side. The shoulder is brought into 90 degrees of abduction, 10 to 15 degrees of adduction, and internal rotation of the upper limb. The patient then resists a downward force by the examiner. At this point, the patient should either feel pain at the top of the shoulder (A-C joint pathology) or inside the shoulder (anterior labrum). The limb is then brought into full external rotation and the symptoms should be alleviated. Sensitivity and specificity are both excellent for the test (12).
Stability Tests
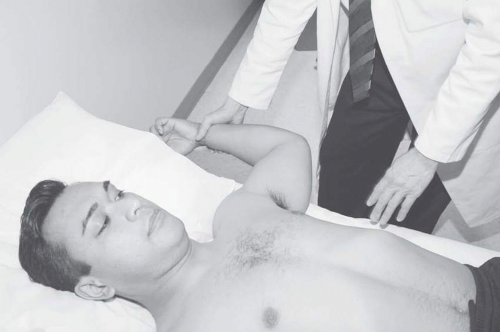
Shoulder instability can be diagnosed with a variety of maneuvers and most likely more accurately using the results of two or more tests. The examiner can begin with the apprehension test. The patient is placed in a supine position with the upper limb to be examined next to the edge of the table. The shoulder is then abducted to 90 degrees, and the elbow is flexed. The examiner then externally rotates the shoulder (Fig. 2-8). A patient with a positive “apprehension sign” has discomfort and a feeling of apprehension in the shoulder as it is externally rotated past 90 degrees that is relieved when the examiner stabilizes the shoulder with a posteriorly directed force to the shoulder with his free hand. The second part of the examination is named the “relocation sign” (Fig. 2-9). Both parts of the examination check for anterior instability of the shoulder, although the relocation test adds specificity to the diagnosis.
The next tests are the anterior and posterior drawer signs (13). With the patient in the same supine position, the examiner stabilizes the forearm and the humerus. Next, the examiner places her free hand on the glenohumeral joint. With the distal portion of the joint stabilized, the humerus is directed anteriorly and posteriorly (Fig. 2-10


Stay updated, free articles. Join our Telegram channel

Full access? Get Clinical Tree


