Operations on the humerus are relatively infrequent and generally involve the open reduction and internal fixation of fractures. All approaches to the humerus are potentially dangerous because the major nerves and vessels at this site run much closer to the bone than they do elsewhere in the body; the axillary, radial, and ulnar nerves all have a direct relationship to the humerus. Of these structures, the radial nerve is at greatest risk during exposure of the humeral shaft (see Fig. 2-33).
Five approaches to the humerus are described in this chapter: the anterior approach to the humerus, the minimal access anterior approach to the humeral shaft, the anterolateral approach to the distal humerus, the posterior approach and the lateral approach to the distal humerus, and the minimal access approach for humeral nailing. Of these, the anterior and posterior approaches are the most versatile, providing access to large portions of bone. The anterolateral approach to the distal humerus is extensile both proximally and distally, but this facility rarely is required. The lateral approach to the distal humerus is a strictly local approach to the common extensor origin and adjacent structures. Because the key surgical structure of the area (the radial nerve) courses down the arm in both the anterior and posterior compartments, the surgical anatomy of the humerus is described in a single section of this chapter, immediately after the description of the operative approaches.
Anterior Approach to the Humeral Shaft
The anterior approach exposes the anterior surface of the shaft of the humerus.1,2,3 Normally, only a portion of the approach is needed for any one procedure. As in all approaches to the humerus, the radial nerve is the structure at greatest risk during surgery.
The uses of the anterior approach include the following:
Internal fixation of fractures of the humerus
Osteotomy of the humerus
Biopsy and resection of bone tumors
Treatment of osteomyelitis
 |
Figure 2-1 Place the patient supine on the operating table. Place his or her arm on an arm board and abduct the arm about 60°. |
Position of the Patient
Place the patient supine on the operating table, with the arm on an arm board, abducted about 60°. Tilt the patient away from the affected arm to reduce bleeding. Most surgeons prefer to sit facing the patient’s axilla, with the surgical assistant on the opposite side of the arm. Do not use a tourniquet; it will only get in the way (Fig. 2-1).
P.75
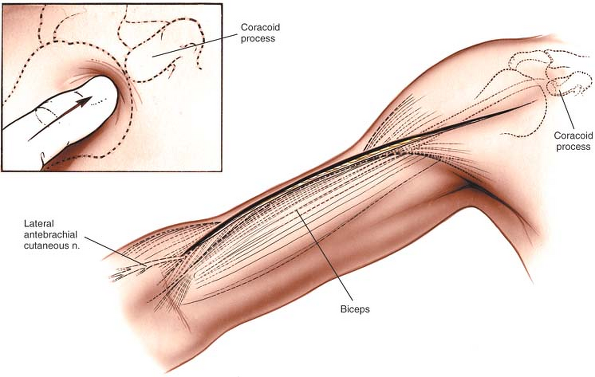 |
Figure 2-2 For an anterior approach, make a longitudinal incision from the tip of the coracoid process distally in line with the deltopectoral groove and continue along the lateral aspect of the shaft of the humerus. Extend the incision as far distally as necessary, stopping about 5 cm above the flexion crease of the elbow. Palpate the coracoid process in a lateral to medial direction (inset). |
Landmarks and Incision
Landmarks
Palpate the coracoid process of the scapula immediately below the junction of the middle and outer thirds of the clavicle (see Fig. 2-2, inset).
Palpate the long head of the biceps brachii as it crosses the shoulder and runs down the arm. The lateral border of its freely moving muscular belly lies on the anterior surface of the arm.
Incision
Begin a longitudinal incision over the tip of the coracoid process of the scapula. Run it distally and laterally in the line of the deltopectoral groove to the insertion of the deltoid muscle on the lateral aspect of the humerus, about halfway down its shaft. From there, the incision should be continued distally as far as necessary, following the lateral border of the biceps muscle. The incision should be stopped about 5 cm above the flexion crease of the elbow (see Fig. 2-2).
Internervous Plane
The anterior approach makes use of two different internervous planes (Fig. 2-3A). Proximally, the plane lies between the deltoid muscle (which is supplied by the axillary nerve) and the pectoralis major muscle (which is supplied by the medial and lateral pectoral nerves). Distally, the plane lies between the medial fibers of the brachialis muscle (which are supplied by the musculocutaneous nerve) medially and the lateral fibers of the brachialis muscle (which are supplied by the radial nerve) laterally (Fig. 2-3B).
Superficial Surgical Dissection
Proximal Humeral Shaft
Identify the deltopectoral groove, using the cephalic vein as a guide (Fig. 2-4, inset), and separate the two muscles, retracting the cephalic vein either medially with the pectoralis major or laterally with the deltoid, whichever is easier. Develop the muscular interval distally down to the insertion of the deltoid into the
deltoid tuberosity and the insertion of the pectoralis major into the lateral lip of the bicipital groove (Fig. 2-4). Take care when retracting the deltoid; overzealous use of the retractor may paralyze the anterior half of the muscle by causing a compression injury to the axillary nerve.
P.76
P.77
deltoid tuberosity and the insertion of the pectoralis major into the lateral lip of the bicipital groove (Fig. 2-4). Take care when retracting the deltoid; overzealous use of the retractor may paralyze the anterior half of the muscle by causing a compression injury to the axillary nerve.
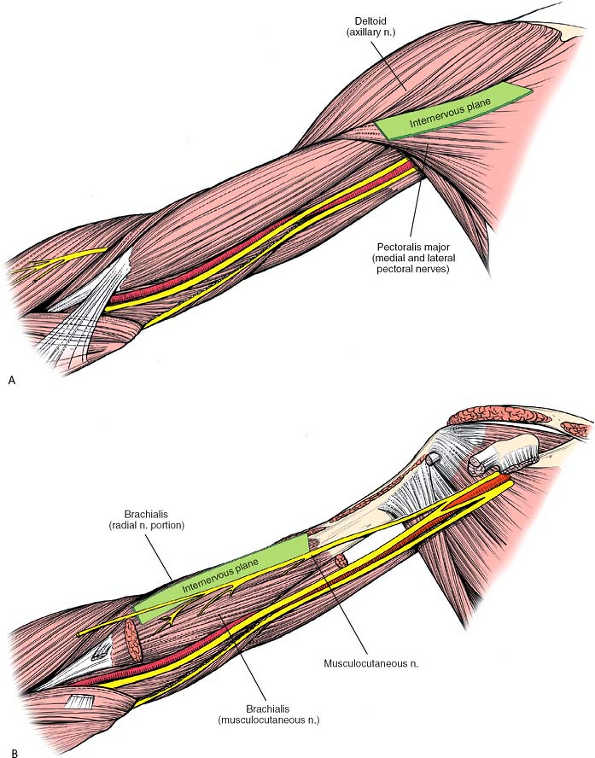 |
Figure 2-3 Internervous plane. (A) Proximally, the plane lies between the deltoid (axillary nerve) and the pectoralis major (medial and lateral pectoral nerves). (B) Distally, the plane lies between the medial fibers of the brachialis (musculocutaneous nerve) medially and the lateral fibers of the brachialis (radial nerve) laterally. |
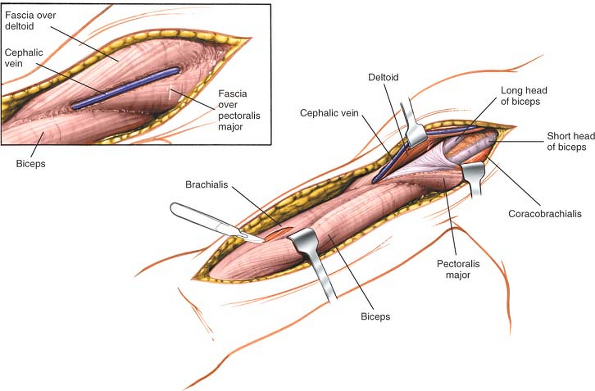 |
Figure 2-4 Identify the deltopectoral groove, using the cephalic vein as a guide (inset). Develop the muscular interval down to the insertion of the deltoid into the deltoid tuberosity and the insertion of the pectoralis major into the lateral bicipital groove. Distally, incise the deep fascia in line with the skin incision to identify the interval between the biceps brachii and the brachialis. |
Distal Humeral Shaft
Incise the deep fascia of the arm in line with the skin incision. Identify the muscular interval between the biceps brachii and the brachialis. Develop the interval by retracting the biceps medially. Beneath it lies the anterior aspect of the brachialis, which cloaks the humeral shaft (Fig. 2-5; see Fig. 2-4).
Deep Surgical Dissection
Proximal Humeral Shaft
To expose the upper part of the shaft of the humerus, incise the periosteum longitudinally just lateral to the insertion of the tendon of the pectoralis major. Continue the incision proximally, staying lateral to the tendon of the long head of the biceps. The anterior circumflex humeral artery crosses the field of dissection in a medial to lateral direction and must be ligated (see Fig. 2-5). To expose the bone fully, you may need to detach part or all of the insertion of the pectoralis major muscle from the lateral lip of the bicipital groove of the humerus (Fig. 2-6). This must be done subperiosteally. Only detach the minimum amount of soft tissue to allow accurate visualization and reduction of the fracture. Try to preserve as much soft-tissue attachment as possible. If you need to dissect further around the bone, this dissection should remain in a strictly subperiosteal plane to avoid damage to the radial nerve, which lies in the spiral groove of the humerus and crosses the back of the middle third of the bone in a medial to lateral direction (Fig. 2-7).
In extreme proximal humeral fractures, especially comminuted fractures, the head and anatomic neck of the humerus may need to be exposed. To accomplish this, the subscapularis muscle must be divided, with care taken to coagulate the triad of vessels that runs along the lower border of that muscle (Fig. 2-8; see Fig. 1-20). Frequently, however, the lesser tuberosity with the attached subscapularis tendon
forms a separate fracture fragment, rendering division of the subscapularis tendon unnecessarily.
P.78
P.79
P.80
forms a separate fracture fragment, rendering division of the subscapularis tendon unnecessarily.
 |
Figure 2-5 Retract the biceps medially, being careful to identify the musculocutaneous nerve. Proximally, identify the anterior circumflex humeral artery as it crosses the field of dissection in a medial to lateral direction. |
 |
Figure 2-6 Proximally, detach the insertion of the pectoralis major from the lateral bicipital groove and then continue dissection subperiosteally to expose the upper portion of the humerus. Distally, split the fibers of the brachialis to expose the periosteum of the anterior humerus. Incise the periosteum, and strip the brachialis off the bone. Flexion of the elbow will take tension off the brachialis, making the exposure easier. |
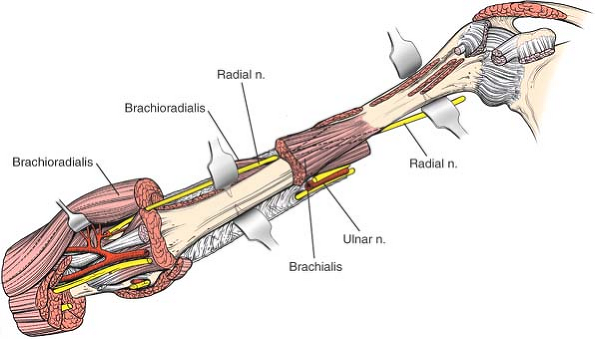 |
Figure 2-7 The radial nerve is vulnerable at two points as it courses along the humerus: one, in the spiral groove, and two, as it pierces the lateral intermuscular septum to run between the brachioradialis and the brachialis. |
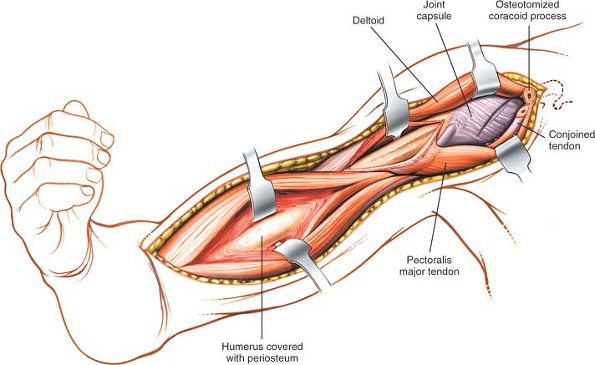 |
Figure 2-8 Proximal extension of the exposure. Using the deltopectoral interval, cut the tip of the coracoid and incise the subscapularis to provide an anterior approach to the shoulder. |
Distal Humeral Shaft
Split the fibers of the brachialis longitudinally along its midline to expose the periosteum on the anterior surface of the humeral shaft. Strip the brachialis off the anterior surface of the bone. Try to preserve as much soft-tissue attachment as possible. To make the task easier, flex the elbow to take tension off the brachialis. The bone is now exposed (see Fig. 2-6).
Dangers
Nerves
The radial nerve is vulnerable at the following two points:
In the spiral groove on the back of the middle third of the humerus, not straying onto the posterior surface of the bone (see Figs. 2-7 and 2-37). Remember that the radial nerve may be damaged by drills, taps, or screws that are inserted anteroposteriorly when anterior plates are being applied in the middle third of the bone.
In the anterior compartment of the distal third of the arm. At this point, the nerve has pierced the lateral intermuscular septum and lies between the brachioradialis and brachialis muscles. Note that this plane is oblique and not vertical (see Fig. 2-34). To avoid damaging the nerve, split the brachialis along its midline; the lateral portion of the muscle then serves as a cushion between the retractors that are being used in the exposure and the nerve itself (see Figs. 2-7 and 2-37).
The axillary nerve, which runs on the underside of the deltoid muscle, may be damaged as a result of a compression injury caused by overly vigorous retraction of the muscle. Care should be taken when the retractors are being positioned on the deltoid to avoid injuring the nerve (see Fig. 2-4).
Vessels
The anterior circumflex humeral vessels cross the operative field in the interval between the pectoralis major and deltoid muscles in the upper third of the arm. Because cutting these vessels cannot be avoided, they should be ligated or subjected to diathermy (see Figs. 2-5 and 2-6).
How to Enlarge the Approach
Local Measures
Flexion of the elbow relaxes both the brachialis and the biceps brachii, facilitating retraction of these muscles.
Extensile Measures
Proximal Extension. Because the anterior approach uses the deltopectoral interval, its upper end can be modified easily into an anterior approach to the shoulder (see Fig. 2-8).
Distal Extension. The anterior approach cannot be extended distally.
Minimal Access Anterior Approach to the Humeral Shaft
The minimal access anterior approach to the humerus utilizes two soft-tissue windows, proximal and distal. The use of this approach is almost exclusively for internal fixation of fractures of the humerus. The advantage of this approach is the preservation of the blood supply to the fracture zone. The disadvantage is that the fracture is not exposed, which makes reduction more difficult to achieve and assess.
Position of the Patient
Place the patient supine on the operating table in the same position as for the anterior approach to the humerus (see Fig. 2-1). Ensure that you can obtain adequate X-ray images of the pathology to be treated before prepping and draping.
Landmarks and Incision
Landmarks
Palpate the coracoid process of the scapula and the lateral border of the biceps brachii (Fig. 2-9).
Incision
Make a 5- to 7-cm longitudinal incision beginning just below the coracoid process running down the arm in the line of the deltopectoral groove. Make a second 5- to 7-cm longitudinal incision overlying the lateral border of the biceps brachii in the distal third of the arm. The positioning of the incision is determined by the site of the fracture.
P.81
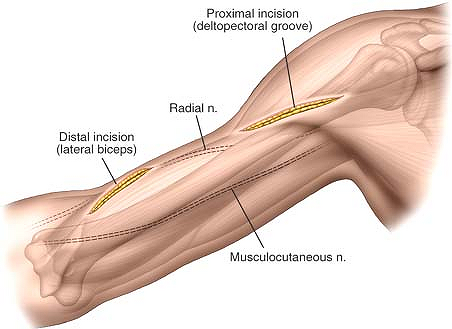 |
Figure 2-9 Proximally make a 6- to 8-cm longitudinal incision based on the coracoid process. Distally make a 6- to 8-cm incision overlying the lateral border of the biceps brachii. The precise length and positioning of the incisions depends on the site of the pathology and the implant used to treat it. |
Internervous Plane
Proximally, the anterior minimal access approach utilizes the plane between the deltoid muscle (axillary nerve) and the pectoralis major muscle (lateral and medial pectoral nerves). Distally, the plane lies between the medial half of the brachialis muscle supplied by the musculocutaneous nerve in the lateral half of the brachialis muscle supplied by the radial nerve (see Figs. 2-3 and 2-4).
Superficial Surgical Dissection
Proximal Window
Identify the deltopectoral groove, using the ce-phalic vein as a guide. Separate the two muscles. This can usually be done with blunt dissection (see Fig. 2-4).
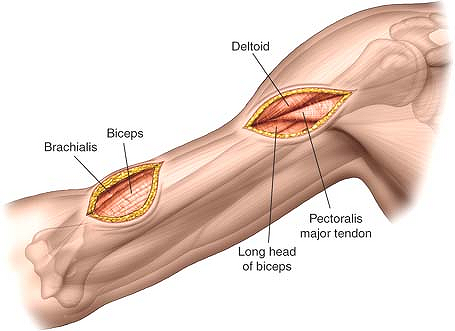 |
Figure 2-10 Deepen the incision in the line of the skin incision. Proximally expose the deltopectoral interval. Distally expose the lateral border of the biceps brachii. |
Distal Window
Incise the deep fascia of the arm in the line of the skin incision and identify the muscular interval between the biceps brachii and the brachialis. Develop this interval by retracting the biceps medially and identify the brachialis muscle covering the anterior humeral shaft (Figs. 2-10 and 2-11).
Deep Surgical Dissection
Proximal Window
Develop the plane between the deltoid and the pectoralis major down to the bone. Stay lateral to the
tendon of the long head of the biceps. For access to some of the bone for plate application, you will now need to detach part or all of the insertion of pectoralis major and the insertion of the deltoid.
P.82
tendon of the long head of the biceps. For access to some of the bone for plate application, you will now need to detach part or all of the insertion of pectoralis major and the insertion of the deltoid.
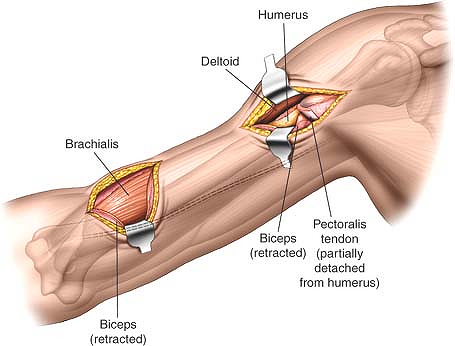 |
Figure 2-11 Proximally develop the interval between the pectoralis major muscle and the deltoid to expose the underlying bone. Part of the tendon of pectoralis major may need to be detached from the bone. |
Distal Window
Split the fibers of the brachialis longitudinally and develop an epi-periosteal plane between the deep surface of the brachialis and the periosteum covering the anterior surface of the humerus. Try to preserve as much of the soft tissue as possible. To make your task easier, flex the elbow to decrease the tension on the brachialis muscle.
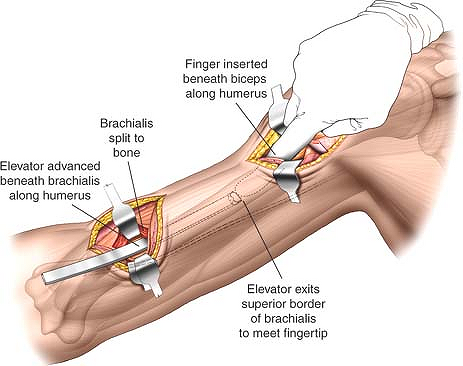 |
Figure 2-12 Distally retract the belly of the biceps brachii muscle medially to expose the anterior surface of the brachialis muscle. Split the brachialis longitudinally in the line of its fibers to expose the anterior surface of the humerus. Next, develop an epi-periosteal plane on the anterior surface of the bone. Proximally develop an epi-periosteal plane on the anterior surface of the humerus using finger dissection. |
To connect the two windows, develop an epi- periosteal plane on the anterior surface of the humerus using a blunt elevator. Begin distally and stick closely to the anterior surface of the bone. You may also need to develop this plane working distally through the proximal window (Figs. 2-12 and 2-13).
P.83
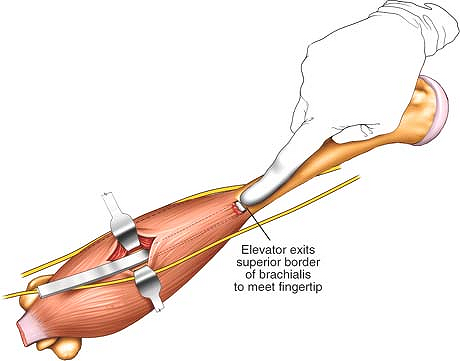 |
Figure 2-13 Connect the proximal and distal windows by blunt dissection in an epi-periosteal plane on the anterior surface of the humerus. |
Dangers
The radial nerve is lateral to the surgical approach in the distal window, lying between the lateral border of the brachialis and the brachioradialis.
The muscular cutaneous nerve and its distal branch, the lateral anti-brachial cutaneous nerve, lie medial to the brachialis and the distal window. To avoid damage to either nerve make sure that the brachialis is split in its mid line.
Vessels
The anterior circumflex humeral vessels cross the operative field in the interval between the pectoralis major and the deltoid muscle in the upper third of the arm. These structures need to be identified while developing the plane and, if possible, avoided.
How to Enlarge the Approach
Local Measures
Minimal access anterior approach to the humerus can be converted into the anterior approach to the humerus by connecting the two skin incisions. Splitting brachialis completes the exposure.
Anterolateral Approach to the Distal Humerus
The anterolateral approach exposes the distal fourth of the humerus. Its major advantage over the brachialis-splitting anterior approach is that it can be extended both distally and proximally, whereas the brachialis-splitting approach cannot be extended distally. Its uses include the following:
Open reduction and internal fixation of fractures of the distal half of the humerus, especially the Holstein Lewis fracture
Exploration of the radial nerve in the distal part of the arm
Position of the Patient
Place the patient supine on the operating table, with the arm lying on an arm board and abducted about 60°. Exsanguinate the limb either by elevating it for 3 minutes or by applying a soft rubber bandage; then apply a tourniquet in as high a position as possible (see Fig. 2-1).
P.84
Landmarks and Incision
Landmarks
The landmarks in this approach include the biceps brachii muscle (see Applied Surgical Anatomy of the Anterior Approach in Chapter 1) and the flexion crease of the elbow.
Incision
Make a curved longitudinal incision over the lateral border of the biceps, starting about 10 cm proximal to the flexion crease of the elbow. Follow the contour of the muscle, ending the incision just above the flexion crease of the elbow (Fig. 2-14).
Internervous Plane
There is no true internervous plane, because both the brachioradialis muscle and the lateral half of the brachialis muscle are supplied by the radial nerve proximal to the area of the incision. Proximal extension of the incision may denervate part of the brachialis, but this is of no clinical significance, because the radial nerve supply to the brachialis is minor and, probably, only proprioceptive. For this reason, the plane is both safe and extensile. Care should be taken during dissection down to the deep fascia; the lateral cutaneous nerve of the forearm runs roughly in the line of approach and should be retracted clear of the incision, in conjunction with the biceps (Figs. 2-15 and 2-16).
 |
Figure 2-14 The incision for the anterior lateral approach. Make a curved longitudinal incision over the lateral border of the biceps, starting about 10 cm proximal to the flexion crease of the elbow. End the incision just above the flexion crease. |
Related posts:

Stay updated, free articles. Join our Telegram channel

Full access? Get Clinical Tree


