Fig. 1
Schematic of a right hip after the approach. A pointed Hohmann retractor sits on the superior pubic ramus, medial to the iliopectineal eminence. The blunt scissors follow the capsule posteromedially to palpate the obturator foramen, ischium, and infracotyloid notch
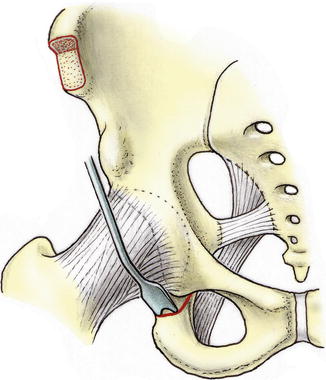
Fig. 2
A narrow curved double tipped osteotome is introduced into the space opened by the scissors. The ischial osteotomy is performed stepwise, leaving the lateral cortex intact (Reprinted with permission from SLACK Incorporated: RANAWAT, Anil (MD). KELLY, Bryan T. (MD). Musculoskeletal Examination of the Hip and Knee: Making the Complex Simple. Thorofare, NJ; Slack Incorporated: 2011)
The second osteotomy is made in the superior pubic ramus with the location of the cut being just medial to the iliopectineal eminence. Subperiosteal elevation is performed, and blunt Hohmann retractors are placed superiorly and inferiorly for protection of the obturator nerve and vessels lying just on the other side of the pubic bone. A pointed Hohmann retractor can be placed further medial into the ramus to allow at least 1 cm bone substance between the planned osteotomy and the hole of the impacted retractor. This will help to avoid fissuring of this bone bridge, losing purchase of the retractor before the osteotomy is completed. A 15 mm Lexer osteotome is then used to osteotomize the ramus with a cut that runs perpendicular to the long axis of the ramus but is inclined 45° medially. With enlarging the cut to 2 mm in the cis cortex, fissuring of the medial part of the pubis is further prevented. Before advancing the osteotome, the position of the retractors at the opposite side should be checked for optimal protection; ideal is to cut against the retractors. The second osteotomy is complete when the levering osteotome creates a visible gap.
The remaining three osteotomies are performed through the supra-acetabular region and posterior column. To perform these cuts, further dissection of the quadrilateral surface, and tunnelling of the lateral side of the iliac wing, is required. The periosteum medial to the iliopectineal eminence is opened, and elevation of the periosteum and soft tissue should be performed. This occurs in a medial and inferior fashion over the quadrilateral plate, and the use of curved elevators facilitates this preparation. One key point is to limit the elevation back only as far as the greater sciatic notch but not into this area, preserving the periosteum prevents slippage of instruments into the foramen. This increases the stability of the reversed Hohmann retractor, which is now placed on the ischial spine. In cases where the PAO is being made for retroversion, the surgeon may find that the access to the quadrilateral plate is easier due to the orientation of acetabulum and spine. Preparation of the lateral aspect of the ilium should be limited to a space large enough to place a second reversed Hohmann retractor; the tip is placed into the greater sciatic notch (Fig. 3). The gluteus minimus muscle fibers are sharply elevated off the external iliac wing creating a tunnel for the Hohmann to be placed back as far as the greater sciatic notch to protect the sciatic nerve. An important part of the dissection is to elevate a tunnel 3 cm wide limiting the distal dissection leaving the distal 3 cm untouched. In doing so, the remaining attachment of tensor fasciae latae is preserved , and the distal origin of gluteus minimus on the acetabular fragment remains undisturbed. The value of limiting the distal/inferior dissection is that the supra-acetabular branch of the superior gluteal artery runs within this muscle and will be an important supply to the acetabular fragment once mobilized.
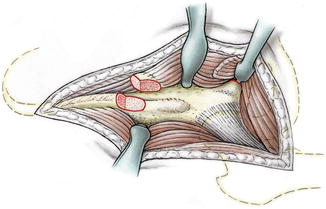
Fig. 3
Schematic after completion of the approach. A reverse Hohmann retractor sits medially on the ischial spine, retracting the iliacus and obturator internus muscle medially, giving view to the quadrilateral space. A second reverse Hohmann retractor is introduced from the outside into the sciatic foramen to protect the sciatic nerve
The third and fourth supra-acetabular and retroacetabular osteotomies proceed sequentially with the supra-acetabular cut being made starting just inferior to the ASIS osteotomy site (Fig. 4). The direction of the cut is made perpendicular to the recumbent patient, heading posteriorly toward the pelvic brim. This osteotomy should stop 1.5 cm anterior to the pelvic brim. To facilitate the cut, prescoring of the line of the osteotomy on the medial aspect of the ilium should be made with a straight Simal osteotome prior to the formal osteotomy. At the end of the planned supra-acetabular osteotomy, the direction changes to begin the posterior osteotomy. The direction changes by approximately 110–120° as the posterior cut is made inferiorly along the posterior column. This angle and apex can vary as per patient morphology, but always the cut is made at a distance of approximately 1.5 cm anterior to the posterior margin of the posterior column. Both osteotomies are performed with a reversed Hohmann retractor placed within the lateral “tunnel” heading posteriorly back to include the greater sciatic foramen, protecting the lateral soft tissues and sciatic nerve. The supra-acetabular cut is made with an oscillating bone saw following the planned score in the ilium. At this point, a curved Simal osteotome is used to create the beginning of the posterior cut at the angle of 110–120°; this part of the posterior cut should end at least 1.5 cm anterior to the greater sciatic foramen (Fig. 5). The osteotome is directed to cut the outer cortex at the same level. It is not completed before the next branch along the quadrilateral surface is osteotomized using a straight Simal osteotome heading along the posterior column, 1.5 cm anterior to the posterior margin and ischial spine (Fig. 6). This cut usually only needs to be between 30 and 40 mm and does not need to connect immediately with the first ischial ramus cut because this bone will soon be fractured in a controlled fashion. Only thereafter the cut produced by the curved osteotome is completed with separating the outer cortex.
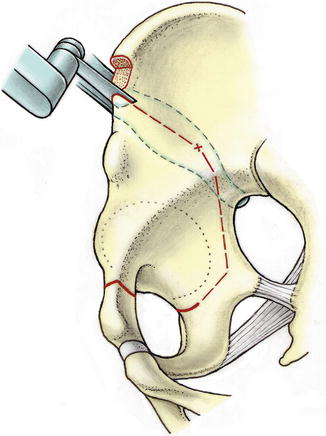
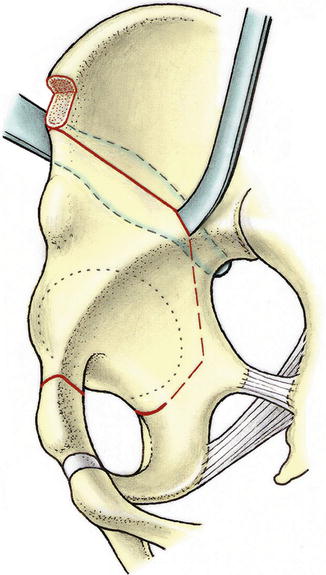
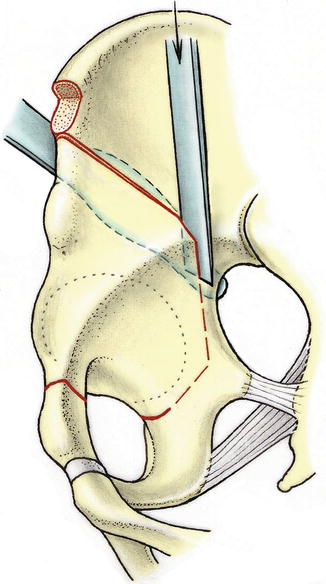
Fig. 4
Supra-acetabular osteotomy with the oscillating saw, starting just distal to the osteotomy of the ASIS. It stops about 1 cm from the pelvic brim
Fig. 5
A curved Simal osteotome is used to cut through the lateral cortex. The sciatic nerve is protected with the reversed Hohmann retractor
Fig. 6
Course of the straight Simal osteotome about 1.5 cm anterior to the posterior margin of the quadrilateral plate (Reprinted with permission from SLACK Incorporated: RANAWAT, Anil (MD). KELLY, Bryan T. (MD). Musculoskeletal Examination of the Hip and Knee: Making the Complex Simple. Thorofare, NJ; Slack Incorporated: 2011)
The bone density and strength of the acetabulum and ischial spine means that keeping the posterior cut between these two structures allows the controlled fracture to pass predictably between these two structures. To perform the controlled fracture, a 15 mm Lexer osteotome is placed within the second part of the posterior osteotomy, and by pulling the handle of the instrument anteriorly, an anterior directed force is applied, fracturing the remaining posteroinferior bone bridge. If this maneuver is unsuccessful with moderate force, then the posterior osteotomy will need to be extended. Because the original ischial ramus osteotomy aims to completely cut the medial surface but only score the lateral aspect of the ramus, there is a retained bone bridge posteroinferiorly between ischial and posterior osteotomies. It is this bone that may require additional attention, and completion of the osteotomy may require that this is cut with an osteotome.
To aid in this additional extension of the posterior cut, a Schanz screw is placed into the AIIS with a universal chuck connected serving as a handle. A large toothed laminar spreader is placed superiorly in the supra-acetabular osteotomy. With a pulling force on the handle of the Schanz screw and opening of the spreader, a distal–lateral moment is created, causing the acetabulum to rotate in that direction. This should make the quadrilateral surface more easily visible to allow the introduction of “special” angled osteotomes into the posterior osteotomy. This must be 4 cm below the pelvic brim, and the angle of the cut is made at 50° to complete the posterior cut through the retained posteroinferior bone bridge. During the completion of the posterior osteotomy, gentle hammer blows on the angled osteotome are made. Attention to loss of resistance is important as these cuts have to potential to injure the sciatic nerve if repeated blows through already completed bone cuts are made. As during the first ischial cut, decreasing the hip flexion together with increasing the knee flexion will relax the sciatic nerve. Signs of loss of bone resistance at the osteotome, less tension on the Schanz crew, and loosening of the laminar spreader indicate sufficient disengagement of the acetabular fragment. The osteotomy of the remaining posteroinferior bone bridge is completed with a controlled fracture by rotating the Schanz screw medially while externally rotating the laminar spreader (Fig. 7).
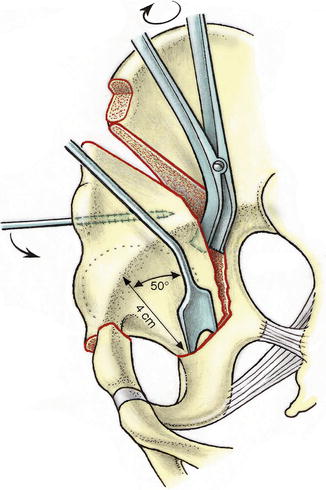
Fig. 7
Execution of the infra-acetabular osteotomy and maneuver to mobilize the acetabular fragment (Reprinted with permission from SLACK Incorporated: RANAWAT, Anil (MD). KELLY, Bryan T. (MD). Musculoskeletal Examination of the Hip and Knee: Making the Complex Simple. Thorofare, NJ; Slack Incorporated: 2011)
With the acetabular fragment free, correction can now be performed. Depending on the severity of dysplasia, correction of the deficiency is made by rotation of the acetabular fragment around the femoral head. This will work in the cases without substantial lateralization; however, if the femoral head does lie more laterally than usual, the joint and acetabular fragment should be medialized to correct for this. The most common form of deficiency in dysplasia is anterolateral loss of coverage which requires an anterior correction with internal rotation of the acetabular fragment. The correction is temporarily held with 2.5 mm threaded tipped K-wires from the ilium into the fragment. Preoperative assessment of the radiographs will help identify posterior deficiency (acetabular retroversion), which can occur in up to 15 % of dysplastic cases. The aim of the correction is to have an adequate acetabular roof angle (0–10°) with the posterior and anterior walls meeting at the lateral edge of the acetabulum, i.e., no crossover sign, and the femoral head sitting neutrally, not too medial as seen by the medial head being lateral to the ilioischial line. Inexperienced surgeons may be at risk of several errors. On attempting correction, the presence of a gap in the supra-acetabular region is generally considered a sign of “hinging” and an incomplete osteotomy/retained posteroinferior bone bridge that requires further completion (Fig. 8). In an attempt to get lateral coverage, the acetabular roof should never be placed at an angle past the horizontal (0°). Also in trying to achieve anterolateral coverage, there is a risk of retroverting the acetabulum and generating anterior impingement. It may require several redirection attempts until the ideal spatial orientation of the acetabulum is achieved. At this stage, a “T capsulotomy” is performed. Any prominence of the femoral head neck junction can be addressed concurrently as can labral surface tears, ganglions, or rim fragments requiring removal or refixation. Visualization of the joint during motion can be done, looking for impingement. Flexion past 90° and balanced internal and external rotation are ideal.
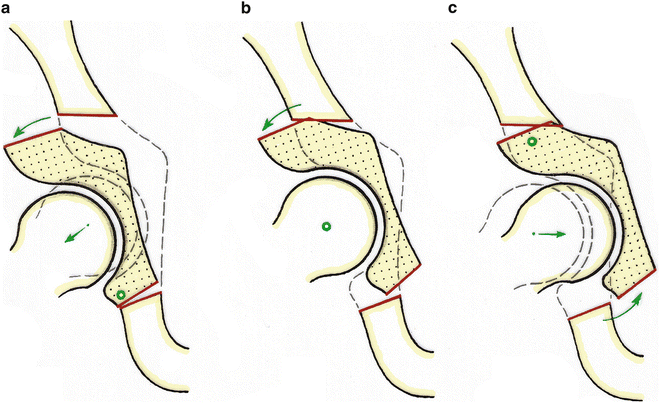
Fig. 8
(a) Inferior hinge (green circle) in the case of incomplete inferior osteotomy. The center of rotation is lateralized. (b) Rotation of the fragment around the femoral head center. The center of rotation remains anatomical. (c) Superior hinge leading to medialization of the fragment
If the surgeon achieves the desired correction radiographically and on intraoperative assessment of the articulation, then definitive fixation is performed with three 3.5 mm screws. Two are directed from superiorly in the ilium into the acetabular fragment, with a third critical screw from the AIIS aimed at the sacroiliac joint, this screw gaining excellent purchase in the bone of the “sciatic buttress.” The rotation of the fragment often leaves a prominent piece of bone anteriorly which should be trimmed and then placed within the supra-acetabular defect as bone graft. The capsulotomy, if performed, is loosely closed with absorbable sutures, and the rectus femoris direct head is reattached to the AIIS with transosseous nonabsorbable sutures. The ASIS osteotomy is fixed with a 2.7–3.5 mm screw with closure of the soft tissues in layers with superficial drains. Deep drains are avoided because at the completion of the osteotomy, large bare areas of cancellous bone are exposed, and deep drain placement could allow for the patient to lose an undesired amount of blood.
In the setting of an additional femoral osteotomy, it has to be decided before surgery whether this should be executed before or after the PAO. In the case of a high-riding trochanter, the femoral procedure has to be completed before; otherwise, the trochanter may limit the optimal acetabular correction. This is best performed in a lateral decubitus. However, the patient can be prepared and draped in such a way that changing the patient into supine position is possible without redraping. After trochanteric advancement and relative neck lengthening, the lateral approach can be used to perform the first ischial cut of the PAO under visual control of the sciatic nerve. Femoral neck or head osteotomies are also best performed before the PAO. Femoral derotation or intertrochanteric varus osteotomies can be performed before or after the PAO [39].
Postoperative Rehabilitation
Immediately post operation, the patient has their leg held in a foam splint in extension and neutral rotation. The patient has routine postoperative blood analysis and removal of drains on day 1–2 coinciding with dressing changes. The patient will mobilize either day one or two depending on comfort. During mobilization, crutches are used to allow touch-weight bearing for a total of 6 weeks. During the first 6 weeks of rehabilitation, active hip flexion with the knee extended is discouraged; this allows time for the disrupted rectus femoris to heal. At the 6-week follow-up, a radiograph is taken to assess bone healing; if adequate, then increased weight bearing and abductor strengthening can commence. Additional follow-ups are scheduled as needed.
Related posts:
 Neuromuscular Hip Disorders: Focus on Cerebral Palsy
 Femoral Deformities: Varus, Valgus, Retroversion, and Anteversion
 Surgical Technique: Arthroscopic Labral Management
 Surgical Technique: Open Proximal Hamstring Repair
 Subspine Impingement and Surgical Technique
 Atraumatic Instability and Surgical Technique
Stay updated, free articles. Join our Telegram channel

Full access? Get Clinical Tree


