Fig. 1
The patient is positioned as distal on the table as allowable to facilitate two teams, one approaching and preparing the hip and one harvesting the fibula
The hip is approached through a curvilinear incision over the lateral aspect of the affected hip. The incision is approximately 10–15 cm in length and is directed convex anterior. This incision is placed such that the lateral femoral circumflex vessels are centered proximal to distal. These donor vessels are located approximately 10 cm distal to the anterior superior iliac spine (Fig. 2). With respect to anteroposterior placement of the incision, it must be positioned such that the microvascular work (anterior) and the hip reaming (posterior) can be performed through the same incision. This requires surface identification of the anterior and posterior borders of the proximal femur and the vastus ridge. The anterior margin of the incision is placed approximately 2 cm anterior to the anterior border of the femur with one-third of the incision superior to the vastus ridge and two-thirds inferior. This incision can be easily drawn by the operating surgeon placing his long finger on the vastus ridge with the tip of the finger 2 cm anterior to the anterior margin of the femur and the index finger superior. With the fingers maximally abducted, a line drawn connecting the fingertips corresponds with the desired skin incision [33].
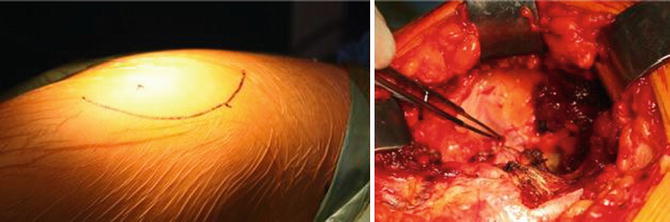
Fig. 2
The hip is approached through a 10–15 cm convex anterior curvilinear incision over the lateral aspect of the affected hip. The lateral femoral circumflex donor vessels are located approximately 10 cm distal to the anterior superior iliac spine
After the skin incision, a variation of the Watson-Jones approach to the hip is used with dissection continuing in the interval between the tensor fascia latae and the gluteus medius. The fascia is incised in a curvilinear fashion directed convex posterior. A four-quadrant retractor is placed to assist with visualization of the deep structures. The anterior and posterior limbs are placed over the cut edges of the fascia, the superior limb is placed around the substance of gluteus medius, and the inferior limb is placed on the skin. The vastus lateralis and vastus intermedius are identified originating from the vastus ridge. The donor vessels can now be visualized anterior to the vastus intermedius in the interval between vastus intermedius and rectus femoris. The ascending branch of the lateral femoral circumflex artery and its two veins typically run obliquely cephalad at a 45° angle at a distance of 10 cm distal to the anterior superior iliac spine (Fig. 2).
Once the donor vessels are identified and can be appropriately protected, the vastus lateralis is sharply elevated to expose the lateral aspect of the proximal femur. An L-shaped incision is used with a longitudinal limb posteriorly and a transverse limb at the level of the vastus ridge. As the vastus intermedius is encountered anteriorly, a right-angle clamp and Metzenbaum scissors are used to safely release its attachments from the proximal femur and to avoid injury to the donor vessels. The complete reflection of the vastus intermedius provides a trough for the donor vessels during the later microvascular anastomosis. The vastus lateralis and vastus intermedius muscles are then secured to the anterior skin edge and placed deep to the inferior limb of the four-quadrant retractor.
The donor vessels can now be clearly seen lying within the aponeurotic falx of the rectus femoris anteriorly. The ascending branch of the lateral femoral circumflex artery and its two veins are carefully dissected out under loupe magnification. The smaller side branches of the vessels are ligated with small vascular clips such that a pedicle of at least 4 cm is obtained for later anastomosis. Typically, there is sufficient pedicle length if the vessels reach halfway up to the anticipated entry site of the fibula. The hip wound is copiously irrigated and the four-quadrant retractor is removed for preparation of the femoral head.
Preparation of the femoral head is done with the aid of c-arm fluoroscopy. The c-arm fluoroscope is draped sterilely and positioned over the patient like an arch. It is canted cephalad slightly to allow the surgeon a greater working space. The ability to obtain true anteroposterior (AP) and frog-leg lateral views is confirmed prior to beginning preparation of the femoral head. With fluoroscopic guidance, a 3 mm sharp-tipped guide pin is placed into the center of the ON lesion. The starting point for this pin is approximately 2 cm distal to the vastus ridge at the junction of the middle and posterior thirds of the proximal femur. Care is taken to avoid making the entry point too distal as encroachment on the high-stress subtrochanteric region will increase the risk of fracture.
Once correct pin placement is confirmed on AP and lateral fluoroscopic views, the guide pin is overdrilled with a cannulated 8 mm drill bit. The sharp-tipped guide pin is exchanged for a blunt-tipped guide pin that is sequentially over-reamed with a series of specialized straight reamers beginning at 10 mm in diameter. These reamers are available in 13, 16, 17.5, 19, and 21 mm and they are sequentially used up to the size of the harvested fibula. The reaming is performed up to 4 mm from the subchondral plate using live fluoroscopy. The healthy bone that is collected in the flutes of the reamer is saved for later bone grafting while obviously necrotic bone is discarded. Similarly, a filtered suction device is used to collect bone fragments generated by the reaming from the core. The scrub nurse fashions this collected bone into “bullets” on the back table for later grafting.
After the final size-matched straight reamer is used, the guide pin is removed and a ball-tipped reamer is placed to remove the remaining area of necrotic bone. These reamers allow the creation of a bulbous cavity and are best used with the assistance of fluoroscopy. Radiographic contrast is used to evaluate the adequacy of the excavation of the ON lesion (Fig. 3).
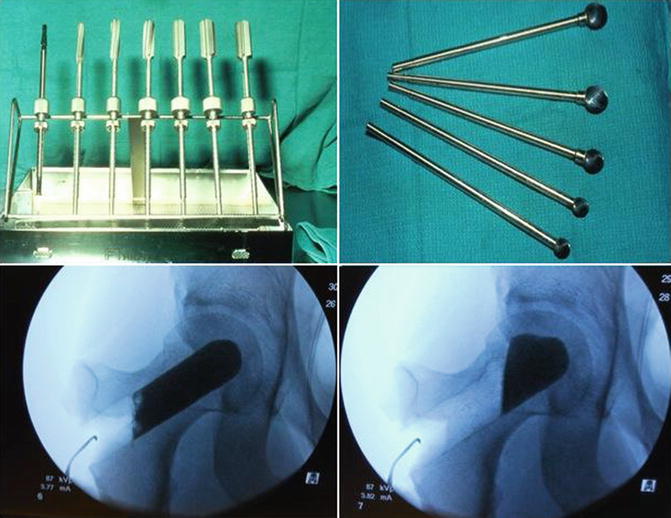
Fig. 3
Straight and ball-tipped reamers are used to remove necrotic bone. Radiographic contrast is used to evaluate the adequacy of the excavation of the osteonecrotic lesion
Cancellous bone is harvested from the greater trochanter through the lateral entry point using a large curet. This bone is kept separate from the bone graft obtained from the reamings. Long DeBakey forceps are used to place this bone graft into the cavity created within the femoral head. The Urbanipactor, a specialized impaction instrument designed for this procedure, is used to impact the bone graft. After placing the cancellous bone graft within the cavity, the Urbanipactor is fully inserted and its position is verified with fluoroscopy. The remaining cancellous bone graft and the bullets are placed within the core of the Urbanipactor and the specialized drill bit is used to disperse the graft within the cavity (Fig. 4). Graduated circumferential markings on the outside of the Urbanipactor are utilized to measure the depth of the core to determine the length of the fibular graft. The Urbanipactor is then removed and radiographic contrast medium is reinjected to confirm adequate bone grafting of the cavitary defect (Fig. 5).
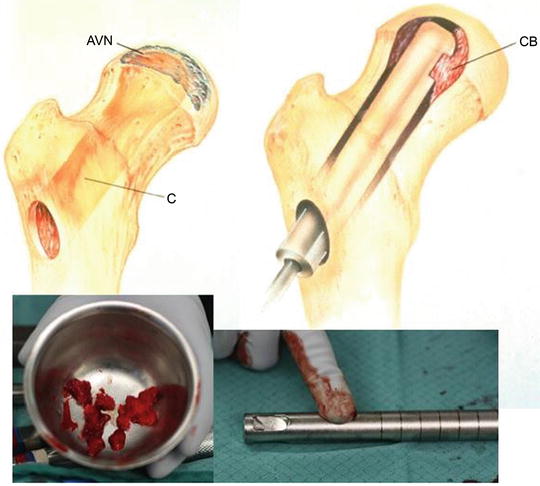
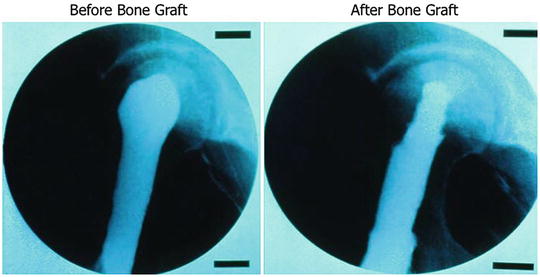
Fig. 4
Cancellous bone graft and bullets are placed within the core of the custom-made bone impactor, which disperses the graft within the cavity [34]
Fig. 5
Radiographic contrast medium is reinjected to confirm adequate bone grafting of the cavitary defect
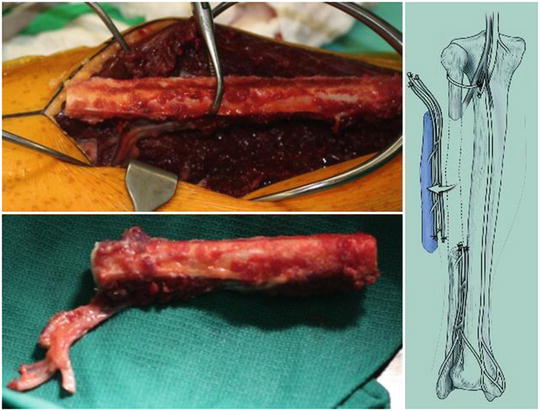
The fibular graft is harvested at the same time as the hip preparation. The lower extremity is exsanguinated with an Esmarch bandage and a thigh tourniquet is inflated to 350 mmHg. A line is marked on the skin connecting the fibular head with the lateral malleolus. The proximal and distal 10 cm of fibula are marked and care is taken to preserve both the proximal and distal tibiofibular joints over this distance. Typically, this leaves approximately 15 cm of the central portion of the fibula available for harvest. The skin is incised over the sulcus between the lateral and posterior compartments of the leg with maintenance of full-thickness skin flaps. The fascia of the lateral compartment is incised longitudinally in line with the peroneal tendon with care to protect the superficial peroneal nerve. The peroneal muscles are reflected anteriorly off the posterior intermuscular septum. The lateral aspect of the fibula is palpable deep to the peroneal muscles. Two large Gelpi retractors are placed to demonstrate this interval and maintain tension of the peroneal muscles as they are sharply reflected off of the fibula. A thin 1–2 mm layer or muscle is left with the fibula (“marble-izing”) in order to preserve the periosteal blood supply to the fibula. Dissection is continued from posterior to anterior until the anterior intermuscular septum is encountered.
A #15 scalpel is used to divide the anterior intermuscular septum approximately 1–2 mm off of the fibula. The anterior compartment musculature is then encountered and bluntly dissected off of the fibula with Metzenbaum scissors and DeBakey forceps. The interosseous membrane is then easily visualized as are the anterior tibial artery and the deep peroneal nerve. The neurovascular structures are protected while the interosseous membrane is released from the fibula with the use of a right-angle Beaver blade (Fig. 6).
 Athletic Populations of Interest in Hip Arthroscopy and Hip Preservation Surgery
Nerve Injuries Around the Hip
Selective and Image Guided Injections Around the Hip and Pelvis
Surgical Technique: Resection Arthroplasty
Femoral Head Fractures
Surgical Technique: Osteochondral Autograft Transfer and Osteochondral Allograft Transplant for Preservation of the Femoral Head and Acetabulum
Athletic Populations of Interest in Hip Arthroscopy and Hip Preservation Surgery
Nerve Injuries Around the Hip
Selective and Image Guided Injections Around the Hip and Pelvis
Surgical Technique: Resection Arthroplasty
Femoral Head Fractures
Surgical Technique: Osteochondral Autograft Transfer and Osteochondral Allograft Transplant for Preservation of the Femoral Head and Acetabulum


Related posts:
Athletic Populations of Interest in Hip Arthroscopy and Hip Preservation Surgery
Nerve Injuries Around the Hip
Selective and Image Guided Injections Around the Hip and Pelvis
Surgical Technique: Resection Arthroplasty
Femoral Head Fractures
Surgical Technique: Osteochondral Autograft Transfer and Osteochondral Allograft Transplant for Preservation of the Femoral Head and Acetabulum
Stay updated, free articles. Join our Telegram channel
Full access? Get Clinical Tree
