Author
Number of procedures
Results
Miller et al. [6]
1
Immediate pain relief, 2.5 years post-op no pain yet decreased sensation over the posterolateral aspect of thigh
Vandertop and Bosma [3]
1
4 years post-op, doing well
Chen [7]
1
Pain resolved in 1 week. Motor weakness of the ankle extensors and toes for 3 months. 4 years post-op asymptomatic
Hughes et al. [8]
5
At 1 year: (1) No pain, slight residual tenderness in buttock, (2) asymptomatic, (3) no pain, slight residual tenderness in buttock, (4) no pain, (5) excellent
Sayson et al. [9]
1
6 months post-op: no pain
Benson and Schutzer [4]
15
2 years post-op: 11 excellent, 4 good
Meknas et al. [10]
12
No pain decrease at 6 months. 8 years post-op: significant decrease in pain
Filler et al. [2]
64
2 years post-op: excellent: 59 %, good: 23 %, no benefit: 17 %, worse: 2 %
Lewis et al. [11]
4
2 months post-op: 3 excellent, 1 still experiencing pain
Issack et al. [12]
10
1 year post-op: partial to complete relief of radicular pain, of diminished sensation, and of paresthesias
Young et al. [5]
44 hamstring
53 months post-op: 33 satisfied, 5 somewhat satisfied, 6 not satisfied
Beauchesne and Schutzer [13]
1
Immediate pain relief, residual numbness and limp resolved in 4 weeks
Jones et al. [14]
1
Immediate pain relief, 6 weeks post-op: complete resolution of symptoms
Endoscopic Decompression
Endoscopy is an effective approach for the treatment of deep gluteal syndrome [15]. Advantages of endoscopy include minimally invasive procedure, magnified view of the sciatic nerve, and potential to evaluate the entire deep gluteal space from the sciatic notch to the proximal thigh, including sciatic nerve biomechanics. Dezawa et al. first reported on six cases of endoscopic piriformis muscle release [16]. Martin et al. reported an endoscopic technique for sciatic nerve decompression in 35 patients presenting with deep gluteal syndrome [15], and this technique has been utilized internationally [17].
The supine technique is utilized and modified by positioning the orthopedic table in maximal contralateral patient tilt. The supine position, as opposed to prone, allows for manual manipulation of the lower limb at the knee and hip joints for the full assessment of sciatic nerve kinematics. A relative contraindication for sciatic nerve decompression in this supine technique is knee recurvatum, considering the increased strain on the sciatic nerve. Nerve conduction and EMG are usually monitored intraoperatively and can demonstrate immediate improvement or change post-release. Mild acute changes in nerve conduction during the course of surgery may be observed due to fluid accumulation over time. For deep gluteal space visualization, a 70° high-definition long arthroscope with adjustable and lengthening cannulas is utilized [15]. The cannulas are opened to maintain the fluid flow, when utilizing the radiofrequency probe [18]. Fluid pressure is set to 60 mmHg with intermittent pressure increases up 80 mmHg. Three portals are utilized: anterolateral, posterolateral, and an auxiliary posterolateral portal positioned 3 cm posterior and 3 cm superior to the greater trochanter (Fig. 1) [15, 19]. Frequent use of intraoperative fluoroscopy will confirm the proper location of the endoscopic view.
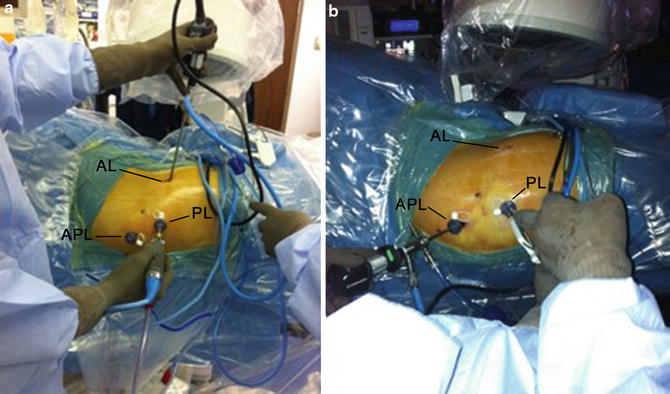
Fig. 1
Portal placement. (a) Use of long scopes from the anterolateral (AL) portal and shaver through the posterolateral (PL) portal. APL auxiliary posterolateral portal. (b) The arthroscope can be also positioned in the auxiliary posterolateral portal (APL) during the procedure (Reprint with permission TIO [19])
A “10-step technique” allows for a complete sciatic nerve assessment and safe nerve decompression in the deep gluteal space. The starting position [20] is shown in Fig. 2, and once orientation has been established, the arthroscope is rotated to allow proximal viewing. Step 1: Inspect the peritrochanteric space and perform a greater trochanteric bursectomy [21], utilizing the anterolateral and posterolateral portals with the hip in neutral position (Fig. 3). Utilize the arthroscopic shaver for the bursectomy, releasing fibrous bands until the quadratus femoris is identified. Replace the shaver with the blunt probe and release any fibrous bands at the level of the quadratus femoris. Step 2: Identify the quadratus femoris muscle and the sciatic nerve with the hip in internal rotation (Fig. 4). Step 3: Evaluate the sciatic nerve color, epineural blood flow, epineural fat, and nerve motion. Normal sciatic nerve appearance (Fig. 5a) will have noticeable epineural blood flow and epineural fat and normal motion with internal/external rotation gliding along the border of the external rotator muscles. An abnormal sciatic nerve (Fig. 5b) will appear white resembling a shoestring and will not move with rotation and feel tight with probing. With deep hip flexion and external rotation, check for greater trochanteric impingement (Fig. 5c). In cases of sciatic nerve entrapment by the greater trochanter or ischium, greater trochanteric osteoplasty or osteotomy may be a consideration. Step 4: Identify the vascular branches penetrating the sciatic nerve anteriorly just proximal to the quadratus femoris muscle (Fig. 6a). These branches originate from inferior gluteal artery, medial circumflex, and first perforating femoral artery and may sometimes reach the sciatic nerve on its posterior surface (Fig. 6b). Step 5: Endoscopic neurolysis of the sciatic nerve. This step requires gentle dissection of the fibrous bands in the area of the nerve along its course in the deep gluteal space. Utilize a blunt probe for dissection while probing the sciatic nerve to protect the perineural sheath. Some fibrous bands may extend down from the greater trochanteric bursa to the sciatic nerve [15]. Fibrovascular scar bands are often present, which will require cauterization prior to release, utilizing arthroscopic scissors. In cases when the fibrovascular bands are thick and clustered, resembling a bird’s nest, combinations of cauterization and ligature may be necessary [15]. Step 6: Rotate the arthroscope for distal viewing and inspect the sciatic nerve at the ischial tunnel, hamstring origin, and sacrotuberous ligament (Fig. 7), releasing any fibers from the sciatic nerve. Step 7: Rotate the arthroscope for proximal viewing and identify the obturator internus muscle and tendon (Fig. 8). Release fibrous bands and probe and check for the relation between the sciatic nerve and obturator internus tendon, which may penetrate the sciatic nerve. Step 8: Move the long scope to the auxiliary or posterolateral portal when required (usually in larger patients). Identify the branch of the inferior gluteal artery, which crosses posterior to sciatic nerve distal to the border of the piriformis muscle. This branch must be cauterized or ligated (when larger than 2 mm using 4/0 PDS) and released before the inspection of the piriformis muscle and tendon (Fig. 9a, b). A recent study reported a mean distance of 8 mm (4–14 mm) between the sciatic nerve and the crossing branch of the inferior gluteal vessel [18]. The same study evaluated the fluid temperature during activation of a monopolar radiofrequency device around the sciatic nerve [18]. The temperature profile was safe to the sciatic nerve during the tested activation times of 3, 5, and 10 s (Tables 2 and 3). The standard approach to vessel cauterization is a? three-second interval of radiofrequency activation, maintaining continuous irrigation. Ten seconds is three times longer than standard activation time. For vessels larger than 2 mm, a ligature (Fig. 10) is utilized rather than longer activation time. Step 9: Identify and resect the piriformis muscle and tendon. The tendon is often hidden under the belly of the muscle which will require probing under the piriformis or shaving the distal border if necessary. The utilization of arthroscopic scissors for tendon release pulling the scissors toward you adds safety and ensures that only the tendon is released (Fig. 11). Any time the shaver or scissors are utilized in the vicinity of the sciatic nerve, a curved probe can be used for sciatic nerve retraction and safety. Following tendon resection, shave the tendinous stump back 1–2 cm. Step 10: Probe the sciatic nerve for tension and look for hidden muscle or tendon branches traversing the nerve. Perform the dynamic testing of sciatic nerve kinematics probing the nerve during hip internal and external rotation with flexion and extension. Cautiously probe the sciatic nerve up to the sciatic notch and confirm the location with fluoroscopy. Carefully note that the superior gluteal neurovascular structures exit the sciatic notch superior to the piriformis muscle. Using the curved probe, thoroughly explore the retrosciatic region to identify and release any ancillary musculotendinous branches that may be binding the nerve (Fig. 12). Internal and external rotation of the hip is helpful to identify these branches. Any restriction of nerve motion should suggest a penetrating branch, intrapelvic entrapment, or osseous abnormality.
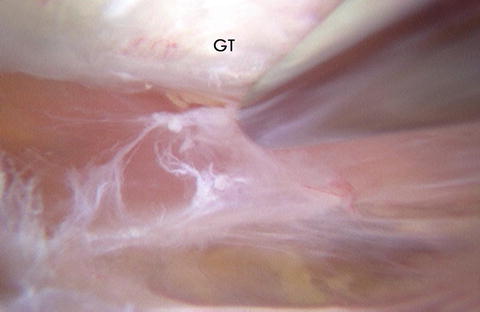
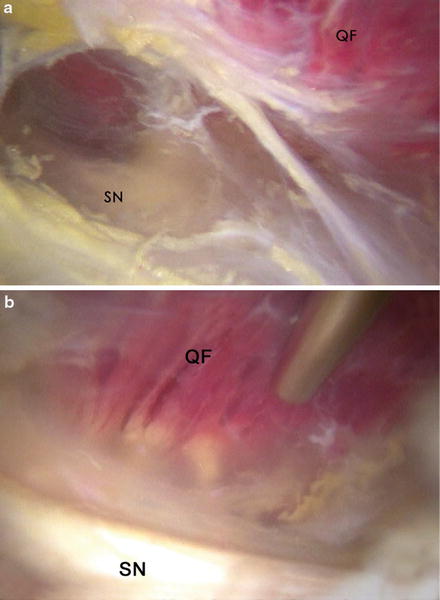
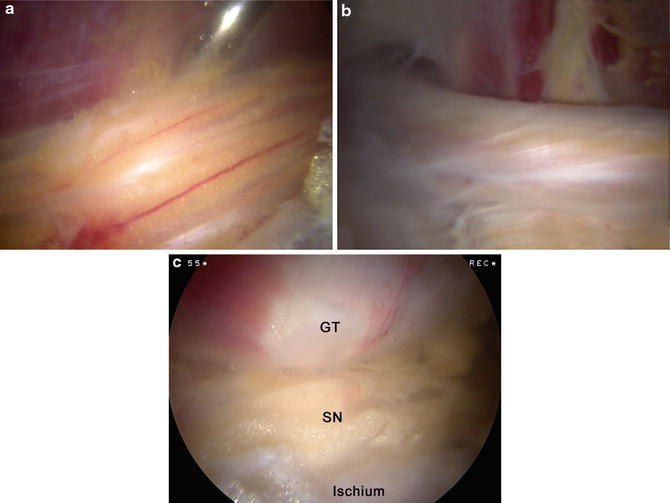
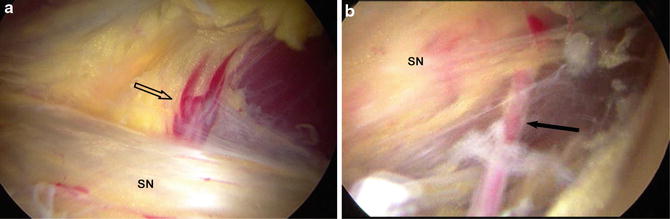
Fig. 2
Starting position and orientation. Establish orientation within the peritrochanteric space based upon anatomical landmarks. The 70° arthroscope is initially looking distal, oriented like a flag with the light cord proximal along with the lens focus distal (Reprint with permission from Slack Inc. [20])
Fig. 3
The first step of the deep gluteal space endoscopy includes the greater trochanteric bursectomy. The bursa and fibrous bands are resected utilizing a shaver before identifying the quadratus femoris muscle. GT greater trochanter
Fig. 4
Identification of the quadratus femoris muscle and sciatic nerve. (a) Internal rotation of the hip allows the visualization of the quadratus femoris muscle (QF) and sciatic nerve (SN). (b) Focused view of the sciatic nerve and quadratus femoris muscle
Fig. 5
Sciatic nerve inspection. (a) Normal sciatic nerve appearance with presence of blood flow and epineural fat. (b) Abnormal sciatic nerve with white shoestring appearance and no epineural fat. (c) Assessment of sciatic nerve (SN) compression between the greater trochanter (GT) and ischium
Fig. 6
 Neuromuscular Hip Disorders: Focus on Cerebral Palsy
 Femoral Deformities: Varus, Valgus, Retroversion, and Anteversion
 Surgical Technique: Arthroscopic Labral Management
 Surgical Technique: Endoscopic Gluteus Medius Repair
 Introduction to Static and Dynamic Overload of Hip Pathology
 Atraumatic Instability and Surgical Technique


Inspection of the vascular supply to the sciatic nerve. (a) Vascular supply (open arrow) reaching the sciatic nerve (SN) on its anterior surface. (b) Vessel accessing the sciatic nerve posteriorly (arrow)
Related posts:
Neuromuscular Hip Disorders: Focus on Cerebral Palsy
Femoral Deformities: Varus, Valgus, Retroversion, and Anteversion
Surgical Technique: Arthroscopic Labral Management
Surgical Technique: Endoscopic Gluteus Medius Repair
Introduction to Static and Dynamic Overload of Hip Pathology
Atraumatic Instability and Surgical Technique
Stay updated, free articles. Join our Telegram channel
Full access? Get Clinical Tree
