Fig. 1
Arthroscopic view of the hip joint from the anterolateral portal. The cannula is in the anterior portal. At the 3 o’clock position on the acetabulum, significant inflammation and an unstable labrum are observed. The iliopsoas crosses behind the labrum at the 3 o’clock position
Imaging
Most studies report that diagnostic imaging provides little insight into the diagnosis of iliopsoas pathology. Despite this, X-rays, ultrasounds, and MRIs are frequently ordered to rule out affiliated hip pathology [4]. Radiographs are indispensible and can exclude osteoarthritis, impingement lesions, AVN, as well as other pathologies. The use of static/dynamic sonography of the iliopsoas tendon as well as bursography or tenography has been historically reported with various results. Presently, dynamic sonography has replaced both bursography and tenography. The patient’s ability to reproduce the snapping may be correlated to the frequency of pathologic findings on sonographic evaluation [10]. In addition to being cost-effective and noninvasive, sonography can be both diagnostic and therapeutic if an injection is used to alleviate symptoms. Much like its use in other aspects of medicine, results are heavily weighted on the experience of the examiner. Although MRI is very nonspecific for cases involving iliopsoas tendinitis, it is frequently utilized by clinicians due to the high incidence of associated intra-articular injuries [2].
Indications for Arthroscopic Release
Indications for iliopsoas release include tendinitis or “snapping” with pain that has failed conservative treatment and possibly atypical anterior labral pathology with significant inflammation at the anterior notch of the acetabulum in approximately the 2–3 o’clock position [1, 3, 5, 8, 11–13]. Patients should have failed injections and physical therapy before surgical release is indicated.
Surgical Techniques
Release from the Central Compartment
Arthroscopic iliopsoas tendon release from the central compartment is the most common method utilized. It can be performed as a component to a standard arthroscopic procedure. Traction is placed across the hip joint, and fluoroscopy is used to ensure that there is approximately 1 cm of distraction. A standard anterolateral portal, as described by Byrd, is established under spinal needle localization at the anterior superior corner of the greater trochanter (arthroscopic evaluation and portal placement is discussed in other chapters). A 70° scope is inserted into this portal and the anterior hip capsule/triangle is visualized. A standard anterior portal is created under spinal needle localization. After completion of a standard transportal capsulotomy, the iliopsoas tendon is exposed. This is completed by extending the anterior capsulotomy to the 2–3 o’clock location on the acetabulum from the anterior portal with visualization through the anterolateral portal (Fig. 2). There is often a notch in the acetabulum/labrum at this position that corresponds to the location of the iliopsoas tendon. There is also a definitive distinction between the hip capsule and the shiny white longitudinal fibers of the iliopsoas. A knife can be used for the capsulotomy; however, it can occasionally be difficult to achieve the appropriate angle on the capsule at the 3 o’clock position. In these cases, a radiofrequency device can be used to release the capsule. With the iliopsoas now exposed (Fig. 3), the radiofrequency device can be used to release the iliopsoas fibers layer by layer. The release is completed once the muscular portion of the iliopsoas is visualized (Fig. 4).
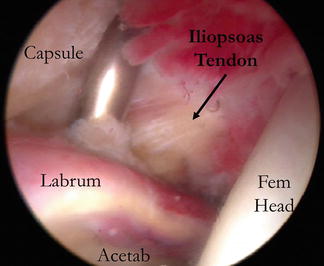
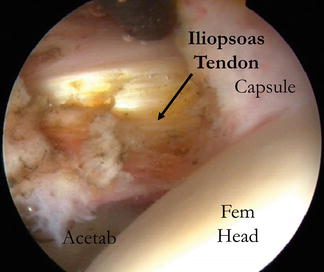
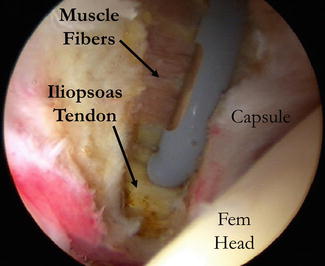
Fig. 2
Arthroscopic view from the anterolateral portal. The capsulotomy was extended to the 3 o’clock position on the acetabulum, and the iliopsoas tendon has been exposed
Fig. 3
Arthroscopic view from the anterolateral portal. The iliopsoas tendon has been exposed, and the release is initiated with an RF device from the anterior portal (black instrument)
Fig. 4
Arthroscopic view from the anterolateral portal with the RF device in the anterior portal. The iliopsoas tendon is being released with the exposure of the muscle portion of the iliopsoas behind in
Release from the Peripheral Compartment
Arthroscopic iliopsoas tendon release from the peripheral compartment can be completed without the use of traction (can also be done at the end of a standard arthroscopic procedure). This technique is a good option for the release of the iliopsoas tendon in the setting of a hip arthroplasty. A 70° or a 30° arthroscope can be used. The hip is flexed 30° and slightly externally rotated. The anterolateral portal can often be utilized to access the peripheral compartment at the anterior inferior femoral neck. However, occasionally an accessory portal is required that is slightly anterior and approximately 2 cm distal. Fluoroscopy is used to direct the spinal needle to the appropriate position at the anterior/inferior femoral neck. The cannulated trocar is then inserted. In a native hip, peripheral compartment landmarks can be visualized. These include the medial synovial fold (which represents the 6 o’clock position on the femoral neck), zona orbicularis, and the femoral head/neck junction (Fig. 5). However, in the setting of a hip arthroplasty, these landmarks will be obscured secondary to scar tissue. In these cases, the medial collar of the prosthesis can serve as a useful landmark. In the release from the peripheral compartment, a mid-anterior portal (distal and lateral compared to a standard anterior portal) is established (Fig. 6). It is more functional and allows appropriate utilization of instruments. Once visualization is achieved, a capsulotomy just proximal to the zona orbicularis in the anterior aspect of the joint will reveal the iliopsoas tendon (Fig. 6). In the setting of hip arthroplasty, access can be more difficult. The capsule is often scarred to the prosthesis and distension with a spinal needle can be difficult. In these cases it is best to use fluoroscopy to locate the head/neck junction. Use the trocar to probe this area under fluoroscopic guidance. Once palpation and X-ray confirm the appropriate location, insert the scope extracapsular. Use triangulation and a spinal needle to establish an additional anterior portal. The shaver can then clear some of the adhesions from the extra-articular portion of the capsule. An RF device can then be used to create a portal or a small capsulotomy in the anterior capsule. The scope can then follow this path into the peripheral compartment (Fig. 7). The first landmark exposed is the femoral neck. The iliopsoas can be difficult to identify in these cases secondary to significant fraying and adherence to the capsule. Once it is visualized and palpated (the iliopsoas will have increased tension across it comparted to capsular tissue), it can then be released with the use of a radiofrequency device again exposing the muscle layer behind it (Figs. 8 and 9).
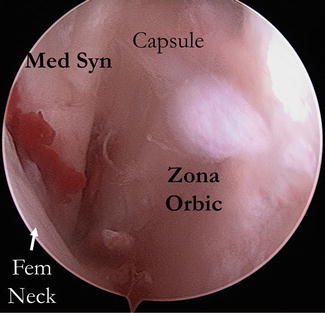
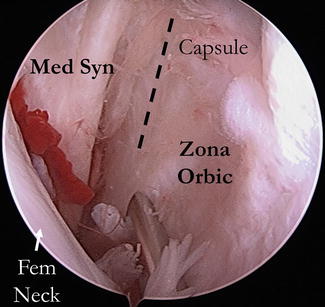
Fig. 5
Arthroscopic view from the anterolateral portal into the peripheral compartment of the hip. The femoral neck (fem neck), medial synovial fold (med syn), and the zona orbicularis (zona orbic) can be identified
Fig. 6
 Neuromuscular Hip Disorders: Focus on Cerebral Palsy
 Femoral Deformities: Varus, Valgus, Retroversion, and Anteversion
 Surgical Technique: Arthroscopic Labral Management
 Surgical Technique: Endoscopic Gluteus Medius Repair
 Subspine Impingement and Surgical Technique
 Atraumatic Instability and Surgical Technique


Arthroscopic view of the peripheral compartment. The spinal needle is localizing an appropriate new anterior portal that is more distal. The dotted line represents the location of the capsulotomy for exposure and release of the iliopsoas from the peripheral compartment
Related posts:
Neuromuscular Hip Disorders: Focus on Cerebral Palsy
Femoral Deformities: Varus, Valgus, Retroversion, and Anteversion
Surgical Technique: Arthroscopic Labral Management
Surgical Technique: Endoscopic Gluteus Medius Repair
Subspine Impingement and Surgical Technique
Atraumatic Instability and Surgical Technique
Stay updated, free articles. Join our Telegram channel
Full access? Get Clinical Tree
