26 Meniscal Injuries/Repair: BioStinger
Meniscal repair recognizes the importance of the meniscus in knee stability, load transmission, joint lubrication, and articular cartilage nutrition. After significant meniscus loss, degenerative knee changes develop. Several meniscal repair devices are available that facilitate an allinside repair.1 These devices are made from various biodegradable materials. One device, the BioStinger, is made of molded poly L-lactic acid (PLLA). Its cannulated design allows insertion over a needle trocar. It has four rows of molded barbs that hold the meniscus tissue and give a “ratchet” effect as the device is inserted into the meniscus giving the surgeon an immediate tactile feedback. The needle trocar reduces and positions the meniscus tear and permits consistent device insertion with a one-handed technique.
Indications
- Longitudinal, peripheral meniscal tears with a good blood supply. Suitable tears are located at the synovial meniscal junction or in the red/white region.
- Tear length: long tears cannot be accessed well with this technique, but tears between 1 and 2.5 cm are appropriate.
- Tears in the posterior medial or posterior lateral corner where other techniques might injure neurovascular structures
- Patients who do not wish to have any secondary incisions associated with the conventional meniscal repair
Contraindications
- Good meniscal blood supply is crucial; therefore, avoid repairs in older patients and horizontal cleavage tears.
- Longitudinal peripheral meniscal tears that have degenerative changes especially multiple bucket-handle configurations
- Degenerative articular cartilage change
- Allergy to lactic acid
Physical Examination
- Joint line tenderness
- McMurray’s test (or other meniscal tests) positive
- Effusion
Diagnostic Tests
- Physical examination
- Knee radiographs
- Magnetic resonance imaging (MRI) (sometimes indicated)
Special Considerations
The outside-in, single vertical suture is the “gold standard” for meniscal repair. Other techniques may approach the good results of this technique. Most repairable meniscal tears are found associated with anterior cruciate ligament (ACL) injury. The surgeon performing an ACL reconstruction should also be prepared to repair the meniscus. Healing rates for “isolated” meniscal repairs in stable knees are ~80%, whereas in knees undergoing ACL reconstruction healing rates can reach 90 to 95%. The BioStinger is made of molded PLLA with four rows of molded barbs and a central cannulation to facilitate insertion and meniscal repair device placement. It requires several years to become fully resorbed. No significant inflammatory reaction is expected. The BioStinger comes in 10-, 13-, and 16-mm lengths and slides over an insertion trocar needle that perforates the meniscus and reduces the tear before device insertion occurs.
Preoperative Planning and Timing of Surgery
Early intervention has not been demonstrated to improve the results, but avoiding continued injury to an already torn meniscus is desirable. With the ACL injured knee, wait until the effusion is resolved and good motion established. This is even more critical when a meniscus repair is performed because of the tendency for postoperative stiffness and swelling to develop.
Special Instruments
- Hornet inserter
- Individual BioStingers to refill the Hornet inserter
Anesthesia
Options are general anesthesia, regional anesthesia, or local anesthesia.
Patient and Equipment Positions
- Patient is supine with knee in leg holder
- Standard knee arthroscopy setup
- Standard anterolateral, anteromedial, or central arthroscopy portals
- View through the contralateral (or central) portal and instrument through the ipsilateral portal.
- The Hornet inserter is placed through the instrument portal.
- To access the posterior medial meniscus, hold the patient’s knee slightly flexed with valgus stress. Access the posterior lateral meniscus by holding the knee in a figure-four position (~90 degrees) with varus stress.
- Procedures to promote meniscal healing (vascular access channel punch, meniscal rasp, synovial abrasion) should be used.
Surgical Procedure
- Establish standard viewing portals. View through the contralateral (or central) portal and instrument through the ipsilateral portal to prepare the meniscus for repair.
- Encourage a healing response by rasping, creating vascular access channels, and synovial abrasion.
- Select the appropriate curved or straight Hornet and load it with the correct BioStinger length.
- Place the Hornet through the portal providing the best access to the tear. The ipsilateral portal works best for posterior horn tears and the contralateral portal works best for middle third tears.
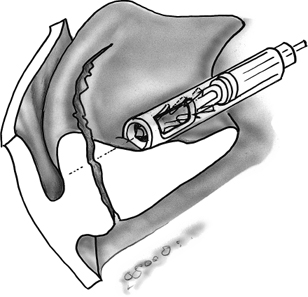
- Direct the Hornet inserter into position against the meniscal inner rim (Fig. 26–1). Make sure the needle trocar is not extruded while entering the joint to avoid capturing soft tissue.
- Push the thumb trigger to the 2-mm line to advance the needle out of the cannula. The needle should enter the meniscus ~3 mm in from the tear edge and, as it is advanced, reduce the meniscal tear (Fig. 26–2).
- Maintain the meniscal reduction with the needle trocar and push the instrument plunger with the palm of hand to advance the BioStinger (Fig. 26–3). It is critical to maintain forward pressure on the Hornet during this insertion.
- Visualize the advancement of the implant through the side window at the end of the cannula (Fig. 26–3). This will show when the implant is fully seated.
- Push the plunger until the head of the implant is buried in the meniscus. There is a 1/2-mm countersink built into the instrument (Fig. 26–4). The BioStinger will capture and compress both inner and outer meniscal segments and penetrate the peripheral capsule (Fig. 26–5).
- Check the final BioStinger placement before completely removing the Hornet inserter by slightly pulling backward on the inserter but leaving the trocar needle inside the BioStinger (Fig. 26–5). If the head is not adequately countersunk, apply forward pressure again to fully seat the BioStinger.
- Place BioStingers every 4 to 5 mm along the tear.
Dressings, Braces, Splints, and Casts
- A simple absorptive sterile dressing is applied to the skin.
- Compression with Ace bandage
- Progressive weight bearing with crutches as needed.
Tips and Pearls
- The BioStinger is designed only for fixation of longitudinal, vertical, peripheral meniscal tears.
- Place the central BioStinger first to stabilize the tear and then alternate additional BioStinger placements on either side of the first one.
- Be certain that the inserter is held firmly against the meniscus. As the BioStinger is advanced, a “ratchet”-like effect can be felt and the device might kick away from the meniscal surface.
- Before completely removing the inserter, withdraw it slightly to confirm that the BioStinger dimples the meniscus surface.
- Sometimes the addition of sutures to augment the BioStinger repair is helpful. This hybrid reconstruction might be suitable for very long bucket-handle tears and those with an anterior extension not easily reached by the Hornet inserter.
Pitfalls and Complications
- Although this technique is straightforward, challenges exist!
- The PLLA BioStinger degrades over a period of years. Countersinking it until the meniscus material dimples and orienting the cross-piece so it is horizontal with the articular surface are necessary to reduce the potential for articular cartilage damage.2
- Be aware of the nature of the meniscus tissue. If there is a degenerative component to the meniscus, the BioStinger can punch through and lose its hold on the inner rim.
- It is difficult to reach tears in the anterior half of the meniscus.
- Hybrid repairs combining the BioStinger with sutures are often an option for longer tears and those with anterior extension.
- Occasionally the BioStinger can migrate into the peripheral tissues and cause posterior medial or posterior lateral knee pain.
- Be aware of the nature of the meniscus tissue. If there is a degenerative component to the meniscus, the BioStinger can punch through and lose its hold on the inner rim.
Related posts:

Stay updated, free articles. Join our Telegram channel

Full access? Get Clinical Tree


