16 Ligament Injuries: Posterior Cruciate Ligament
Patient Presentation and Symptoms
- Pain
- Swelling
- Knee instability
- Progressive loss of motion
- Progressive deformity (posterior shift of tibia)
Indications
- A symptomatic ruptured posterior cruciate ligament (PCL) that does not respond well to conservative treatment with physical therapy and activity modification
- The skin must be intact and uninjured
- The neurovascular structures must be intact and uninjured.
Contraindications
- Other compounding injuries (head injuries, open fractures) or uncontrolled medical problems (diabetes, chronic infections)
- Immobilization of the extremity following the injury; such immobilization leads to soft tissue edema and stiffness that can complicate the return of motion.
- A posterior shift of the tibia that is not manually correctable must be braced first to return the tibia to its anatomic position.
Physical Examination
- Posterior Lachman test
- Posterior Drawer test
- Posterior sag test
- 30- and 90-degree dial test1
- Reversed pivot shift2
Diagnostic Tests
- Five-view knee radiographs (standing, anteroposterior, lateral, notch, sunrise)
- Posterior stress radiograph
Special Considerations
Many of these patients present with concomitant injuries to the posterior corner that may need to be addressed with a posterolateral reconstruction.
Preoperative Planning and Timing of Surgery
- Surgery should be performed as close to the time of injury as safely possible.
- Generally, PCL reconstruction can be accomplished as an outpatient procedure.
Special Instruments
- Tundra anterior cruciate ligament (ACL)/PCL tibial tunnel drill guide (Smith & Nephew, Boston, MA)
- Three 7-mm × 25-mm bioabsorbable interference screws (Smith & Nephew); two 7-mm × 20-mm if posterolateral reconstruction is needed
- Freeze-dried Achilles allograft
- Cold therapy cuff (IceMan, DJ Ortho, Vista, CA)
- Hinged postoperative knee brace (T-Rom, DJ Ortho)
Anesthesia
General anesthesia
Patient and Equipment Positions
- The patient is placed in the supine position.
- A tourniquet is placed around the thigh.
- A leg holder is placed at the level of the tourniquet.
- The leg is prepped and draped and hung free off the end of the table.
Surgical Procedure
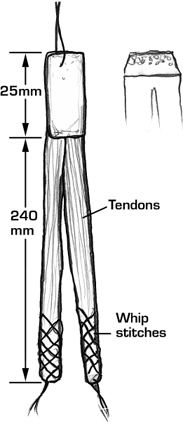
- Using an Achilles tendon allograft, a double bundled graft is prepared at a side table. The tendinous portion of the graft is divided into two 7-mm bundles. To allow advancement of the graft, a 5-cm-long series of whip-stitches is placed at the end of each bundle. The bony portion of the graft is typically trimmed to a length of 25 mm and sized to fit a 12-mm tunnel. After the graft is trimmed, a wire suture is attached to the bone plug to allow positioning and tensioning (Fig. 16–1).
- Establish standard anteromedial, posteromedial, distal anterolateral, and proximal anterolateral arthroscopic portals.
- A 10-mm cannula is placed through the posteromedial portal. The portal is positioned approximately 13 to 15 cm proximal to the joint line and anterior to the hamstring tendons at the posterior margin of the vastus medialis muscle. The portal is directed from this position toward the tibial PCL attachment (Fig. 16–2).
- Using an arthroscopic shaver the torn PCL is resected. The stump of the PCL is debrided with the shaver placed through the posteromedial portal.
- A 2.5-cm vertical incision is initiated 1 cm medial to the crest of the tibial tubercle and extended distally.
- A specialized PCL drill guide is used to place the tibial tunnel. The drill guide incorporates a circular back-splash that limits reamer advancement, thereby protecting the posterior structures of the knee. The drill guide is placed through the anteromedial portal and directed to the anatomic insertion of the PCL on the posterior tibia.
- The distal end of the drill guide is positioned over the medial tibial incision and locked firmly in place. Using fluoroscopic visualization, the reamer is carefully advanced until it exits through the tibia posteriorly and contacts the back-splash (Fig. 16–3).
- Approaching through the extreme distal anterolateral portal with the knee flexed to 90 degrees, two chiselpoint Beath pins are placed near the distal and proximal margins of the femoral footprint of the PCL (posterior and anterior margins when the knee is extended). The guidewires are directed proximally and medially so that they exit the thigh medially approximately 7 to 10 cm proximal to the joint line.
- A cannulated 7-mm reamer is then drilled over the previously placed slot-eyed Beath pins to and then through the lateral femoral cortex. The slot-eyed Beath pins are left in each femoral tunnel. Each Beath pin is advanced until the slot eye slightly protrudes from the femoral tunnel and into the joint space (Fig. 16–4).
- The tendinous portion of the Achilles allograft is advanced through the tibial tunnel one bundle at a time. The graft is oriented such that the tendinous side of the bone block is oriented posteriorly, with one bundle exiting medial and one bundle laterally.
- The medial bundle is passed first. The leading sutures are then grasped through the anteromedial portal and looped through the slot-eyed Beath pin in the distal femoral tunnel. The Beath pin is then advanced and the sutures attached to the bundle are brought through the skin on the medial side of the femur and held with a Kocher clamp. The lateral bundle is directed into the proximal femoral tunnel and then passed in a similar fashion (Fig. 16–5).
- The distal/proximal position of the graft is adjusted such that the proximal end of the bone block is flush with the proximal orifice of the tibial tunnel.
- A guidewire is advanced anteriorly within the tibial tunnel, thereby positioning it between the cancellous side of the bone block and the tibial tunnel wall. A 7-mm × 25-mm cannulated bioabsorbable screw is advanced along the guidewire until the screw makes solid purchase with the bone block and tibial tunnel wall. This maneuver can be fluoroscopically monitored.
- The knee is then manipulated vigorously with traction maintained on both bundles. The distal femoral bundle is tensioned and fixed near extension, typically approximately 20 degrees of flexion. A guidewire is directed through the distal anterolateral portal and positioned anterior to the bundle in the distal femoral tunnel. With traction applied to the distal bundle a 7 mm × 20 mm cannulated bioabsorbable screw is advanced alongside the graft until it is seated completely within the tunnel, thereby providing direct tendon to bone fixation.
- The proximal femoral bundle is tensioned and fixed in flexion, typically 90 degrees. Fixation is accomplished with a 7 mm × 20 mm cannulated bioabsorbable screw directed through the anterolateral portal (Fig. 16–6).
- Marcaine 1/2% is injected. The arthroscopic portals including the posterior portal are closed with Steri-Strips. The tibial tunnel incision is closed with 2-0 Vicryl subcutaneously, 3-0 Vicryl subcuticularly, and Steri-Strips.
Related posts:

Stay updated, free articles. Join our Telegram channel

Full access? Get Clinical Tree


