Fig. 1
Original cadaver dissection done by James M. Glick and Thomas G. Sampson to develop the portals for the lateral approach
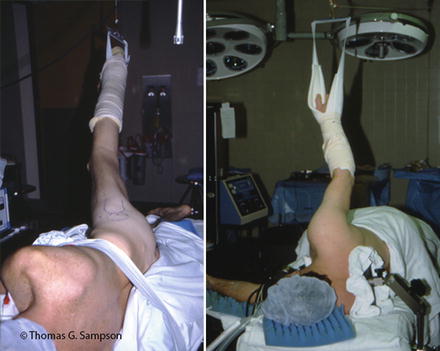
Fig. 2
The first hip distractor design using a Buck’s traction as a leg holder suspended with ropes and pulleys from the ceiling and the wall with >45 lb of weight
With the interest by industry to develop arthroscopic instruments and distractors, the supine approach was once again used and described by Byrd [6–8]. There have been editorials, journal articles, and book chapters arguing the advantages of each method over the other, with the results that whichever approach to be used should be based on the surgeon’s training and comfort. All procedures of hip arthroscopy are done equally well using either technique, and complications are not reported as technique specific. A distractor has been designed to be used on any operating room table for both techniques (Smith & Nephew, Inc., Andover, MA), and all instruments designed for hip arthroscopy can be used for either technique; however, it was found that shorter traditional length instruments work well in the lateral position as the distance from the skin to the depths of the central compartment seems to be shorter due to the soft tissue dropping away from the portals.
The major advancements in getting into the central compartment came from a better understanding of distraction and the use of cannulated trochars and fluoroscopy. Later, the development of longer arthroscopes, slotted (half-pipe) cannulas, and curved and flexible instruments has allowed for advanced techniques following a similar but delayed enthusiasm as with knee and shoulder arthroscopy (Fig. 3a, b).
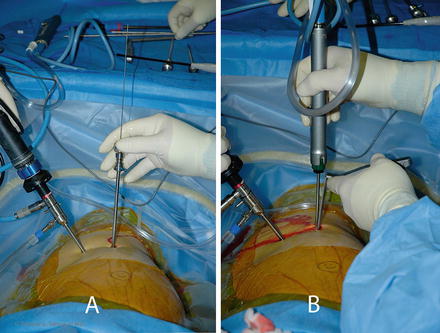
Fig. 3
The arthroscope has a shortened hub and the hip trochar is cannulated for a nitinol wire (Note the Mayo stand is above the patient’s shoulder and is used to keep the instruments organized and for easy access by the surgeon)
Preoperative Planning/Anesthesia/Setup
Most commonly general anesthesia is used. With regional anesthesia, there must be muscle relaxation. Often conscious sedation is employed as the downside shoulder may become sore. A protocol of antibiotic prophylaxis with one of the cephalosporins is given preoperatively. DVT prophylaxis is done using compression stockings (SCD) and a sequential pump on either legs or feet.
Positioning
The patient is placed on a well-padded operating room table in the lateral decubitus position (Fig. 4). An axillary roll or shoulder trough is positioned and hip positioners are used to support the pelvis. By preventing the pelvis from rolling backward on the peroneal post, the risk of pudendal neuropraxias may be reduced.
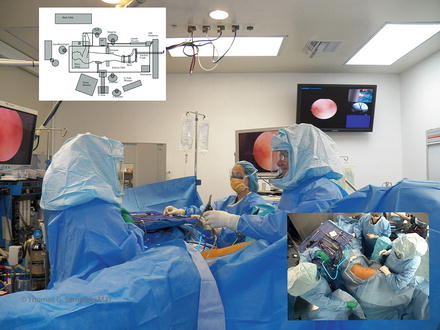
Fig. 4
Room setup in the lateral approach – the surgeon stands anterior (some prefer posterior if they do total hips from the posterior approach). The assistant works from the opposite side and the scrub technician to the side of the surgeon. The C-arm lies below the table throughout the case, and a Mayo stand is placed above the shoulder for instruments
The foot is wrapped with padding then strapped into the holder taking care to avoid skin pinching and over compression of the foot by the device. The leg is held in abduction by the assistant for careful placement of the well-padded peroneal post. We have determined that the post should have an outer diameter greater than 9 cm for safety. Commercially available hip distractors all exceed this size. The genitalia are inspected to ensure they are free from compression. Distraction should be tested to ensure that the foot would not slip out of the holder. It is recommended to apply only enough traction to support the leg during the setup, preparation, and draping.
The fluoroscopic C-arm is brought in with the apex under the table and centered at the level of the greater trochanter. Multiple preoperative X-rays are done to check for positioning, head-neck/acetabular conflicts, and hip anatomy. A trial of distraction will be of benefit for two reasons: (1) to check for the distractibility of the joint and (2) to ensure the foot is properly secured in the foot holder. If the hip does not distract well, it may be due to a tight or hypertrophic capsule, and a few minutes of traction may allow it to relax. Failure to distract may require greater forces of distraction and necessitate capsulotomy or acetabular rim trimming to avoid femoral head scuffing and iatrogenic labral damage. If the foot slips out of the holder during the trial, less padding and careful attention to strap placement and tightening may help prevent slippage. Adequate security of the foot in the holder is imperative to prevent an accidental release of distraction when the instruments are in the central compartment, which may result in iatrogenic articular cartilage damage.
Sticky towels or drapes are placed from the iliac crest to 6 in. below the greater trochanter and a sagittal line lateral to the anterior superior iliac spine anterior and the sciatic notch posterior.
The anesthesiologist is at the head of the table, the surgeon stands either anterior or posterior with the assistant on the opposite side. The scrub technician stands next to the surgeon with the C-arm in between. A Mayo stand is placed above the patient’s shoulder for easy accessibility to the instruments and organization of the arthroscopic cords.
Typically split sheets are used to drape the surgical site along with a large plastic pouch to catch fluids.
Distraction
For optimal viewing and safe surgery, at least 1.2 cm of distraction is required to enter the femoroacetabular joint (central compartment). Commercially available distractors for the lateral approach are available and have the ability to move the hip into various positions to optimize surgery in the central, peripheral, and peritrochanteric compartments during surgery (Fig. 5).
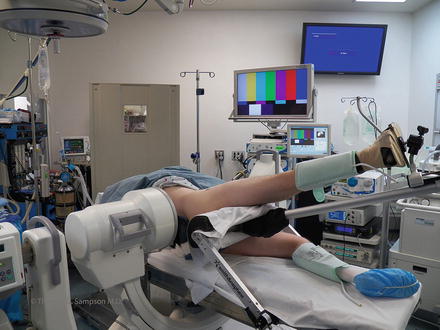
Fig. 5
A commercially available lateral hip distractor made by Smith and Nephew®
Not all distractors have a tensiometer to measure the force of distraction. Distraction should be thought of in the same way as a tourniquet. James M. Glick M.D., in a study using evoked potentials, originally concluded that forces less than 75 lb for less than 2 h were safe and did not cause permanent neuropraxias; however, on a later analysis of his original data using modern statistical analysis, the actual force is more pertinent than the time spent in traction [9]. Over 2,000 cases have been done by TGS and JMG without a tensiometer, taking care to keep the distraction time and the forces to a minimum resulting in few neuropraxias [10, 11]. A well-planned capsulotomy will reduce the forces of distraction necessary to enter the center compartment. The entire team should be aware of when the hip distraction begins and its duration. The surgeon must appreciate, however, that complications may occur from too little or too much traction, and to accomplish the procedure, the joint surfaces must be separated to introduce and properly use the instruments.
The peroneal post should have padding of at least 9 cm in diameter and positioned eccentrically over the pubic symphysis with little to no compression to the downside thigh (Fig. 6).
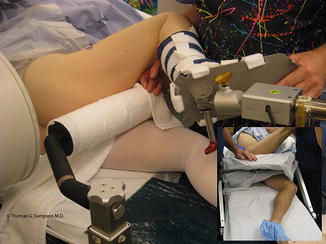
Fig. 6
A patient’s right leg being placed in the hip distractor (Note the posterior hip positioner, the large peroneal pad, and the foot padding. Not seen is the axillary roll)
The operative distraction is initiated after the case is entirely set up and all the equipment have been turned on and are functioning. The traction time is recorded on a white board, which may be entered into the operative record. The abdomen is palpated under through the surgical drapes for distension from retroperitoneal extravasation every 15 to 30 minutes.
Once the surgery of the central compartment is completed, all of the distraction forces are released and the periarticular work in the peripheral compartment can be done without distraction concerns. Distraction is then only instituted whenever the procedure requires entry into the central compartment such as labral repair or to protect the head from the burr during rim trimming.
OR Setup
Leg Position
In traction, the hip capsule is maximally relaxed in 15° of flexion, neutral rotation, and 15° of abduction [3, 12, 13]. This as a starting position and positional adjustments are made during the procedure to facilitate getting into different areas. Additionally, the peroneal post may be elevated laterally to add an abduction moment for better viewing.
Instruments
The 30° arthroscope is best for central viewing. It is easier to become oriented with this angle and is the best for getting started using the lateral approach. The 70° arthroscope is best for peripheral viewing, around the femoral head, deep in the fossa, to view the fovea and to create additional portals. On thin patients, standard arthroscopic equipment may be used if the sheath has a short hub. The advantages of commercially available hip kits are that they contain the proper sheath lengths and cannulated systems. The option for longer arthroscopes should be available for larger patients and for those cases in which excessive swelling occurs in the thigh during the procedure.
Related posts:
 Neuromuscular Hip Disorders: Focus on Cerebral Palsy
 Femoral Deformities: Varus, Valgus, Retroversion, and Anteversion
 Surgical Technique: Arthroscopic Labral Management
 Surgical Technique: Open Proximal Hamstring Repair
 Subspine Impingement and Surgical Technique
 Atraumatic Instability and Surgical Technique
Stay updated, free articles. Join our Telegram channel

Full access? Get Clinical Tree


