6
Common Procedures in the Athletic Training Clinic
Larry Collins, Tiffany O’Connor and Micki Cuppett
At the completion of this chapter the reader should be able to do the following:
1. Name the limitations of the practice act pertaining to invasive procedures
2. Demonstrate use of an appropriate informed consent prior to performing any of the procedures described in this chapter
3. Employ fundamental aseptic procedures, including the use of sterile gloves and the creation of a sterile field
4. Properly unpack a sterile package and prepare for a sterile procedure
5. Compare the various types of sutures and suture needles and their specific applications
6. Describe the difference between interrupted, running, and mattress sutures and the advantages and disadvantages of each
Introduction
This chapter begins with a disclaimer about state practice acts. At present 47 states regulate the practice of athletic training in some fashion, whether it be by certification, licensure, or other regulation.1 What is important to remember is that the practice act for athletic trainers as well as other health care professionals varies widely by state. Knowing and understanding the specific practice act is ultimately the responsibility of the clinician. Recognizing the limitations and following the practice act in their state will allow the athletic trainer to fully use his or her skills and knowledge base to provide appropriate health care to patients and athletes.
Informed Consent
Informed consent ensures an individual’s right to be an active participant in the decision-making process regarding their health care. Sufficient information should be presented to every individual so that they may make an informed decision regarding whether or not to consent to a specific treatment or procedure. Although the legal requirement to obtain informed consent rests with the physician, the physician may delegate this responsibility to another health care provider. A health care provider who is substantially involved with the patient’s care must obtain the informed consent. An example of an informed consent may be found in Figure 6-1. Informed consent should include, at a minimum, a thorough discussion of the following:
• The nature and purpose of a proposed treatment or procedure
• The risks and benefits of a proposed treatment or procedure
• Alternatives to the proposed treatment or procedure (regardless of the cost or the extent to which the treatment options are covered by health insurance)
• The risks and benefits of the alternative treatment or procedure
• The risks and benefits of not receiving or undergoing a treatment or procedure
Preventing Infection
As indicated in detail in Chapter 1 of this textbook, OSHA and the Centers for Disease Control and Prevention (CDC, Atlanta, GA) define universal precautions as a simple set of effective practices designed to protect health care workers and patients from infection with a range of pathogens including blood-borne viruses. These practices are used when caring for all patients regardless of diagnosis.2
Universal precautions apply to blood and other body fluids containing visible blood, semen, and vaginal secretions. Universal precautions also apply to tissues and to cerebrospinal, synovial, pleural, peritoneal, pericardial, and amniotic fluids. Universal precautions do not apply to feces, nasal secretions, sputum, sweat, tears, urine, and vomitus unless they contain visible blood. Universal precautions do not apply to saliva except when visibly contaminated with blood or in the dental setting where blood contamination of saliva is predictable.3
Universal precautions provide for the use of protective barriers such as gloves, gowns, aprons, masks, or protective eyewear, which can reduce the risk of exposure of the health care worker’s skin or mucous membranes to potentially infective materials. It is also recommended that all health care workers take precautions to prevent injuries caused by needles, scalpels, and other sharp instruments or devices.2 Box 6-1 describes numerous best practices to prevent sharps injuries in the sports medicine clinic.
Asepsis and Aseptic Technique
Preventing infection and maximizing healing should be the primary goal when performing any invasive procedure. The term asepsis means the absence of infectious organisms3 and the goal of aseptic technique is to prevent the transfer of microorganisms into the wound. Preventing site contamination requires the efforts of all trained team members to use their knowledge and experience in aseptic practices to provide their patients with optimal care resulting in positive procedural outcomes.
Whenever an invasive procedure is performed, aseptic practices must be followed:
• Assess the patient for any risk factors.
• Assess any environmental concerns.
• Ensure proper disinfection and sterilization of instruments.
Adherence to the principles of asepsis and observance of the boundaries established by the techniques are the responsibility of each clinician involved in the medical procedure.3
Sterile versus Nonsterile Individuals
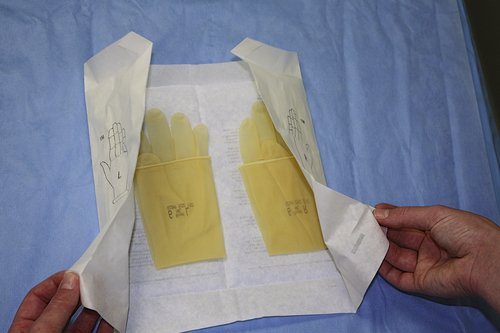
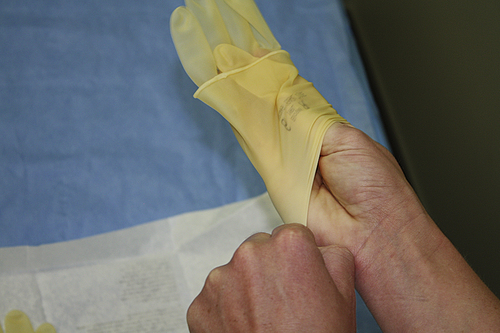
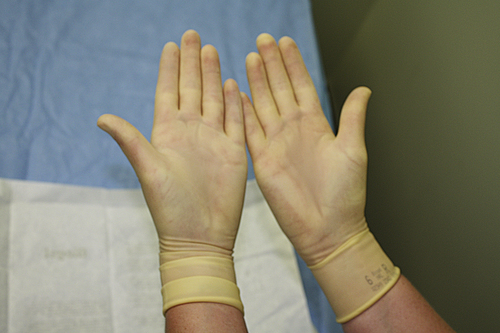
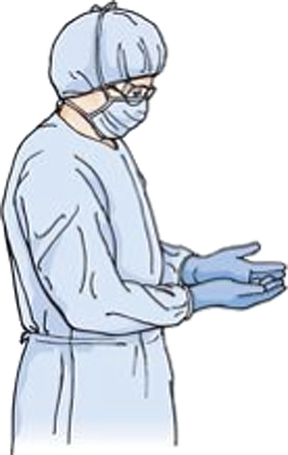
Aseptic technique can include both sterile and nonsterile individuals. Once an individual dons sterile equipment (gown, gloves, etc.) he/she must pay particular attention to maintaining sterility. Nonsterile personnel must be careful not to contaminate the sterile person or the sterile field. Before performing a sterile procedure, the clinician must don sterile gloves. This procedure is very different from the normal use of latex gloves under normal universal precautions. The procedure is described in Box 6-2. Before donning sterile gloves a thorough hand scrub with antibiotic soap should be performed. If close contact with body fluids or tissue is likely or in the event of potential splash, a surgical mask and protective eyewear should also be worn (Figure 6-2).
BOX 6-2 PROPER TECHNIQUE FOR OPENING AND DONNING STERILE GLOVES
1. Peel away the packaging, exposing the sterile gloves.
2. Hold opened package horizontal to the table.

3. Flip the contents onto the table without releasing either end of the packaging.
4. While keeping the package flat on the table, pinch the bottom corners and open.
5. Pinch the bottom corners inside the package and unfold.
6. Pinch the top corners inside the package and unfold.

7. Without touching the fingertips of the gloves, gently unfold the packaging, leaving it flat on the table.
8. Pick up the right glove and gently slide your fingertips inside, using your left hand for guidance and assistance. Make sure not to touch the fingertips of the glove.
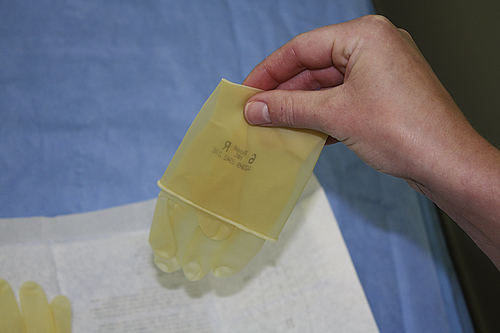
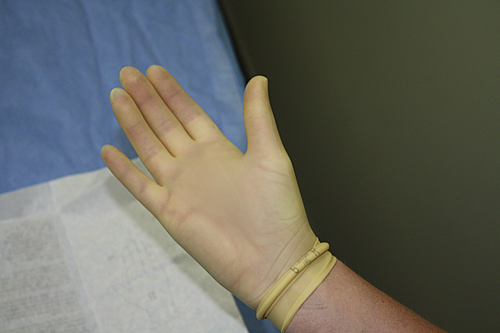
9. Properly applied sterile glove.
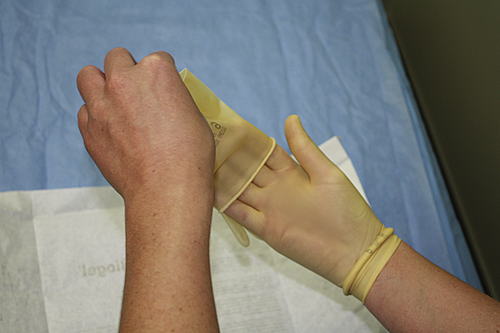
10. With your gloved right hand, place your fingertips inside the pocket of the left glove, while sliding your left hand into the glove.
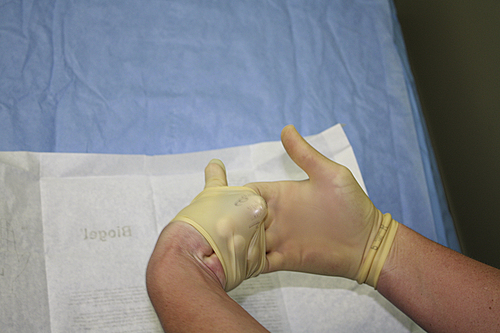
11. Properly applied sterile gloves.
Sterile Field
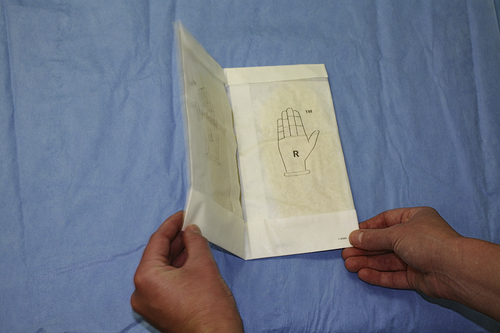
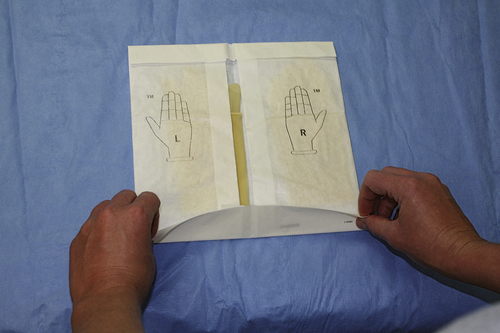
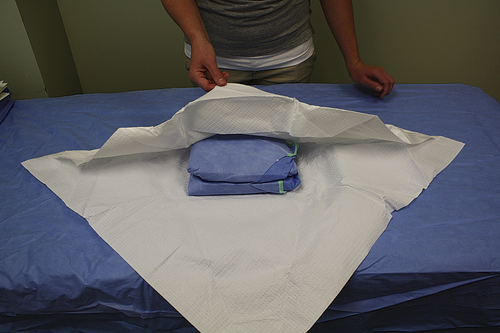
Sterile drapes are used to create a sterile field. The sterile field may be thought of as an imaginary “box” that also encompasses the space above the person. Sterile drapes should be placed on the patient to leave only the procedural area exposed (Figure 6-3). Sterile drapes are used to establish an aseptic barrier between nonsterile and sterile areas. Proper technique for unpacking disposable drapes may be found in Box 6-3. Keep in mind that after draping, only the top surface of the draped area is considered sterile.
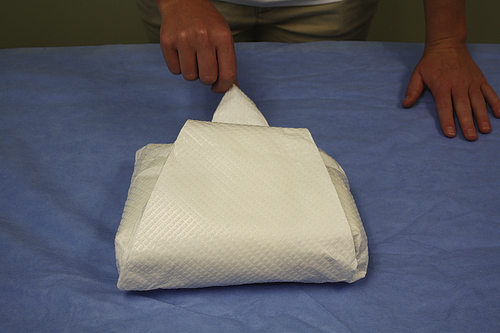
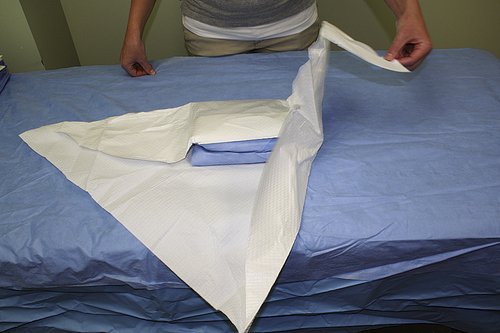
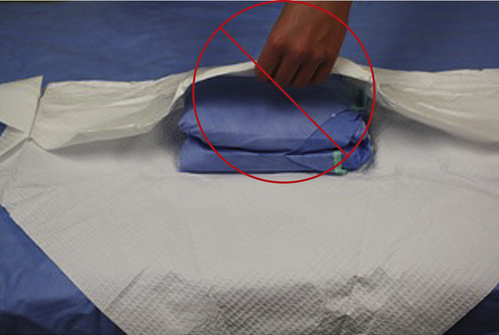
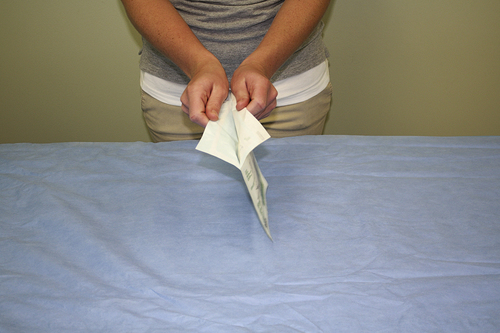
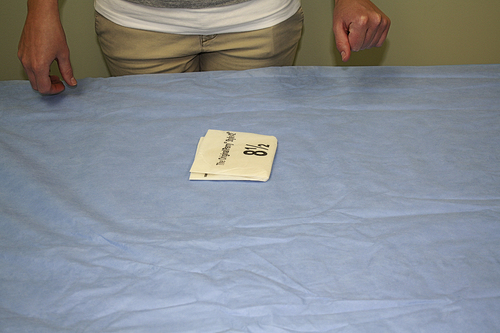
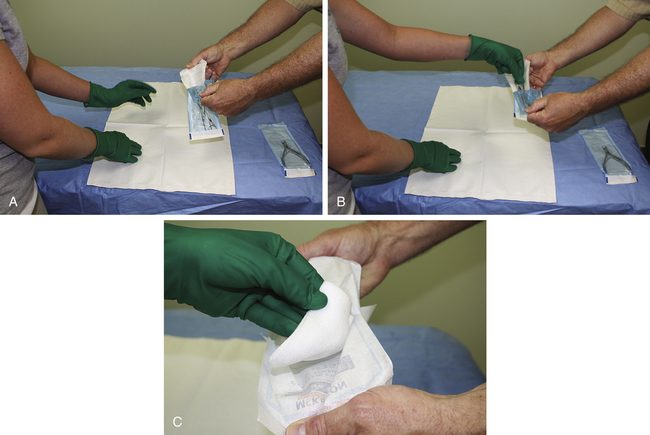
All items placed within the sterile field must be sterile. Only sterile packages, instruments, and materials should be placed in the sterile field. Under no circumstances should sterile and nonsterile items be mixed. Nonsterile persons (such as a student who is observing) should never reach across or into the sterile field. To ensure sterility, all sterile items should be inspected for package integrity. If a package has been compromised, it should be considered contaminated and not be used. When a sterile packaged item is dropped on the floor, air can penetrate the sterile package. The force that is created when the package contacts the floor can cause the sterile barrier to be penetrated by forcing sterile air out and allowing contaminated air and particles into the package.3–5 Nonsterile personnel must use good judgment when dispensing sterile items onto the sterile field either by presenting them directly to the sterile person or by placing them securely on the sterile field. Proper technique must be used when opening wrapped supplies and is presented in Figure 6-4.
When a breach of sterility occurs, team members must take immediate and appropriate action to correct the break in technique to reduce further risk of contamination. If there is doubt regarding an item’s sterility, consider it not sterile. The sterile field should be prepared as close as possible to the time of use. Once set up, the sterile field needs to be monitored constantly.6
All personnel moving near or in a sterile field should do so in a manner that maintains the sterile field. Once gloved, personnel should remain in or close to the sterile field without wandering around the room. Gloved personnel should keep their arms and hands within the sterile field at all times to avoid any accidental contact with nonsterile items or areas. Just as the sterile person must maintain a safe distance from nonsterile areas and persons, nonsterile personnel must always be aware of and maintain a “margin of safety” when approaching sterile fields and scrubbed personnel. And finally, when delivering sterile supplies to the sterile field, the nonsterile team member must always maintain a margin of safety between themselves and the sterile field, never contacting or reaching over any portion of the sterile area. This margin of safety is generally identified as a minimum of 12 inches (30 cm) or more.3
Maintaining Asepsis
All medical team members must practice these principles of aseptic technique to help prevent the transfer of microorganisms into the wound during the procedure. It is the responsibility of the team members to develop a strong conscience, adhering to the principles of asepsis and rectifying any improper technique witnessed during the procedure. In addition, proper surgical attire plays an important role in the reduction of site infections by reducing the amount of hair and skin contaminants reaching the sterile field.6
Procedures used to Close Lacerations
Adhesive Skin Tape
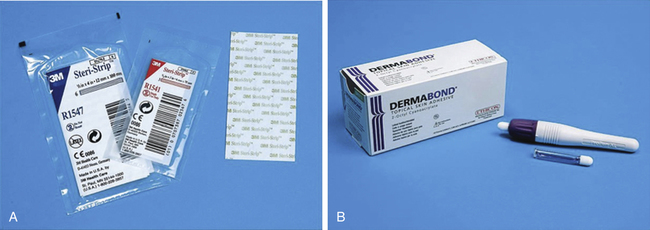
Adhesive skin tape is used to close small, superficial, low-tension wounds and to reinforce larger wounds closed with sutures or after removing sutures to protect the wound during the proliferation and early remodeling periods of healing (Figure 6-5, A).
Application Technique
• Dry the edges and surrounding skin.
• Consider an adhesive application such as tincture of benzoin or Mastisol (Ferndale Laboratories, Ferndale, MI). Both may be applied to the skin via a cotton-tipped applicator before applying tape. They may offer some degree of protection from allergy to the adhesive in the tape, and they improve the adherence of the tape. Mastisol does appear to have superior adhesion and fewer adverse reactions.7
• If significant swelling is anticipated, it is probably best not to apply an adhesive.
• Elastic tape may be used, but should be used with caution if swelling is anticipated as it may also cause blistering of the skin.
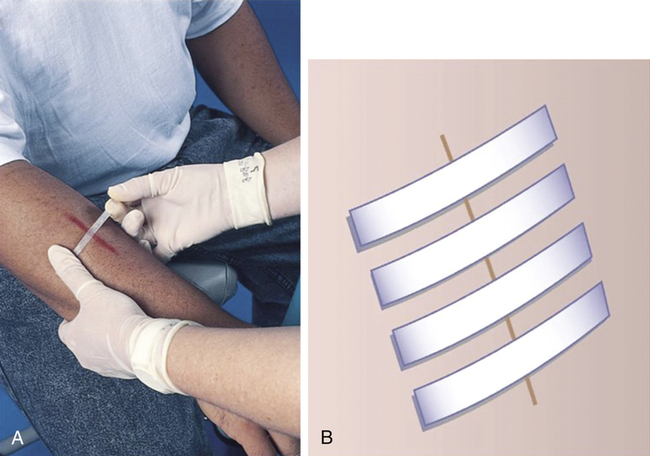
• Ensure that the wound edges are nicely aligned. Starting at the center of the wound, apply strips in an evenly spaced manner opposing gravity, until the edges of the wound are approximated (Figure 6-6).
• Do not apply too much tension across a wound that may swell, or the tape may cause blisters.
Topical Liquid Skin Adhesive
Tissue adhesives are polymers formulated to be used in place of nonabsorbable sutures for primary closure of skin wounds. Commercially available tissue adhesives include Histoacryl (B. Braun, Melsungen, Germany), Dermabond (Ethicon, Somerville, NJ), and Indermil (Syneture brand; Covidien, Dublin, Ireland).8 These products are approved for the closure of skin wounds and as barriers against certain bacterial infections (Figure 6-5, B).
Usage
If used appropriately, the adhesive will act as a strong bridge to hold well-apposed wound edges together.9 When necessary, deep dermal sutures (vertical mattress stitches) are used to bring the skin edges into everted apposition.9 Everted edges are extremely important to successful closure with tissue adhesives, because they prevent scar broadening and improve the cosmetic result. Everted skin apposition should be maintained with forceps or fingers during the application of adhesive.
The adhesive should be applied to dry tissue that is under very little tension. For best results, a thin layer should be applied over the epidermis and allowed to dry for approximately 20 to 30 seconds. This method prevents pooling and running of the tissue adhesive, and it also provides a layer of protection from the heat generated by the exothermic polymerization.10 Subsequent layers of the adhesive are then applied over the top of this initial layer.
When applying tissue adhesives, it is important to ensure that the adhesive does not leak into the wound. If leakage into the wound occurs, the adhesive acts as a barrier to epithelialization. The adhesive may also cause a foreign-body reaction and potentially increase the risk of infection if it enters the wound.11,12 It is also important to remember to use proper sterile technique and to minimize tissue trauma while applying these products. Always reduce skin tension at the site of the laceration and ensure that no dead space is present before sealing with a tissue adhesive.
Sutures
Understanding the principles of wound healing is essential before learning and mastering suturing techniques. It is assumed that the reader is well versed in these principles. Sutures are used to approximate wound edges in good apposition to facilitate the healing process and should be left in place long enough to allow healing to proceed to a sufficient degree that the natural properties of the skin are able to hold the wound together. Remove facial sutures after 3 to 5 days (the physician may give instructions to remove every other suture on day 3 and the rest on day 5). For extremities and trunk, sutures should remain in place for 5 to 7 days. On the scalp, back, feet, hands, and over the joints sutures may need to be left in place for 10 to 14 days.8 Leaving sutures in place for an extended period may increase the risk of leaving permanent marks in the skin. Although an athletic trainer may not perform the actual suturing, depending on the state practice act or the direction of the physician, he/she may often be asked to assist in the preparation of materials and the patient to expedite the suturing process. It is important for the athletic trainer to be familiar with the materials and techniques used in suturing (Boxes 6-4 and 6-5).
BOX 6-4 BASIC SUTURING INSTRUMENTS
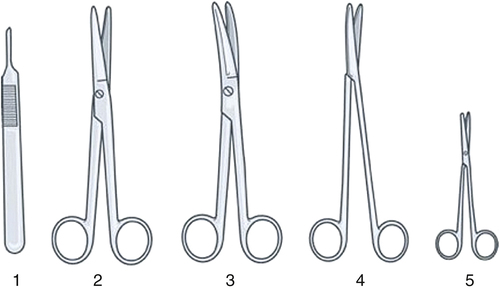
• Metzenbaum scissors, curved (4)
• Suture scissors, straight (5)
• Suture materials (see Box 6-5)
• Forceps (for grasping tissue)
Modified from Rothrock JC: Alexander’s care of the patient in surgery, ed 13, St. Louis, 2007, Mosby.
BOX 6-5 SUTURE MATERIALS


