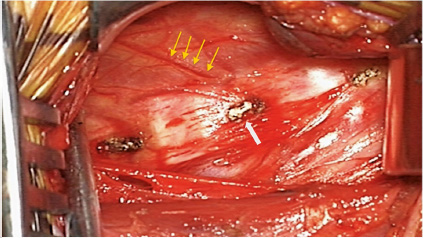
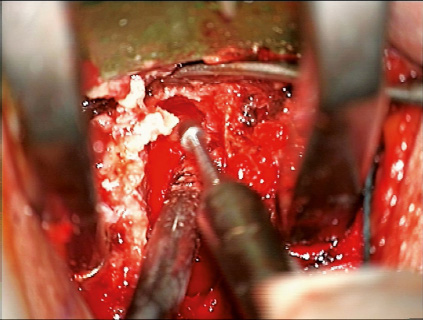
2 Anterior cervical decompression and fusion is the gold standard for the treatment of cervical spondylosis resulting in radiculopathy, myelopathy, or myeloradiculopathy. In recent years there has been a tremendous increase in options utilized for achieving fusion, with a variety of graft types and structural cages. The advantages of fusion include maintenance of cervical lordosis, indirect decompression by increasing foraminal dimensions, prevention of recurrent spondylosis or neural compression at the operated level, and stabilization of the operated level to prevent progressive spondylosis in the posterior elements (osteophytes from the superior adjacent process).1 Nonetheless, these advantages do not come without potential disadvantages, including longer operative times and failure of fusion. Although pseudarthroses can be asymptomatic, they sometimes can lead to clinical sequelae necessitating revision surgery.2 This chapter discusses methods used for cervical decompression and fusions via an anterior approach, with a special focus on the techniques used by the senior author (K.D.R.) for optimizing stability and fusion rates. Prior to performing an ACDF, attention is focused on the radiographic evaluation of the patient. We utilize six views of the cervical spine on plain radiography (anteroposterior [AP], lateral, flexion, extension, and both oblique views) as well as magnetic resonance imaging (MRI) and computed tomography (CT) scans to plan the operation. The plain radiographs are important for assessing uncinate hypertrophy, which can be best seen on AP and oblique views. The dynamic radiographs are important for assessing unstable spondylolisthesis as well. The MRI is important for visualizing soft tissue pathology. In addition, it is also valuable for determining the location of the vertebral arteries, as well as dominance based on vessel caliber on the axial images. Parasagittal MRI can sometimes demonstrate fused vertebrae anteriorly as well as in the facet joints. Also, oblique parasagittal images are useful to assess the degree of foraminal narrowing. Sometimes, it can also be important for assessing the integrity of the esophagus for thickened walls or dysplasia, which might put patients at higher risk for postoperative dysphagia. CT is important for evaluating the bony anatomy, determining whether compressive pathology is soft or hard, identifying the presence of ossification of the posterior longitudinal ligament (OPLL), and assessing spondylosis in the facet joints or auto-fusions. Oblique parasagittal images are used similarly to MRIs, to determine the degree of foraminal narrowing. The combination of MRIs and plain CTs are useful to assess the bony and soft tissue anatomy of the spine. When performing an ACDF, we routinely utilize the Smith-Robinson approach to the anterior cervical spine with a transverse skin incision in an appropriate skin crease. It is imperative to stay just medial to the sternocleidomastoid muscle and the carotid pulse to maintain the correct plane of dissection. As much as possible, it is preferable to bluntly dissect and mobilize rather than cut any crossing structures to avoid injury to nerves (e.g., recurrent laryngeal nerve). The omohyoid muscle belly should be identified, except for high cervical exposures. Novice surgeons often inadvertently dissect medial to the omohyoid, trapping themselves in the axilla of the muscle. This then necessitates greater retraction force on the esophagus to expose the spine and limits cranial exposure. The muscle can be divided if it appears to necessitate increased retraction force. We usually find that exposures of the C5 and below are more easily done by dividing the muscle. Care in performing generous mobilization of the multiple fascial planes encountered will diminish tension on the soft tissues of the neck. We typically expose two more levels than our planned operative levels, as this facilitates adequate exposure with less force on the retractors, which in turn may decrease postoperative dysphagia. Once deep exposure is achieved, the small vessels on top of the longus colli muscles are coagulated with the bipolar electrocautery. They traverse obliquely from inferior-lateral to superior-medial and perforate the lateral aspect of the midvertebral body, where the longus attaches to the periosteum (Fig. 2.1). We also use the bipolar electrocautery to coagulate this area of the periosteum and then use it along with a Penfield No. 2 dissector to dissect the longus off of the anterior cervical spine all the way lateral to the costal process. The vertebral artery typically lies about a third of the distance deep to the anterior border of the vertebral body from C3 to C6 and anterior to the foramen transversarium starting at C7 and below. However, anomalies are common. We therefore always check the MRI to make sure that the course of the vertebral artery is not anomalous and that it is not sitting anterior to the foramen transversarium where it can be injured by the exposure. If it is anomalous, we generally prefer to expose the muscle with the Penfield No. 2 while coagulating the bleeders with the bipolar electrocautery under direct visualization. As long as the tips of the bipolar are seen during this process, the likelihood of vertebral artery injury is low. In addition, the risk for an iatrogenic Horner’s syndrome is low because the sympathetic chain sits on the ventral lateral aspect of the muscle. Caspar pin distractors are used to provide distraction along the disk space of interest for the operation. Center placement of the pins is important to enable centralized plate placement and good screw placement after pin removal. The center is approximated during the dissection of the longus colli muscles because the middle will usually be the exposed bone midway between the two sides of the muscle (Fig. 2.1). Once the longus is exposed to the lateral border of the uncinate, we can get a better estimate of the midline. Alternatively, one can determine the location of the inner border of the uncinate by incising the lateral aspect of the disk with the cautery. We typically place the cranial pin ~ 10 mm above the disk space and the caudal pin 5 mm below the disk space. They are angled cranially such that they are parallel with the disk space. Caudal angulation can result in the caudal pin inadvertently perforating the next disk space. Care must be taken when using these pins in the face of osteoporotic bone, as the pins can plow through the vertebrae after application of distraction. In such cases, Gardner-Wells tong traction can be helpful in stabilizing the head and neck when performing corpectomy. Five pounds of weight is used to steady the head initially, and then weight is added after decompression to facilitate proper graft insertion. Typically, 30 to 40 pounds of traction will suffice. Significant traction should be avoided until the cord is decompressed to avoid the potential for cord compromise. Fig. 2.1 When deep exposure is achieved, the small vessels on top of the longus colli muscles can be seen traversing obliquely from inferior-lateral to superior-medial and then perforating the lateral aspect of the midvertebral body, where the longus attaches to the periosteum (yellow arrows). The midline is marked with a Bovie and is the point midway between the heads of the longus colli muscle bellies (white arrow). Using the microscope for visualization, we use a No. 15 blade to perform the initial annulotomy. Typically, the inferior annulus is incised first from uncinate to uncinate. The bone of the uncinate prevents the blade from going too lateral, thus avoiding a vertebral artery injury. In addition, while one hand is on the blade, the other hand holds a Frasier tip suction in place in the direction the blade is cutting. This ensures that soft tissues structures are protected if the blade slips or if there are any sudden movements. During the annulotomy, the depth of the blade is used to gauge the depth of the annulotomy. Care must be taken not to allow the blade to go any deeper than this because doing so can result in accidental durotomy or spinal cord transection. We use a No. 15 blade on a long skinny handle to do this and do not bury the blade any deeper than the sharp edge, which is 11 mm long. Burying the blade in a small patient can result in inadvertent laceration of the dura or spinal cord. Once the annulotomy is completed, we utilize cervical curettes in sequential order from largest to midsized to remove the disk fragments. Meticulous curetting is performed to remove all cartilage from the end plates and disk material prior to the use of a bur, because the bur generates pure bone dust that can be used as an adjunct to the allograft bone we use for fusion. But bone dust that is “contaminated” with disk material may inhibit fusion because components of the nucleus have been shown to inhibit bone formation. Finally, the PLL can be transected with the use of a 1-mm microcurette. Although we do not routinely transect the PLL, we do so in instances where there are disk fragments that might have herniated through the PLL or when there is significant central stenosis. In cases where there is significant central stenosis, transecting the PLL enables visualization of the thecal sac and any area of tension that can signify residual stenosis from osteophytes or disk fragments. An anterior foraminotomy is an important procedure for achieving a thorough decompression of the nerve roots during an anterior decompression and fusion operation. Bone spurs in the posterior-lateral aspect of the uncinate that remain after an ACDF can result in residual symptoms.3 For routine cases in which the patient has only radicular pain, we recommend a foraminotomy but not an uncinatectomy or radical foraminectomy, because the pain usually subsides even with minimal or no foraminal decompression in most cases. We perform extensive foraminotomies in cases where there is foraminal stenosis associated with profound numbness or weakness. We have found that most neurologic deficits resolve if the foramen is thoroughly decompressed. Patients with mild to moderate pain and intermittent or mild neurologic deficits usually do fine without extensive foraminotomy. The proximity of the vertebral arteries can make this procedure challenging, and thorough examination of the preoperative MRI is essential for examining the location and morphology of the vertebral arteries at the level of the operative segment. The technique we describe below is for expert surgeons who feel comfortable using the bur close to the nerve root, as well as the vertebral artery. In inexperienced hands an extensive foraminotomy risks injury to the nerve and vertebral artery. The foraminotomy is done on the side opposite to where the surgeon stands. We utilize the Penfield retractor to protect the vertebral arteries while performing the uncinatectomy (Fig. 2.2). The first step is to create a space lateral to the uncinate. A small 1-mm microcurette can be used to develop the plane between the uncinate and the longus colli muscle. Then, a Penfield No. 4 is placed lateral to the uncinate and gently wiggled and pushed posteriorly until the tip is buried 5 to 7 mm such that it lies between the vertebral artery and the lateral border of the uncinate. Care must be taken to ensure that the Penfield is not too dorsally placed, because this can result in compression of the nerve root. Then it is moved side to side to create a big enough space to accommodate the larger Penfield No. 2, which is then placed into this space to the same depth. Alternatively, one can place a small patty in this space to protect the artery. The advantage of the Penfield No. 2 is that the assistant can lever back to improve the exposure. With the Penfield protecting the vertebral artery to enable the safe and judicious use of the bur, the decompression and uncinatectomy can be performed efficiently. The uncinate can be visualized and its anatomy verified. It is more narrow ventrally (more superficially in the dissection) and thicker dorsally (deeper) until the posterior border is reached (lateral to which at this depth is the foramen). At this point, attention can be turned toward the uncinatectomy. The bur is used to remove the medial aspect of the uncinate from a ventral to dorsal direction. We try to minimize the use of the medial to lateral directed use of the bur because it is easier to past point and go too far laterally with the bur and injure the vertebral artery.
Anterior Cervical Decompression and Fusion Techniques: Anterior Cervical Decompression and Fusion, Corpectomy, and Foraminotomy
 Introduction
 Anterior Cervical Decompression and Fusion
Preoperative Considerations
Surgical Approach
Decompression
Foraminotomy
< div class='tao-gold-member'>
Related posts:
 Cervical Disk Arthroplasty
Adjacent Segment Pathology of the Cervical Spine
Indications and Techniques of Cervical Pedicle Screws C3-7 for Degenerative Conditions
Cervical Sagittal Balance: What Is Normal and What Is the Effect on Reconstruction Outcomes
Complications of Anterior Surgery: Vertebral Artery Injury, Esophageal Perforation, and Dysphagia
Navigation for Cervical Reconstruction Surgery
Cervical Disk Arthroplasty
Adjacent Segment Pathology of the Cervical Spine
Indications and Techniques of Cervical Pedicle Screws C3-7 for Degenerative Conditions
Cervical Sagittal Balance: What Is Normal and What Is the Effect on Reconstruction Outcomes
Complications of Anterior Surgery: Vertebral Artery Injury, Esophageal Perforation, and Dysphagia
Navigation for Cervical Reconstruction Surgery
![]()
Stay updated, free articles. Join our Telegram channel

Full access? Get Clinical Tree


