12
The Eye
Laurie Small, Charles B. Slonim and David Eischenbaum
At the completion of this chapter the reader should be able to do the following:
1. Describe the basic anatomy and physiology of the eye
2. Perform a basic eye examination
3. Describe appropriate initial management of common conditions and injuries of the eye
4. Recognize conditions of the eye that require referral
5. Recognize conditions of the eye that may preclude the athlete from participation
Overview of Anatomy and Physiology of the Eye
The anatomy of the eye consists of external and internal structures. All structures are contained within the bony eye socket. The eye socket (Figure 12-1), anatomically known as the bony orbit, comprises four walls made up of seven different facial bones of the skull, connective tissue, fat, blood vessels, and nerves.
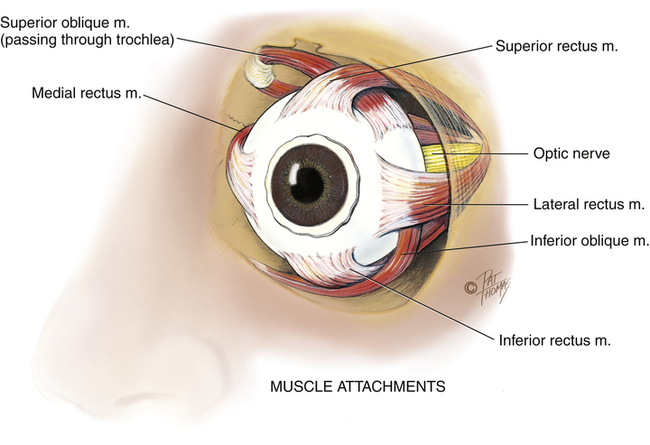
Anteriorly, the orbit rim is created by the frontal, zygomatic, and maxillary bones (see Figure 11-1). The sphenoid, lacrimal, ethmoid, and maxillary bones form the posterior and medial aspects of the orbit. The palatine, zygomatic, and maxillary bones create the floor of the orbit, and the zygomatic and sphenoid bones form the lateral aspect. The orbit provides protection for the eyeball (globe) and contains the lacrimal gland, which produces the tears that lubricate and rinse the surface of the eye. The bony orbit also provides anchorage for the six small extraocular muscles that move the eye. The optic nerve passes through the posterior aspect of the orbit. The visual cortex is located in the occipital lobe of the brain.
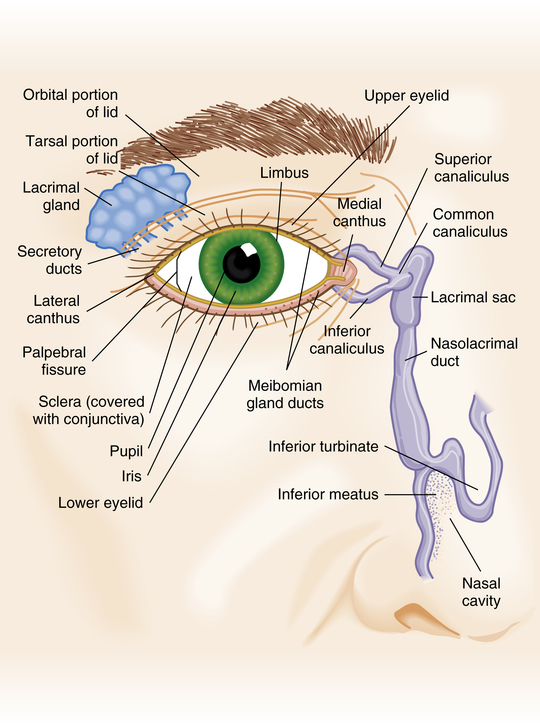
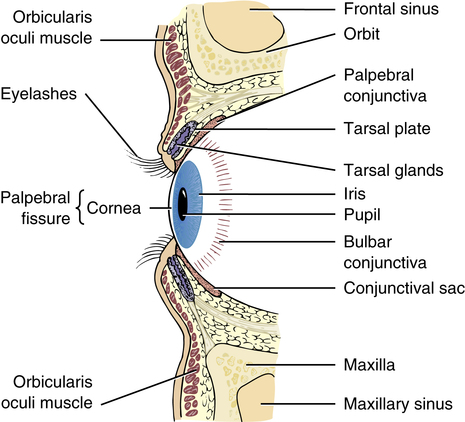
The external eye includes the eyelid, the conjunctiva, and the lacrimal gland (Figure 12-2). These structures serve to protect the eye from foreign objects and to distribute tears evenly across the eye. The eyelids provide protection for the external surface of the eye. They help lubricate the ocular surface with their blinking action. The eyelid skin is the thinnest skin of the body. Within each eyelid is a relatively rigid tarsal plate containing meibomian glands, which secrete the oily component of the three-layered tear film. The conjunctiva is a thin, essentially transparent, highly vascular mucous membrane that covers the anterior sclera and the posterior surfaces of both the upper and lower eyelids.
The eye consists of the sclera, cornea, iris, lens, retina, choroid, optic disk, and macula (Figure 12-3). The sclera is the dense white connective tissue that makes up more than 90% of the outer layer of the globe and provides structure for the contents of the eyeball. The cornea serves as the barrier between the environment and the aqueous humor. The cornea is made up of several layers and is the clear window of the eye through which light passes. The iris creates the color of the eye. The pupil is the round, central opening in the iris that creates a pathway for light to reach the retina. This aperture dilates or constricts to regulate the amount of light that enters the eye. Between the cornea and the iris is the anterior chamber. This space is filled with a clear fluid known as aqueous humor.
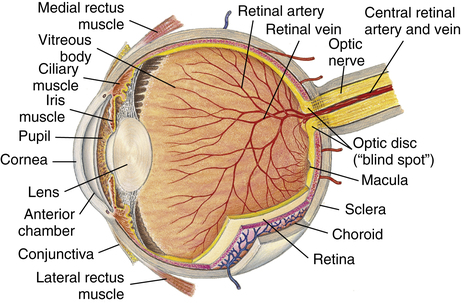
The crystalline lens is a round, transparent tissue located directly behind the iris. Tiny filaments called zonules, which are attached to the ciliary body, suspend the lens and control its thickness by contracting or relaxing it, allowing the image to be focused onto the retina. The ciliary body is responsible for production of the aqueous humor that fills the anterior chamber of the eye. The large space behind the lens is filled with the transparent gelatinous fluid of the eye known as the vitreous humor.1
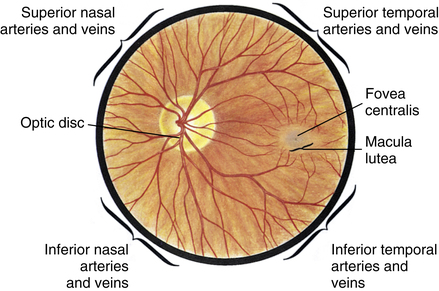
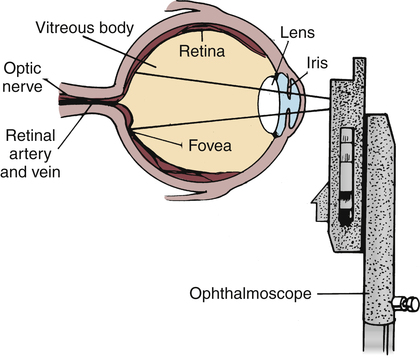
The retina is the thin, transparent membrane lining the back of the eye that receives light and sends the initial visual signal through the optic nerve to the brain, where it is processed and interpreted. Between the retina and the sclera is the vascular tissue called the choriocapillaris. The choriocapillaris supplies blood and nourishment to the outer layers of the retina. The “red eye” seen in a photograph is caused by the reflection of the camera flash through a dilated pupil against the choriocapillaris. As the nerve fibers from the retina exit the eye through the optic nerve, they bunch together at the origin of the optic nerve to form the optic disk. The optic disk is the visible portion of the optic nerve that can be seen when examining the eye. The other structure that can be seen during examination with an ophthalmoscope is the macula and its center point, the fovea, which is considered the site of central vision and color perception of the eye. The majority of color receptors, called cones, are found in the macula (Figure 12-4).2,3
Basic Examination Techniques
Testing Visual Acuity
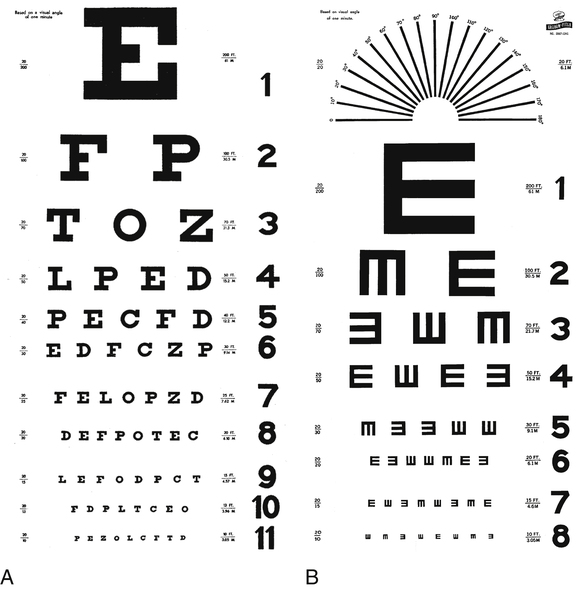
The most important part of an eye examination is the testing of visual acuity. The ability of the eye to focus clearly on distant or near objects is directly related to the structural integrity of all its parts. Visual acuity is assessed while the patient wears his or her spectacles or contact lenses for distance vision. The Snellen chart (Figure 12-5, A) is a quick and easy-to-use screening tool for far vision. The chart contains graduated sizes of letters with standardized acuity numbers at the end of each line. The patient is asked to read the lines of the chart while standing 20 feet away and covering one eye. The Snellen visual acuity is recorded as a fraction comparing the patient’s performance with the standard or “normal” person’s performance. The first number, or numerator, represents the patient’s distance from the eye chart, which should be 20 feet, and the second number, or denominator, represents the distance at which a normal person can read the same-size letter or letters on the same line of the chart. For example, reading the 20/40 line (from 20 ft away) indicates that the patient can see a specific-sized letter at 20 feet4, whereas a person with normal visual acuity can see the same-size letter from 40 feet away, thus revealing that the athlete has suboptimal acuity.1,5 One must remember that this is a screening tool for far visual acuity only and does not measure near vision or dynamic visual acuity. Referring a patient to an optometrist or ophthalmologist for a complete visual assessment may be warranted. Each eye is tested independently, with the other eye occluded with the palm of one hand or an opaque object. When testing acuity in children or nonreaders, an illiterate E or C or picture chart is used (Figure 12-5, B).
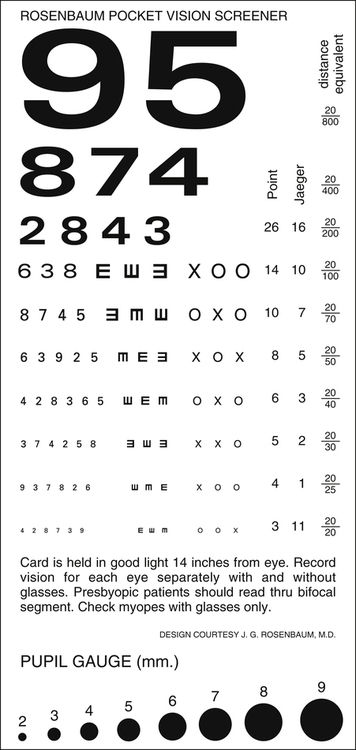
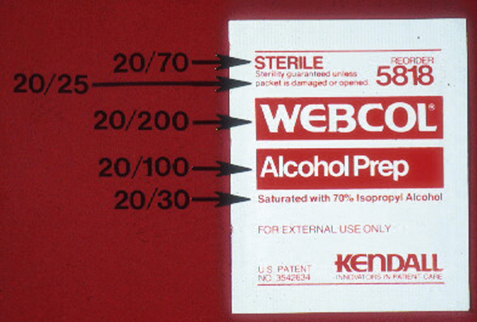
If a standard eye chart is not available, a near-vision card can be used to assess visual acuity (Figure 12-6). These small cards can be easily added to a standard first-aid kit. If near vision is tested, then the patient should wear reading glasses or bifocals if he or she typically requires corrective lenses to read. In lieu of a vision card or a Snellen chart, a common alcohol prep pad may be used to test visual acuity (Figure 12-7).
Testing Pupillary Responses
The ability of the pupil to react to light is a basic feature of a normal functioning ocular system. Brisk pupil constriction in response to a bright light also suggests the presence of vision in the absence of any standard eye chart. While the patient is looking into the distance, a light is moved in toward the eye from the side and shined directly into the pupil (Figure 12-8). The speed (briskness) of the pupillary constriction is noted. Each eye is examined separately and should have similar findings.
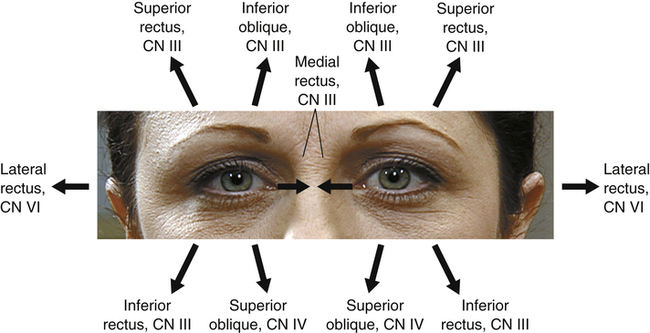
Testing Extraocular Muscle Motility
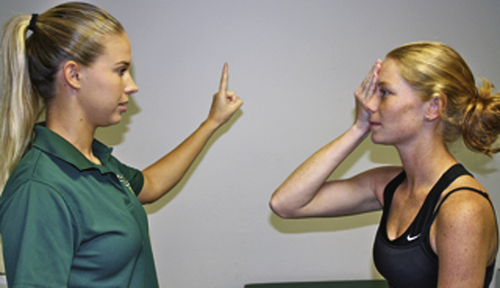
Part of the basic assessment of an patient’s eye is the examination of ocular motility. The inability of one or both eyes to move into the cardinal fields of gaze (Figure 12-9), especially after an eye injury, indicates a severe eye injury with possible eye socket pathology or entrapment of the extraocular muscles (Figure 12-10).6 The examiner asks the patient to follow an object or a fingertip up, down, left, and right with both eyes together. The examiner assesses the patient for smooth, uninterrupted movements of both eyes in all fields of gaze. There should be no restriction of gaze in either eye; movements of the two eyes should be harmonious and parallel. Any alteration of extraocular movements after an injury may also represent a variety of neurological conditions and requires immediate medical attention.7
Testing Peripheral Vision
The method most often used to grossly test peripheral vision is called confrontation visual field testing (Figure 12-11). The examiner tests the patient, peripheral vision one eye at a time. To test the right eye, the examiner sits approximately 3 feet directly in front of the patient. The patient, left hand over left eye, focuses only on the examiner’s left eye. Conversely, the examiner’s right eye is closed. This allows the examiner to watch his or her own open hands during the examination while fixating on the patient’s right eye.
Examining the Anatomical Structures of the Injured Eye
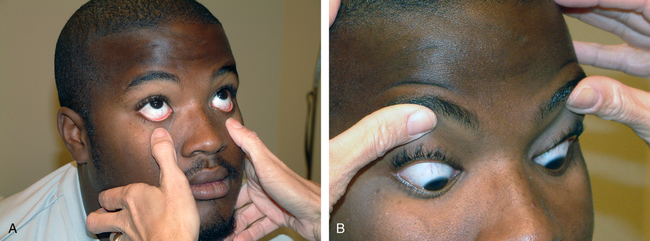
The examiner can use room lighting or a directed source of light (e.g., a flashlight or penlight) to assess the anterior portion of the ocular anatomy (Figure 12-12). Inspection of the lids and palpation of the bony orbital rim can reveal serious trauma after a blunt injury. If there is any suspicion that the trauma was severe enough to penetrate or rupture the eyeball then no external pressure should ever be placed on the eye or surrounding structures (i.e., eyelids).

A light is directed toward the patient’s opened eye; the patient is asked to look up while the examiner retracts the lower lid (Figure 12-13, A) and to look down while the examiner retracts the upper lid (Figure 12-13, B). This facilitates examination of the entire anterior aspect of the globe including the conjunctiva, sclera, cornea, and iris. Foreign bodies are commonly found in the conjunctival fornices. The fornices are the most posterior portions of the upper and lower portions of the conjunctiva, where the conjunctiva overlying the sclera (bulbar conjunctiva) and the conjunctiva lining the eyelids (palpebral conjunctiva) join together.
Examining the Eye With the Ophthalmoscope
The ophthalmoscope is an instrument used to view the internal structures of the eye. The head of the instrument contains a light source, which allows the examiner to visualize the inner eye through a series of lenses and apertures to allow for near or far focusing (Figure 12-14). The most commonly used aperture projects a large, round beam. Other apertures include the small aperture, the slit-lamp aperture to examine the anterior eye, the red-free filter aperture that shines a green beam to check the optic disk, and the grid aperture used to estimate size of fundal lesions.7
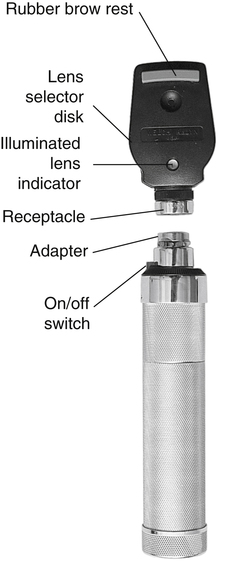
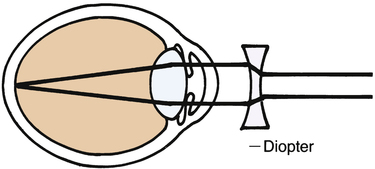
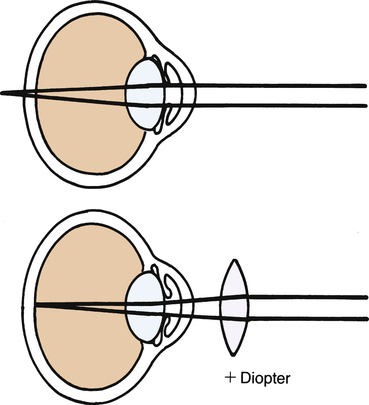
The diopter (magnification power of the lens) of the ophthalmoscope may be changed by turning the lens selector disk to the corresponding magnification.1,2 The black numbers indicate positive magnification power, and the red numbers show the negative. Turning the wheel clockwise selects positive lenses, and rotating it counterclockwise selects negative lenses. Lens numbers range in magnification power from ±20 to ±140. The range of plus and minus lenses can compensate for myopia or hyperopia in both the examiner and the patient.7 It is interesting to note that the abbreviations seen on a prescription for corrective lenses refer to the right and left eyes: oculus dexter (OD) for the right eye and oculus sinister (OS) for the left eye.
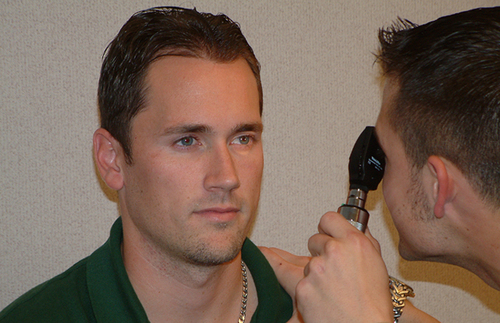
To examine a patient’s eye with the ophthalmoscope, the athletic trainer turns on the ophthalmoscope and selects the large aperture. This should project a large round light on the examiner’s hand or the wall. Next the room is darkened. The examiner holds the handle of the ophthalmoscope in the right hand (to examine the patient’s right eye) with the index or middle finger on the lens selector wheel. To examine the left eye, the left hand is used. The ophthalmoscope is held firmly against the bony orbit of the examiner’s eye (right eye for examining the patient’s right eye and left eye for the patient’s left eye) with the handle tilted laterally. This will prevent the athletic trainer and the patient from bumping noses during the examination (Figure 12-15).
To view the internal structures of the eye, such as the optic disk, arteries, veins, and retina, the athletic trainer may need to turn the lens selector wheel to focus on various structures. If the patient is myopic, a minus (red) lens will be used (Box 12-1). The fundus or retina will appear as a yellow or pink background with blood vessels branching away from the optic disk (see Figure 12-4). It is often easier to find the blood vessels and follow them back to the optic disk than to try to locate the optic disk by itself. The arterioles are smaller than the venules and reflect brighter light. The vessels should be followed as far as possible
BOX 12-1 USING THE OPHTHALMOSCOPE
The diopter is set at zero (clear glass) when both the patient’s and the examiner’s eyes are normal.
Modified from Jarvis C: Physical examination & health assessment, ed 5, Philadelphia, 2008, Saunders.
in each of the four quadrants of the eye (i.e., superior, inferior, nasal, and temporal) as they go away from the optic disk. When the optic disk is visualized, it should appear yellow to creamy pink but may be darker in dark-skinned individuals. The borders of the disk should be sharp and well defined. Moving in a temporal direction from the optic disk, the macula (fovea centralis) may be able to be visualized.4 To bring the fovea into the field of vision, the examiner asks the patient to look directly at the light of the ophthalmoscope. It will appear as a yellow dot surrounded by a deep pink periphery and will not have any blood vessels running through it.2 Considerable practice is needed to visualize the macula, and it may be impossible to view without the pupil being dilated.
Pathological Conditions
Refractive Error
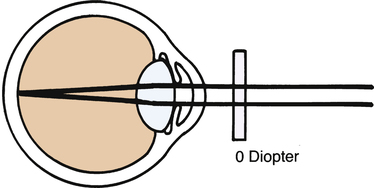
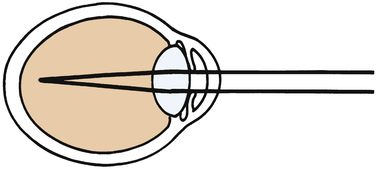
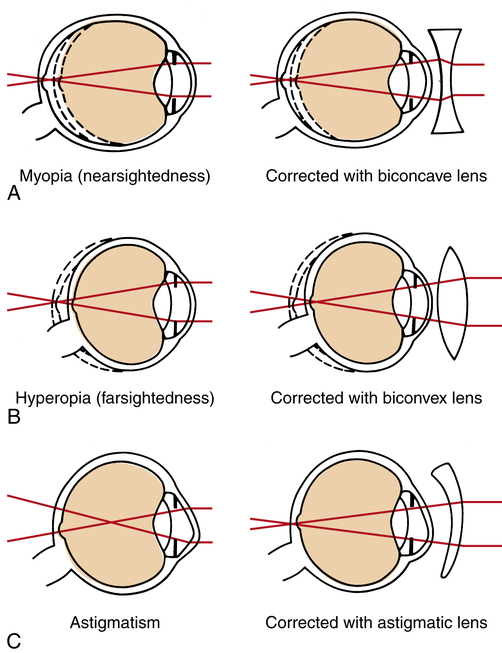
For clear vision, both near and distant images must be sharply focused onto the retina, which lines the back of the eyeball. The ability of the eye to focus these images is directly related to the length of the eye, the curvature of the cornea, the clarity of the ocular media, and the flexibility of the crystalline lens. The first two parameters, length of eye and curvature of cornea, determine the refractive error of an eye. Myopia, or nearsightedness, is produced by a longer than normal eye. A distant object is focused in front of the retina instead of on it (Figure 12-16, A). Hyperopia, or farsightedness, is produced by a shorter than normal eye (Figure 12-16, B). A distant object is out of focus when it reaches the retina and, theoretically, focuses behind the retina.8 The shape of the cornea is typically spherical (just like a tennis ball) on its anterior curvature. When this curvature is not spherical and has multiple curvatures (such as an egg or football), the eye is considered astigmatic8 (i.e., astigmatism; Figure 12-16, C). After the age of 40 years, the crystalline lens inside the eye loses its flexibility and the ability to focus on near objects. This is known as presbyopia. Presbyopic patients require reading glasses for near vision.
Treatment
The refractive error can be corrected with spectacles or contact lenses. Refractive surgery, such as laser-assisted in situ keratomileusis (LASIK), is also an option for treatment. LASIK is a procedure that is performed to correct myopia, hyperopia, or astigmatism. In LASIK, a small, partial-thickness flap is made from the top of the cornea. A laser is used to reshape the cornea tissue under the flap and remove any refractive error present. The corneal flap is repositioned onto the lasered cornea surface. This procedure takes approximately 15 to 30 minutes, with many patients capable of seeing an immediate improvement in their vision. Not everyone is eligible for LASIK. The success of the operation depends on the degree of initial refractive error of the patient as well as the thickness of the cornea. In one study, 36.4% of patients interviewed cited the desire to pursue sports and leisure activities as one of their main reasons for having LASIK.9 Many athletes consider having LASIK to avoid wearing glasses or contact lenses while playing sports as these may fog or dislodge, respectively, during play. There have been no studies to date showing any improvement in the performance of players who have had LASIK. Although generally viewed as a safe procedure, there have been multiple case reports of dislodged flaps due to sports-related eye trauma.9,10 LASIK should not be performed until the refraction has been stable for at least 2 years, especially in the adolescent or young adult.
Conjunctivitis
Signs and Symptoms
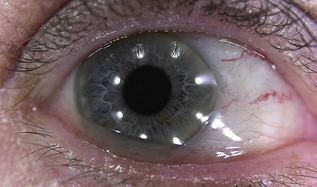
The symptoms of conjunctivitis, sometimes called pink eye, are not specific to the causative agent and can include all or some of the following: redness, burning, itching, tearing, irritation, and foreign body sensation (Box 12-3). Allergic conjunctivitis is classically characterized by itching. Viral conjunctivitis is often associated with recent cold or flu symptoms or recent contact with someone with a red eye.11,12 The most obvious signs of conjunctivitis are redness or vascular engorgement (Figure 12-17). There may be a discharge, ranging from watery to mucoid to frank purulence (pus). Redness of the conjunctiva in the space between the eyelids associated with a burning sensation is common after exposure to sun, wind, or dusty conditions, which are all common to outdoor athletics.
BOX 12-3 EVALUATION OF RED EYE
Follow these steps to assess the need for referral of a patient with red eye:
1. Check the athlete’s visual acuity.
2. Inspect for a pattern of redness. A diffuse “pink” color is quite different from a deep localized redness.
3. Observe for the presence of discharge.
4. Use a fluorescein stain and blue cobalt light to observe for corneal defects if an abrasion is suspected.
5. Use an ophthalmoscope to observe the inner structures of the eye for irregularities.
6. Refer a patient with any abrasions, foreign bodies, hyphemas, or irregularities in the shape of the pupil to an eye care specialist immediately.
Modified from Black JM, Hawks JH: Medical–surgical nursing: clinical management for positive outcomes, ed 7, St. Louis, 2005, Elsevier, p 1920.
Referral and Diagnostic Tests
Viral conjunctivitis is highly contagious, and therefore referral to an eye care practitioner for diagnosis is important in most cases of conjunctivitis. Without the benefit of a slit-lamp biomicroscope used by the ophthalmologist or optometrist, determining the exact cause of conjunctivitis may be difficult (Box 12-4).
BOX 12-4 THE CAUSE OF RED EYE

Stay updated, free articles. Join our Telegram channel

Full access? Get Clinical Tree


