“Very” Future Directions in Minimally Invasive Spinal Surgery

CHAPTER 61 “Very” Future Directions in Minimally Invasive Spinal Surgery


(Note to the reader: In order to describe the future directions of minimally invasive spinal surgery, a case performed in 2022 is described. All the technology described as follows is available today.)


It’s difficult to say exactly what day you become a surgeon, but you’re probably born sometime during your residency. Given this birth date, I can say that I’ve been operating for 40 years. I entered my third year of residency in July of 1982, and here it is today, July of 2022.


It’s even more difficult to call what I’m doing now surgery. When they opened the Techno-Suite 2 years ago, I took over the remote console pretty much full time (Fig. 61–1), and the residents worked the “Pit.” That’s the macho nickname for the sterile area. Compared with the old spinal surgery operating rooms I used to work in, the so-called Pit is pretty tame. Getting blood on the floor nowadays almost calls for an incident report, unlike back in the day, when you always saw the mop and bucket come out after a spinal fusion. Probably the biggest culture shift is the cast of characters needed to pull off a spinal case; the Pit is no longer the dominion of the solitary alpha male, perpetually irritated spinal surgeon, but rather looks like the clean room at NASA, where they assemble the Mars modules. Actually looking through the glass into the Pit now, I can’t even see a surgeon.
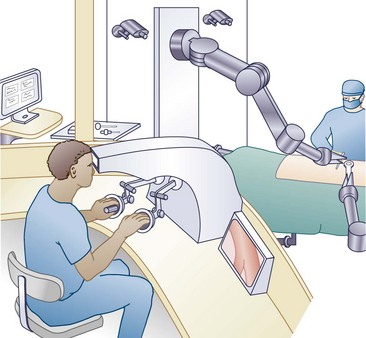


The robot-guy (as he’ll forever be known), Brad, is draping out the two robotic arms, #1 and #2. Each arm is about 6 feet long and is mounted on tracks that go up and down the length of the pit. On the far track is #2, and on the near track is #1. Between them, they get 360-degree access to the patient. Their “park” position is at the foot of the table, where Brad can change out their end manipulators. Although they’re designed to move within the operative space, I can also operate them with the two haptic handpieces right behind me on the console.


Brad works in the Pit with Gordon, the virtual planner. We submitted the work plan last week to give Gordon enough time to show us what the surgery should look like when we’re done and to sequence all the tools and implants before they were sterilized. Gordon will also continually update the virtual image during surgery to ensure its accuracy. Actually, reviewing the plan on my phone this morning, it looks like this first case is a five-part, complex restoration. The patient today has end-stage disc degeneration at L5-S1, with an early spondylolisthesis and stenosis at L4-L5. We did a metabolic survey of the L3-L4 disc and it still may be salvageable with a reconstitution, so we’ll tack that on at the end. It’s unusual that people let their backs get this bad nowadays. A four-part restoration takes about 4 hours, which by today’s standards is a pretty big case.


Tonya is the new biomodulator technologist. She brings in all the potions that we’ll be putting in the pumps and handles the electroactive implants. She’s taking the plasmids out of deep freeze and sequences the factors. She knows all the formulas: factors II and VII early, factor IX late for de novo bone, and pumping VEGF (vascular endothelial growth factor) in before the chondrocytic plasmids. That’s not even mentioning some of her epidural pain concoctions. We couldn’t do the surgery without her. On a four-part restoration we’ll be doing both plasmids and factors and then mechano-modulation at the end. As soon as we get started, she’ll prefill the pumps before we put them in.


The actual surgical technologist is setting up the soft tissue area. The old-style back table has dwindled down to a scalpel, a bovie, and set of soft tissue dilators. With the subdermal, absorbable zip ties and epidermal adhesives, there isn’t a suture to be seen. People are actually requesting that they get the robotic skin closure.


Preparation


Well, here come the traditional players into the suite: the circulator, the anesthesiologist, the resident, and of course, the patient. This may be the last traditional-looking scene that happens today; after this, it gets a little unconventional. So far, nothing special is going on. They’ll do the intubation, the IVs, and the Foley catheter. Once the patient is ready for positioning, the resident and I have to recite the Hippocratic Oath as part of the new time-out procedure.


To get the patient articulated into the 3-D (three-dimensional) universal spine positioner, the limb, pelvic, chest, and head shells need to be put on. The head shell looks just like a full-contact motorcycle helmet. The anesthesiologist takes charge of getting that into place and hooking up the helmet’s pressure insufflations, tubes, and sensors. The resident and circulator start at the patient’s feet and start placing the boots and thigh cuffs on, making sure the pressure tubes and sensors are connected. The sacral and iliac pads form the pelvic ring. It’s the hardest to place and done next. I’m starting to get the pressure sensor signals up on my monitor, and so far all the pieces are insufflating and beginning to cycle the pressure points appropriately. Finally, the chest vest and arm pieces are in place and the actual positioner can be hooked up.


Although it’s every bit as sophisticated as our operative robots, we still call the positioner the “table.” The last mechanical vestige of a table is the connecting bridge between the chest vest and the pelvic ring, only because it connects and supports the upper and lower body. After the draping skirts are placed around the patient, the 3-D positioner itself comes in like two jousting forklifts with the patient in the middle. The left and right sides of the lower body are attached to each arm of the lower positioner, and the upper torso is clipped on to the upper positioner. The helmet is held by the upper positioner with a separate passive arm. The resident connects the active link between the chest vest and the pelvic ring and gives me the “high” sign to begin turning the patient. All the pressure sensors are recording, so the positioner accepts the patient by accepting the weight and the gurney simply slides out from underneath the patient. David Copperfield would have been proud. We’ll be doing mainly posterior and lateral approaches today, so I turn on the patient positioning warning light and begin the rotation to prone.


Now that we’re prone, it’s time to start the process. The circulator preps the trunk circumferentially, while the resident goes out and scrubs his hands. Brad puts the fluoroscopic receiver on #2 and the transmitter on #1. By this time the draping skirts have been opened and unrolled, and the positioner is covered.


Identifying and Tagging the Anatomy


As the resident dons his lead, I reflexively look up at the ceiling at the tracking cameras that surround the Pit. They’re all on, making you feel like you’re under surveillance … technically you are. The ceiling cameras create a seamless optical environment. Just like a surveillance camera following a criminal, if you block one, you’ll still be seen on one of the others. With the #1 and #2 on simple tracking mode, the resident holds the EM (electromagnetic) gun over the patient. The gun is being optically followed by both #1 and #2. As the resident moves the gun down toward the pelvis, the robotic arms follow the gun like two enthralled spectators, one looking from above and one looking from below. There are 10 EM coil emitters preloaded into the gun. Each has a short tacklike tip that fixes it into the bone. Each coil emitter has a unique signal, based on its distance from, and orientation to, a magnetic field. Each coil trails from it a thin wire that communicates to the navigation system. The gun is steadied over the pelvis, and a light touch of the trigger produces an image of the iliac crest on all the screens hanging in the techno-suite, as well as my monitor screen on the console. Looks like it’s a good spot—the resident makes a stab incision, pushes the gun down against the crest, and fires the 5-mm-long EM coil sensor onto the crest. Next up is the L5 vertebra. The fluoro shots on my monitor show him lining up the gun on top of the spinous process and firing a coil emitter into L5. He goes ahead and places a coil emitter on L4 and L3 as well. To make these trackable, Brad goes under the table and attaches the EM field generator and then attaches each of the coil emitter wires into the switch box.


It’s time for the robotic dance. A fluoroscopic receiver is placed on one arm and a transmitter is mounted on the other robotic arm. Each arm has its own EM sensor, so not only do we know where the arms are within the EM field but, more importantly, we can know where the images (by virtue of their attached emitter coils) are within the EM field as well. We locate the anatomic center of the operative field. I push the automatic movement mode and the red flashing lights come on. Autonomous robotic motion always has to be done under alert conditions as dictated by the FDA (U.S. Food and Drug Administration) robotic guidelines. While #1 goes above the patient with the transmitter, #2 goes below with the receiver. They begin at the top of the operative field. Each one spins in a nearly 180-degree arc, one above and one below the patient. By staying “isocentric” to the patient and moving slowly down the length of the target anatomy, complete cross-sectional imaging of the operative field is obtained.


I check the images on my console and assemble them into the 3-D model. There’s always a fair amount of noise in the OR (operating room) images, so I pull up the preoperative plan that Gordon gave us and tease out the naked CT (computed tomography) scan. By merging the preoperative scan with the intraoperative scan, it cleans up nicely.


It’s time to tell the optical tracking cameras where each emitter coil lies on the pelvis and vertebrae. Whenever we begin to address a specific spinal segment, we “find” it optically first by using a detector that has its own EM detector and an optical array. When the detector’s sensor coil recognizes its relation to the implanted spinal segment sensor coil in the EM field, the image of the attached spinal segment will be precisely located by the optical cameras as well. This accomplishes two goals. First, standard, optically tracked instruments can be used for the rest of the procedure, and second, each spinal segment is continually tracked within the EM field even if breathing, patient motion, surgical manipulation, and so on cause them to move from their original position. Emitter coil placement and image acquisition placement to registration took 17 minutes, 43 seconds.


Part I: Transalar Fusion L5-S1


We’ll start from the bottom (literally) and work up. I notice out of the corner of my eye that everyone in the pit is getting ready. Brad is taking the cameras off of the robotic arms, while Gordon is bringing up the plans that will let us drill a 7.5-mm tunnel on each side of the iliac crest, up the sacral ala, and then across the L5-S1 disc. The plans are now up and I give them official approval. The robotic arms are outfitted with the drill and drill guide.


The resident reconfirms the position of the pelvis with the EM detector, and #2, following the preop plans, points to the entry point where the trajectory of the pathway crosses the skin. I watch the resident make the skin incision, then turn and keep track of the virtual world on my monitor. Through this I watch the drill guide go down the access portal, followed by the drill going down the drill guide. Because robotic policy requires passive drilling, the resident manually presses the drill forward. I watch it on the screen and also monitor the drill pressure through sensors. Pressure goes up as the drill goes through the iliac crest and then drops as it crosses the sacrospinous space. Drill pressure sensing while watching the progress of the virtual drill is a nice reality check. I tell the resident that he’s in the L5-S1 disc. He then does the other side. The robotic arms pull back, Brad switches the end actuators back to the fluoro mode, and they come back in for a reality fluoro check.


Once drill position is confirmed, Brad reoutfits the end actuators. #1 gets the reamer, #2 gets the tube retractor holder. The reamer is placed into the tissue protector, and the tunnel to the disc is reamed. I watch the virtual instruments as they enter the disc on the console: the reamer, the curettes, and even the pituitaries have their graphic counterparts on my screen. Tonya, on cue, starts putting the filled bone tubes with the loading BMP dose on her ready table. The resident manually fills the disc with the graft, while Brad outfits #2 with the implants. These are the new biointegrated implants, so Tonya is getting the biomodulation pump ready. Tonya would like the left implant to be infused by the pump, and Brad hooks up the catheter from the implant to the first infusion port on the pump. Number 1 threads the cages across the L5-S1 disc space, carefully positioning them so that they can later be connected to a rod system. Tonya, meanwhile, loads the pump’s reservoirs with BMPs (bone growth factors), FGFs (fibrous growth factors), VEGFs (vascular endothelial growth factors), and chondrocytic plasmids that will be infused into their target discs postoperatively. She activates portal 1 on the pump and confirms that BMP is flowing into the implant. The resident now does the first thing that actually resembles surgery, creating a subcutaneous pouch.


Our time’s not bad. Lumbosacral implants with pump in took 47 minutes.

< div class='tao-gold-member'>

Stay updated, free articles. Join our Telegram channel

Jul 28, 2016 | Posted by in ORTHOPEDIC | Comments Off on “Very” Future Directions in Minimally Invasive Spinal Surgery

Full access? Get Clinical Tree

Get Clinical Tree app for offline access