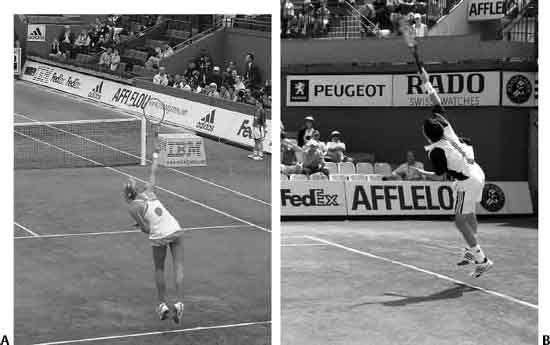
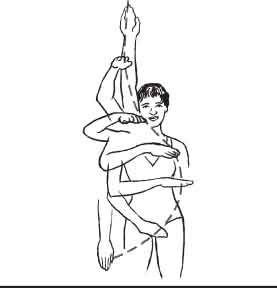
9 Todd S. Ellenbecker, Kevin E. Wilk, Michael M. Reinold, Timothy F. Murphy, and Russ Morgan Paine Prior to providing the specific guidelines for each sport, several common characteristics are inherent in each of the four programs detailed in this chapter. First, it is of primary importance that the clinician use specific objectively based guidelines individualized to each patient to determine that patient’s readiness to enter an interval sport program. For example, with the exception of golf, all of the sports reviewed in this chapter utilize the 90/90 [90 degrees of abduction and 90 degrees of external rotation (ER)] position as a major force-producing and stabilatory entity. Thus, the patient must demonstrate tolerance to this pattern during resistive exercise and simulated activity prior to actual repetitive sport participation using that position. Tests such as the subluxation relocation maneuver that utilizes the 90-degree abducted position with full ER in an attempt to provoke the GH joint’s stabilizing elements including the rotator cuff and labrum can be clinically applied.1,2 Additionally, muscle performance testing in the 90/90 position is highly recommended to determine the effectiveness of the dynamic stabilizers in functioning in that position. Muscle performance testing can range from simple manual muscle testing to sophisticated isokinetic dynamometry.3–5 Second, each of these programs contains a progression from the simplest sport-specific activity to the more challenging. This concept allows for progression of the activity according to the patient’s symptoms and recovery status; it enables each program to be tailored specifically to each patient regardless of skill level or degree of involvement in the sport. Finally, each interval program incorporates proper biomechanical technique to minimize the chance of reinjury and to prevent injury in adjoining segments of the kinetic chain. Of critical importance is the enlistment of an expert who combines extensive training in the biomechanical evaluation of the specific sport with the necessary experience and credential level to initiate actual changes in the patient’s biomechanics in relation to the sports activity. The kinetic link principle describes how the human body can be broken down into a series of links or segments, which are interrelated and ultimately affect segments both proximal and distal to that segment. Kibler6 refers to the kinetic link system as a series of sequentially activated body segments. The kinetic link principle is predicated on a concept developed by Hanavan,7 who constructed a computerized form of the adult human body composed of conical links connecting the lower extremities, torso, and upper extremities. In upper-extremity skill performance, activity in the upper-extremity segments is transmitted to the trunk and spine via a large musculoskeletal surface. This generates a change of forces across the musculoskeletal surface, which results in the generation of massive amounts of energy.7 Davies8 has described how the upper extremity can be viewed as a series of links. The links proposed by Davies8 include the trunk, scapulothoracic (ST) articulation, scapulohumeral (SH) or GH joints, and distal arm regions. Each of these links can be independent anatomically and biomechanically, but in relation to human function acts as a unit. When analyzing human movement, Putnam9 has discussed the concept of proximal to distal sequencing. This principle states that to produce the largest possible speed at the end of a linked chain of segments, movement must initiate in more proximal segments and proceed to the more distal segment. Additionally, the distal segment motion should commence at the time of maximal speed in the more proximal segment. This concept has been referred to by many names—the summation of speed principle,10 the kinetic link principle,11 and Palgenhoef’s12 concept of acceleration–deceleration. It has been verified and illustrated by measuring the linear speeds of segment end points, joint angular velocities, as well as joint moments.13 Several investigators have reported proximal-to-distal sequencing for kicking a ball, with the hip, knee, and ankle joints reaching their peak speeds in a sequence and each peak being greater than that of the proximal joint.9 Most researchers feel that the proximal segment deceleration is caused by the acceleration of the distal segment.9 Proximal-to-distal sequencing has been reported in the upper extremity during throwing,14–16 as well as in the tennis serve.17,18 However, more recent analysis suggests that there are aspects of these upper-extremity patterns (throwing, serving, and striking) that have significant modifications in the traditional proximal-to-distal sequencing. Feltner and Depena19 reported peak internal rotation (IR) velocity of the humerus following movements of the wrist and hand during overhead throwing, and Sprigings et al20 have shown IR to be the largest contributor to racquet head velocity at impact despite being one of the last components in the modified sequence of proximal-to-distal sequencing. Groppel21 has applied the kinetic link system to the analysis and description of optimal upper-extremity sport biomechanics. Groppel states that the initiation of the sequential activation of the kinetic link system starts at the ground as the lower extremities of the body create a ground reaction force. The sequential activation then proceeds from the legs, through the hips and trunk, and is funneled via the ST and GH joints to the distal aspect of the upper extremity. The important role of both linear and angular momentum in the production of force and power in upper-extremity sport activities such as the throwing motion and tennis serve is clearly evident by analyzing this model. It is important to note that the initiation of movement of the next segment in the kinetic chain occurs prior to complete deceleration of the previous segment. The angular velocity of the segmental rotation in the body’s kinetic link system was originally thought to occur at increasingly faster velocities moving from the lower extremities to the upper extremity during the tennis serve.21 Further biomechanical analysis, however, has demonstrated that although this sequential increase in angular velocities does occur over many of the segments, a perfect progression in angular velocity does not occur.17 Kibler6 has provided an objective analysis of force generation during a tennis serve. This analysis has identified 54% of the force development during the tennis serve coming from the legs and trunk, with only 25% coming from the elbow and wrist. Nonoptimal performance and increased risk of injury occur in tennis and other sport activities when individuals attempt to utilize the smaller muscles and distal arm segments as a primary source for power generation.21,22 The demands on the GH joint in tennis occur with virtually every ball contact with additional loading occurring during the movements prior to and following ball contact. Electromyographic (EMG) analysis of the tennis serve and groundstrokes finds the highest activity in the rotator cuff muscle tendon unit occurring during the serve. The tennis serving motion can be broken down into four primary phases: wind-up, cocking, acceleration, and follow-through.23 These phases are used to scientifically break down the movement and do not occur as separate individual stages or phases during actual performance. Arm cocking occurs as the hands separate and the ball toss is initiated.23 Dillman et al24 reported a composite maximal ER angle of the dominant arm of 154 degrees during serving in elite level players. Additionally, during arm cocking when the elbow is in a position of 90 degrees of elbow flexion, dominant arm abduction angles have been reported at 83 degrees in elite Australian players.17 Inappropriate abduction angles greater than 90 degrees during arm cocking and acceleration may lead to impingement of the rotator cuff tendons under the coracoacromial arch. After maximal external rotation, the dominant shoulder undergoes rapid concentric internal rotation. Angular velocities of 1074 to 1514 deg/s have been measured during the acceleration phase of the tennis serve in elite players.25 During the acceleration phase, proper evaluation and monitoring are indicated as the hips, trunk, and shoulders segmentally rotate. Premature opening of the hips and trunk can lead to “arm lag” in which the shoulder is placed in extremes of horizontal abduction. This has also been termed hyperangulation where the humerus lags behind the scapular plane of the body during IR of the GH joint.26 This hyperangulation can lead to rotator cuff and labral injury and has been implicated as a major factor in overuse injury in overhead athletes, including tennis players.26 Figure 9–1 Tennis serve ball contact illustrating glenohumeral abduction angle between 90 and 100 degrees. For the purpose of analyses, the acceleration phase terminates at ball contact. Initial appearance of GH joint position during ball contact often reveals a nearly vertical humeral position. However, upon closer analysis, the contribution from the trunk via lateral flexion allows the GH joint to be positioned between 90 and 100 degrees (Fig. 9–1). This position is critical; it allows for forceful rotational movements with the GH joint below positions with inherent subacromial impingement or compression.27 Frequently, tennis players with nonoptimal trunk control or stabilization, or players who are unable to laterally flex their trunk to allow for this important alignment use inappropriate amounts of GH abduction during their serve. Following ball contact, the follow-through phase begins and terminates at the end of the serving motion. The follow-through phase is characterized by significant eccentric muscular activity.23 A common biomechanical fault found in players with shoulder dysfunction is for the rapid abbreviation of the follow-through phase following ball contact. Recommended technique includes a full motion including trunk flexion and rotation, shoulder extension adduction, and cross-arm adduction as well as IR. Research showing reduced IR range of motion (ROM) in the dominant shoulder of the elite tennis player28,29 may lead to abbreviated patterns of movement and an increase in scapular upward rotation and protraction. This finding can be compared with the clinical examination findings of total rotation ROM to determine whether abbreviated follow-through patterns are being applied because of a true loss of GH joint IR. Tennis groundstrokes consist of the forehand and backhand and can be divided into three primary phases: preparation, acceleration, and follow-through. The discrimination between the acceleration and follow-through phases is based upon ball contact. Most consequences for the tennis playing shoulder occur during acceleration and follow-through with the preparation phase showing minimal muscular activity in the shoulder region.23 One important point regarding the forehand groundstroke preparation phase is the importance of scapular retraction. Placement of the arm behind the body requires horizontal abduction with trunk rotation. Failure to achieve this position with a scapular protracted position may lead to increased anterior shoulder stress particularly as forward trunk rotation is imposed upon this protracted position with the GH joint horizontally abducted. One very important concept for analysis of the forehand and backhand groundstroke pertains to the position or stance taken by the player during execution. Three primary stances are prevalent: open, square, and closed.30,31 Traditionally, the square stance has been taught whereby the player stands perpendicular to the net (sideways) with the tips of one foot aligned with the tips of the other foot. The shoulders are also perpendicular to the net and baseline such that upper body and trunk rotation can occur. Players using this type of stance rely primarily on linear momentum to gain power and this is initiated as the player steps forward toward the oncoming ball.30 Although this classic stance has been used for a very long time, one limitation occurs during follow-through when the pelvis can block further rotation of the trunk and pelvis due to the square stance alignment. This blocking is particularly prevalent when the player uses a truly closed stance where the front foot is placed in a position where it actually crosses over the back foot. This stance is rarely used and not recommended for forehand groundstrokes and would limit the effective transfer of kinetic energy from the lower body and trunk to the upper body for power generation. The final stance to discuss is the open stance. In today’s tennis, nearly all the top players use an open or partially open stance on the forehand with many top players using the open stance for the two-handed backhand as well. The open stance involves placement of the feet parallel to the net or baseline. It is important to note however, that the position of the shoulders must be rotated or closed such that they are placed perpendicular to the pelvis and lower body position and perpendicular to the net or baseline. This allows for greater generation and utilization of angular momentum because of the large angle of separation between the pelvis and shoulders (pelvic/shoulder separation angle). The relationship of the lower extremities in the open stance does not block the pelvis and allows for a more optimal rotation pattern as the upper extremity is accelerated toward the ball and continues through the follow-through phase.30 One common error with the open-stance forehand that can lead to anterior shoulder pain and rotator cuff dysfunction occurs during the early rotation of the pelvis when the lower body and trunk rotate ahead of the arm. This improper sequential rotation leaves power generation to the upper body as the trunk and pelvis rotate too early preventing the optimal transfer of power from the lower extremities and trunk. This poorly timed rotation places the GH joint in a position in the coronal plane during ball contact, or in many cases ball contact occurs with even greater amounts of horizontal abduction behind the coronal plane of the body. This creates a position similar to that described during the serving motion of hyperabduction, and when coupled with scapular protraction and imbalanced muscle function can lead to injury or reinjury if these type of mechanics are used in the interval tennis program.2,27 The backhand groundstroke can be executed with both one and two hands. Research has shown that muscular activity during the one-and two-handed backhands are statistically similar31; however, the use of both hands on the racquet can allow for greater facilitation of trunk rotation and more optimal transfer of energy via the kinetic chain theory. Ball contact should occur slightly in front of the body to allow for a forward progression of the momentum generated. One common error inherent in many players who report pain during the backhand groundstroke is late ball contact. This occurs when the ball is hit while either in line with the body or actually behind the midline (umbilicus) of the body. This results in a nonoptimal transfer of energy from the lower body and trunk and a reliance on concentric shoulder ER for power generation. Additionally, during the one- and two-handed backhands, the dominant arm is initially brought into some degree of cross-arm adduction during preparation. If the player does not rotate the pelvis and trunk and merely cross-arm adducts (horizontally adducts) the arm, pain may be reported over either the anterior or superior aspect of the shoulder from primary impingement or compression of the rotator cuff under the coracoacromial arch. Careful monitoring of body position and a reliance on rotation of the pelvis and trunk ensure a clear path for arm movement during this important stroke. The specifics of the interval tennis program are outlined in Table 9–1. Each of these elements plays an important role in the successful return of the tennis player regardless of skill level. The guidelines for an interval tennis program are presented in Table 9–2. An alternate day format should be followed in the interval program to allow for at least 1 and in some cases 2 days of recovery between sessions. Continuation of the patient’s posterior rotator cuff and scapular strengthening program should continue in addition to any formal therapy that is required to normalize ER:IR strength ratios and improve muscular endurance as well as optimize shoulder GH ROM if needed. As mentioned earlier, there is a great emphasis placed on the patient’s ability to utilize proper biomechanics. Often when a program is initiated too early because of pressure from the player, coach, or parent, compensatory mechanics are utilized, which may produce injury and introduce inappropriate sport biomechanics. Supervision of the interval program by a certified tennis teaching professional or knowledgeable coach and physical therapist is highly recommended. The recommended stroke progression is based on the upper-extremity kinetic and kinematic research data that clearly demonstrates significantly lower stress levels on the GH joint during the groundstrokes as compared with the overhead serving motion. The initiation of serving before hitting overhead smashes is also recommended; the serve consists of a self-initiated toss, whereas in the overhead smash the player takes the ball out of the air and must optimally position the shoulder to properly execute the shot. Preimpact ball velocity is also controlled during the interval tennis program. The ball should be fed by a partner or coach from the net, thus allowing the patient to strike the ball with minimal preimpact ball velocity. This is progressed to having the player rally from the baseline with a partner or coach. Rallying from baseline to baseline produces greater preimpact ball velocities and greater inherent stress to the patient’s shoulder during the program. Further reduction of shoulder stress is achieved by using low-compression or foam tennis balls (EZ Hit Foam Ball, Wilson Sporting Goods, Chicago, IL; low-compression ball or “Star Ball” Penn Racquet Sports, Phoenix, AZ), which are much lighter than the standard tennis ball. These balls when struck by a normal tennis swing go shorter distances, thus facilitating training. In addition, the type of racquet, string type, and string tension that the player uses should be addressed. Researchers and medical professionals typically recommend racquets that are in the midrange in weight, stiffness, and head size.32,33 As for string type, “coreless” multifilament strings have been shown to have greater resiliency and thus help protect the arm. String tension that is overly tight for the racquet frame can increase stress to the extremity of the player; string tensions should be in the midrange of the manufacturer’s recommendation. It is beyond the scope of this chapter to cover all aspects of the string and equipment; however, we recommend referring the patient to a USRSA (United States Racquet Stringers Association) certified technician for an evaluation of racquet compatibility and string evaluation.
Use of Interval Return Programs for Shoulder Rehabilitation
Interval Tennis Program
Interval Baseball Throwing Program
Injuries in Swimmers
Training Stresses in Swimmers
Interval Programs for Swimmers
General Strategies for All Swim Progression Programs
Electromyographic Analysis of the Golf Swing
Pathomechanical Analysis of the Golf Swing
Modifications to the Golf Swing
Rehabilitation, Conditioning, and Training Tips for Golfers
Proper Warm-up for Golfers
Interval Golf Program
 The Kinetic Link Principle
 Tennis
Interval Tennis Program
| Frequency | Alternate Day Performance |
| Supervision | Emphasis on proper stroke mechanics. |
| Stroke pattern progression | Groundstrokes—volleys—serves—overheads progression—matchplay |
| Impact progression | Low preimpact ball velocity to higher preimpact ball velocity |
| Ball progression | Low-compression (foam) to regulation tennis ball |
| Sequencing | Proper warm-up, interval tennis program, cool-down, and cryotherapy |
| Timing | Supplemental rotator cuff and scapular exercises performed either on “rest” day following interval tennis program or after execution of interval tennis program on the same day to minimize the effects of overtraining and overload. |
Preliminary Stage: Foam ball impacts beginning with ball feeds from a partner. Perform 20–25 forehands and backhands assessing initial tolerance to groundstrokes only. Presence of pain or abnormal movement patterns in this stage indicates that you are not ready to progress to the actual interval tennis program. You should continue rehabilitation. Interval Tennis Program: Excessive fatigue on your previous outing—Remain at the previous stage or level until you can perform that part of the program without fatigue or pain. 1. a. Have a partner feed 20 forehand groundstrokes to you from the net. (Partner must use a slow, looping feed that results in a waist-high ball bounce for player contact.) b. Have a partner feed 20 backhand groundstrokes as in 1a above. c. Rest 5 minutes. d. Repeat 20 forehand and backhand feeds as above. 2. a. Begin as in stage 1 above, with partner feeding 10 forehands and 10 backhands from the net. b. Rally with partner from baseline, hitting controlled groundstrokes until you have hit 50–60 strokes. (Alternate between forehand and backhand and allow 20–30 seconds rest after every 2–3 rallies.) c. Rest 5 minutes. d. Repeat 2b above. 3. a. Rally groundstrokes from the baseline for 15 minutes. b. Rest 5 minutes. c. Hit 10 forehand and 10 backhand volleys, emphasizing a contact point in front of body. d. Rally groundstrokes for 15 additional minutes from the baseline. e. Hit 10 forehand and 10 backhand volleys as above. Preserve Interval: (Perform Prior to Stage 4) (Note. This can be performed off court and is meant solely to determine readiness for progression into stage 4 of the interval tennis program.) a. After stretching, with racquet in hand, perform serving motion for 10–15 repetitions without a ball. b. Using a foam ball, hit 10–15 serves without concern for performance result (only focusing on form, contact point, and the presence or absence of symptoms). 4. a. Hit 20 minutes of groundstrokes, mixing in volleys using a 70% groundstrokes/30% volleys format. b. Perform 5–10 simulated serves without a ball. c. Perform 5–10 serves using a foam ball. d. Perform 10–15 serves using a standard tennis ball at approximately 75% effort. e. Finish with 5–10 minutes of groundstrokes. 5. a. Hit 30 minutes of groundstrokes, mixing in volleys using a 70% groundstrokes/30% volleys format. b. Perform 5–10 serves using a foam ball. c. Perform 10–15 serves using a standard tennis ball at approximately 75% effort. d. Rest 5 minutes e. Perform 10–15 additional serves as in “5c” above. f. Finish with 15–20 minutes of groundstrokes. 6. a. Repeat stage 5 listed above increasing the number of serves to 20 to 25 instead of 10 to 15. b. Before resting between serving sessions, have a partner feed easy short lobs to attempt a controlled overhead smash. 7. Prior to attempting match play, complete steps 1–5 without pain or excess fatigue in the upper extremity. Continue to progress the amount of time rallying with groundstrokes and volleys, in addition to increasing the number of serves per workout until 60–80 overall serves can be performed interspersed throughout a workout. Remember that an average of up to 120 serves can be performed in a tennis match, therefore be prepared to gradually increase the number of serves in the interval program before full competitive play is engaged. |
USPTA, United States Professional Tennis Association.
 Baseball
Similar to the demands listed in the previous section for the tennis serve, specific aspects of the throwing motion produce large stresses upon the GH joint; when these stresses are repetitively applied, tissue overload and injury or reinjury can occur.
The baseball pitching motion may be broken down into specific phases, similar to the tennis serve. These phases include the wind-up, stride, arm cocking, arm acceleration, arm deceleration, and follow-through (Fig. 9–2). Concerning shoulder pathologies, the arm cocking through arm deceleration phases places the greatest amount of force on the shoulder. Fleisig et al34 have determined that the greatest amount of kinetic forces at the shoulder occur at the time of maximum ER and ball release.
The cocking phase of the throwing motion occurs following hand separation when the ball leaves the glove and continues until maximal ER of the throwing shoulder occurs.35 By the end of the cocking phase, the shoulder can obtain a nearly horizontal position of 180 degrees of ER. This amount of ER, however, is combined with ST and trunk articulation and gives the appearance of the artificially high ER value at the shoulder joint.36 Fleisig et al34 have suggested that the high amount of forces observed at the GH joint during the cocking phase may lead to pathological anterior gleno-humeral hyperlaxity and subsequent rotator cuff and labral lesions associated with internal impingement.
At the time of maximal ER in the throwing arm, it is also important to note that the ST joint must be in a retracted position.6,26 The scapula actually translates 15 to 18 cm during the throwing motion.6 Failure to retract the scapula leads to an increase in the antetilting of the glenoid because of a protracted scapular position. This can exacerbate the instability continuum and create anterior instability and suboptimal performance leading to injury.6,26 Recent research has demonstrated that in late cocking, the abduction and ER position places the posterior band of the inferior GH ligament in a “bowstrung” position under the humeral head. Tightness in this structure can lead to a posterosuperior shift in the humeral head, which can bring on rotator cuff and labral pathology.26 Improper scapular positioning coupled with increases in horizontal abduction during late cocking and the transition into the acceleration phase has been termed “hyperangulation” and leads to aggravation of undersurface rotator cuff impingement and labral injury derangement.
The acceleration phase begins after maximal ER and ends with the release of the ball. During the delivery phase, the arm initially starts in −30 degrees of horizontal abduction (30 degrees behind the coronal plane).24 As acceleration of the arm continues, the GH joint is moved forward to a position of +10 degrees of horizontal adduction (10 degrees of horizontal adduction anterior to the coronal plane).24 During acceleration, the arm moves from a position of 175 to 180 degrees of composite ER to a position of nearly vertical (105) degrees of external rotation at ball release. Internal rotation of the glenohumeral joint during this phase occurs at over 7000 to 9000 deg/s.24,36
An additional important variable to monitor during arm cocking and acceleration is the abduction angle of the GH joint. Research has consistently shown that the abduction angle for the throwing motion ranges between 90 and 110 degrees.24,37 It is important to note that this angle is relative to the trunk with varying amounts of trunk lateral flexion changing the actual release position while keeping the abduction angle remarkably consistent across individuals and major pitching styles.24,36,37 Elevation of the GH abduction angle to > 110 degrees can subject the rotator cuff to impingement stresses from the overlying acromion. Careful monitoring of this abduction angle during the throwing motion is recommended; still digital images or digital video aids in this regard.
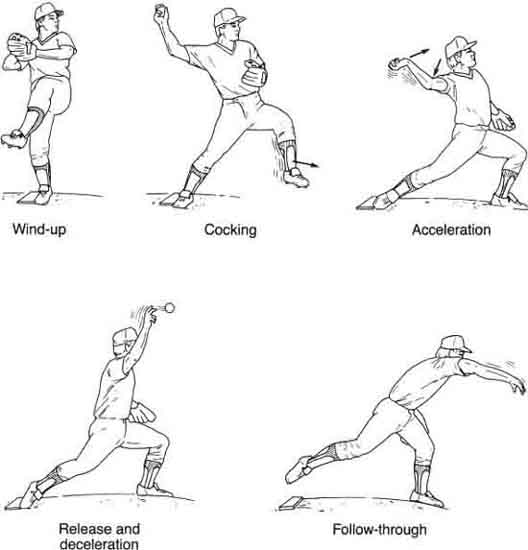
Figure 9–2 Phases of the throwing motion. (From Walsh DA. Shoulder evaluation of the throwing athlete. Sports Med Update 1989;4:24. Also reprinted in Andrews JR, Harrelson GL, Wilk KE. Physical Rehabilitation of the Injured Athlete. 3rd ed. Philadelphia, PA: Saunders; 2004:521, Figure 19–5. Reprinted here by permission)
Interval Baseball Throwing Program
An interval throwing program (ITP) is used to gradually return baseball pitchers and positional players to competition. The ITP is used for high school, collegiate, and professional baseball players and has been developed based on research conducted quantifying the biomechanics of flat-ground, long toss throwing,38 and partial effort throwing.39 An athlete can begin an ITP following a satisfactory clinical exam demonstrating full ROM, minimal pain or tenderness, adequate dynamic stabilization, and sufficient strength and muscular endurance.5,40 The ITP is set up to minimize the chance of reinjury and emphasizes warm-up and stretching. Because there is an individual variability in all athletes, there is no set timetable for completion of the program. Variability will exist based on the skill level, goals, and injury of each athlete. It is recommended that the athlete follow the program rigidly because this will be the safest route to return to competition. Highly competitive individuals who wish to return to competition quickly have a tendency to increase the intensity of the ITP. This may promote the incidence of reinjury and may retard the rehabilitation process.
The athlete should supplement the ITP with a high-repetition, low-weight exercise program. The strengthening program should achieve a balance between anterior and posterior musculature; however, special emphasis should be given to the posterior rotator cuff and scapular musculature for any strengthening program.41,42
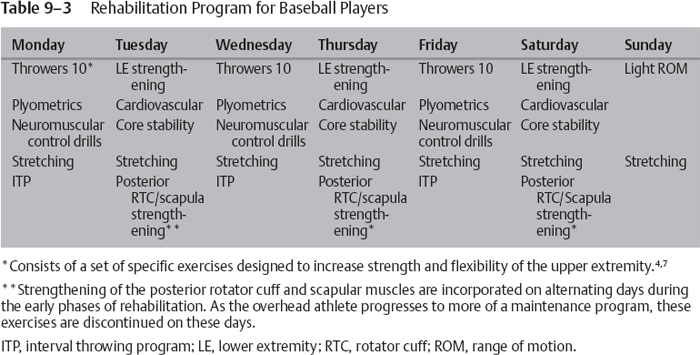
The rehabilitation program should follow a sequential order of alternating days.43 All strengthening, plyometric, and neuromuscular control drills should be performed three times per week (with a day off between days) on the same day as the ITP. The athlete should warm up, stretch, and perform one set of each exercise before the ITP, followed by two sets of each exercise after the ITP. This provides an adequate warm-up but also ensures maintenance of the necessary ROM and flexibility of the upper extremity. Cryotherapy may be used following the completion of a session to minimize pain and inflammation. The alternate days are used for lower extremity, cardiovascular, and core stability training. In addition, the athlete performs ROM and light strengthening exercises emphasizing the posterior rotator cuff and scapular muscles.43 The cycle is repeated throughout the week with the seventh day designated for rest and light ROM and stretching exercises (Table 9–3).
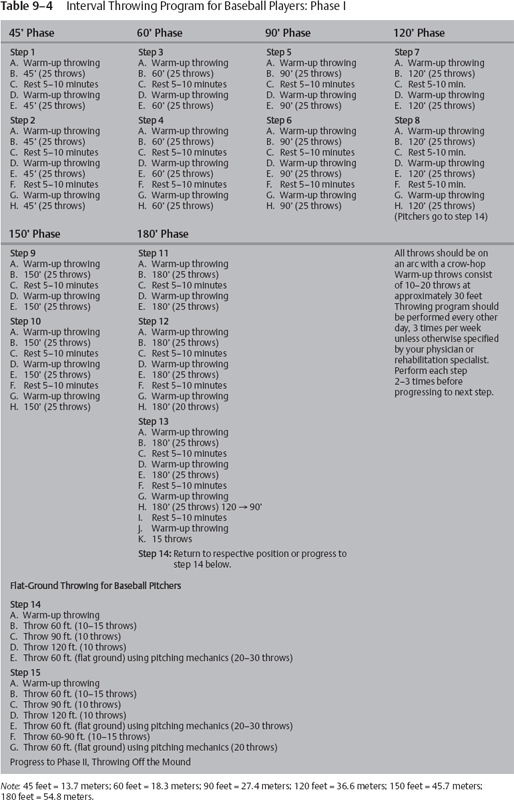
The ITP is divided into two phases. Phase I is initiated with throwing on flat ground (Table 9–4). The athlete begins throwing at 45 feet (13.7 m) and gradually progresses to 60, 90, 120, 150, and 180 feet (18.3, 27.4, 36.6, 45.7, 54.8 m).
A critical aspect of phase I is the use of the “crow-hop” to simulate the throwing act, emphasizing proper body mechanics. Components of the crow-hop method are first a hop, then a skip, followed by the throw. Normally, the velocity of the throw is determined by the distance; however, in the crow-hop, the ball should be thrown with an arc and have only enough momentum to travel the desired distance.
The athlete should begin warm-up throws at a comfortable distance ~30 to 45 feet (9.1 to 13.7 m)] and then progress to the distance indicated for each step of the ITP. The program consists of throwing at each step two to three times on separate days without pain or symptoms before progressing to the next step. Initially, the athlete will perform two sets of 25 throws at the specified distance. Adequate warm-up before each set and a rest of 5 to 10 minutes are encouraged. The amount of throws is then increased to three sets of 25 throws at each distance and finally to the next distance in the sequence. If pain or symptoms arise at a particular step, the athlete is instructed to return to the previous asymptomatic step and attempt to progress again when symptoms subside.
After the pitcher can perform phase I without symptoms they will be ready to progress to phase II, throwing off a mound (Table 9–5). Just as the advancement to this point has been gradual and progressive, the return to unrestricted pitching must follow the same principles. The length of phase II is determined specifically for each athlete. A pitcher should first throw only fastballs at a 50% level of effort, progressing to 75 and 100% levels. The level of effort is often difficult for the athlete to perceive. Fleisig et al39 have determined that when athletes are instructed to throw at their 75% level of effort, the ball’s actual velocity was measured at their 90% level. Similarly, when asked to throw at a 50% level, the actual ball velocity was 85% of their full throwing speed. The use of a radar gun is a helpful tool in effort control.
Phase II of the ITP begins by using the 120 feet (36.6 m) step of phase I as a warm-up. The pitcher then throws 15 throws off the mound using full wind-up pitching mechanics at a 50% level of effort. As the player progresses through phase II, the number of pitches as well as the throwing level of effort is gradually advanced until the athlete is allowed to pitch at light batting practice. At this time, the player may start more stressful pitches such as breaking balls as well as the initiation of simulated games.
During the recovery process, the athlete may experience soreness and a dull, diffuse aching sensation in the muscles and tendons. If sharp pain is felt, particularly in the joint or point of injury, the athlete is instructed to stop all sport activity until the pain ceases. If pain persists, the athlete needs to undergo a physical assessment.
Furthermore, the use of proper throwing mechanics is critical during the ITP. It is imperative that the athlete minimize mechanical faults that may increase stress on the throwing shoulder and elbow such as leading with the elbow, dropping the elbow, and closing the stance during foot contact. A pitching coach or someone proficient in sports biomechanics is a valuable ally to the rehabilitation team to ensure that proper throwing mechanics are used.
An ITP for Little League–aged athletes may also be applied. The Little League ITP (Table 9–6) parallels the previously outlined ITP in providing the young baseball player with a graduated progression of throwing distances. Alterations are made based on the size of Little League fields and the distance from home plate to the mound compared with high school and adult playing situations. Similar warm-up and flexibility exercises are incorporated. The Little League player begins throwing with a warm-up consisting of lobbing the ball 15 to 20 feet (4.6 to 6.1 m). The player then performs two sets of 25 throws at 30 feet (9.1 m) with a 15-minute rest in between. As the athlete progresses, three sets of 25 throws are initiated. The Little League player is progressed from 30 feet to 45, 60, and 90 feet (9.1 m to 13.7, 18.3, and 27.4 m) followed by positional drills and pitching off the mound similar to phase II of the ITP.
 Swimming
Unlike the highly structured interval return progressions associated with sports whose mechanisms are based upon a return from a period of little or no activity, plans for returning the swimmer to unrestricted training and competition are fraught with variables, which are as unique as the athletes themselves. Depending on the nature and degree of their injury, swimmers may be returning to training from scratch, from a break of several days to weeks, or from a temporary reduction in training intensity.
| Stage One: Fastballs Only | All throwing off the mound should be done in the presence of your pitching coach or sport biomechanist to stress proper throwing mechanics |
| Step 1: Interval throwing | |
| 15 Throws off mound 50% | |
| Step 2: Interval throwing | |
| 30 Throws off mound 50% | (Use speed gun to aid in effort-level control) |
| Step 3: Interval throwing | |
| 45 Throws off mound 50% | Use interval throwing 120 ft (36.6m) phase as warm-up |
| Step 4: Interval throwing | |
| 60 Throws off mound 50% | |
| Step 5: Interval throwing | |
| 70 Throws off mound 50% | |
| Step 6: 45 throws off mound 50% | |
| 30 Throws off mound 75% | |
| Step 7: 30 throws off mound 50% | |
| 45 Throws off mound 75% | |
| Step 8: 10 throws off mound 50% | |
| 65 Throws off mound 75% | |
Stage Two: Fastballs only | |
| Step 9: 60 throws off mound 75% | |
| 15 Throws in batting practice | |
| Step 10: 50–60 throws off mound 75% | |
| 30 Throws in batting practice | |
| Step 11: 45–50 throws off mound 75% | |
| 45 Throws in batting practice | |
Stage Three | |
| Step 12: 30 throws off mound 75% warm-up | |
| 15 Throws off mound 50% Begin breaking balls | |
| 45–60 Throws in batting practice (fastball only) | |
| Step 13: 30 throws off mound 75% | |
| 30 Breaking balls 75% | |
| 30 Throws in batting practice | |
| Step 14: 30 throws off mound 75% | |
| 60-90 Throws in batting practice Gradually | |
| increase breaking balls | |
| Step 15: Simulated game: progressing by | |
| 15 throws per workout (pitch count) |
Injuries in Swimmers
The majority of the musculoskeletal problems facing the competitive swimmer are seen at the shoulder, with up to 73% of swimmers at the elite and collegiate levels experiencing shoulder pain that limits training at some point in their career.44–47 A significant volume of overuse injuries are prevalent in this sport, based primarily on the high volume of repetitive overhead movements.
The classic symptom complex associated with swimmers’ shoulder pain involves subacromial impingement. In most cases, this is related to fatigue-related changes in stroke mechanics in individuals with GH hypermobility or instability. In a small number of swimmers, impingement is related to hypomobility and inflexibility, particularly with limitations in scapular retraction and upward rotation leading to increased subacromial compressive loads.48 These restrictions can also be factors in the development of upper-quarter neurovascular symptoms. Additionally, swimmers present with a variety of muscular irritation and tendinitis, particularly in the biceps (long and short heads), posterior rotator cuff, and periscapular muscles.
| 30′ Phase | 45′ Phase |
| Step 1 | Step 3 |
| A. Warm-up throwing | A. Warm-up throwing |
| B. 30′ (25 throws) | B. 45′ (25 throws) |
| C. Rest 15 minutes | C. Rest 15 minutes |
| D. Warm-up throwing | D. Warm-up throwing |
| E. 30′ (25 throws) | E. 45′ (25 throws) |
| Step 2 | Step 4 |
| A. Warm-up throwing | A. Warm-up throwing |
| B. 30′ (25 throws) | B. 45′ (25 throws) |
| C. Rest 10 minutes | C. Rest 10 minutes |
| D. Warm-up throwing | D. Warm-up throwing |
| E. 30′ (25 throws) | E. 45′ (25 throws) |
| F. Rest 10 min. | F. Rest 10 minutes |
| G. Warm-up throwing | G. Warm-up throwing |
| H. 30′ (25 throws) | H. 45′ (25 throws) |
60′ Phase | 90′ Phase |
| Step 5 | Step 7 |
| A. Warm-up throwing | A. Warm-up throwing |
| B. 60′ (25 throws) | B. 90′ (25 throws) |
| C. Rest 15 minutes | C. Rest 15 minutes |
| D. Warm-up throwing | D. Warm-up throwing |
| E. 60′ (25 throws) | E. 90′ (25 throws) |
| Step 6 | Step 8 |
| A. Warm-up throwing | A. Warm-up throwing |
| B. 60′ (25 throws) | B. 90′ (20 throws) |
| C. Rest 10 min. | C. Rest 10 min. |
| D. Warm-up throwing | D. Warm-up throwing |
| E. 60′ (25 throws) | E. 60′ (20 throws) |
| F. Rest 10 minutes | F. Rest 10 minutes |
| G. Warm-up throwing | G. Warm-up throwing |
| H. 60′ (25 throws) | H. 45′ (20 throws) |
| I. Rest 10 minutes | |
| J. Warm-up throwing | |
| K. 45′ (15 throws) |
Note: 30 feet = 9.1 meters; 45 feet = 13.7 meters; 60 feet = 18.3 meters; 90 feet = 27.4 meters.
Training Stresses in Swimmers
At the competitive age group and high school levels, the frequency of overhead cycles exceeds any other overhead sporting activity, and at the elite level, the number of end-range overhead movements is staggering. Based on a conservative estimate of 8 stroke cycles per 25 yards, a swimmer performing a 10,000 yard workout may expect to complete as many as 3200 overhead cycles with each arm during the workout. In some extreme cases, a swimmer may reach overhead as many as 2 million times over the course of a year.49
Interestingly, as swimmers fatigue and begin to experience a breakdown in stroke mechanics, they lose efficiency and take more strokes to complete a given distance, compounding the abnormal biomechanical forces leading to their pathology. Without question, fatigue is the leading factor to stroke breakdown and the onset of symptoms. The majority of swimmers experience no symptoms until they are well into their workout, or when they are performing particularly fatiguing activity (sprint sets, long-distance intervals). Swimmers, in the course of developing overuse problems, relate gradual onset of symptoms late in their workout. As the irritation progresses and performance degrades, the onset of symptoms occurs progressively earlier in the swim. The temporal onset of symptoms in swim training forms the basis for much of the strategy involved in returning the injured swimmer to fully functional training levels.
Typical swim training is really a form of “controlled” overtraining. Swimmers push training to the extent that their performance is actually degraded to the point that midseason performances are rarely record efforts. When training is “tapered” at some strategic point (usually just several weeks before key championships), there is a resultant surge in performance and significant drop in race times.50–53
Up to 60 to 80% of swim workouts involve freestyle swimming, regardless of stroke or event specialty.50–53 For that reason, most swimmers may be evaluated based on symptom presentation in freestyle swimming. Freestyle is also the preferred stroke “vehicle” by which swim training is progressed (Fig. 9–3). Unlike the butterfly stroke, and to a lesser extent, the backstroke, body roll may be exaggerated in freestyle to relieve shoulder stress, and the overhead stroke reach may be reduced to avoid shoulder stress. The ultimate goal is to achieve unrestricted performance of the desired stroke without compensation, but the interval progression may involve the “buying” of extra yards at the expense of technique as a legitimate tool in tolerating the overhead stresses of this sport.
Related posts:
 Rehabilitation of Adhesive Capsulitis
Rehabilitation of Micro-Instability
Rehabilitation of Macro-Instability
Rehabilitation of Shoulder Impingement: Primary, Secondary, and Internal
Rehabilitation of Acromioclavicular Joint Injuries
Modification of Traditional Exercises for Shoulder Rehabilitation and a Return-to-Lifting Program
Rehabilitation of Adhesive Capsulitis
Rehabilitation of Micro-Instability
Rehabilitation of Macro-Instability
Rehabilitation of Shoulder Impingement: Primary, Secondary, and Internal
Rehabilitation of Acromioclavicular Joint Injuries
Modification of Traditional Exercises for Shoulder Rehabilitation and a Return-to-Lifting Program
Stay updated, free articles. Join our Telegram channel

Full access? Get Clinical Tree


