Clinical presentation
Biopsy technique
Biopsy site
Direct immunofluorescence biopsy site
Comments
Blisters/bullae
Punch biopsy
Edge of the blister or entire blister
Punch biopsy of perilesional skin or normal skin adjacent to the lesion
Keep the roof of the blister attached
Necrosis/ulceration
Punch biopsy
Edge of the ulcer or the necrotic area
Edge of the ulcer or the necrotic area or adjacent skin
Rash/dermatitis
Punch biopsy
New lesion
Lesional skin and non-lesional skin
Multiple punches required if multiple morphologies present
Connective tissue diseases
Punch biopsy
Lesional skin
Lesional skin
Older lesions may show negative DIF
Lupus band test
– Lesional skin for DLE, SLE, and SCLE
Avoid ulcerations and facial lesions if possible
– Non-lesional sun-exposed skin for SLE and SCLE
Lupus profundus may have negative lupus band test
– Non-lesional, nonsun-exposed skin for SLE
Vasculitis
Punch biopsy
Lesional skin of less than 48 h duration
Lesional skin of less than 48 h duration or adjacent normal skin
DIF is helpful to rule out Henoch-Schönlein purpura
Non-ulcerated lesions
Panniculitis
Wedge incisional biopsy
Lesional skin
Adequate sampling of subcutaneous fat is required for diagnosis
Punch within a punch biopsy
Nodules
Punch biopsy
Lesional skin
Lesional skin
Lupus Band Test – When lupus erythematosus (LE) is suspected, three biopsies can be done: lesional skin, non-lesional sun-exposed skin, and non-lesional sun-protected skin [2, 3]. A band-like deposition of immunoglobulin/complement at the dermal-epidermal junction is present in lesional skin in a majority of LE patients. This band may be seen in non-lesional skin of LE patients and may help to distinguish between cutaneous LE and systemic LE [3]. The presence of three or more immunoreactants at the dermal-epidermal junction in sun-protected non-lesional skin correlates with high diagnostic specificity for systemic LE [3]. Controversy about the diagnostic and prognostic significance of the non-lesional lupus band test still persists however.
Biopsy Techniques
Various techniques can be used to perform a skin biopsy based on the type of lesion, the site of lesion, the differential diagnosis, and the purpose of the biopsy. In the case of connective tissue diseases, the punch biopsy which samples both the epidermis and the dermis is most commonly used [1, 4]. Other useful techniques include incisional (wedge) biopsy, excisional biopsy, and punch within a punch biopsy (Fig. 12.1) for the purpose of sampling an adequate amount of subcutaneous tissue [4]. Shave biopsies are not recommended when biopsying inflammatory lesions of the skin.
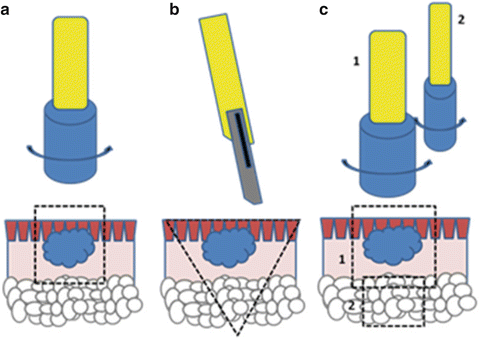
Fig. 12.1
Biopsy techniques: (a) punch biopsy, (b) incisional (wedge) or excisional biopsy, (c) punch within a punch biopsy
Punch Biopsy
The punch biopsy [5, 6] is the primary technique to obtain full-thickness specimens and is suitable for inflammatory lesions especially those with deep components such as lupus erythematosus and vasculitis. A disposable punch biopsy instrument is used which consists of a circular blade attached to a pencillike handle. The diameter varies from 2 to 8 mm, but in most cases a 3–4 mm instrument is adequate. The selected biopsy site is cleaned with a skin antiseptic such as isopropyl alcohol or povidone-iodide. A surgical marker can be used to mark the intended biopsy site. A local anesthetic, usually 1 % or 2 % lidocaine with epinephrine, is administered adjacent to or into the lesion by raising a skin wheal to decrease discomfort and bleeding. Epinephrine should be avoided for distal acral lesions. The skin surrounding the biopsy site is stretched perpendicular to the lines of least skin tension to obtain an oval-shaped wound. The punch is placed perpendicular to the skin and rotated downward using a twirling motion with constant pressure. Once the instrument reaches the subcutaneous fat and resistance lessens, the instrument is removed. The specimen is gently elevated with forceps or a needle tip, and scissors are used to free it from the subcutaneous tissue by cutting below the dermis or if possible below the subcutaneous tissue when fat needs to be sampled. Care is required in removing the specimen to prevent crushing artifacts. The specimen should be immediately placed in fixative (10 % formalin) or Michel’s medium for immunofluorescence. The wound can be closed with one or two nylon sutures. Small wounds can be allowed to heal by secondary intention. On the scalp, best results are achieved by holding the instrument along the axis of the hair follicle. When different fixatives are required, two specimens should be taken rather than cutting one specimen into two parts. Care must be taken on the areas where the skin is thin or overlying the bone to decrease the possibility of hitting the periosteum or the nerves and arteries below the skin. Post procedure, Vaseline or antibiotic ointment can be applied, followed by a dry dressing.
Related posts:

Stay updated, free articles. Join our Telegram channel

Full access? Get Clinical Tree


