CHAPTER 18 Thoracic Spine
Surgical Approaches
Anatomy of Anterior Cervicothoracic Spine
The cervicothoracic junction corresponds to the area just superior to the mediastinum and extends into the sternum and T4-5 intervertebral discs. The left brachiocephalic vein, formed by the confluence of the left internal jugular and subclavian veins, lies immediately posterior to the upper sternum. The thymus gland lies just anterior to this structure. The left and right brachiocephalic veins combine to form the superior vena cava at the right first intercostal space. The superior vena cava enters the left atrium posterior to the third costal cartilage. The vagus and phrenic nerves lie anterior to the arch of aorta (Fig. 18–1). The recurrent laryngeal nerve branches off the vagus nerve between T1 and T3 on the left side and reliably loops around the aorta to ascend into the tracheoesophageal groove. The right recurrent laryngeal nerve branches off the vagus nerve in the upper cervical region and loops around the right subclavian artery. On this side, it may also leave the carotid sheath at a higher level and course anteriorly behind the thyroid before entering the groove.
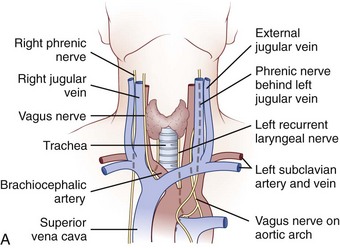
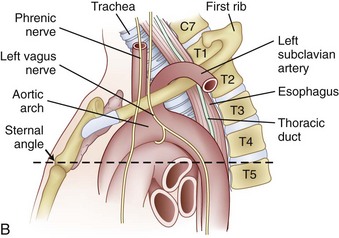
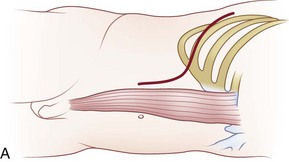
FIGURE 18–1 A, Anteroposterior view of cervicothoracic junction. B, Lateral view of cervicothoracic junction.
Injury to the recurrent laryngeal nerve may occur with indiscriminant dissection to the cervicothoracic junction. C5-T1 levels are especially vulnerable. Controversy exists regarding which approach (left-sided vs. right-sided) minimizes the risk of injury to the recurrent laryngeal nerve. Tew and Mayfield1 described the asymmetry between the right and left laryngeal nerves and described the anatomic loop of the nerve around the aortic arch on the left side as longer, more predictable, and more protected than the right-sided nerve. These authors believed that the anatomic loop on the left side rendered the recurrent laryngeal nerve less susceptible to contusion and stretch injury when a left-sided surgical approach was used. Other authors have reported that there is no statistical difference between the rate of injury and the side of the surgical approach.2 It is acknowledged that injury to this structure can cause mild dysphagia and dysphonia. The reported incidence of dysphagia after anterior surgery ranges from 28% to 57%, and the incidence of dysphonia is 2% to 30%.3
Surgical Approaches to Anterior Spine
Cervicothoracic Junction
Low Anterior Cervical and High Transsternal Approach
Indications for the anterior cervicothoracic approach include the following:
Operative Procedure
The patient is positioned supine on the operating table after general endotracheal anesthesia has been instituted. The arms should be tucked at the side, and the hands and wrist should be checked to ensure that they are positioned without undue pressure. Typically, a towel roll or other bolster is placed between the scapulae. This towel roll allows the head to be placed in a slight amount of extension and the shoulders to lie slightly extended at the side for adequate exposure of the junction. The head should also be turned either slightly right or slightly left depending on the surgeon’s preferred approach. A left-sided approach to a virgin neck is preferable because the laryngeal nerve has a more reliable course into the tracheoesophageal groove on this side.4,5
The surgical incision is typically made from the left anterior border of the sternocleidomastoid muscle to the notch and can be continued distally along the middle of the manubrium (Fig. 18–2A). The first portion of the approach is an extension of the standard Smith-Robinson approach. Other authors have described a transverse incision that parallels the medial half of the clavicle. The vertical extension of the incision depends on the overall exposure required by the treating surgeon. If exposure from C7 to T4 is needed in its entirety, the vertical portion of the incision is made with the distal portion terminating just distal to the suprasternal notch. The extent of the incision is typically to the third costal cartilage.
After marking the incision, a No. 10 blade scalpel is used to incise down to the subcutaneous layer. Dissection is done through the platysma, creating flaps on either side for easier closure at the end of the case. Care should be taken not to injure the jugular veins, but they may be sacrificed if further exposure is needed. The strap muscles including the sternocleidomastoid are identified as they insert into the clavicle (Fig. 18–2B and C). Next, the clavicular and manubrial insertions of the sternocleidomastoid muscle are elevated subperiosteally proximally and laterally. The remaining strap muscles should be elevated in a similar manner and taken medially.
When visualized, subperiosteal stripping of the medial third of the clavicle and ipsilateral half of the manubrium should be performed. This stripping exposes the osseous structures for distal exposure to the lower cervical thoracic junction. The clavicle can be sectioned at the middle to medial third junction with an oscillating saw or osteotome (Fig. 18–2D). Care should be taken not to injure the underlying subclavian vein that is in close proximity. When freed laterally, the clavicle can be disarticulated from the manubrium providing exposure to the proximal cervicothoracic junction.
For a more extensive distal exposure, an alternative to clavicular resection and disarticulation involves a sternum-splitting approach. After performing the proximal incision, the skin incision can be extended further distally for added exposure (see Fig. 18–2A). Next, the sternocleidomastoid and strap muscles are dissected subperiosteally from the manubrium and sternum to expose the midline to the anticipated level desired. One is usually able to use this dissection to visualize down to the T4 vertebral level. The manubrium is split longitudinally in the midline with an oscillating or Gigli saw and retracted with self-retaining retractors. Care should be taken not to injure the structures in the retropleural fascia with the saw. This area is protected by dissecting the thymus and surrounding fat from behind the manubrium. Also, care should be taken to avoid injuring the thoracic duct because it ascends to the left of the esophagus from the level of T4 to its junction with the left internal jugular and subclavian veins. A Kerrison rongeur can be used to complete the osteotomy on the posterior aspect of the manubrium. The innominate vein and inferior thyroid vein may also be encountered and can be ligated if necessary for exposure.
Finally, closure should be performed in a stepwise manner.6 If a sternal split was performed, wiring of the sternum and manubrium should be employed to reapproximate the two halves. If the clavicle is disarticulated, it should be reintroduced and fixed into place. Next, strap muscles should be repaired with absorbable sutures, and the sternocleidomastoid should be reattached to its insertion in a similar manner. The platysma can be reapproximated with running or interrupted absorbable sutures, and a suction drain can be placed just underneath this muscle before its closure.
Key Points
Transthoracic (Third Rib Resection)
Disadvantages to using this approach include the need to mobilize the scapula and violation of chest wall muscles during dissection. This approach also requires violating the pleural space and necessitates placement of a chest tube at the end of the procedure.7
The indication for the transthoracic approach is as follows:
Operative Procedure
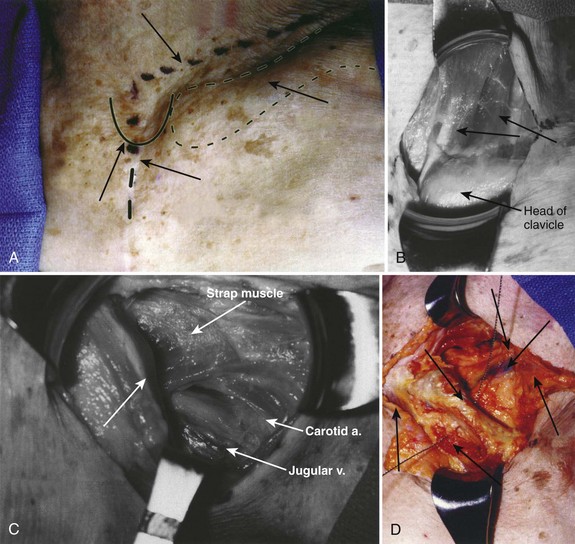
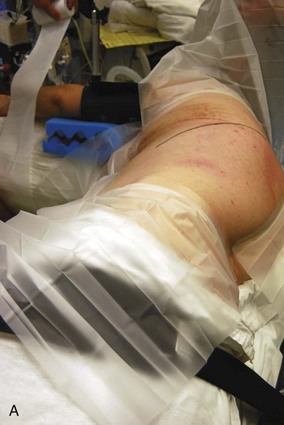
Before positioning the patient, it is recommended that a double-lumen endotracheal tube with lung isolation be used.8 The patient is placed in the lateral decubitus position with the desired operative side up (Fig. 18–3A). Positioning the patient in this manner can be accomplished using a deflatable beanbag or foam-type bolster. The surgeon should ensure that all bony prominences are well padded. A soft roll is placed just distal to the axilla to prevent pressure on the brachial plexus. The arms are abducted, and the elbows and knees are slightly flexed in a position of comfort. The ipsilateral arm may be positioned comfortably by keeping it abducted on stacked pillows or blankets just under the arm and forearm. The surgeon should ensure that the head is also positioned comfortably and that no undue stress is placed on the head-neck junction. Preparation and draping is done in the usual sterile fashion from the shoulder to just above the iliac crest and from below the mid-spine posteriorly to below the umbilicus anteriorly.
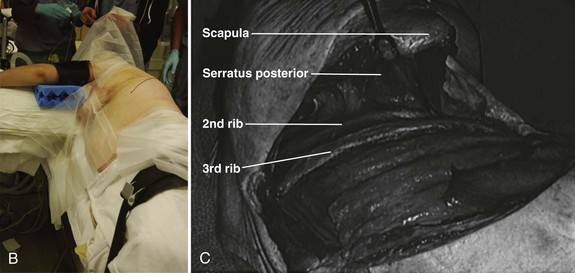
The incision is drawn from the T1 spinous process, following the curvature of the medial-to-inferior border of the scapula. The incision is continued anteriorly along the seventh rib and ends on the costal cartilage of the third rib. This same trajectory is followed by incising through skin and subcutaneous tissue with a No. 10 blade knife. Next, the muscles of the trapezius and latissimus dorsi are identified and divided in a layered fashion with electrocautery. Any bleeders that are encountered in the muscle during this approach are cauterized. Rarely, the rhomboid major and serratus posterior also need to be divided in a similar manner.7 As the muscle layers are divided further, using a retractor, the scapula is retracted proximally; doing this makes it easier to cut the muscles.
When exposure of the chest wall is accomplished, the surgeon counts down the ribs to the operative level. The second rib is often the highest easily palpated rib, and the first rib is situated inside the second (Fig. 18–3B). At this stage, the lung on the operative side can be selectively deflated. When the operative level (the third rib in this case) has been confirmed and the lung has been deflated, the intercostal muscles are stripped off of the rib extraperiosteally using a periosteal elevator. A Doyen rib elevator is an excellent dissection tool to strip the muscle circumferentially from the rib while preserving the underlying intercostal nerve and vessels. When exposed, the rib can be resected using a rib cutter. The rib is cut as far posterolaterally and anteromedially as possible. This rib can be used as bone graft if desired. The remaining rib bed can be transected, and the pleural cavity can be entered; this can be done safely with the lung selectively deflated on this side. A chest spreader can be used to provide retraction for entry into the chest cavity. A second spreader can be placed at a right angle in the surrounding soft tissue to allow for maximal exposure. The lung can be protected further with a malleable retractor shielded with a sponge.
With the lung deflated, the spine can be visualized at the base of the incision. At this time, it is important to identify clearly the neurovascular structures in the area. The aorta, the spine, parietal pleura, veins, and sympathetic plexus should be recognized. The parietal pleura is incised over the desired disc space with atraumatic pickups and Metzenbaum scissors in a longitudinal fashion with the spine. This area is typically relatively avascular and a safer plane for initial dissection than the vertebral body (Fig. 18–3C). When the vertebral body is exposed, the intercostal arteries and veins are visualized, ligated, and cut appropriately. Further exposure of the adjacent vertebral bodies and intervertebral discs can be obtained by extending the incision of the pleura proximally or distally or both, but with each level, ligature of the intercostal artery and vein may be required.
Key Points
Thoracic Spine
Thoracotomy
A traditional thoracotomy provides access to the anterior spine from T6 to T12. In addition to these levels, further manipulation of the thoracolumbar junction of T12-L1 can be performed if the diaphragm is taken down. Access to T4 and T5 can also be accomplished, but one frequently has to elevate the scapula to do so.7 The thoracotomy provides a versatile tool for exposure of much of the thoracic spine for manipulation and instrumentation.
The indication for thoracotomy is as follows:
Operative Procedure
A double-lumen endotracheal tube with lung isolation is used.8 The patient is placed in the lateral decubitus position with the desired operative side up. Approaching from the left side may require one to manipulate the aorta and segmental vessels on the left. When possible, a right-sided approach allows more spinal surface area exposure from behind the azygos vein than behind the aorta. Exposure from T10 to T12 is more easily accomplished from the left, however, because the liver causes the diaphragm to ride higher on the right; limiting the visibility of the spine on this side.
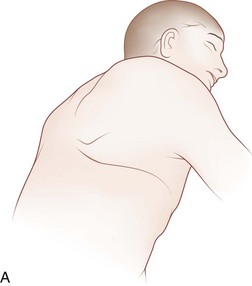
Selective positioning can be accomplished by using a deflatable beanbag or foam-type bolster placed underneath the patient’s right torso. The surgeon should ensure that all bony prominences are well padded. An intravenous fluid bag or other soft roll can be placed just distal to the axilla to prevent pressure on the brachial plexus. The arms are abducted and the elbows are slightly flexed in a position of comfort using blankets or pillows to hold them in position (Fig. 18–4A). The hip and knee nearest the bed are slightly flexed, and the contralateral extremity is allowed to remain more extended and slightly adducted. The weight of the contralateral leg helps open the rib interspace when exposure is accomplished. The surgeon also should ensure that the head is positioned comfortably in a neutral position.
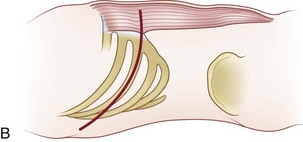
To localize the operative level, a fluoroscopic image can be obtained preoperatively before the incision. Otherwise, the desired rib level can be confirmed by counting the ribs by palpating from proximal to distal. One may also count from the 12th rib proximally. Typically, the numbered rib that is resected is considered to be two levels above the expected working area because of the oblique orientation of the ribs. When the numbered rib is identified, the incision is drawn from the posterior angle of the corresponding rib following its curvature anteriorly (Fig. 18–4B). The incision should be made through skin and subcutaneous tissue with a No. 10 blade knife. The incision is deepened with electrocautery, and any bleeders that are encountered are coagulated. Care should be taken not to injure the neurovascular bundle that runs on the undersurface of the rib.
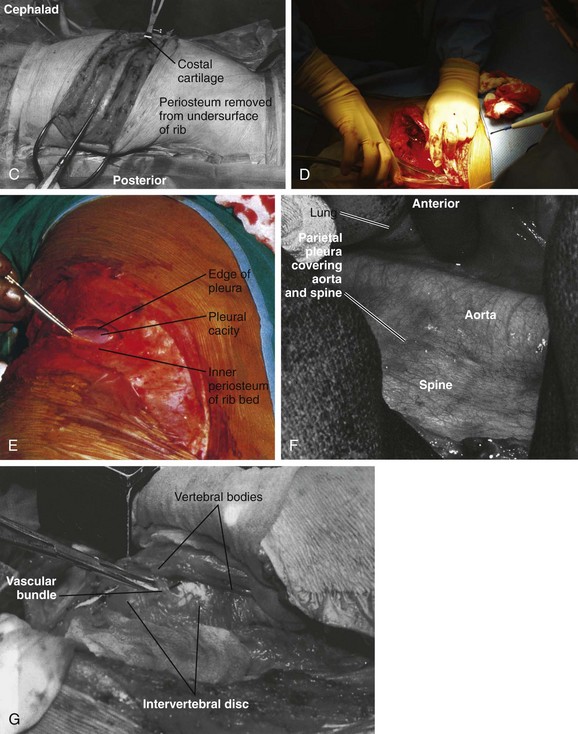
Next, the muscles of the latissimus dorsi are identified and divided in a layered fashion in line with the incision and overlying the rib with the electrocautery. It should not be necessary to separate this muscle from the surrounding tissue. A portion of the posterior margin of the serratus anterior lies on the undersurface of the latissimus and may be divided. As the muscle is divided anteriorly, any bleeders that are encountered are cauterized. When the superficial surface of the rib is exposed, the intercostal muscles are separated from the periosteum with a periosteal elevator, such as an Alexander-Farabeuf periosteotome. Also, the undersurface of tissue is released from the rib; this can be done circumferentially with a Doyen dissector (Fig. 18–4C). Dissection should be far posteriorly and anteriorly for adequate exposure. Next, a rib cutter is used to cut the rib anteriorly at the costal junction and posteriorly at the costotransverse junction for sufficient surgical access (Fig. 18–4D). This rib can be used as bone graft if desired. The cut edges are smoothed with a rasp, and bone wax is applied if active bleeding is present.
The ipsilateral lung is selectively deflated, and the pleural cavity is entered with a pickup and Metzenbaum scissors (Fig. 18–4E). A rib spreader can be used to provide retraction for entry into the chest cavity. A second spreader can be placed at a right angle in the surrounding soft tissue to allow for maximal exposure. The lung can be protected further with a malleable retractor shielded with a sponge.
With the lung deflated, the spine can be clearly visualized. The neurovascular structures in the area are identified (Fig. 18–4F). The parietal pleura is incised over the desired disc space with atraumatic pickups and Metzenbaum scissors in a longitudinal fashion, and the pleura is retracted laterally. Care should be taken not to injure the segmental vessels, which may bleed incessantly if not tied or clipped in a controlled fashion. The vessels close to the middle of the vertebral body are dissected and ligated, and the arteries are clamped away from the aorta. If the segmental arteries are tied too close to the aorta, the tie can loosen, and bleeding can resume. A right-angle clamp is used to free the vessel, and a 2-0 tie is passed around the vessel (Fig. 18–4G). Further exposure of the adjacent vertebral bodies and intervertebral discs can be obtained by extending the incision of the pleura proximally or distally or both, but with each level ligature of the segmental vessels may be required. With adequate exposure, the disc interspace and pedicle can be identified by following the head of the rib to its base. The disc is the more prominent, white, soft structure flanking the larger recessed vertebral bodies.
Thoracolumbar Junction
Exposure of the thoracolumbar spine may be necessary to gain access to T10-L2 of the spine. The key to this approach is exposure and partial mobilization of the diaphragm and entry into the thorax and retroperitoneum.9
Indications for approaching the thoracolumbar junction include the following:
Anatomy of Thoracolumbar Junction
The thoracolumbar junction constitutes the lower three thoracic and upper two lumbar vertebrae. This region is a transition zone from a stiffer and less mobile kyphotic thoracic spine to a more mobile, lordotic lumbar spine. It is this characteristic that lends this region to a higher incidence of trauma.10
Operative Procedure
Either a left-sided or a right-sided surgical approach can be undertaken; a left-sided dissection is preferred. A left-sided approach avoids being obscured by the liver or having to mobilize the vena cava. If injured, the vena cava can bleed profusely, and the thin-walled vessel can often be difficult to suture. A right-sided approach may be necessary, however, to treat some pathology or may be the required approach in accessing the convexity in a scoliotic spine.11
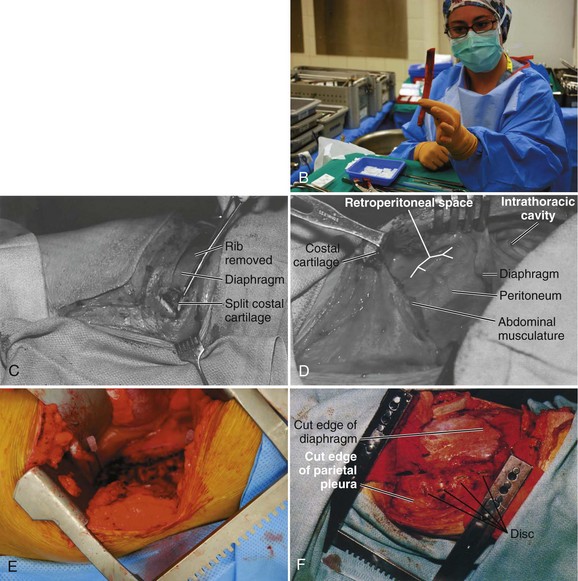
The operative level is reconfirmed with a fluoroscopic image before incision. The desired rib level also can be isolated by counting the ribs; this can be accomplished by counting from the 12th rib proximally. The incision is typically made at the 9th, 10th, or 11th rib depending on the operative level and amount of exposure required (Fig. 18–5A). After the site of the incision is identified, the surgeon draws the incision from the posterior angle of the corresponding rib, following its curvature anteriorly and ending distally to the level just lateral of the pubic symphysis if needed. The curvilinear incision allows for exposure of the distal thoracic and lumbar spine. The incision should be made through skin with a No. 10 blade knife and deepened with the electrocautery. Any bleeders are coagulated as they are encountered. Care is taken not to injure the neurovascular bundle that runs on the undersurface of the rib during its exposure.
< div class='tao-gold-member'>

Stay updated, free articles. Join our Telegram channel

Full access? Get Clinical Tree


