11
Opening Wedge Osteotomy
High tibial osteotomy (HTO) has an important role in the painful knee with localized osteoarthrosis. The principle of transferring load by osteotomy to the relatively unaffected compartment of the knee to relieve symptoms has been used, with success, for many years.1
Opening wedge osteotomy in the medial proximal tibia is used as an alternative to the traditional method of lateral closing wedge osteotomy. The indications for this procedure are being broadened as the need to treat more active patients with arthrosis and malalignment, often combined with ligament instability, increases. The results of HTO closely relate to patient selection and accuracy of correction;1, 2 therefore, to achieve good results, preoperative clinical assessment and detailed preoperative planning are critically important.
Clinical Indications
Varus standing alignment associated with any of the following:
- Medial compartment arthrosis in a stable knee (classical indication)
- Medial compartment arthrosis with associated ligament deficiency and instability [e.g., anterior cruciate ligament (ACL), posterior cruciate ligament (PCL), posterolateral corner, combined ligament deficiencies]
- Painful medial knee compartment with associated medial meniscus deficiency, articular cartilage defects requiring resurfacing, or osteochondritis dissecans lesions. These conditions often require HTO to unload the effected compartment as part of either a combined or staged procedure.
Advantages
- Restores proximal tibia anatomy by addition of bone stock to the medial proximal tibia
- Preserves proximal tibiofibula joint and does not violate anterior muscle compartment
- Single-cut osteotomy
- Correction can be carefully adjusted intraoperatively in both the coronal and sagittal planes.
- Can be combined with other procedures such as ACL reconstruction
Disadvantages as Compared with Lateral Closing Wedge Osteotomy
- Bone graft is often necessary, hence the associated morbidity of autograft or allograft bone.
- Increased risk of delayed union or nonunion
- Increased period of restricted weight bearing postoperatively
Alternative Proximal Tibial Osteotomy Techniques
- Lateral closing wedge osteotomy, as popularized by Coventry1 and Insall et al3
- External fixators, unipolar fixator, or circular frame fixator may be indicated for large deformities not amenable to single-stage opening-wedge technique.
- Dome osteotomy4
Preoperative Assessment and Planning
Clinical failure following tibial osteotomy has been related to accuracy of correction.1, 2
- Examination: Document standing alignment, gait including dynamic component of deformity (e.g., varus thrust), correctability of deformity, range of motion including flexion contracture, medial joint line tenderness, knee stability, patellofemoral tracking and crepitus, effusion and neurovascular status.
- Radiologic studies: Routine preoperative x-rays in our practice include bilateral standing anteroposterior (AP), bilateral standing posteroanterior (PA) tunnel view in 30 degrees of flexion, and lateral and skyline views. We obtain a single-leg weight-bearing hip-to-ankle radiograph to measure lower limb alignment. The joint line convergence angle (JLCA) is measured to give an indication of the component of deformity due to soft tissue laxity.5, 6 To prevent overcorrection, the JLCA should be taken into account when calculating the desired correction.6
- Calculation of correction: Detailed description of the methods of calculation is beyond the scope of this chapter; however, numerous methods have been described.7–1 The surgeon should become comfortable with one of these described methods prior to undertaking any HTO. The current technique used at our institution is that described by Dugdale et al7 (Fig. 11-1).
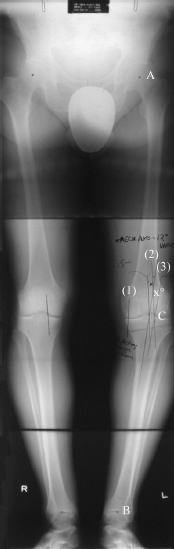
Figure 11-1 The preoperative weight-bearing line (1) is designated by the line passing from A (center of the femoral head) to B (center of the ankle). The projected (postoperative) weight-bearing line (2) passes through the lateral tibial plateau at point C (62.5% of the width of the plateau). The angle (which correlates with size of correction in millimeters) of correction (x°) is determined from lines 2 and 3.
Surgical Technique
The described operative technique utilizes the Arthrex Opening Wedge Osteotomy System (Arthrex Inc., Naples, FL) developed in association with G. Puddu, P. Fowler, and A. Amendola.
Set Up
- A radiolucent operating table is utilized, and a tourniquet is applied to the proximal thigh.
- If iliac crest bone autograft is to be utilized, the ipsilateral crest is also draped appropriately and elevated with a sandbag under the buttock.
- The surgeon stands on the opposite side of the operating table, allowing a direct approach to the medial side of the leg.
- Fluoroscopy C-arm can be positioned over the table at the level of the affected knee.
- We do not routinely perform arthroscopy if the symptoms such as pain and swelling are attributable to the arthrosis rather than to treatable intraarticular pathology. If arthroscopy is required, it should be performed prior to commencement of the open surgery.
Incision and Approach
- A skin marker is used to identify the medial joint line, the tibial tubercle, and the posteromedial border of the tibia. The leg is elevated and the tourniquet inflated.
- A 5 cm longitudinal incision is created, extending distally from 1 cm below the medial joint line midway between the medial border of the tubercle and the posteromedial border of the tibia.
- The sartorius fascia is exposed by sharp dissection. The pes anserinus tendons are identified by palpation, and the sartorius fascia is incised just proximal and parallel to the gracilis tendon. The pes is retracted distally with a blunt retractor (e.g., Homann), exposing the superficial fibers of the medial collateral ligament.
- The anterior border of the superficial medial ligament is identified and raised from the proximal 4 cm of the tibia with a periosteal elevator. A subperiosteal sleeve, including the superficial medial collateral ligament (MCL), is elevated to the posteromedial corner of the tibia. A blunt lever is then passed deep to the medial ligament, around the posteromedial corner of the proximal tibia.
- The medial border of the patellar tendon is next identified. A short longitudinal incision is made to allow a second blunt lever to be placed deep to the patellar tendon just proximal to the tubercle and retract it laterally. The medial insertion of the tendon is released for a few millimeters to allow clear identification of the superomedial corner of the tubercle.
- The soft tissues between the retractors are elevated toward the joint line with a proximally based flap to clearly expose the proximal anteromedial tibial surface.
Guidewire Insertion
Accurate positioning of a tibial guidewire is key to the success of the operation.
- A 3.0 mm guidewire is inserted using a power drill. The osteotomy will be performed immediately distal to the guidewire, using the wire to direct the osteotomy and avoid proximal (intraarticular) extension.
- The superomedial corner of the tibial tubercle and the tip of the head of the fibula laterally are identified. A guide to the starting point for wire insertion on the anteromedial tibia is the medial continuation of a straight line between these two points (Fig. 11-2).
- The obligatory requirements for wire position include:
a. Osteotomy to be placed above the patellar tendon insertion
b. Medial start position is far enough distal to allow sufficient bone for positioning of the fixation plate on the proximal fragment.
c. Osteotomy remains at least 1 cm distal to the tibial articular surface at its most proximal (lateral) extent.
d. Osteotomy is directed toward the upper end of the proximal tibiofibular articulation.
- Guidewire position is assessed with fluoroscopy and corrected until the position is optimal. Do not proceed until the guidewire placement is satisfactory (Fig. 11-3).
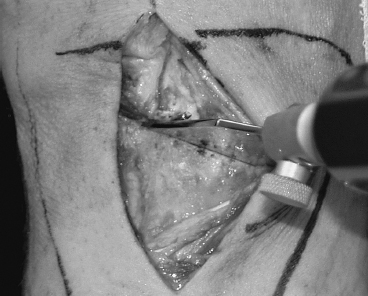
Figure 11-2 The starting point for guidewire placement on the anteromedial surface of the tibia is determined by the superomedial corner of the tibial tuberosity and the point located 1 cm from both the articular surface and the lateral cortex of the lateral tibial plateau. The osteotomy is created immediately below this guidewire.
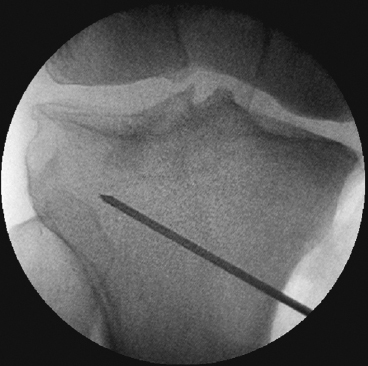
Figure 11-3 The guidewire position is critical to the success of the procedure. Care and time should be taken to adjust the position of the wire to achieve the ideal position.
Osteotomy
- The tibial osteotomy is performed immediately distal to the guide pin.
- The slope of the osteotomy in the sagittal plane is critical and should mimic the proximal tibial joint slope (5 to 10 degrees). Avoid the tendency to make the osteotomy perpendicular to the long axis of the tibia, as this creates a very thin bony fragment posteriorly (because of the natural posterior tibial slope). We mark the tibial bone with a cautery device to reference the sagittal slope of the osteotomy.
- Always be cognizant of the important neurovascular structures posteriorly.
- With a broad blunt retractor (Homann) protecting the medial ligament posteromedially and a second retractor anteriorly, a small oscillating saw is used to cut the medial, anteromedial, and anterolateral cortices only.
- Thin, flexible osteotomes are then used to advance the osteotomy laterally, ensuring that the osteotomes are always directed parallel (immediately distal) to the guidewire. Begin anteriorly and work progressively posterior (this avoids the osteotome becoming stuck within the bone). The posteromedial retractor should protect the MCL and the posterior neurovascular structures.
- Solid, broad but thin osteotomes are then used to further extend the osteotome to within 1 cm of the lateral tibial cortex.
- Intermittent fluoroscopy is required.
- A smaller instrument can be used to “feel” the completeness of the osteotomy anteriorly and posteriorly with an osteotome in place centrally.
- Remember, remain parallel and distal to the guide pin, and the osteotomy position is likely to be excellent.
- Check the mobility of the osteotomy by gentle manipulation of the leg with a valgus force. Ensure the osteotomy opens slightly before proceeding with the wedge-shaped osteotome. If the osteotomy seems incomplete, check again with a narrow flexible osteotome anteriorly and posteriorly. Often “stacking osteotomes” can be useful in encouraging mobility in the osteotomy.
- Engage the Puddu tapered osteotome (Arthrex Osteotomy Wedge, Arthrex Inc., Naples, FL). This is calibrated to allow assessment of the size of the opening achieved (in millimeters, not degrees). This should be advanced slowly to allow gradual opening of the osteotomy. Rapid advancement is likely to produce unwanted extension of the osteotomy proximally or laterally.
- Alignment should be checked intermittently. A long alignment rod may be used to check the hip to ankle mechanical axis correction. This can be confirmed with fluoroscopy. The sagittal plane correction should also be assessed by looking carefully at the amount of opening of the osteotomy anteriorly and posteriorly. When the osteotomy has been opened to equal the preoperative plan, a final alignment check is made using the long rod (hip to center ankle).
Plate Insertion and Fixation
- The appropriate-size (sloped) plate is inserted between the tines of the Puddu osteotome after removing the handle (Fig. 11-4). The plate sits flush on the anteromedial tibial cortex, usually midway between the tubercle and posteromedial border. Proximally the plate sits deep to the soft tissue flap raised in the exposure, and distally the plate is deep to the upper pes tendons.
- The plate is fixed in position using two 6.5 mm-long threaded cancellous (unicortical) screws proximal to the osteotomy. Two 4.5 mm full-threaded cortical screws are used for fixation distal to the osteotomy. Care should be taken with the sagittal tibia slope during fixation of the plate, as it may be altered by the tendency to lever the tibia toward hyperextension (this would decrease the slope by closing the osteotomy gap down anteriorly—advantageous in ACL deficiency).
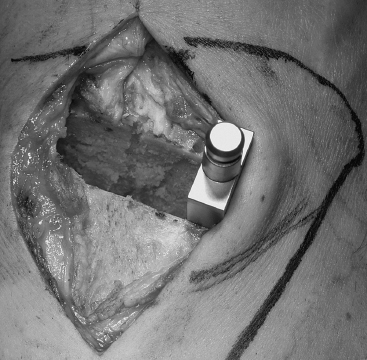
Figure 11-4 The Puddu wedge osteotome handle can be removed to insert the plate.
- Image intensifier (Fig. 11-5)
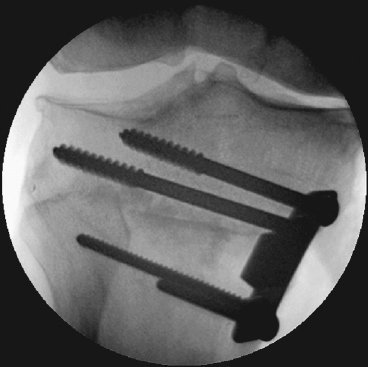
Figure 11-5 The image intensifier is used regularly to check the osteotomy and screw position.
Bone Graft
- Osteotomies of 7.5 mm and less do not require bone graft. Currently we would recommend bone graft for osteotomies of 7.5 mm and larger.
- Iliac crest autograft, allograft cancellous bone, allograft crotch-cancellous bone, and synthetic bone substitutes are all suitable alternatives.
- Recently we have tended to use corticocancellous allograft (femoral head) because of multiple factors, including its availability and its ability to shorten operating time and to reduce early donor-site morbidity. Cancellous bone is packed into the osteotomy, and then two small corticocancellous blocks are cut to size and press fit into position adjacent to the plate, anterior and posterior.
Closure
- The medial ligament may be taut and can be fenestrated with a blade to allow it to slide and assume the appropriate length.
- Thorough irrigation of the wound is recommended.
- A suction drain is inserted into the subcutaneous space.
- The sartorius fascia is not repaired.
- Layered closure with absorbable sutures is performed.
- A soft Robert Jones bandage is applied for 24 hours.
Postoperative Care
- The patient is admitted to the hospital for 24 to 72 hours for analgesia and physiotherapy.
- The patient wears a light padded, hinged knee brace for 6 to 8 weeks and is instructed to do partial (30%) weight bearing.
- Early physiotherapy concentrates on range of motion, muscle strengthening exercises, and then gait training.
- At 6 weeks postoperation, if the x-ray shows signs of osteotomy consolidation, the patient commences full protected weight bearing until 12 weeks postoperatively. By 12 weeks union would be expected.
Pearls and Pitfalls
- Use radiographic imaging frequently and proceed slowly throughout the procedure to avoid inadvertent fracture or destabilization of the osteotomy.
- In the senior author’s early experience with this technique, intraarticular fractures were caused by using thicker, traditional (rapidly tapering) osteotomes.10
- Remember the shape of the proximal tibia in cross section. The tibial tubercle is approximately halfway across the tibia; therefore, the distraction of the osteotomy at the tubercle should be about half that of the posteromedial corner of the tibia to ensure appropriate (no change) tibial slope. If the opening anteriorly (near the tubercle) is equal to the distraction at the posteromedial corner of the tibia, the posterior slope of the tibia will be inadvertently increased (Fig. 11-6).
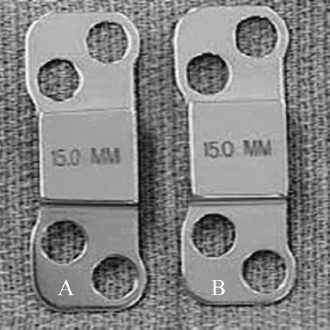
Figure 11-6 Care needs to be taken with the sagittal slope of the tibia. The sloped Puddu plate (A) should be used to ensure the slope of the proximal tibia is not altered. Note that the osteotomy opening should be greater posteriorly than anteriorly to maintain unchanged tibial sagittal slope.
- The sagittal slope can be altered in instability patterns to decrease tibial translations and assist with knee stability.11 A decreased posterior tibial slope (i.e., tibial posterior slope of 0 to 5 degrees) will decrease anterior tibial translation in the presence of ACL deficiency. This may be important to address both in medial compartment arthrosis subsequent to chronic ACL deficiency and anterior instability patterns with associated varus deformity.
- Intraoperative alignment is used to confirm achievement of the preoperative plan. Rarely should the preoperative plan be altered, as the standing alignment x-ray is likely to be more reliable than the supine intraoperative x-ray.
- Guidewire obliquity can be altered depending on the size of the tibia and the required size of correction (a more oblique osteotomy will allow for only a small angle of correction). Fixation failure and intraarticular fracture are more likely with increased obliquity of the osteotomy.10
- If the lateral “hinge” is disrupted, a more conservative approach should be taken with postoperative mobilization and weight bearing.
Conclusion
Medial opening wedge osteotomy is an alternative in the treatment of painful medial arthrosis associated with malalignment. The procedure can be combined successfully with other operations such as ACL reconstruction and articular cartilage resurfacing. Care is needed with preoperative assessment and planning, intraoperative technique, and postoperative rehabilitation to achieve optimal results.
References
1 Coventry MB. Upper tibial osteotomy. Clin Orthop Relat Res 1984;182:46–52
2 Hernigou P, Medevielle D, Debeyre J, Goutallier D. Proximal tibial osteotomy for osteoarthritis with varus deformity. A ten to thirteen-year follow-up study. J Bone Joint Surg Am 1987;69:332–354
3 Insall J, Shoji H, Mayer V. High tibial osteotomy. A five-year evaluation. J Bone Joint Surg Am 1974;56:1397–1405
4 Maquet P. Valgus osteotomy for osteoarthritis of the knee. Clin Orthop Relat Res 1976;120:143–148
5 Tetsworth K, Paley D. Malalignment and degenerative arthropathy. Orthop Clin North Am 1994;25:367–377
6 Brown GA, Amendola A. Evaluation and preoperative planning for high tibial osteotomies. Oper Tech Sports Med 2000;8:32–38
7 Dugdale TW, Noyes FR, Styer D. Preoperative planning for high tibial osteotomy. The effect of lateral tibiofemoral separation and tibiofemoral length. Clin Orthop Relat Res 1992;274:248–264
8 Coventry MB. Radiographic upper tibial osteotomy for osteoarthritis. J Bone Joint Surg Am 1985;67:1136–1140
9 Miniaci A, Ballmer FT, Ballmer PM, Jakob RP. Proximal tibial osteotomy. A new fixation device. Clin Orthop Relat Res 1989;246:250–259
10 Amendola A, Mrkonjic L, Clatworthy M, Kirkley A. Opening wedge high tibial osteotomy using a Puddu distraction plate: focus on technique, early results and complications. Presented at the International Society of Arthroscopy, Knee Surgery and Orthopaedic Sports Medicine, Washington, DC, 1999
11 Amendola A, Giffin R, Sanders D, Hirst J, Johnson J. Osteotomy for knee instability: the effect of increasing tibial slope on anterior tibial translation. Presented at Specialty Day of American Orthopaedic Society for Sports Medicine, San Francisco, March 2001
< div class='tao-gold-member'>
Related posts:
 Multiligament Injuries
 Lateral Closing Wedge Osteotomy
 Posterolateral Corner Hamstring Figure-Eight Reconstruction
 Arthroscopic Lateral Retinacular Release
 Proximal/Distal Realignment for Patellar Instability
 Posterior Cruciate Ligament Reconstruction: All-Inside Arthroscopic Technique and Tibial Inlay Technique with Two-Strand Quadriceps Tendon-Patellar Bone Graft


