10
Lateral Closing Wedge Osteotomy
Indications
- Medial unicompartmental osteoarthritis with primarily medial compartment pain associated with mild to moderate varus deformity
- It is optimal for patients younger than 55 with a high activity level.
Contraindications
- Multicompartment disease
- Inflammatory arthritis
- Limited range of motion, lacking more than 15 degrees of full extension, or less than 90 degrees of flexion
Factors Associated with a Poor Result
- Preoperative varus greater than 20 degrees1
- Advanced destructive changes of the medial compartment (actual loss of bone);1 overweight patients may have a higher rate of failure.
- Undercorrection leads to recurrence of the deformity.
- Overcorrection results in lateral compartment overload or a cosmetic valgus deformity.
Physical Examination
- Evaluate the knee range of motion.
- Assess the presence of instability.
- Assess the presence of mechanical symptoms that could be the source of pain.
- Assess the patient’s gait, as a varus thrust may not be completely eliminated by a valgus osteotomy.2
- It is important to document the neurovascular status prior to any surgery.
Diagnostic Tests
- Three-foot, weight-bearing, full-length x-rays should be obtained to assess the degree of deformity in the anteroposterior (AP) plane and to plan osteotomy.
- AP, lateral, 45-degree bent-knee posteroanterior (PA) view (skier’s view), and Merchant patellar views to assess details of the articular surface, to assess the patellofemoral joint, and to look for evidence of crystalline disease. Also evaluate tibial/femoral instability in the coronal plane.
Differential Diagnoses and Concomitant Injuries
- Inflammatory arthritis
- Knee instability
- Symptomatic tricompartmental osteoarthritis
Special Considerations
- Overcorrection of the normal 5 degrees of anatomic valgus improves the long-term result (7 to 10 degrees), as it is critical to obtain a correction that shifts the tibial load bearing from the diseased cartilage on the medial side to the healthy lateral side of the knee.
- Undercorrection gives less predictable long-term pain relief.
- Total knee replacement technically is more difficult after a high tibial osteotomy, but the results of knee replacement in patients who have had an osteotomy are similar to those who have not had one.3–5
Preoperative Planning and Timing of Surgery
- Preoperative planning is performed using full leg length standing AP and lateral radiographs of both extremities.
- To determine the degree of correction, find the spot on the lateral tibial plateau that represents 60% of the entire plateau (Fig. 10-1). Next, draw the femoral mechanical axis from the center of the femoral head to the “60% spot” on the tibia. Then draw the tibial mechanical axis to the same spot. The difference between the two axes represents the degree of correction.6
- Generally, 1 mm of resected bone is equivalent to 1 mm of correction.
Special Instruments, Positions, and Anesthesia
- Osteotomy guide jig
- General anesthesia
- Position supine, with bump under hip
- Place a tourniquet around the proximal thigh of the operative leg
- Have a radiolucent table or a radiolucent end on the operative table
- Fluoroscopy
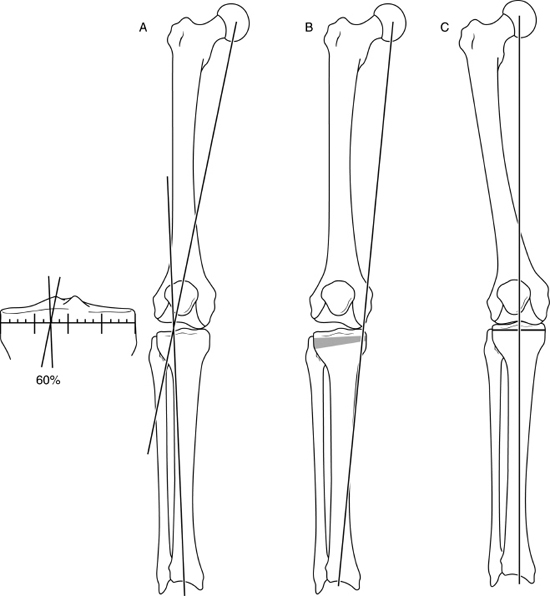
Figure 10-1 (A) Determination of the angle of correction. A line is drawn from the center of the femoral head to the 60% spot on the plateau. A second line is drawn from the center of the tibial plafond to the 60% spot on the plateau. The angle formed by these two bisecting lines equals the angle of correction. (B) Mechanical axis in varus. (C) Normal mechanical axis.
Surgical Procedure
C-arm fluoroscopy is used to monitor correction.
The patient is positioned supine on a table that has a radiolucent end for the legs.
A nonsterile tourniquet is placed on the operative extremity.
The operative extremity is draped free.
A diagnostic arthroscopy is performed first to evaluate and address any intraarticular pathology contributing to mechanical symptoms.
- Incision: An oblique incision beginning just superior to the fibular head extending distal and anterior toward the tibial tubercle is created. An alternative is a longitudinal parapatellar incision that is most compatible with future arthroplasty procedures.
- Raise subcutaneous flaps.
- Incise the fascia over the anterior compartment fascia at the flare of the proximal tibia about 1 cm below the joint line and then extend it inferiorly along the lateral border of the patellar tendon.
- Elevate the proximal anterior compartment musculature subperiosteally from the proximal tibia with electrocautery.
- Identify the fibular head, iliotibial (IT) band, fibular collateral ligament, and biceps tendon.
- The IT band is partially elevated from Gerdy’s tubercle but is not detached fully.
- A vertical incision is then created just lateral to the patellar soft-tissue tendon. The tendon is elevated with two Z-retractors along the anterior aspect of the proximal tibia.
- Divide the proximal tibial/fibular joint from anterior and hinging posteriorly, or create a proximal fibular osteotomy. For correction less than 10 to 12 degrees, the proximal tibial/fibular capsule is hinged open posteriorly to avoid fibular impingement on closure of the osteotomy. With larger corrections (12 degrees) an oblique midshaft fibular osteotomy is preferred.
- Fluoroscopy is used to ensure the proper placement of retractors on the posterior tibia.
- It is preferred to flex the knee to 90 degrees [drops the neurovascular bundle posteriorly and relaxes the iliotibial band (ITB)] prior to making the osteotomy cuts.
- A guide pin is placed under fluoroscopy guidance to determine the level of the osteotomy, and it should be parallel to the joint surface. Two pins are placed in the proximal tibia to stabilize the jig, and they represent the holes for the two proximal screws in the plate. The angle of the correction is set on the jig (as predetermined during preoperative planning), and two guide pins are placed in the distal pin placement guide (Fig. 10-2). The guide should be parallel to the axis of the tibia (Fig. 10-3).
- The jig is removed, and the cutting blocks are placed over the guide pins. One can use the guide or place parallel pins.
- The level of the osteotomy should be 1.5 to 2.0 cm below the joint line to reduce the risk of articular fracture or avascular necrosis. The osteotomy must be proximal to the tibial tubercle (Fig. 10-4). Use a long, flat saw blade with a power saw and copious irrigation. Alternatively, initiate with the saw and complete with a thin osteotome to minimize thermal necrosis.
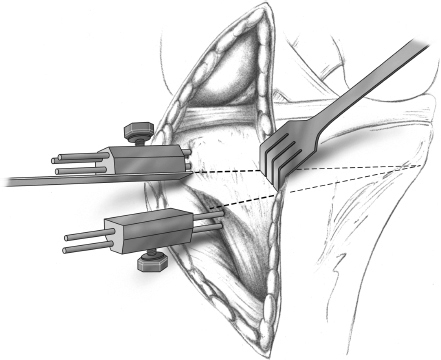
Figure 10-2 Jig in place.
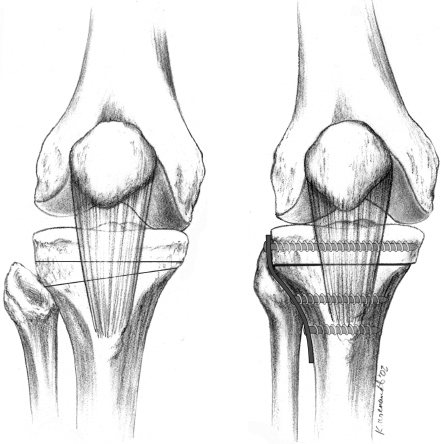
Figure 10-3 The jig should be parallel to the long axis of the tibia.
- The cuts should extend to but not through the medial cortex. Maintain the medial cortex as a hinge to close down the osteotomy.
- The posterior cortical cut should be performed with the knee flexed, a popliteal retractor in place to avoid neurovascular injury. This cut can be done with the saw or with an osteotome.
- Remove the wedge and curette from any remaining bone while maintaining the angle of the resected wedge.
- Reduce the tibial osteotomy site. If the osteotomy will not close, reexamine for bony debris or fibular impingement. Forceful closure of the osteotomy can lead to intraarticular fracture.
- Limb alignment is assessed using the electrocautery cord, which is stretched from the femoral head to the center of the ankle joint to assess overall alignment. This assesses the mechanical axis and weight-bearing line. If this is acceptable, apply the plate in compression.
a. If additional correction is needed, the recutting jig is applied, and the tibia is recut.
b. If overcorrection occurs, the bone wedge is morselized to fill the void, and alignment is rechecked prior to plate fixation.
c. Fig. 10-5 shows a completed osteotomy with the plate in place.
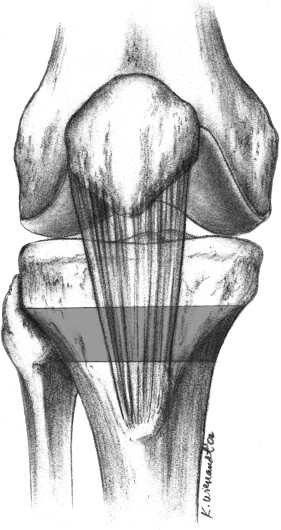
Figure 10-4 Safe zone for osteotomy.
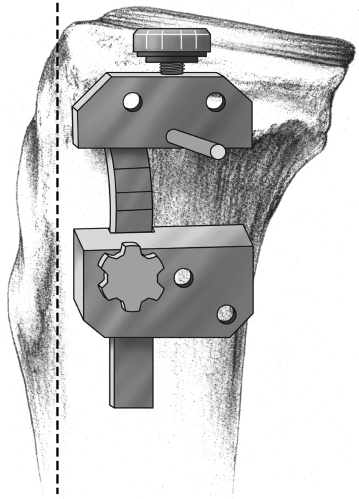
Figure 10-5 Closure of the osteotomy with the plate in place.
- The tourniquet is released (if used during the procedure), and hemostasis is attained. With high levels of cancellous oozing, a drain should be placed at the osteotomy site, and consideration should be given to an anterior compartment fasciotomy to minimize the risk of compartment syndrome.
- Thoroughly irrigate the wound and if possible close the layer of fascia over the plate with suture and then close the skin.
- The cuts should extend to but not through the medial cortex. Maintain the medial cortex as a hinge to close down the osteotomy.
Postoperative Care
- Touchdown weight bearing using a hinged knee brace is allowed for the first 6 to 8 weeks.
- Begin physical therapy for range of motion (ROM) immediately.
- At 2 weeks begin isometric exercises.
- The use of continuous passive motion is optional but does not appear to effect long-term ROM.
Pearls and Pitfalls
- When performing the osteotomy, be sure that the retractors are placed at the proper level on the posterior tibia to prevent neurovascular injury.
- Instead of cutting through the posterior cortex with a saw, it is feasible to complete this cut with an osteotome under direct vision to reduce the risk of thermal necrosis and injury to the neurovascular structures.
- If a tibial plateau fracture occurs, it should be stabilized with a lag screw technique.
Complications, Pitfalls, and How to Avoid Them
- Recurrence of varus angulation most commonly occurs secondary to undercorrection.
- Peroneal nerve palsy is prevented by not performing a fibular head excision or proximal third diaphyseal excision.
- To avoid neurovascular injury in the popliteal region, keep the patient’s knee flexed while performing the osteotomy.
- Patella baja can be avoided with immediate motion and active quadriceps contractions.
- Nonunion can be avoided with stable fixation, compression at the osteotomy site, and avoidance of thermal necrosis.
References
1 Coventry MB, Ilstrup DM, Wallrichs SL. Proximal tibial osteotomy. A critical long-term study of eighty-seven cases. J Bone Joint Surg Am 1993;75:196–201
2 Wang JW, Kuo KN, Andriacchi TP, Galante JO. The influence of walking mechanics and time on the results of proximal tibial osteotomy. J Bone Joint Surg Am 1990;72:905–909
3 Bergenudd H, Sahlstrom A, Sanzen L. Total knee arthroplasty after failed proximal tibial valgus osteotomy. J Arthroplasty 1997;12:635–638
4 Mont MA, Alexander N, Krackow KA, Hungerford DS. Total knee arthroplasty after failed high tibial osteotomy. Orthop Clin North Am 1994;25:515–525
5 Meding JB, Keating EM, Ritter MA, Faris PM. Total knee arthroplasty after high tibial osteotomy. A comparison study in patients who had bilateral total knee replacement. J Bone Joint Surg Am 2000;82:1252–1259
6 Dugdale TW, Noyes FR, Styer D. Preoperative planning for high tibial osteotomy. The effect of lateral tibiofemoral separation and tibiofemoral length. Clin Orthop Relat Res 1992;274:248–264
< div class='tao-gold-member'>


