3
Meniscus Repair Fixation Devices
Meniscal function includes load transmission and distribution, joint nutrition, joint stability, and neuromuscular proprioception. As such, the preservation of meniscal function is critical to long-term knee function. Consequently, the repair of certain types of meniscus tears is theoretically preferable to partial meniscus excision.
All-inside meniscus repair techniques were designed to eliminate the potential risks and morbidity of the inside-out and outside-in repair methods, such as nerve injury, and the need for additional knee incisions. All-inside techniques obviate the need for additional incisions and decrease the risk to neurovascular structures. Numerous commercial fixation devices are currently available for arthroscopic, all-inside meniscus repair. This chapter summarizes the form and mechanism of action of selected meniscus repair devices and demonstrates their surgical applications.
Indications
- Patients with peripheral meniscus tears are the best candidates for repair. According to Warren’s zone system for the classification of meniscal tears (Fig. 3–1), zones 1 and 2 (red-red and red-white zones) offer good healing potential due to the sufficient vascularity of these areas. Peripheral, longitudinal tears (<3 mm from the meniscosynovial junction) showed an 89% and 79% clinical success rate at 5 and 10 years, respectively.2
- Patients undergoing concomitant anterior cruciate ligament (ACL) reconstruction and meniscus repair have a higher success rate for meniscal healing as compared with patients with isolated tears.1, 3 In a review of 62 patients Cooper et al1 report a 5% failure rate when meniscus repair is performed with ACL reconstruction, a 23% failure rate with a normal ACL, and a 50% failure rate when meniscus repair was performed on an ACL-deficient knee. Cannon3 reported an 83% success rate in patients with combined ACL and meniscus reconstruction as compared with a 75% success rate with meniscus repair alone.
- Repair of tears that are less than 3.9 cm have a much lower failure rate than repairs of larger tears.2
- Repair of lateral meniscus tears tends to be slightly more successful than repairs of medial meniscus tears.3
- Meniscus tears less than 1.5 cm in length and less than half the depth of the meniscus often do not require repair. These tears may be treated with rasping or shaving to stimulate healing.1 Moreover, these tears may also be treated using one of the described all-inside devices demonstrated in this text.
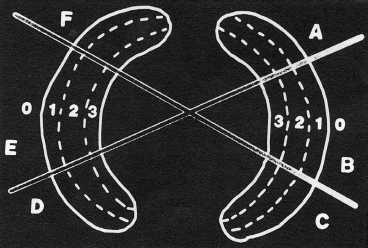
Figure 3-1 The zone system of meniscal tears. Each meniscus is divided into radial thirds represented by the letters A to F. The meniscus is then subdivided into circumferential thirds represented by 1, 2, or 3. Zone 0 is the meniscosynovial junction. (From Cooper D, Arnoczky S, Warren R. Meniscal repair. Clin Sports Med 1991;10:529–547.)
Contraindications
- Central, avascular meniscus tears have poor prognosis for healing.1
- Repair of meniscus tears in ACL-deficient knees has a much higher failure rate than patients undergoing meniscal repair with stable knees.2
- Complex tears, degenerative tears, or tears with multiple cleavage planes usually do not heal well, and repair does not typically restore the load-bearing characteristics of the meniscus.
- Complete radial tears are typically not suitable for repair because the circumferential collagen bundles of the meniscus have been disrupted and there is little hope of functional restoration.1
- Repair of tears with a length of 4 to 5 cm has been shown to have a much higher failure rate than smaller tears.2
Preoperative Evaluation
- History and physical exam can often accurately predict the presence of a meniscus tear but typically are not helpful in determining whether a particular tear is amenable to repair.
- Common symptoms of meniscus tear include knee pain, catching, locking, giving way, and swelling.
- Common signs of a meniscus tear include joint line tenderness, effusion, lack of knee extension, positive McMurray test, and patient apprehension noted with hyperflexion of the affected knee.
- Anteroposterior, lateral, Merchant’s, and intercondylar notch radiographs should be performed to rule out other joint derangements. Magnetic resonance imaging (MRI) is the standard imaging modality indicated for the visualization of meniscus tears.
- MRI does not accurately predict those tears that will be amenable to repair. The decision to proceed with meniscal repair should be based on arthroscopic findings (tissue quality, vascularity).
- MRI is not a good predictor of clinical healing in menisci that have already undergone repair. Abnormal signal often persists even in healed menisci.2
Differential Diagnosis and Concomitant Injuries
- Osteochondral defect
- Osteochondritis dissecans
- Loose bodies
- Ligament insufficiency
- Chondromalacia patella
- Osteoarthritis
- Meniscal cysts
- Synovitis
- Iliotibial band friction syndrome
Special Considerations
The operating surgeon should be prepared to perform several meniscal repair techniques including all-inside and traditional, suture-based repairs. As such, the appropriate technical materials should be available prior to the start of the procedure.
Surgical Techniques
Intraoperative Assessment
- The decision to proceed with meniscal repair is made following a thorough arthroscopic assessment of the knee joint. The type, location, size, and vascularity of the meniscus tear are evaluated and noted.
- The entire inferior surface of both medial and lateral menisci extending to the meniscosynovial junction is evaluated. The entire superior surface of the lateral meniscus is typically visible. To more fully evaluate a tear of the superior surface of the medial meniscus, a posteromedial portal or a 70-degree arthroscope placed through the intercondylar notch can be used.2
- Once located, the tear(s) should be measured and probed for depth and configuration.
- To assess the vascularity of a tear, the tourniquet (if applied) should be deflated. There should be a vascular bed on the synovial side of the tear. In tears where the vascularity is not readily obvious, clinical judgment must be made as to the appropriateness of the tear for repair.
- Longitudinal tears that are less than 3 mm from meniscosynovial junction are considered appropriately vascular. Longitudinal tears that are greater than 5 mm from the peripheral rim are considered avascular and are poor candidates for repair without healing enhancement techniques such as the use of a fibrin clot or the creation of vascular access channels (trephination). Tears with a 3 to 5 mm rim range and no definitive sign of vascularity should be repaired based on the physician’s clinical judgment (Fig. 3–1).
Tear Preparation
The surfaces of the tear should be freshened with a meniscal rasp or small-diameter shaver. Loose fragments and frayed edges should be debrided and smoothed. Again, a bleeding surface should be readily visible on the synovial side of the tear.
Fixation Devices
Fast-Fix Suture Device
The FasT-Fix (Smith and Nephew, Andover, MA) is a suture-based repair device that is composed of two 5 mm polymer bars and a zero polyester nonabsorbable suture that has a pre-tied sliding knot that can be tensioned with arthroscopic assistance.
- The FasT-Fix system comes with a depth penetration limiter (blue plastic sheath) that is preset to a 2 cm stop. An alternative depth limiter (white plastic sheath) is also available that can be modified or trimmed according to tear morphology.
- Posterior horn tears are approached from the ipsilateral portal, and middle third and anterior tears are approached from the contralateral portal.
- After the tear has been prepared, the FasT-fix delivery needle is inserted into the appropriate portal through either a 5 mm 55 mm cannula (Acufex, Mansfield, MA) or a split cannula (Smith and Nephew). If the split cannula is used, the curve of the needle must be inserted at a 90-degree angle to the split (Fig. 3-2A).
- The inner fragment of the tear is pierced with the needle and advanced to the depth set by the limiter for horizontal repair or through the outer fragment for vertical repair. The needle should be inserted perpendicular to the tear (Fig. 3-2B).
- The needle is withdrawn from the meniscus using a slight pronation-supination motion. This releases the first suture retention bar on the outside edge of the meniscus. Tension is applied to test the seating of the implant (Fig. 3-2C).
- Next, the gold trigger is moved forward to advance the second implant into the proper position on the delivery system needle for placement of the second bar.
- Insert the delivery needle in the meniscus 4 to 5 mm from the first implant (Fig. 3-2D). As with the first implant, seat the second implant and pull on the tensioning suture to remove slack from the repair (Fig. 3-2E).
- If the suture repair needs to be tensioned, a knot pusher may be threaded over the suture and the desired tension achieved (Fig. 3-2F).
- To cut the tensioning suture, rest the tip of the knot pusher against the knot and pull the gold trigger of the FasT-Fix system. This will leave a 2 to 3 mm suture tail. Arthroscopic scissors may also be used.4
The FasT-Fix device compares favorably to vertical mattress sutures for maximum force at failure in human meniscus, and it showed the least deformity of fixation when studied in vitro:5, 6
Barbed Devices (Dart, Arrow)
The barbed meniscal repair devices available include the Dart (Arthrex, Naples, FL) and the Arrow (Bionix, Blue Bell, PA). These bioabsorbable implants act on a similar fixation principle. They are designed to approximate the sides of meniscus tears and resist pullout or deformation through mechanical engagement of barbs in the meniscus tissue.
Meniscal Arrow
- The Bionix Meniscal Arrow is a sharp-tipped, barbed polylactic acid (PLA) device with a head (Fig. 3-3A).
- After visual assessment, probe the tear and measure for proper Arrow length. Hook the probe over to the capsule and measure the distance to the exterior edge of the tear. Add 3 to 5 mm to that measurement plus 1 mm for capsule penetration. Select the proper-length Arrow for each part of the tear and arrange on the back table before proceeding.
- Select the cannula that allows the most perpendicular approach to the tear. Perpendicular repair is critical to achieve the necessary engagement of the device’s barbs.
- Insert the cannula into the joint with the obturator in. Remove the obturator and grab the central portion of the tear with the top teeth of the cannula or stilt on the straight cannula.
- For tears with a significant posterior component, place the first Arrow in the posterior portion of the tear and the second Arrow in the center. For all other tears place the first Arrow in the center of the tear initially.
- Reduce the tear and maintain the position of the cannula with the flat dimension of the cannula parallel to the joint line.
- Insert the cutting needle, and advance across the tear (the needle protrudes 13 mm). If the needle tip is just palpated, then use a 13 mm Arrow. If a substantial portion of the tip can be palpated, use a 10 mm Arrow.
- Remove needle and pass the Arrow through the cannula by using the blunt obturator. Tap the Arrow in place with a mallet. When the obturator is at the end of the cannula, the Arrow should be seated with a dimple in the meniscus tissue so that the head does not protrude.
- Place additional Arrows from anterior to posterior to anterior, alternating around the centrally placed Arrow at 5 mm increments (Fig. 3-3B).8
Albrecht-Olson et al9 found that initial failure strength in Arrow-repaired bovine menisci was similar to that of horizontal sutures.
Meniscal Dart
- The Arthrex Dart is a flat, flexible, barbed device made of DLDA copolymer PLA-coD and L-lactalide (Fig. 3–5).
- The Dart uses a delivery gun system. To assemble the gun, depress the red and silver triggers, and slide the T-handle assembly into the back end of the gun barrel until the threads touch the gun barrel. Release the triggers and turn the knob until tight. Insert the sheath onto the driver opposite the end of the points and together slide into the front end of the barrel until seated.
- Next, insert the cannula and obturator into the joint through the anteromedial or anterolateral portal, according to tear morphology and location.
- The Dart system comes with a flexible probe with indexed measuring lines to help determine proper Dart size. Probes are marked at 10, 12, and 14 mm.
- After probing the tear, select the appropriate curved or straight insertion sheath that will allow perpendicular placement of the Dart. Attach the sheath to the front of the Dart gun handle; pull back the T section until a click is heard. This activates the spring mechanism.
- Select the proper Dart size and load to the end of the sheath. The sheath is loaded through the cannula, and the central fragment of the meniscus tear is secured with the fixation teeth at the tip (Fig. 3-5A).
- Position the sheath 4 to 6 mm from the tear to obtain maximal fixation.
- To deploy the Dart, press the red safety trigger and then squeeze the main trigger (Fig. 3-5B). If the Dart is not fully seated, the sheath may be inserted over the end, and the mechanism may be activated again or a blunt obturator may be used.
- Insert additional Darts as needed in 5 mm increments.7
- Probe the tear after Dart deployment to confirm tear stability.
- Next, insert the cannula and obturator into the joint through the anteromedial or anterolateral portal, according to tear morphology and location.
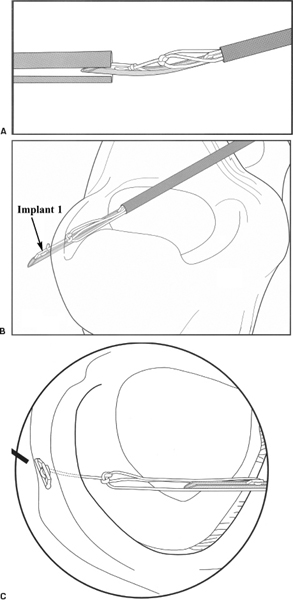
Figure 3-2 Stepwise progression of FasT-Fix device implementation. (A) Curved delivery needle positioned 90 degrees to split cannula. (B) Delivery of first implant. (C) First implant and tensioned suture construct after release.
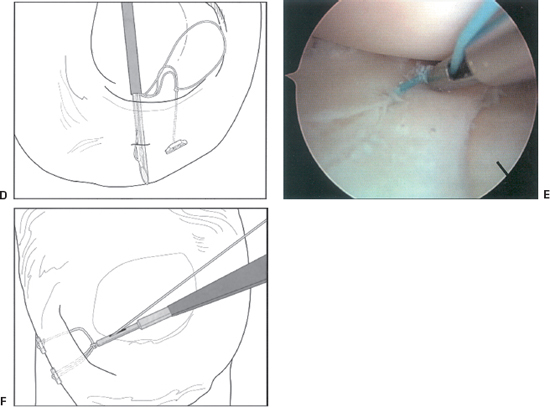
Figure 3-2 (Continued) (D) Insertion of second implant. (E) Tightened suture construct. (F) Suture tensioning. (From Caborn D. Illustrated Guide for the FasT-Fix Meniscal Suture System. Andover, MA: Smith and Nephew, 2001.)
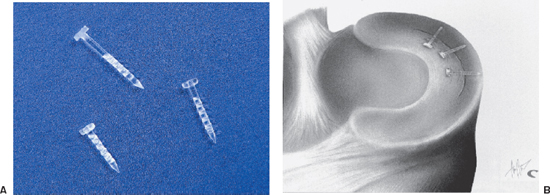
Figure 3-3 (A) Bionix Arrow. (B) Bionix Arrows placed sequentially at 5 mm intervals.
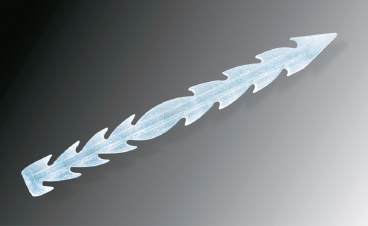
Figure 3-4 Arthrex Dart.
Meniscal Screw
- The Clearfix Screw (Mitek, Norwood, MA) is a meniscal repair device that uses a threaded, cannulated screw to obtain fixation across tears. It is made of PLA and is delivered via a flexible square nitinol needle-tipped driver (Fig. 3-6A).
- The screw comes mounted on a cartridge. Before selecting a cannula, load the screw onto the driver by placing the needle into the cannula of the screw and turning the driver counterclockwise.
- Standard arthroscopy portals may be used in combination with one of the six color-coded, zone-related cannulae. Probes corresponding to cannulae may be used to determine proper cannula selection.
- Pass the appropriate cannula through the portal and make certain that the obliquely angled tip makes full contact with the meniscus surface.
- Maintain the cannula position and pass the driver-screw assembly through the cannula to the repair site. Never insert the driver inside the cannula until the cannula is inside the joint due to the risk of bending the tip of the needle (Fig. 3-6B).
- The flexible needle is a guide for the screw and should be advanced through the proximal fragment until the screw tip touches the meniscus (Fig. 3-6C).
- Reduce the tear with the needle and advance the screw by carefully turning the driver knob counterclockwise. The screw can be viewed through the cannula window.
- Advance the screw until the driver knob touches the cannula and the screw is flush with the meniscus surface.
- Remove the driver, and the screw will remain in place. Screws may be advanced or removed if desired.10
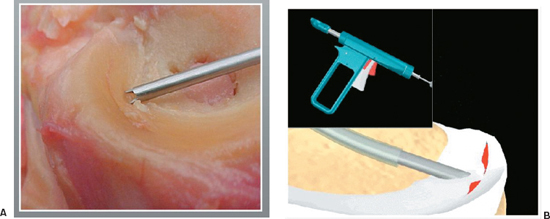
Figure 3-5 (A) The meniscus is secured with the fixation teeth of the insertion sheath and positioned for fixation. (B) The red safety trigger is depressed, and then the main trigger is pressed to deliver the dart across the tear.
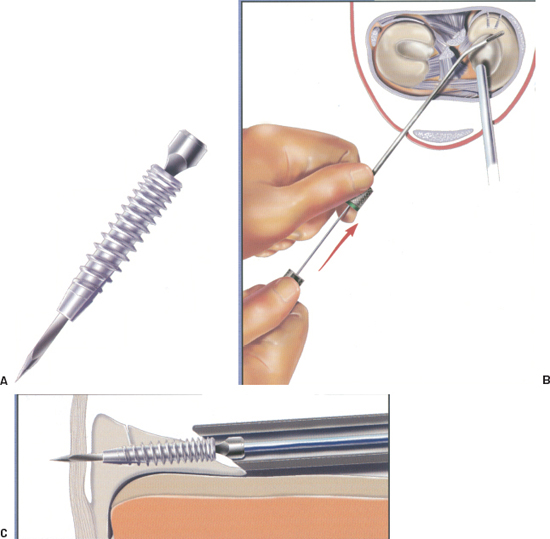
Figure 3-6 (A) The Clearfix screw is can nulated with a square hole that mates with the square nitinol needle on the driver. (B) Placement of the driver into the cannula to facilitate screw delivery. (C) Approximating the meniscal tear. (From Innovasive Clearfix Meniscus Screw Surgical Technique Guide, 2001.)
Barber and Herbert11 report a pullout strength similar to that of the meniscal Arrow, which is approximately half the strength of a single vertical suture.
Meniscus Fastener Repair Device
The Mitek meniscus fastener is a double T-shaped device (polypropylene or PLA) that is delivered via a loaded needle and gun system. This device comes in 6 and 8 mm sizes with either a 27- or 34-degree delivery needle (Fig. 3-7A, B).
- For application, measure the distance across the meniscus tear.
- Select the appropriate-size device and delivery needle.
- Penetrate the tissue with the delivery needle until the collar abuts the tissue.
- Pull the trigger to advance the fastener.
- Withdraw the needle from the tissue, and the fastener will remain in place across the tear (Fig. 3-7C).12
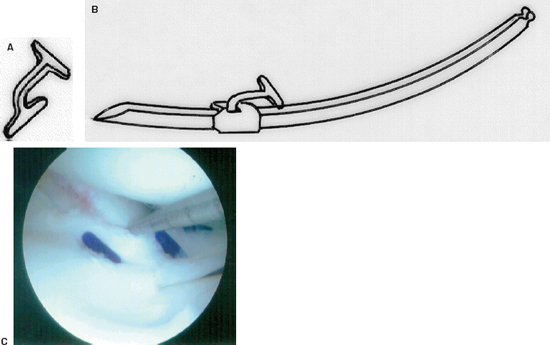
Figure 3-7 (A) The Mitek meniscus repair device. (B) The fastener is loaded onto a delivery needle. (C) Intraoperative photo of the repair device approximating the tear. (From Mitek Meniscal Repair System Instructional Brochure, 2000.)
Pearls and Pitfalls
- The stability of the repaired meniscus should be confirmed after placement of any meniscal repair device using a probe. The repaired meniscus should be stable, and the edges remain tightly approximated. Loose devices should be removed and replaced. Loose repair devices may detach from meniscal tissue. Such loose body formation may put the intraarticular structures, including the articular cartilage, at risk.
- If a meniscal repair cannot be adequately achieved using all-inside methods, a suture-based repair should be employed to increase the likelihood of a successful repair.
- The FasT-Fix utilizes two nonabsorbable polymer retention bars; the meniscus fastener is supplied in a nonabsorbable polypropylene form. Migration of these permanent implants may be of long-term concern (chondral damage, loose body formation).
- One disadvantage of the barbed devices is their relatively low pullout strength compared with vertical mattress suture repair in cadaver and porcine menisci.9, 11, 13 Meniscal arrows showed increased gapping of tear lesions when stress was applied compared with sutures.13 It is not known whether these characteristics affect healing in clinical situations.
- Chondral injury, foreign-body reaction, and hematoma formation are also of concern with the use of all-inside meniscal repair devices. Hechtman and Uribe14 reported migration of one Arrow and formation of cystic hematoma in the posteromedial joint line 5 weeks after implantation, which required reexploration and debridement. There are two cases involving either aseptic synovitis or foreign-body reaction after implantation of bioabsorbable devices.15, 16 There have also been multiple cases of chondral injury.17–20 The possibility of screw fracture, migration, or arrowhead prominence from soft tissue presents risk to healthy articular cartilage and intraarticular soft tissue.
Dressings, Braces, Splints, or Casts
- A simple sterile nonadherent dressing is placed with a compression stocking.
- The leg is braced in extension (optional).
- A CryoCuff (Aircast, Summit, NJ) device is used in the immediate postoperative period.
- Limited weight bearing, with two crutches, is employed over the first 4 weeks.
Rehabilitation and Return to Sports
- During the first weeks after surgery, the patient utilizes a home exercise regimen dedicated to maintaining quadriceps function. Straight leg raise, quadriceps isometrics, and calf pump exercises are performed daily.
- The patient may unlock the brace while sitting. Knee flexion should not exceed 90 degrees during the first 4 weeks after meniscal repair.
- Knee flexion and weight bearing are advanced as tolerated after 4 weeks.
- Formal physical therapy is employed for about 12 weeks after surgery.
- A running program (treadmill) is employed at about 4 months.
- The patient is restricted from high-demand activities for 5 to 6 months.
References
1 Cooper D, Arnoczky S, Warren R. Meniscal repair. Clin Sports Med 1991;10:529–547
2 DeHaven K. Meniscus repair. Am J Sports Med 1999;27:242–250
3 Cannon W. Arthroscopic Meniscal Repair. In: McGinty J, Caspan R, Jackson R, et al., eds. Operative Arthroscopy, 2nd ed. Philadelphia: Lippincott-Raven, 1996: 299–315
4 Caborn D. Technique and Illustrated Guide for the FasT-Fix Meniscal Suture System. Andover, MA: Smith & Nephew, 2001
5 Becker R, Schroder M, Starke C, Dietmar U, Nebelung W. Biomechanical investigations of different meniscal repair implants with horizontal sutures on human meniscus. Arthroscopy 2001;17:439–444
6 Coen M, Caborn D, Urban W, Nyland J, Johnson D. An anatomic evaluation of T-fix suture device placement for arthroscopic all-inside meniscal repair. Arthroscopy 1999;15:275–280
7 Arthrex. Meniscus Dart Product Brochure, 2001
8 Bionix Implants. Meniscus Arrow Surgical Technique Guide. Blue Bell, PA: Bionix, 1998
9 Albrecht-Olson P, Lind T, Kristensen G, Falkenberg B. Failure strength of new meniscus repair arrow technique: biomechanical comparison with horizontal suture. Arthroscopy 1997;13:183–187
10 Johnson & Johnson. Clearfix Meniscal Screw Surgical Technique Guide, 2001
11 Barber F, Herbert M. Meniscal repair devices. Arthroscopy 2000;16:613–618
12 Mitek. Meniscal Repair System. Instructional Brochure, 2000
13 Dervin G, Downing K, Keene G, McBride D. Failure strengths of suture vs. biodegradable arrow for meniscal repair: an in vitro study. Arthroscopy 1997;13:296–300
14 Hechtman K, Uribe J. Cystic hematoma formation following the use of biodegradable arrow for meniscus repair. Arthroscopy 1999;15:207–210
15 Song E, Lee K, Yoon T. Aseptic synovitis after meniscal repair using the biodegradable meniscus arrow. Arthroscopy 2001;17:77–80
16 Menche D, Phillips G, Pitman M, Steiner G. Inflammatory foreign body reaction to an arthroscopic bioabsorbable meniscal arrow repair. Arthroscopy 1999;15:770–772
17 Anderson K, Marx R, Hannafin J, Warren R. Chondral injury following meniscal repair with biodegradable arrow. Arthroscopy 2000;16:749–753
18 Ross G, Grabill J, McDevitt E. Chondral injury after meniscal repair with bioabsorbable arrows. Arthroscopy 2000;16:754–756
19 Seil R, Rupp S, Dienst M, Mueller B, Bonkhoff H, Kohn D. Chondral lesions after arthroscopic meniscus repair using meniscus arrows. Arthroscopy 2000;16:E17
20 Kumar A, Malhan K, Roberts SN. Chondral injury from bioabsorbable screws after meniscal repair. Arthroscopy 2001;17:34
< div class='tao-gold-member'>


