27
Management of Patellofemoral Instability and Chondral Injury with Autologous Chondrocyte Implantation
When a patellar or trochlear chondral defect is present, patellofemoral maltracking should be suspected. Acute patellar subluxation or dislocation leading to chondral defects is more obvious; however, in chronic conditions the underlying patellar malalignment or maltracking may be more subtle. Careful preoperative assessment with a thorough history and physical examination, radiographs, and, when indicated, computed axial tomography and magnetic resonance imaging (MRI) all may assist in confirming the underlying patellofemoral instability.1 Arthroscopic evaluation can also be the final determinant in deciding on a concomitant realignment procedure when treating full-thickness chondral defects of the patella or trochlea.
The treatment of full-thickness chondral defects of the patellofemoral joint with autologous chondrocyte implantation (ACI) requires a two-stage procedure. In the initial arthroscopic stage a chondral biopsy is obtained to grow the autologous cultured chondrocytes for later implantation and definitive treatment. The arthroscopic stage also allows for assessment of the defect(s) and evaluation of the patellar tracking through different portals. Any abnormal patellar tracking is not only the likely source of the patellar or trochlear injuries, but also would preclude an environment conducive for the maturation of the implanted chondrocytes into the ideal hyaline-like repair tissue. In addition to the concerns of lateral maltracking of the patella, decreasing the patellofemoral contact forces also is desirable.2 To address both of these objectives concurrently, the procedure of anteromedialization of the tibial tubercle is combined with the second stage of the procedure, the implantation of the autologous chondrocytes. The combination of these procedures appears to provide the optimal environment for the maturation of the autologous chondrocytes and restoration of functional activity.
Indications
- Full-thickness chondral defects of the patella or trochlea that have failed other treatment options, including conservative measures and arthroscopic treatments
- Osteochondritis dissecans defects of the trochlea or patella
- Prerequisites include adequate quadriceps function, and obtainable or satisfactory patellofemoral alignment and tracking.
- Demonstration by the patient of an understanding of the requirements of postoperative rehabilitation and compliance
Contraindications
- The presence of sympathetic maintained pain syndrome, such as reflex sympathetic dystrophy (RSD), about the knee
- Inflammatory arthritis condition
- Inadequate extensor mechanism function or arthrofibrosis
- Demonstrated lack of compliance
Alternative Treatments
- Patellofemoral realignment without autologous chondrocytes
- Osteochondral allografting for smaller defects
Surgical Technique
Arthroscopic Assessment and Chondral Biopsy
During arthroscopic evaluation of a chondral defect of the patellofemoral joint, dynamic patellar tracking should be carefully assessed throughout the range of motion. In patients without clear lateral tracking and normal alignment, the tibial tubercle osteotomy should be planned to be brought more anterior than medial. In some cases without lateral maltracking, anterior transfer of the tibial tubercle alone may be sufficient to reduce the contact pressure of the patellofemoral articulation. In the vast majority of cases, however, some degree of lateralization of patellar tracking is present. The chondral defect is evaluated for size, location, and containment. A defect that is uncontained on one or more sides, such as on the outer edge of a patellar facet lesion, requires special techniques to attach the periosteal graft with the appropriate contour and a watertight seal. The most common sites for cartilage biopsy are the superomedial or superolateral edge of the femoral condyles that are nonarticulating with the tibia or patella. Another option is the lateral intercondylar notch in the same location in which a notchplasty is performed during anterior cruciate ligament (ACL) reconstruction. An arthroscopic gouge or ring curette is used to obtain several small slivers of full-thickness chondral tissue totaling the approximate volume of a pencil eraser. After the three or four small biopsy fragments are removed from the knee they are placed in the prepackaged biopsy medium/shipping vial in sterile fashion, packaged with dry ice, and forwarded for cell culture (Genzyme Biosurgery, Cambridge, MA).
Timing
Although the cultured chondrocytes can be retrieved in as soon as 3 to 4 weeks, typically it is prudent to wait until the patient has regained knee equilibrium with full motion, good strength, and none or minimal effusion prior to proceeding with ACI. Additional practical and social considerations by both the surgeon and patient should also be taken into account to optimize the focus on the rehabilitation process after the ACI.
Exposure
Performing an anteromedialization of the tibial tubercle at the time of the ACI can make exposure of patellar or trochlear defects very straightforward. An anterolateral longitudinal incision is made just lateral to the tubercle extending from about the level of the superior patella to about 5 to 6 cm distal to the tubercle. The patellar tendon insertion is identified at the tubercle, and the anterolateral musculature is dissected subperiosteally from the anterolateral tibia (Fig. 27-1). A lateral release is then performed with electrocautery and Mayo scissors. Next, a medial parapatellar arthrotomy is performed from the tibia superiorly to the vastus medialis insertion or about the level of the superior patella, leaving a healthy cuff of tissue for later closure without reefing. The triplanar osteotomy is performed, adjusting the angles according to the predetermined degrees of desired anterior or medial transfer. The distal cut of the osteotomy should be about 5 to 6 cm distal to the patellar tendon insertion, ensuring adequate size for rigid fixation with lagged cortical screws at the end of the procedure. The osteotomy is then completed distally and reflected proximally. The fat pad is transected sharply off the tibia. This enables the extensor mechanism and tibial tubercle to be turned superiorly, giving wide exposure to the knee and particularly the patella and trochlea chondral surfaces (Fig. 27-2). At this point, trial positioning of the transferred tubercle should be accomplished while placing the knee through a range of motion. The ideal location for the tubercle is noted and marked so that after the ACI, no manipulation of the knee will be necessary, only fixation of the tubercle in the predetermined location.
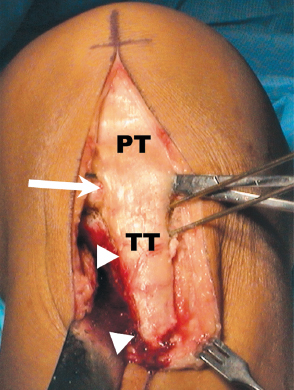
Figure 27-1 Initial incision and exposure for autologous chondrocyte implantation (ACI) of the trochlea or patella incorporating anteromedialization of the tibial tubercle. Note the level of the patellar tendon (PT) insertion on the tubercle (TT) at the large arrow. The small arrowheads show the reflected anterolateral musculature off the tibia. The Kirschner wires (K-wires) indicate the angle of the tubercle osteotomy.
Defect Debridement
After adequate exposure of the chondral defect is obtained, a No. 15 blade is used to score the periphery of the defect to the level of a circumferential rim of healthy, normal-appearing cartilage. There are frequently areas of damaged, thinned, or undermined cartilage present around a chondral defect (Fig. 27-3A). Failure to debride these regions compromises the repair tissue’s ability to integrate with the host cartilage.3 Furthermore, securing the graft patch to soft damaged host cartilage compromises the integrity of the host-graft interface, potentially allowing it to pull loose during the early motion phase of rehabilitation. Small curettes are used to remove the calcified zone of cartilage down to subchondral bone without penetrating the bone. Penetration of the subchondral bone should be avoided, as it leads to the potential introduction of stem cells and fibroblasts into the defect that can compromise the quality of the repair tissue. If bleeding in the defect is encountered, hemostasis can be obtained by direct pressure with epinephrine-soaked neuro-patties, thrombin spray, or a small amount of fibrin glue over the bleeding point, followed by direct pressure can compromise the quality of the repair tissue. If bleeding in the defect is encountered, hemostasis can be obtained by direct pressure with epinephrine-soaked neuro-patties, thrombin spray, or a small amount of fibrin glue over the bleeding point, followed by direct pressure with a neuro-patty. As a final option, electrocautery with a needlepoint set at a low setting, 5 to 8 W, can be used for punctate bleeders.
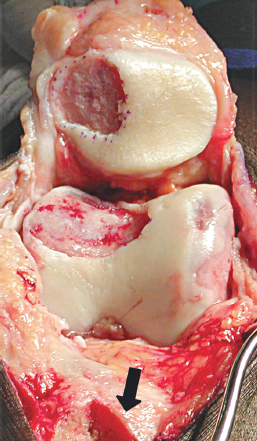
Figure 27-2 There is wide exposure of both the trochlea and patella defects afforded by reflection of the tubercle osteotomy proximally. Note the tubercle osteotomy bed (large arrow).
After adequate debridement of the defect, there should be a dry defect with clean subchondral bone and a healthy surrounding cartilage border at the periphery of the defect (Fig. 27-3B). Defect dimensions adding 1 to 2 mm to each side can then be measured using a sterile ruler to determine the size of periosteal graft necessary. Another method that works particularly well for contained defects is to make a template from sterile surgical glove wrapper paper. Placing the paper over the defect and outlining the defect with a marking pen can make a template. The template is then cut 1 to 2 mm larger and used during periosteal patch procurement. The extra size accounts for periosteal shrinkage after harvest.
Periosteal Harvesting
The periosteum procurement requires a second small incision over the proximal medial tibia, two finger-breadths distal to the pes anserinus and medial collateral ligament insertion on the subcutaneous border. All fat and fascia layers must be removed from the periosteum prior to harvest. The outer surface of the periosteum is then marked by tracing the template or drawing the dimensions. A fresh No. 15 blade is used to sharply incise the periosteum down to the bone, and a sharp, rounded periosteal elevator is used to dissect the periosteum in one smooth layer. The graft is then transferred to the knee and placed on the defect with the cambium (deep) layer toward the subchondral bone.
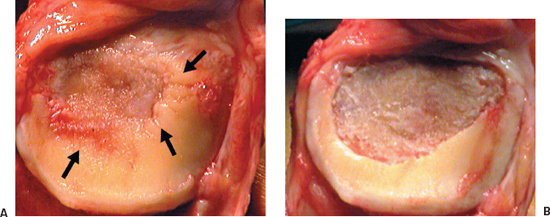
Figure 27-3 (A) Large central patellar defect with damaged and undermined cartilage around the central full-thickness lesion (black arrows). (B) After debridement, the defect now has a peripheral margin of healthy appearing cartilage.
Securing the Periosteal Graft
The periosteal graft is positioned over the defect and oriented for fit. It is attached to the rim of healthy cartilage using multiple 6–0 Vicryl simple interrupted sutures. The goal is to re-create the contour of the missing articular surface left by the chondral defect and provide a watertight seal for capture of the chondrocytes. The length and width axis of the defect should be secured first to ensure re-creation of the surface contours, tension, and appropriate fit of the graft. Alternating sutures between top and bottom and side to side seems to accomplish these objectives best. The sutures are spaced every 2 to 3 mm around the periphery of the defect. After fully securing the graft except for a small 5 to 6 mm opening to accommodate an angiocatheter, the watertight integrity of the graft is tested by gently injecting saline into the defect. Any noted areas of leakage are then fixed with one or two additional sutures. Next, the suture line is further sealed with commercially available fibrin glue.
Implantation of Autologous Chondrocytes
Each vial of autologous chondrocytes contains about 10 million to 12 million chondrocytes, and provides more than adequate cells for defects up to 10 cm2. The cells are aspirated into a tuberculin syringe with sterile technique and then injected with an angiocatheter under the periosteal graft through the final opening left at the periphery of the defect. Once the cells are injected, one or two additional sutures are put in place followed by additional fibrin glue to complete the cell implant.
Closure
Following completion of the cell implantation on the patella or trochlea, the tibial tubercle is gently replaced on the anterior tibial osteotomy bed in the predetermined position. No manipulation or range of motion is undertaken at this point. The tubercle is then temporarily held with a smooth Kirschner wire (K-wire) while fixation is completed. Generally, two 4.5 mm cortical screws are placed from anterolateral to posteromedial in the lagged mode. This provides excellent bony fixation and healing. The anterolateral musculature fascia is loosely reapproximated to the anterolateral tibia. The lateral release is left open, and the medial arthrotomy is closed without capsular or retinacular reefing. The wound is then closed routinely in layers without the use of a drain.
Special Technique Considerations
Defects of the patella that involve both facets and the median ridge, or trochlear defects that involve the sulcus and extend medially and laterally, require special techniques to re-create the surface contours with the periosteal graft. Additionally, either location may extend past the articular surface, leaving an uncontained border that will require another method of securing the periosteum.
Central Patellar and Trochlear Defects
For both large central patellar and trochlear defects, the periosteum should be oversized in both the medial and lateral directions by 3 to 4 mm, as opposed to the standard 1 to 2 mm. The apex of the medium ridge of the patella should be sutured first (at the highest point of convexity). Then sutures should be placed in an alternating fashion medially and laterally, extending out peripherally, creating a tent-like structure. Suturing of a large central trochlear defect should begin at the central sulcus (at the lowest or deepest point, concavity), and then progress medially and laterally up the sides of the sulcus in an alternating fashion. In each case, the periosteum should be tensioned so as not to be redundant or too tight. This may require trimming the periosteum when one is certain that enough remains to reach all contours of the defect. Using a fine nontoothed forceps to frequently check the fit and tension of the periosteal graft is also helpful. With these techniques, the double contours of the trochlea and patella can reliably be re-created.
Uncontained Margins
When patellar or trochlear defects are uncontained by a border of healthy articular cartilage on any side, several options are available to still accomplish the goals of the procedure (Fig. 27-4A). If there is well-attached soft tissue at the uncontained margin, the periosteal graft can be sutured into soft tissue with interrupted knots, and then reinforced with a running suture to make it as secure as possible. Longer needles can be used to provide a larger bite in soft tissue or thinned articular cartilage as might occur on the edges of the patella or superiorly on the trochlea. Another option is to use small microanchors reloaded with absorbable 5–0 suture (Fig. 27-4B, C). A further option is to place multiple peripheral drill holes at the border where there is no cartilage or synovium, approximately 3 to 4 mm apart with a Keith needle. Then a P-1 cutting needle can be flattened out and passed through these drill holes. To obtain the most secure fixation of graft to bone and to avoid bunching of the periosteum, all drill holes should be drilled or microanchors placed and all sutures passed through the periosteum and bone before tying and securing the sutures. It is critical to reduce any areas of bunching of the periosteum to minimize concentrating friction or stress on the periosteal edges. Mechanical friction can act as a catalyst for periosteal hypertrophy.4
Postoperative Care and Rehabilitation
- Knee rehabilitation brace locked at 0 degrees, ice, quad sets, ankle pumps, touch weight bearing in full extension, continuous passive motion (CPM) starting 6 to 12 hours postoperation (0 to 40 degrees)
- As the patellofemoral contact pressure is maximized between 40 and 70 degrees of knee flexion, the patient should avoid active extension in this range for 3 months.
- Establish range of motion, patellar mobility, progressive weight bearing at 4 to 6 weeks, and dynamic quadriceps exercises at 4 to 6 months.
- Running at 8 to 9 months; plyometric exercises and jumping at 12 months
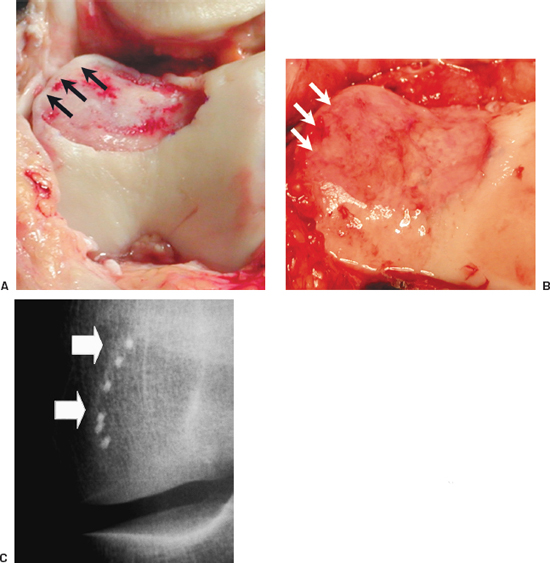
Figure 27-4 (A) Peripheral margin of this trochlear defect is uncontained without sufficient tissue to secure the periosteal graft (black arrows). The periosteum is now in place, re-creating the convex contours of the sulcus. (B) The white arrows show where microanchors were used for periosteal attachment. (C) A radiograph shows the microanchors in place.
References
1 Fulkerson JP. Patellofemoral pain disorders: evaluation and management. J Am Acad Orthop Surg 1994;2:124–132
2 Fulkerson JP. Anteromedialization of the tibial tuberosity for patellofemoral malalignment. Clin Orthop 1983;177:176–181
3 Richardson JB, Caterson B, Evans EH, Ashton BA, Roberts S. Repair of human articular cartilage after implantation of autologous chondrocytes. J Bone Joint Surg Br 1999;81:1064–1068
4 Peterson L. Cartilage cell transplantation. In: Malek MM ed. Knee Surgery-Complications, Pitfalls, and Salvage. New York: Springer-Verlag; 2001:440–449
5 Gillogly SD, Voight M, Blackburn T. Treatment of articular cartilage defects of the knee with autologous chondrocyte implantation. J Orthop Sports Phys Ther 1998;28:241–251
< div class='tao-gold-member'>
Related posts:
 Multiligament Injuries
 Lateral Closing Wedge Osteotomy
 Posterolateral Corner Hamstring Figure-Eight Reconstruction
 Arthroscopic Lateral Retinacular Release
 Proximal/Distal Realignment for Patellar Instability
 Posterior Cruciate Ligament Reconstruction: All-Inside Arthroscopic Technique and Tibial Inlay Technique with Two-Strand Quadriceps Tendon-Patellar Bone Graft


