Chapter 4 Hip Resurfacing
Preoperative Radiographic Evaluation and Templating
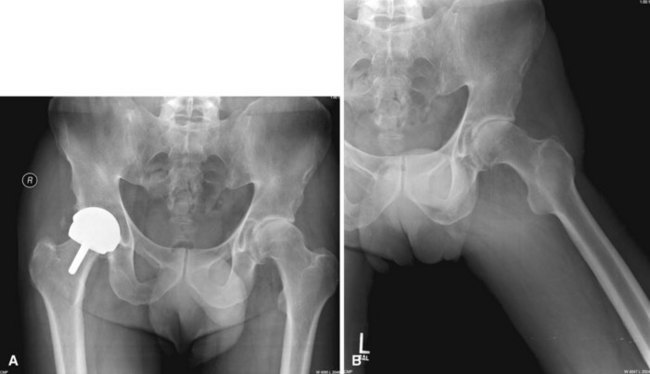
As with all arthroplasty hip surgery, preoperative templating, radiographic evaluation, and planning are critical to success. If a patient’s anatomy is distorted by previous surgery, injury, or deformity, he may not be a candidate for hip resurfacing. The femoral head and neck bone quality should be normal, and there should not be more than 25% to 30% of the head involved with avascular necrosis or cyst formation as seen on radiographs. If the femoral neck is enlarged by remodeling, there may not be a clear delineation between the head and neck, with the head being larger than the neck (Fig. 4-1). If the neck and head are of the same width, especially along the superior neck as seen on an anteroposterior radiograph, then removing bone from the head will risk notching the femoral neck and thus risk neck fracture.
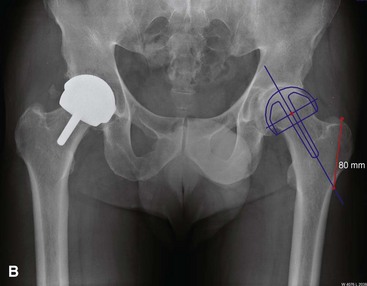
The first step in templating is to measure the size of the femoral component. A template is laid over a radiograph of the proximal femur. The width of the opening of the femoral component should be wider than the femoral neck by 2 to 4 mm total. If not, the next larger template should be used. Then, the center post of the implant is aligned over the center of the femoral neck on radiograph. The line from the top of the greater trochanter to where the line on the template intersects the lateral cortex is measured and documented (Fig. 4-2A). This distance will be used when measuring the valgus angle of the implant intraoperatively (Fig. 4-2B).

Technique
Hip Resurfacing Posterolateral Position
 Position the patient in the lateral position with the affected hip up. Stabilize the pelvis with a pelvic clamp or pegboard, with the pelvis oriented straight up and down. If the pelvis is leaning forward, the acetabular component may be placed in retroversion; and if it is leaning backward, the acetabular component may be placed in excessive anteversion.
Approach and Exposure
 To resurface the hip, extensive exposure is necessary to allow the acetabulum to be visible and later on in the procedure to keep the femoral head visible over its entire surface. Therefore, steps must be taken to achieve exposure not commonly used in total hip replacement surgery. Obviously, the femoral head is removed during a total hip replacement, which greatly aids in exposure.
 Make a curved skin incision over the greater trochanter, angling the proximal portion posteriorly, pointing toward the posterior superior iliac spine (Fig. 4-3A). Carry the incision over the center of the greater trochanter and then distally over the shaft of the femur to end over the attachment of the gluteus maximus on the linea aspera.


 Make two radial incisions in the posterior capsule to create a posterior capsular flap. This is helpful for retraction and later repair (Fig. 4-3B).
 Dislocate the femoral head and perform a complete anterior capsulotomy with sharp scissors. The inferior portion of the capsule is seen by extending and internally rotating the femur. The psoas tendon is exposed at the lesser trochanter, and the capsule is isolated just in front of the psoas tendon. While maintaining the scissors just posterior to the psoas tendon, incise the capsule from inferior to superior (Fig. 4-3C). Maintain the femur in internal rotation and apply anterior traction with a bone hook on the lesser trochanter.

 Measure the femoral neck from superior to inferior, its longest dimension (Fig. 4-3D). The Birmingham Hip comes with heads in 2-mm increments. The measurement tool should loosely fit over the femoral neck to avoid undersizing the femoral component, which could cause notching of the femoral neck. Femoral neck notches may weaken the neck and predispose it to early postoperative fracture. If there is any doubt, choose the next larger size of the femoral head component.


 Once the pouch has been created, dislocate the femoral head into the pouch under the gluteus muscles and retract it with a sharp, narrow Hohmann retractor driven into the ilium superior to the acetabulum and resting on the femoral neck (Fig. 4-3E). Additional pins may be driven into the ilium and ischium to help with the acetabular exposure. A retractor also is placed inferiorly to expose the transverse acetabular ligament. Sharply excise the labrum.
 Ream the acetabulum medially through the cotyloid notch of the acetabulum to the medial wall. Take care not to ream through the medial wall. Once medialized, the reamers are used to increase the bony acetabulum to the desired size. The acetabulum usually is underreamed by 1 mm from the desired component size. Use an acetabular trial to assess the potential component’s stability. The trial components in the Birmingham Hip Resurfacing System are 1 mm smaller than their stated size to provide for tighter fitting of the actual component. Impact the trial into the acetabulum with a mallet, and excise osteophytes for unobstructed cup insertion (Fig. 4-3F and G
Related posts:

Stay updated, free articles. Join our Telegram channel

Full access? Get Clinical Tree


