Hip Arthroscopy: Supine Position
J.W. Thomas Byrd
Introduction
Arthroscopy of the hip can be effectively performed with the patient in either the supine or lateral position. The selection is largely based on the surgeon’s personal preference. Most surgeons have chosen to adopt the supine method. The qualities of this approach that we favor are as follows. Positioning of the patient is simple and can be accomplished in just a few minutes. The procedure can be performed on virtually any standard fracture table although special distractors are also available that are more readily available in an outpatient setting. Orientation of the joint is familiar to orthopedic surgeons accustomed to managing hip fractures and the layout of the operating room is user-friendly for the surgeon, assistants, and operating room staff. There is reliable access for all standard portal placements and it easily accommodates repositioning for arthroscopy of the peripheral compartment as well as iliopsoas bursoscopy and other surrounding endoscopic procedures for the peritrochanteric and subgluteal spaces.
Dictums on Hip Arthroscopy
Regardless of the position or technique that is chosen for performing this procedure, there are several dictums that should be thoroughly understood. First, a successful outcome is most clearly dependent on proper patient selection. A technically well-executed procedure will fail when performed for the wrong reason. This may include failure of the procedure to meet the patient’s expectations. Second, the patient must be properly positioned in order for the case to go well. Poor positioning will assure a difficult procedure. Third, simply gaining access to the hip joint is not an outstanding technical accomplishment. The paramount issue is accessing the joint in as atraumatic a fashion as possible. Because of its constrained architecture and dense soft tissue envelope, the potential for inadvertent iatrogenic scope trauma is significant and, perhaps to some extent, unavoidable. Thus, every reasonable step should be taken to keep this concern to a minimum. Perform the procedure as carefully as possible and be certain that it is being performed for the right reason.
Operating Room Set-Up
Anesthesia
The procedure is performed as an outpatient under general anesthesia. Epidural is an appropriate alternative, but requires an adequate motor block to ensure muscle relaxation.
Patient Positioning
A fracture table can be used, or a specially designed distractor can be adapted to a standard OR table (Fig. 23.1A,B).
The patient is positioned supine. A heavily padded perineal post is used. The genitalia are carefully inspected to make sure that the area is not going to be harmed by the post during the application of traction. The post is positioned laterally against the medial thigh of the operative leg (Fig. 23.2). Lateralizing the perineal post adds a slight transverse component to the direction of the traction vector (Fig. 23.3). It also distances the post from the area of the pudendal nerve, lessening the risk of compression neurapraxia.
The patient is positioned supine. A heavily padded perineal post is used. The genitalia are carefully inspected to make sure that the area is not going to be harmed by the post during the application of traction. The post is positioned laterally against the medial thigh of the operative leg (Fig. 23.2). Lateralizing the perineal post adds a slight transverse component to the direction of the traction vector (Fig. 23.3). It also distances the post from the area of the pudendal nerve, lessening the risk of compression neurapraxia.
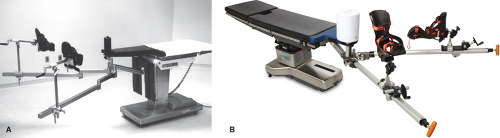 Figure 23.1. A: Most standard fracture tables can accommodate the needs of hip arthroscopy with a few modifications. B: A specialized distractor provides versatility and is more practical for an outpatient ambulatory surgery setting. |
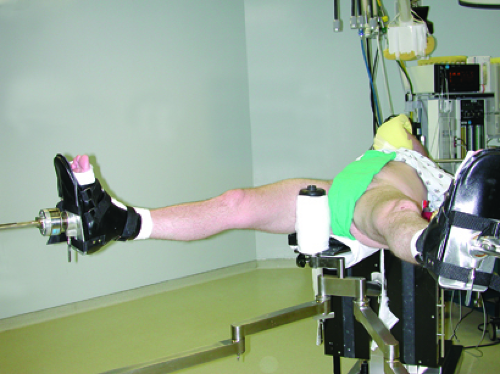 Figure 23.2. The patient is positioned on the fracture table so that the perineal post is placed as far laterally as possible toward the operative hip resting against the medial thigh. (Reprinted with permission from J.W. Thomas Byrd, MD) |
The operative hip is positioned in approximately 25 degrees of abduction. Slight flexion (<10 degrees) may relax the capsule and facilitate distraction, but excessive flexion should be avoided. Increasing flexion places tension on the sciatic nerve and may increase the risk of traction neurapraxia, and will also start to close off access to the anterior part of the hip. Neutral rotation of the extremity during portal placement is important for proper orientation but freedom of rotation of the foot plate during the procedure facilitates visualization of the femoral head.
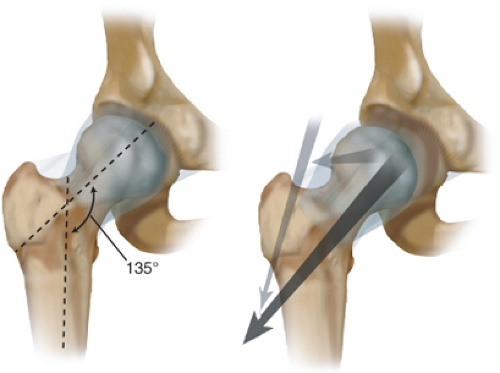 Figure 23.3. The optimal vector for distraction is oblique relative to the axis of the body and more closely coincides with the axis of the femoral neck than the femoral shaft. This oblique vector is partially created by abduction of the hip and partially accentuated by a small transverse component to the vector. |
The contralateral extremity is abducted as necessary to accommodate positioning of the image intensifier between the legs. The image intensifier can be placed from the opposite side of the patient, but this eliminates the ability to obtain lateral or oblique views of the hip. Before distracting the operative hip, slight traction is applied to the nonoperative leg. This stabilizes the torso on the table and keeps the pelvis from shifting during distraction of the operative hip.
Traction is then applied to the operative extremity and distraction of the joint confirmed by fluoroscopic examination. Usually, about 50 lb of traction force is adequate. Sometimes more force is necessary for an especially tight hip, but should be undertaken with caution. About 8 to 10 mm of joint space separation is needed for introduction of the instruments. Some hips can be easily distracted with only slight traction. Excessive joint space separation (greater than 1.5 to 2 cm) should be avoided. Traction neurapraxia can occur from excessive elongation as well as from excessive force.
If adequate distraction is not readily achieved, allowing a few minutes for the capsule to accommodate to the tensile forces often results in relaxation of the capsule and adequate distraction without excessive force. Also, a vacuum phenomenon will be apparent fluoroscopically. This is created by the negative intracapsular pressure caused by distraction. This seal will be released when the joint is distended with fluid at the time of surgery and may further facilitate distraction. However, the effect is variable and should not be depended on to overcome inadequate traction (1).
Once the ability to distract the hip joint has been confirmed, the traction is released. The hip is then prepped and draped and traction reapplied when ready to begin arthroscopy. The surgeon, assistant, and scrub nurse are positioned on the operative side of the patient. The monitor and arthroscopy equipment with a sterile Mayo stand containing the arthroscopes and power shaver are positioned on the contralateral side (Fig. 23.4).
Equipment
Specialized distractors have been developed that can be applied to a standard operating room table (Fig. 23.1B). These are especially applicable in the outpatient setting where a fracture table would not normally be available. Otherwise, most standard fracture tables can accommodate the few specific needs of hip arthroscopy (Fig. 23.1A). A tensiometer is a helpful tool that can be incorporated into the foot plate. This is especially useful for monitoring the intra-operative ability to maintain adequate distraction. A large-sized perineal post with generous padding more safely distributes the pressure on the perineum and facilitates lateralization of the operative hip.
An image intensifier is used for all cases. This is important for assuring precise portal placement. Simply accessing the joint is often not difficult. More important is care and
precision in portal placement to minimize the risk of iatrogenic damage.
precision in portal placement to minimize the risk of iatrogenic damage.
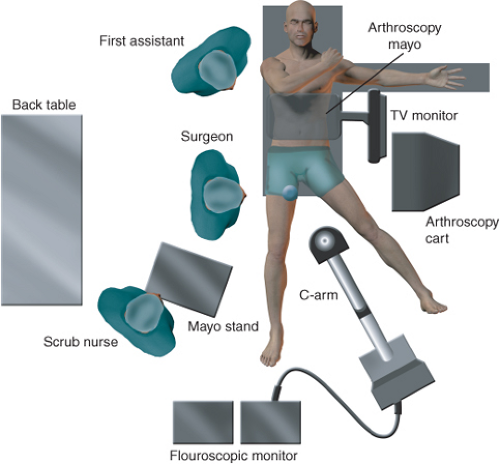 Figure 23.4. Schematic of the operating room layout showing the position of the surgeon, assistant, scrub nurse, arthroscopy cart, monitor and Mayo, scrub nurse’s Mayo, C-arm, and back table. |
Both the 30-degree and 70-degree arthroscopes are routinely used to optimize visualization. Interchanging the two scopes allows excellent visualization despite the limited maneuverability caused by the bony architecture of the joint and its dense soft tissue envelope. The 30-degree scope provides the best view of the central portion of the acetabulum and femoral head and the superior portion of the acetabular fossa, whereas the 70-degree scope is best for visualizing the outer edges of the joint, the acetabular labrum, the capsule, and the inferior portion of the fossa.
A fluid pump provides significant advantages in the hip. A high flow system can provide optimal flow without having to use excessive pressure. This is important for visualization and safety. Adequate flow is essential for good visualization necessary to perform the procedure effectively and in an expedient manner. Flow cannot be as precisely modulated with a gravity system, creating difficulties both with visualization and extravasation. However, the surgeon must always be cognizant that the pump is functioning properly. Different pumps perform and behave differently and it is important to be familiar with the traits of a given pump before using it on complex hip procedures.
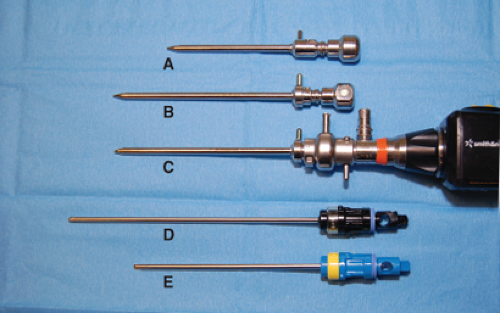 Figure 23.5. A standard arthroscopic cannula (A) is compared to the extra length cannula (B). A modified bridge (C) has been shortened to accommodate the extra length cannula with a standard length arthroscope. Extra length blades (D) are also available compared to the standard length blades (E). (Reprinted with permission from J.W. Thomas Byrd, MD) |
Extra-length cannulas are specifically designed to accommodate the dense soft tissue envelope that surrounds the hip (Fig. 23.5). The extra length has been accomplished by shortening the accompanying bridge which allows these cannulas to be used with a standard arthroscope. For extremely large patients, there are also special extra-long scopes (Fig. 23.6). Cannulated obturators allow passage of the
cannula/obturator assembly over a nitinol guide wire prepositioned in the joint through 6″, 17-gauge spinal needles (Fig. 23.7). The scrub nurse’s Mayo stand contains the instruments routinely needed for each case (Fig. 23.8). The 5-mm cannula is used for initial introduction of the arthroscope while the inflow is attached. The diameter allows adequate flow for the fluid management system attached through the bridge. Once all three portals have been established, the inflow can be switched to one of the other cannulas and the 5-mm cannula replaced with a 4.5-mm cannula. The use of three 4.5-mm cannulas allows complete interchangeability of the arthroscope, instruments, and inflow. The 5.5-mm cannula is available for larger shaver blades.
cannula/obturator assembly over a nitinol guide wire prepositioned in the joint through 6″, 17-gauge spinal needles (Fig. 23.7). The scrub nurse’s Mayo stand contains the instruments routinely needed for each case (Fig. 23.8). The 5-mm cannula is used for initial introduction of the arthroscope while the inflow is attached. The diameter allows adequate flow for the fluid management system attached through the bridge. Once all three portals have been established, the inflow can be switched to one of the other cannulas and the 5-mm cannula replaced with a 4.5-mm cannula. The use of three 4.5-mm cannulas allows complete interchangeability of the arthroscope, instruments, and inflow. The 5.5-mm cannula is available for larger shaver blades.
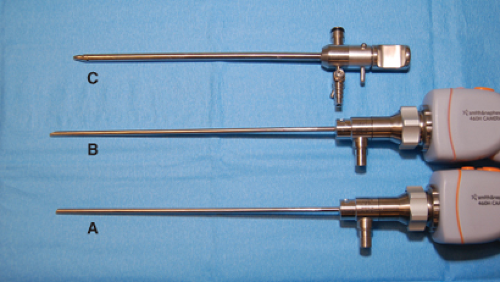 Figure 23.6. Extra-length 30-degree (A) and 70-degree (B) scopes are available with an accompanying diagnostic cannula (C) to accommodate extremely dense soft tissues. (Reprinted with permission from J.W. Thomas Byrd, MD) |
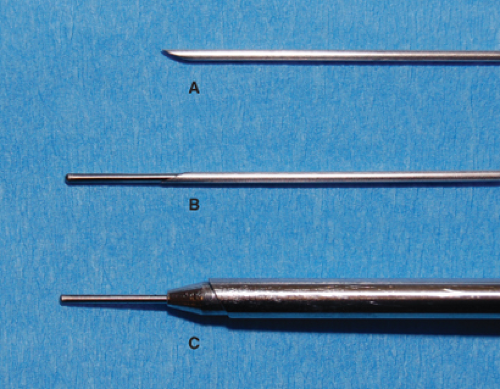 Figure 23.7. The cannulated obturator system allows for greater ease in reliably establishing the portals once proper positioning has been achieved with the spinal needle. The 6″ 17-gauge spinal needle (A, B) accommodates passage of a Nitinol wire (B, C). Specially treated, the wire is resistant to kinking. The cannulated obturator allows for passage of the obturator/cannula assembly over the guide wire (C). (Reprinted with permission from J.W. Thomas Byrd, MD) |
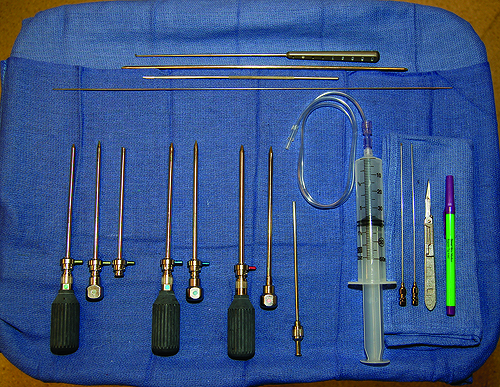 Figure 23.8. The scrub nurse’s Mayo stand contains basic instruments necessary for initiating the arthroscopic procedure including: A marking pen; No. 11 blade scalpel; 6″ 17-gauge spinal needles; 60-cc syringe of saline with extension tubing; a nitinol guide wire; three 4.5-, two 5-, and one 5.5-mm cannulas with cannulated and solid obturators; a switching stick; a separate inflow adapter; and modified probe. (Reprinted with permission from J.W. Thomas Byrd, MD) |
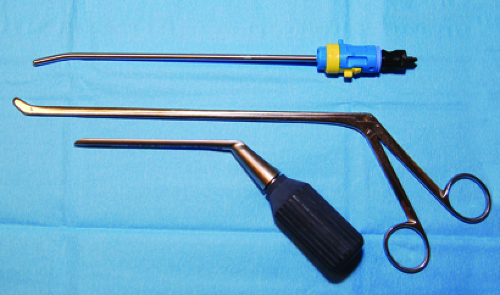 Figure 23.9. A slotted cannula allows great versatility for curved shavers, large hand instruments, and numerous other needs around the hip. (Reprinted with permission from J.W. Thomas Byrd, MD) |
Extra-length blades are available. Curved designs can be useful for maneuvering within the spherical geometry of the joint. These can be passed through slotted cannulas (Fig. 23.9) which accommodate the curved shaver blades as well as other hand instruments.
Thermal devices demonstrate specific advantages in the hip. The small diameter and flexible designs allow access to recesses within the joint difficult to access with mechanical blades (Fig. 23.10). Also, because of the limits on maneuverability, it can be difficult for the shaver to excise damaged articular cartilage or labrum and create a stable edge. Thermal devices are often much more effective at creating a smooth transition zone, preserving more healthy tissues.
General Technique
The technique described here has proved to be effective and reproducible (2,3). Routine arthroscopy begins in the
central compartment because it is the most common site of pathology that leads to painful symptoms precipitating the need for arthroscopy. Usually, the procedure will include arthroscopy of the peripheral compartment and possibly other extra-articular areas. However, it is the findings of the central compartment that typically dictate the extent of the procedure that must be performed; for example, correction of FAI, as well as others.
central compartment because it is the most common site of pathology that leads to painful symptoms precipitating the need for arthroscopy. Usually, the procedure will include arthroscopy of the peripheral compartment and possibly other extra-articular areas. However, it is the findings of the central compartment that typically dictate the extent of the procedure that must be performed; for example, correction of FAI, as well as others.
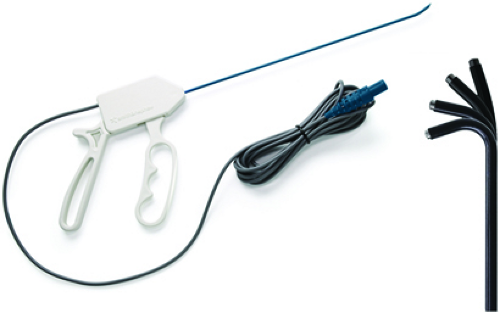 Figure 23.10. A flexible radiofrequency device is an important adjunct to rigid instruments and shavers, which are restricted because of the constrained anatomy of the hip. (Courtesy of Smith & Nephew, Inc.) |
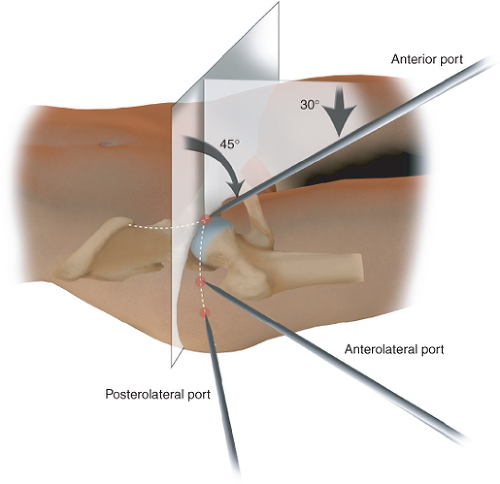 Figure 23.11. The anterior portal roughly coincides with the intersection of a sagittal line drawn distally from the anterior superior iliac spine and a transverse line across the superior margin of the greater trochanter. Generally, it is directed approximately 45 degrees cephalad and 30 degrees toward the mid-line. Depending on the patient’s anatomy, it may be chosen to place this slightly more lateral and distal to properly intersect the joint. The anterolateral and posterolateral portals are positioned at the anterior and posterior borders of the trochanteric tip, converging slightly as they enter the joint. |
Central Compartment
Portals
Three standard portals are utilized for arthroscopy of the intra-articular compartment: anterior, anterolateral, and posterolateral (Figs. 23.11 and 23.12) (4,5). The site of the anterior portal generally coincides with the intersection of a sagittal line drawn distally from the anterior superior iliac spine and a transverse line across the superior margin of the greater trochanter. The direction of this portal courses, on average, approximately 45 degrees cephalad and 30 degrees toward the midline. The anterolateral and posterolateral portals are positioned directly over the superior aspect of the trochanter at its anterior and posterior borders.
Another popular portal is the modified anterior position (Fig. 23.13) (6). As the name implies, it is a modification of the standard description, with a more lateral and distal location. Variations of 1 to 2 cm on the anterior portal are common to achieve accurate triangulation into the joint. A more distal position may be chosen by some to give a better angle for placing anchors in the anterior rim of the acetabulum. However, this site may need to have a more extreme distal location to make sure that the anchors diverge from the articular surface of the acetabulum. A curved drill guide system can make this a little easier from the modified position. A more distal site has less utility for accessing other pathologies of the central compartment. Also, there is a misperception that moving the portal more laterally avoids branches of the lateral femoral cutaneous nerve which is not the case (4).
Anterior Portal
Related posts:
 Etiology of Hip Osteoarthritis
Patient Selection for Hip Preservation Surgery
Hip Arthroscopy Anatomy and Access to the Central Compartment
Chiari and Salvage Osteotomy for the Treatment of Symptomatic Acetabular Dysplasia
FAI: Extra-articular Bony Impingement
Treatment of Slipped Capital Femoral Epiphysis Deformities in Skeletally Mature Patients
Etiology of Hip Osteoarthritis
Patient Selection for Hip Preservation Surgery
Hip Arthroscopy Anatomy and Access to the Central Compartment
Chiari and Salvage Osteotomy for the Treatment of Symptomatic Acetabular Dysplasia
FAI: Extra-articular Bony Impingement
Treatment of Slipped Capital Femoral Epiphysis Deformities in Skeletally Mature Patients
Stay updated, free articles. Join our Telegram channel

Full access? Get Clinical Tree


