Fig. 1
Operative room layout
After anesthesia is induced and the airway is deemed secure, the OR staff can start to prepare for surgery as the anesthesiologist takes further protective measures, such as ocular lubrication. As the patient may be under anesthesia for longer than 2 h, a Foley catheter may be considered prior to surgical positioning and operative prepping. Furthermore, the radio-frequency grounding pad should be attached to the patient’s skin across the abdomen or contralateral thigh prior to creating a sterile field.
Positioning
The upper extremity (ipsilateral to the operative side) needs to be positioned away from the operative field. Concomitant papoose wrapping with the contralateral upper extremity or simply the ipsilateral arm draped over the patient’s chest will accomplish the desired effect. Utilizing a small stack of blankets to allow less than 90° of flexion at the elbow reduces the risk of positional ischemia by optimizing the circulation to the arm(s). The use of a pulse oximeter on the ipsilateral arm may help confirm good perfusion intraoperatively when the arm cannot be otherwise evaluated. Keeping the needs of anesthesia in mind, the contralateral arm may alternatively be secured to an arm board. Regardless of which position is chosen, the flow of the IV catheter should be reassessed prior to establishing a sterile field.
The patient is repositioned on a standard fracture table or via a standard operative table with traction attachment. A padded perineal post is lateralized toward the operative side and subsequently secured. The patient is then moved so that the perineum is against a padded perineal post, which will contact the medial thigh of the operative hip and allow for controlled lateralization of the femur (Fig. 2). Additional padding of the post minimizes the potential of pudendal neurapraxia by providing a transverse force vector against the patient’s thigh. While a commercially padded perineal post is not required, it is recommended in order to ensure that it is sized appropriately. The size of the perineal post corresponds with the degree of lateral force vector in place when the operative leg is placed in traction [3]. The use of oversized perineal post (commercial posts range between 9 and 12 cm) has been associated with less pudendal neurapraxia risk [1]. In a series of 20 patients, Byrd found this to occur in two patients with the use of “hand-devised” post, but not to occur in subsequent cases where a commercial post was used [1, 3, 4]. Careful attention should be paid toward the positioning of the scrotum to ensure that the genitalia are not compressed, as excessive pressure may result in edema, hematoma, or scrotal necrosis [5]. A glove may be left on top of the post for the ease of the circulating nurse, who may need to reevaluate the positioning of the male genitalia with changes in traction throughout the case. Similar positioning care of the female patient should be observed as well.
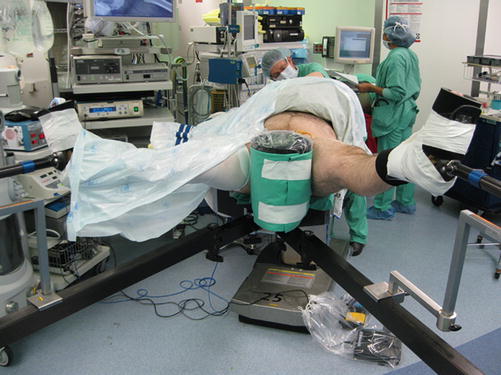
Fig. 2
Patient positioning
Foam and/or towel padding is utilized over all bony prominences in order to prevent the formation of decubiti. In particular, the surgeon should pay specific attention to the contralateral ischial tuberosity and sacrum which depending on the operative table may rest upon metal or plastic bed parts. When positioning the nonoperative limb, the surgeon must consider stabilization of the pelvis and torso with a mild counterforce, providing adequate room for the C-arm fluoroscope to provide visualization of the operative hip while avoiding any unnecessary stress on the nonoperative hip limb. The patient’s feet are placed in traction boots (after padding), and once the feet are secured in the traction boots, the pelvis and torso are stabilized by applying a delicate countertraction (10–20 lb/4.5–9 kg) to the nonoperative limb. Prior to applying traction, the operative hip is placed in 90° of flexion with approximately 20–30° of abduction; the traction boots enable the securement of the operative leg in this position by securing the boot along the rail. The C-arm is then brought in from the contralateral side, and a 45° Dunn lateral view of the hip is obtained. Fluoroscopic examination is then able to assess dynamic hip pathology that may not be evident on traditional static preoperative films (Fig. 3). Next, the operative hip is placed in a neutral rotation with approximately 0° of adduction and 15° of flexion in preparation for the application of traction. One may consider internal foot rotation of 10° to position the femoral neck more parallel to the operative horizon. Excessive flexion of the hip is avoided because tension on the sciatic nerve is increased during distraction and can result in sciatic injury. The contralateral limb is secured in its natural rotation for the remainder of the operative course.
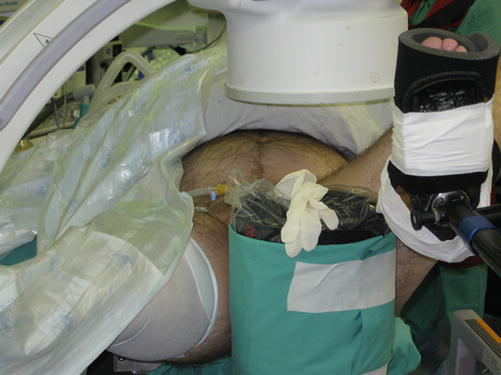
Fig. 3
Preoperative fluoroscopic evaluation, with operative hip in flexion
Traction
In order to perform a successful operation, it is imperative for the hip arthroscopist to establish access to the hip joint. The complex soft tissue envelope that constrains the hip joint makes access difficult. Historically, entrance between the femoral head and acetabulum was thought “manifestly impossible” as the labral seal holds a vacuum force between 120 and 200 N; therefore, initial distraction forces are reported at around 200 lb (90 kg) [6–8]. It was later determined that this seal could be broken and the negative pressure vented by puncturing the joint and with an injection of normal saline causing distension to overcome part of these forces [5, 9, 10]. The addition of distension with proper anesthesia has reduced the amount of distraction force needed to less than 50 lb (23 kg) while still obtaining operative access [5]. Understanding all the aspects used to overcome the intra-articular force explains why the majority of complications related to hip arthroscopy are related to the duration and extent of traction applied [4, 11, 12]. Complications associated with excess traction include pudendal neurapraxia, sciatic nerve injury, genital injury, and lower extremity skin injury [1]. Careful monitoring of the amount of traction force applied and total traction time can avoid these potential complications [12, 13]. Intermittently removing traction throughout the case, in order to keep the total traction time under 2 h, and limiting continuous traction to 1 h minimize these risks [12].
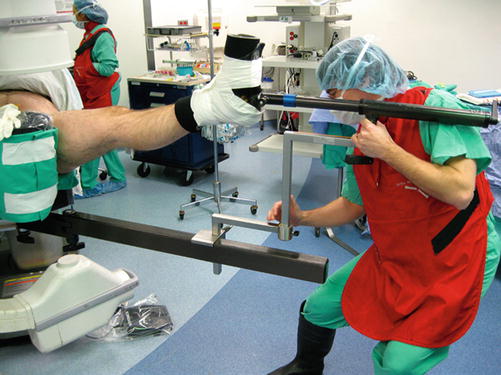
Application of Traction
The use of traction should be applied gently and with considerable care. Applying traction prior to prepping and draping for the procedure establishes a secure operative setup and confirms adequate muscle paralysis, as well as ascertains the amount of distraction that will be necessary. The amount of traction required will be dependent upon each patient’s pathophysiology; specifically, laxity requires less and arthritis more traction in order to distract the joint. Most patients will require 25–50 lb (11–23 kg) in order to achieve adequate distraction when appropriately relaxed [1, 14].
Traction is applied with the knee in full extension and a neutral rotation of the foot. Movement of the rail allows for changes in abduction and adduction of the hip without alteration of traction. Initially the operative lower extremity is placed against the padded perineal post in neutral adduction. Pulling on the operative leg prior to attaching the distraction clamp allows for the attachment to be maximally distal, thereby ensuring that the amount of distraction will not exceed the limitations of the device (Fig. 4). This will result in an initial traction of 20–30 lb (9–14 kg). The use of a tensiometer can assist with monitoring the amount of traction utilized throughout the case (Fig. 5). If a tensiometer is employed, then the readings should be adjusted to account for the manually applied traction.
 Femoro-acetabular Impingement: Definition, Etiology, Pathophysiology
Surgical Technique: Open Hip Dislocation, Open Reduction, and Internal Fixation
Femoral Deformities: Varus, Valgus, Retroversion, and Anteversion
Complications with Hip Arthroscopy and Open Hip Surgery
Surgical Technique: Arthroscopic Treatment of Chronic Slipped Capital Femoral Epiphysis
Smith-Petersen Approach to the Hip
Femoro-acetabular Impingement: Definition, Etiology, Pathophysiology
Surgical Technique: Open Hip Dislocation, Open Reduction, and Internal Fixation
Femoral Deformities: Varus, Valgus, Retroversion, and Anteversion
Complications with Hip Arthroscopy and Open Hip Surgery
Surgical Technique: Arthroscopic Treatment of Chronic Slipped Capital Femoral Epiphysis
Smith-Petersen Approach to the Hip


Related posts:
Femoro-acetabular Impingement: Definition, Etiology, Pathophysiology
Surgical Technique: Open Hip Dislocation, Open Reduction, and Internal Fixation
Femoral Deformities: Varus, Valgus, Retroversion, and Anteversion
Complications with Hip Arthroscopy and Open Hip Surgery
Surgical Technique: Arthroscopic Treatment of Chronic Slipped Capital Femoral Epiphysis
Smith-Petersen Approach to the Hip
Stay updated, free articles. Join our Telegram channel
Full access? Get Clinical Tree
