Cemented Acetabular Components
Fares S. Haddad and Adam M.M. Cohen
Key Points
• Best practice in performing the technique of cementing the component is described.
• Limitations of the procedure are explained.
Introduction
Total hip replacement (THR) has been performed for osteoarthritis for nearly 50 years. The start of the revolution that has been total hip replacement began when John Charnley developed low-friction arthroplasty.1 Charnley used a stainless steel femoral head 22 mm in diameter articulating with a high-density polyethylene following initial use of Teflon for the acetabulum, which failed badly. The components were cemented in originally with dental cement2 and subsequently with specifically designed bone cements.3
A cemented acetabular replacement is a composite of materials with different moduli of elasticity compared with bone. The cement, which acts as a grout between the articulating component and the bone, allows torque forces produced at the articulation to be transmitted to the bone to minimize the shear stress effect on the bone (Fig. 65-1).
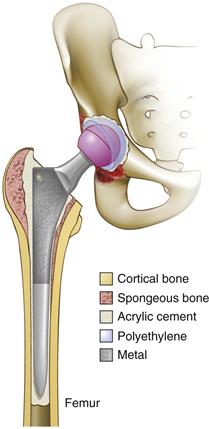
Figure 65-1 Line drawing of cemented total hip arthroplasty (THA).
Cemented acetabular components have been shown to work well in patients over the age of 65, but their survival in young patients and in those with rheumatoid arthritis, dysplasia, or revision surgery is not as good.4
Indications/Contraindications
Indications for using a cemented acetabular component when performing a total hip replacement (THR) are often debated. Cemented components have been used since the dawn of total hip arthroplasty and therefore have a long track record.5–7 Cemented THR continues to be the most commonly performed procedure of all THR types.4 However, it is commonly pointed out that the cemented acetabular component is the “weak link” in the longevity of a fully cemented total hip replacement.4,5
The age of the patient is an important consideration in deciding the most appropriate implant. Patients over the age of 65 constitute a significant proportion of patients undergoing THR.4 Factors that affect component choice in this age group include underlying pathology, medical comorbidities, osteopenia, and the surgeon’s skills/preferences. Evidence suggests that cemented total hip replacement in this age group is an acceptable technique, given that with modern cementing methods the replacement can be expected to last 20 years in 90% of patients.4 In the younger patient (<65 years), the argument to use a cemented acetabular component is more difficult to make,8 although each case should be considered on its merits.
Patients with osteopenia who require hip replacement are poor candidates for uncemented components because of the risk of pelvic fracture and the difficulty in attaining adequate primary stability. The more logical choice is a cemented acetabulum. In the United States, cemented acetabular components have been replaced by cementless fixation in many centers. Reasons for this include observed poor results of cemented “metal-backed” components9 and perceived difficulties of using bone cement in an effective manner. Therefore, many surgeons may struggle when faced with an irradiated acetabulum, severe osteopenia, or metabolic bone disease, all of which are good indications for cementation.
Cemented fixation of the acetabulum remains the most commonly used method in certain parts of Europe.4,10,11 Most other countries performing total hip arthroplasty have been using uncemented acetabular implants more commonly. The cemented all-polyethylene component is much cheaper to insert, and its use in experienced hands produces excellent long-term results. The Ranawat Orthopaedic Center uses an all-polyethylene component in patients over the age of 60 years who have osteoarthritis of the hip. Exclusions for the cemented method include the following:
These indications/exclusions are by no means exclusive. Such criteria can produce excellent results.12 Various studies of cemented acetabular components are summarized in Table 65-1.
Table 65-1
Results of Cemented Acetabular Components
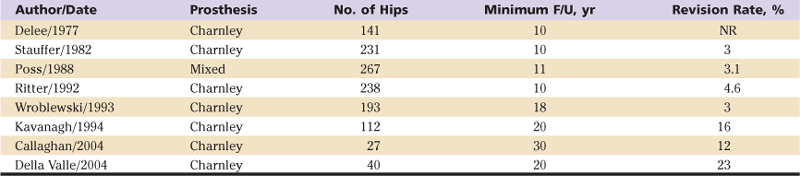
F/U, Follow-up; NR, not reported.
Preoperative Planning
Preoperative planning is an essential part of hip replacement surgery. It serves many functions including the following:
• Ensuring that appropriate implants are obtained prior to surgery
• Ensuring that correct sizes are available
• Providing knowledge of the anatomic challenges of each individual hip
• Restoring appropriate biomechanics
• Avoiding leg length inequalities
Each patient must undergo plain radiographic examination for accurate planning of the operation. An anteroposterior pelvic view with the extremities internally rotated 15 degrees that includes the proximal third of the femora and a lateral view of the affected hip should be routine. The basic principle is to restore normal hip anatomy and therefore biomechanics. Modern templating is often performed on digital radiographs using commercially available templating programs. Therefore, it is imperative to obtain accurate scaling of the radiographic view. This requires the use of a templating ball of known dimension with every radiograph taken for arthroplasty surgery.
Accurate templating improves with experience; however, certain conventions, when followed, enhance the accuracy of acetabular templating.13 Positioning of the acetabular component predicts the center of rotation of the replaced joint and therefore is an essential step in the process. One of the main objectives is to provide sufficient support for the acetabular component within the native socket. The “teardrop” is an important reference point, indicating the acetabular floor. The lateral lip of the teardrop corresponds to the outer acetabular floor, and the medial lip corresponds to the inner floor. The template should not be placed medial to this anatomically consistent point. The abduction angle should be 40 to 45 degrees. A 2-mm allowance for the bone cement should be taken into consideration when the size and position of the acetabular component are assessed (Fig. 65-2).

Figure 65-2 Templating for cemented total hip arthroplasty (THA).
If complex anatomic deformities are noted, or if the socket is very deficient, a computed tomography (CT) scan is often helpful.
Among the potential advantages of cemented acetabular components, avoidance of acetabular fracture is important. Patients with relative osteoporotic bone, which may not be appreciated on preoperative radiographs, are at increased risk of this complication with uncemented cups. Similarly, iliopsoas irritation from retroverted or overhanging uncemented cups is a problem avoided with the cemented option.14 Finally, the stress-shielding phenomenon has been described in association with uncemented implants. This problem seems to be avoided with cemented cups because stresses are distributed over a wider area compared with the very stiff implants used in uncemented cups, which concentrate the stresses.15
However, the use of cemented cups limits the clinician to the use of polyethylene and does not allow for the use of modern bearing surfaces. Despite this, improvements in polyethylene manufacture have produced ultrahigh-molecular-weight polyethylene, which has very favorable wear characteristics, especially when used in conjunction with harder bearings such as ceramic heads.
Description of Technique
Exposure
A cemented acetabular component may be inserted by a variety of different approaches. It is not the purpose of this chapter to recommend a particular method. However, the approach used must provide 360-degree exposure of the acetabulum. The transverse acetabular ligament (TAL) is an important anatomic landmark across the floor of the acetabulum.16 It is imperative to expose the TAL as an indicator of true anteversion of the acetabulum. Osteophytes may grow over the TAL, obscuring its position. These osteophytes must be removed before reaming. The labrum and extraneous soft tissue should be removed to expose the edge of the acetabulum. Obvious peripheral osteophytes may be removed at this stage.
Reaming
The process of reaming is designed to expose sufficient cancellous bone to allow effective interdigitation of cement with bone.17 Initial reamer selection should facilitate reaming of the acetabular floor. The direction of reaming must represent the position in which the definitive component is expected to lie. Therefore, an abduction angle of 35 to 40 degrees and an anteversion angle of 20 to 30 degrees are appropriate. Successive reamers are chosen to remove remaining cartilage. Reamers must be sharp, and excessive pressure should not be necessary. The presence of bleeding cancellous bone indicates that sufficient reaming has been performed. Unlike the technique of reaming required for cementless cups, it is beneficial to ream through the subchondral bone to improve the potential for interdigitation of the cement mantle.18,19 Any residual cartilage in the periphery of the acetabulum should be removed with a sharp curette. This avoids the subsequent use of a larger-diameter reamer, which otherwise might remove more peripheral bone than is absolutely necessary.
As reaming progresses, there is a tendency to ream excessively into the posterior column. Gentle pressure with the hand nearest to the acetabulum in an anterior direction helps to prevent potentially uneven reaming.
The recently introduced rim cutter (Figs. 65-3 and 65-4) has been claimed to help with pressurization and therefore with the quality of the cement mantle in cemented hip arthroplasty.20 This device is designed for use with flanged polyethylene cups. Its use produces a flat rim at the periphery of the acetabulum to aid seating of the flange of the polyethylene cup (Fig. 65-5). This provides a seal, which improves pressurization of the cement as the cup is being inserted.21
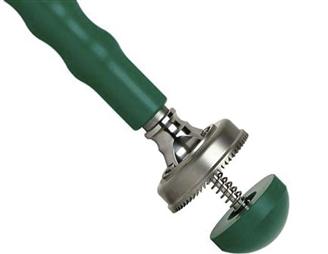
Figure 65-3 Acetabular rim cutter. (From Conroy JL, Chawda M, Kaushal R, et al: Does use of a “rim cutter” improve quality of cementation of the acetabular component of cemented Exeter total hip arthroplasty? J Arthroplasty 24:71–75, 2009.)
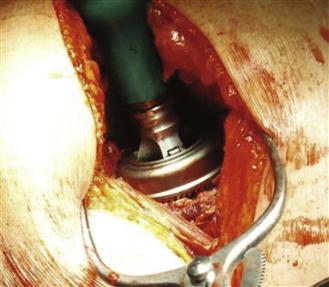
Figure 65-4 Rim cutter in use. (From Conroy JL, Chawda M, Kaushal R, et al: Does use of a “rim cutter” improve quality of cementation of the acetabular component of cemented Exeter total hip arthroplasty? J Arthroplasty 24:71–75, 2009.)
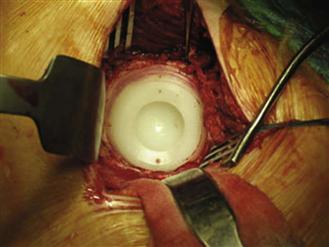
Figure 65-5 Rim-seated flanged polyethylene cup. (Courtesy Exeter Total Hip, Exeter, United Kingdom.)
Drill Holes
The use of drill holes with cemented cups is essential in providing torsional resistance at the bone-cement interface (Fig. 65-6). Between five and eight drill holes measuring 5 to 10 mm in diameter should be placed into the roof of the acetabulum, as well as in the ischium and pubis.22 These holes should be made with a step drill to prevent penetration into the pelvis. The drill holes should be made at 90 degrees to the acetabular bone and chamfered to reduce edge stresses.23 Any cysts that are curetted may also be used as cement fixation holes.
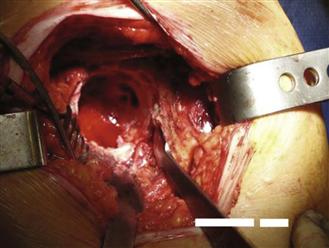
Figure 65-6 Acetabular drill holes.
Cementing Technique
The priority in using cement is to obtain a good bone-cement interface. Bleeding from the bony bed hinders a good bone-cement interface; therefore reducing bleeding through hypotensive anesthesia18 may improve the long-term outcome. Pulsatile lavage is essential in cleaning the cancellous bed of any loose bone fragments and blood, which otherwise would affect cement interdigitation. Cleaning drill holes through pulsed lavage and removing any soft tissue that may have become stuck in the cancellous bone also have proved helpful.
Maintaining a dry acetabular bed before the introduction of cement may be facilitated by the use of an iliac wing aspirator.20 This device, designed by John Timperley (Fig. 65-7), is placed into the iliac wing before cement is introduced into the acetabulum. The effect is to remove blood from the cancellous bone to improve the cement-bone interface. Use of an iliac wing aspirator has been shown to improve cement intrusion into the bone.24
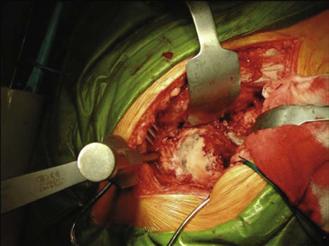
Figure 65-7 Iliac wing aspirator. (From Sierra RJ, Timperley JA, Gie GA: Contemporary cementing technique and mortality during and after Exeter Total Hip arthroplasty. J Arthroplasty 24:325–332, 2009.)
Related posts:

Stay updated, free articles. Join our Telegram channel

Full access? Get Clinical Tree


