8
Autologous Chondrocyte Implantation of the Femoral Condyle
Treatment of articular cartilage injuries is an evolving science and presents one of the most intriguing challenges in orthopaedics today. Although we do not yet have a full understanding of the natural history of articular cartilage injuries, once they are symptomatic they lead to diminished knee function and progressive deterioration over time without a significant capacity to heal. Classic symptoms include pain with weight bearing and pain following activities associated with swelling, locking, catching, and crepitation.
The technique for autologous chondrocyte implantation (ACI) first appeared in a peer-reviewed publication in 1994, demonstrating good or excellent results in 14 of 16 patients treated on the weight-bearing femoral condyle.1 Since then, ACI has been performed in more than 5000 patients worldwide with more than 10 years of follow-up and has emerged as an accepted treatment option for full-thickness chondral injury. The growing appeal of ACI is in part attributed to its ability to resolve the limitations of other techniques that are at best palliative or promote a fibrocartilage healing response but fail to restore hyaline or hyaline-like tissue. When appropriately indicated and with strict adherence to surgical technique, the compliant patient should expect a predictably good or excellent clinical result following ACI.2
Surgical Indications and Other Options
- Symptomatic patients between 15 and 50 years of age
- Unipolar, full-thickness (i.e., Outerbridge3 grade III or IV) articular cartilage lesions (Fig. 8-1); reciprocal chondral lesions, when present, should be no more than Outerbridge3 grade I or II.
- Located on articulating or weight-bearing portion of the distal femur (i.e., medial and lateral femoral condyles or trochlea); experience with patellar or tibial lesions has been less predictable and is a relative contraindication.
- ACI is also indicated for treatment of osteochondritis dissecans (OCD), provided the bone loss is limited to a depth less than 6 to 8 mm. Greater depths of bone loss should be bone grafted prior to ACI, or an alternative technique such as an osteochondral autograft or allograft should be considered.
- Size of lesion: 2 cm2 to 12 cm2
- Smaller lesions, less than 2 to 3 cm2, are best treated with marrow stimulating techniques or osteochondral autograft transplantation.
- Large lesions, greater than 12 cm2, are rarely isolated, unipolar injuries, and should be considered for osteochondral allograft, realignment osteotomy, or joint replacement.
- Multiple lesions may be addressed concomitantly using ACI, provided that each lesion falls within the indications given above.
- When ACI is indicated in patients with patellofemoral instability, axial malalignment, or ligament instability, the associated pathology must be addressed through bony realignment or ligament reconstruction prior to or concomitantly with ACI.
- Radiographic evidence of osteoarthritis is a relative contraindication to ACI.
- Prior subtotal or total meniscectomy is a relative contraindication, although consideration may be given to a combined ACI-allograft meniscal transplantation procedure when necessary.
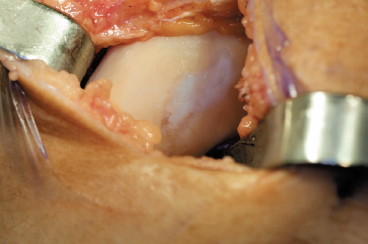
Figure 8-1 Clinical example of an isolated, full-thickness medial femoral chondral defect with fibrocartilage fill following previous microfracture technique indicated for autologous chondrocyte implantation due to recurrent symptoms.
Surgical Technique
Autologous chondrocyte implantation is a two-stage procedure. The initial procedure consists of arthroscopic evaluation and cartilage biopsy. The harvested chondrocytes, which can be maintained for up to 18 months, undergo a 3- to 5-week process of cellular expansion. Chondrocyte implantation is performed as a second-stage procedure after cell processing is completed.
Stage 1
Patient Assessment
- Patients typically complain of knee pain localized to a particular compartment. Weight-bearing activities may exacerbate medial and lateral compartment disease, whereas sitting or stair climbing may exacerbate patellofemoral disease.
- Catching, locking, or giving way are uncommon and may indicate the presence of concomitant injuries, such as meniscal pathology or ligament deficiency.
- Physical examination includes assessment for lower limb malalignment and gait abnormalities.
- Localized tenderness related to the articular lesion is inconsistent. A positive patellar grind test may indicate a trochlear lesion, whereas joint line tenderness may indicate an associated meniscal tear.
- A thorough ligament examination is performed.
- Radiographic evaluation should include an extension weight-bearing anteroposterior (AP), supine lateral, 45-degree flexion weight-bearing posteroanterior (PA) view,4 and a Merchant or skyline view. If malalignment is of concern, a full-length weight-bearing mechanical-axis view should be obtained.
- Magnetic resonance imaging (MRI) of the knee is increasingly accepted as a preoperative tool and is most helpful to assess the subchondral bone (e.g., avascular necrosis and OCD) and for determining associated ligament or meniscal injuries.5
Arthroscopic Assessment
- Defect assessment includes measuring its dimensions, location, and depth, the quality of the surrounding tissue, the condition of the opposing surface, and the knee flexion angle leading to lesion contact with the opposing surface.
- Probe the menisci and cruciate ligaments for evidence of tears. Meniscal lesions, ligament tears, and malalignment requiring treatment are usually managed at the time of arthroscopy and cartilage biopsy.
Cartilage Biopsy
- If the criteria for ACI are met, a full-thickness biopsy of the host articular cartilage is performed arthroscopically using a sharp ring curette or gouge (Fig. 8-2).
- There are several sites suitable for cartilage biopsy. The superior medial and superior lateral edge of the trochlea are commonly advocated sites; however, we prefer the lateral intercondylar notch in the region where a notchplasty is regularly performed during ACL reconstruction. An additional site includes the superior transverse margin of the proximal femoral articular surface adjacent to the supracondylar synovium obtained through a separate superior portal.6
- The biopsy should be 200 mg to 300 mg in total weight, approximately the size of two large rice grains totaling 5 mm by 10 mm of tissue, and normally contains between 200,000 and 300,000 chondrocytes.
- The biopsy is placed into the sterile media and sent overnight at 4°C to Genzyme Biosurgery in Cambridge, Massachusetts, for processing.
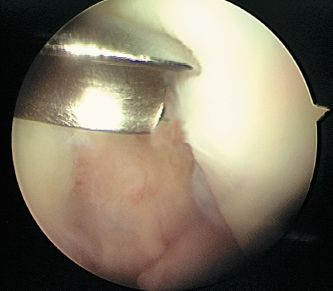
Figure 8-2 Cartilage biopsy taken from within the intercondylar notch in the same area as where a notchplasty is typically performed using a curved gouge through the inferomedial portal
Stage 2
Positioning and Surgical Exposure
- Prophylactic antibiotics are administered prior to the procedure.
- A tourniquet may be inflated until after the periosteum is harvested. It is best to deflate the tourniquet after periosteal harvest to obtain hemostasis within the defect.
- The patient is positioned supine on the operating table, with a tourniquet placed on the upper thigh, and the entire lower extremity is sterilely prepped and draped, allowing the knee to come into extreme flexion.
- An 8 to 10 cm midline incision is utilized. Smaller incisions are feasible when strategically placed over the defect.
- A medial or lateral parapatellar arthrotomy is performed to expose the involved compartment.
- The knee is flexed and the patella retracted to visualize the defect.
Defect Preparation
- The goal of defect preparation is to achieve smooth, vertical walls consisting of healthy, full-thickness, and firmly attached cartilage. Fissured or delaminated cartilage does not provide a secure platform for suturing and may compromise containment of the implanted cells.
- A fresh No. 15 scalpel blade is used to outline the walls of the defect (Fig. 8-3).
- A sharp ring curette is used to excise the articular cartilage down to the level of the calcified cartilage (Fig. 8-4). Violation of the subchondral bone is avoided to prevent bleeding into the defect, which may adversely affect the implanted chondrocytes.
- Hemostasis is crucial and can be controlled with the use of neuro-patties soaked with a dilute 1:1000 epinephrine and sterile saline solution.
- The dimensions of the defect are measured and documented using a sterile ruler. Alternatively, a template of the defect can be made by placing sterile tracing material over the defect and outlining the defect with a marking pen (Fig. 8-5). The template is cut and used during periosteal patch procurement.
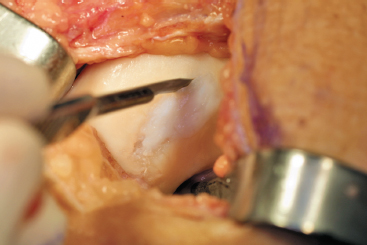
Figure 8-3 A No. 15 blade is used to create a vertical shoulder of articular cartilage at the junction of the normal and abnormal tissue.
Harvesting the Periosteal Patch
- A 3 cm skin incision is made along the subcutaneous medial border of the proximal tibia, two finger-breadths distal to the attachment of pes anserine tendons.
- Blunt dissection is used to develop the plane between the periosteum and overlying subcutaneous fat and fascia. Electrocautery should be used only superficially, if absolutely needed, and never on or near the periosteum.
- Utilize the template to outline the periosteal patch. Because the periosteum has a tendency to shrink after harvest, oversize the template by 2 mm in each dimension to ensure an adequate fit over the defect.
- Label the outer surface of the periosteum with a marking pen to distinguish it from the inner cambium layer.
- A fresh No. 15 scalpel blade is used to incise the outline of the patch full-thickness through the periosteum down to the underlying bone (Fig. 8-6).
- A sharp, curved-tip periosteal elevator is used to slowly and carefully dissect the periosteum from the underlying bone, starting distally and progressing proximally. Minimize side-to-side motion to prevent inadvertent tearing of the patch. Use smooth forceps to provide gentle countertraction and to raise the leading edge of the periosteum to prevent bunchingup and tearing. Avoid penetration of the underlying bone (Fig. 8-7).
- For multiple defects, additional patches are harvested from adjacent areas.
- Utilize the template to outline the periosteal patch. Because the periosteum has a tendency to shrink after harvest, oversize the template by 2 mm in each dimension to ensure an adequate fit over the defect.
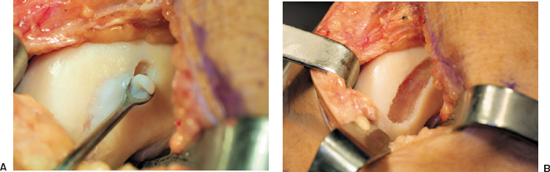
Figure 8-4 (A) A ring curette is used to debride the defect down to but not through the subchondral plate. (B) Prepared defect with vertical articular cartilage walls.
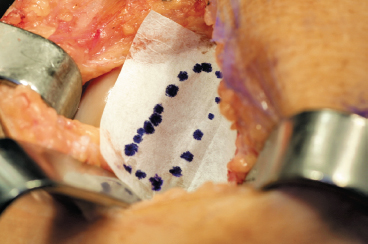
Figure 8-5 Sterile paper taken from the glove package is used to template the defect.
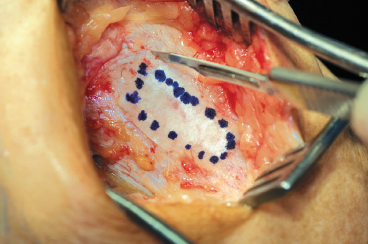
Figure 8-6 The template is used to determine the size and shape of the periosteal patch harvest performed using a No. 15 blade.
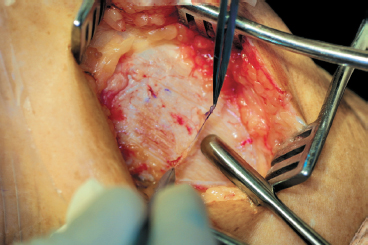
Figure 8-7 A round-tipped periosteal elevator is used to sharply elevate the periosteum from distal to proximal, taking care to avoid side-to-side motion, which might inadvertently cause a tear or rent in the periosteum.
Securing the Periosteal Patch
- The tourniquet is deflated and hemostasis confirmed within the defect (Fig. 8-8).
- The periosteal patch should be kept moist at all times to minimize shrinkage and maintain the viability of the cambium layer (Fig. 8-9).
- The patch is placed over the defect, cambium layer down, and trimmed to sit flush to the edge of the defect, but not overlapping.
- The periosteum is secured with 6–0 absorbable Vicryl suture on a P-1 cutting needle. The suture should be repeatedly coated in sterile glycerin or mineral oil to facilitate smooth passage through the periosteum and cartilage and to prevent tearing of either tissue.
- Proper suturing technique begins with passage of the needle through the periosteum from within the defect and into the cartilage edge, exiting 2 to 3 mm away from the edge of the defect. Follow the curve of the needle to avoid bending or breaking the needle and to prevent tearing through the tissue (Fig. 8-10).
- The sutures are tied gently, with the knot placed over the periosteal patch at the junction of the patch and articular cartilage. Start with sutures placed at the four corners of the defect. The sutures are then placed alternately around the defect, about 3 to 4 mm apart, maintaining equal tension across theperiosteum and creating a watertight seal. A small opening, 6 mm in width, is left at the proximal end of the defect to allow access for the 18-gauge catheter used to test the seal and to inject the chondrocytes.
- Test for a watertight seal using a saline-filled tuberculin syringe with an 18-gauge catheter. The catheter is placed through the patch opening, and the saline is injected under the patch. No leakage of fluid should be visible. Add sutures where needed if an area of leakage is found. Once the seal is confirmed, aspirate the saline from within the defect, leaving a dry bed.
- The periosteal patch is now sealed with fibrin glue. Autologous fibrin glue is formed from cryoprecipitate prepared from one unit of whole donated blood combined with a mixture of bovine thrombin and calcium chloride. Alternatively, commercially available fibrin glue (Tisseel, Baxter Healthcare Corp., Glendale, CA) may be used for convenience and consistent quality. The surrounding articular cartilage is dried gently, and the fibrin glue is applied along the edges of the defect up to the opening.
- Reconfirm the watertight seal as previously described.
- Proper suturing technique begins with passage of the needle through the periosteum from within the defect and into the cartilage edge, exiting 2 to 3 mm away from the edge of the defect. Follow the curve of the needle to avoid bending or breaking the needle and to prevent tearing through the tissue (Fig. 8-10).
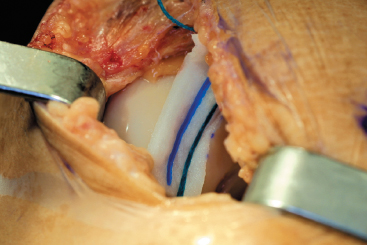
Figure 8-8 An epinephrine-soaked neuro-patty is used to facilitate hemostasis following deflation of the tourniquet.
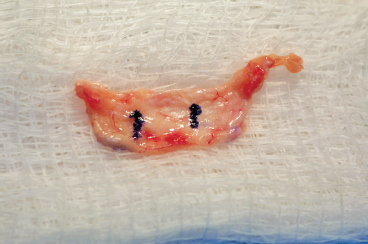
Figure 8-9 Periosteal patch marked on outer surface for orientation is maintained on a moist sponge to prevent desiccation.
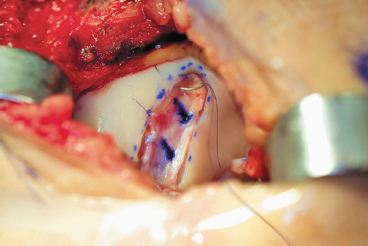
Figure 8-10 Periosteal patch in place secured with interrupted 6-0 Vicryl suture by passing the needle through the periosteum and then through the articular surface following the radius of curvature of the needle.
Chondrocyte Handling and Injection
- The autologous chondrocytes cells arrive in a small vial. Each vial contains enough cells and solution to fill a defect or defects totaling about 6 to 10 cm2. If the defect size is greater than this, or if multiple defects totaling a greater area are present, additional vials should be requested prior to surgery and can be processed from the same original biopsy.
- The suspension medium should be clear, and the cells appear as an off-white pellet at the bottom of the vial. If the solution is turbid or cloudy before resuspension, the vial should be discarded.
- The exterior of the vial is not sterile, and careful handling is required to prevent contamination of the contents during resuspension, aspiration, and implantation.
- The vial is held in a vertical position, the lid is removed, and the top is wiped with alcohol.
- A sterile 18-gauge catheter (smaller gauges will damage the cells) with the metal needle in place is inserted into the vial and advanced until the tip lies just above the cells. The metal needle is withdrawn, leaving the plastic catheter tip within the vial.
- A sterile tuberculin syringe is attached to the catheter, and the fluid is gently and slowly aspirated into the syringe, leaving the cells behind. The fluid is then gently injected back into the vial, resuspending the cells within the fluid. The aspiration/injection process is repeated several times to achieve a uniform suspension of cells (Fig. 8-11).
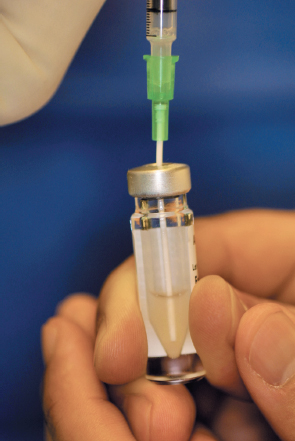
Figure 8-11 An 18-gauge angiocatheter used to resuspend the cells. Care is taken to avoid inadvertent contamination due to the nonsterile container.
- The entire contents of the vial are then aspirated into the syringe, and the syringe is detached from the catheter to ensure sterility. A new 18-gauge catheter without the metal needle is inserted onto the syringe. The syringe is maintained in the vertical position with the tip down to keep the air bubble proximal to the cell solution. Inadvertent syringe detachment during withdrawal can lead to contamination or critical cell loss.
- The catheter is then placed through the periosteal patch opening and advanced to the distal end of the defect. The cells are slowly injected into the defect with a side-to-side motion while the catheter is slowly withdrawn to the opening of the defect, creating an even distribution throughout the defect. If multiple defects are treated with a single vial, care must be taken to distribute the volume of cells proportional to the size each defect.
- The opening is closed with additional sutures and sealed with fibrin glue (Fig. 8-12).
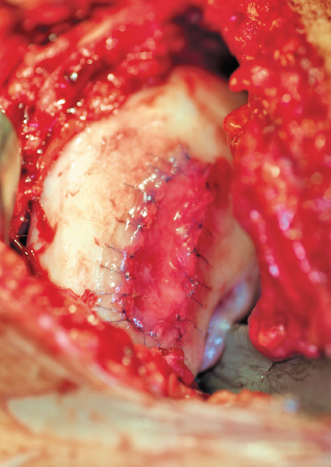
Figure 8-12 Final patch in place sealed with fibrin glue.
- Closure of the arthrotomy is performed in a layered fashion.
- The use of drains is avoided to prevent damage to the periosteal patch and loss of the implanted chondrocytes.
- A soft, sterile dressing is applied, with a cryotherapy device incorporated into the dressing.
- The leg is placed in a hinged brace, locked in extension.
- The entire contents of the vial are then aspirated into the syringe, and the syringe is detached from the catheter to ensure sterility. A new 18-gauge catheter without the metal needle is inserted onto the syringe. The syringe is maintained in the vertical position with the tip down to keep the air bubble proximal to the cell solution. Inadvertent syringe detachment during withdrawal can lead to contamination or critical cell loss.
Postoperative Rehabilitation
Weeks 0 to 6
- Continuous passive motion (CPM) is started at 6 hours after surgery and performed for 6 to 8 hours per day in 2-hour increments at a rate of one cycle per minute. CPM has a beneficial effect on the quality of the repair tissue and on the degree of defect fill.7, 8
- For lesions of the femoral condyles, the range of motion is started from 0 to 45 degrees of flexion, and is gradually increased as tolerated. Trochlear lesions are limited to 45 degrees of flexion to minimize patellofemoral contact forces. Patients are allowed to flex their knee to 90 degrees passively several times a day, however, to prevent a flexion contracture.
- Ambulation is limited to touchdown weight bearing for condylar lesions and partial weight bearing for trochlear lesions, with crutches used for assistance.
- Isometric quadriceps sets and straight leg raises promote the return of quadriceps muscle function.
- A brace maintains the leg in extension except during range-of-motion exercises. The brace is discontinued once the extension lag is eliminated during straight leg raise.
- Modalities, including cryotherapy, electrical stimulation, and ultrasound, are used to limit pain and effusion.
- Ambulation is limited to touchdown weight bearing for condylar lesions and partial weight bearing for trochlear lesions, with crutches used for assistance.
Weeks 6 to 12
- Full, active knee motion is achieved.
- Weight bearing is rapidly progressed from 20% per week to full, and the patient is weaned from crutches to a cane until normal gait is obtained.
- Short-arc closed-chain exercises augment straight leg raises for strengthening. Open-chain extension is avoided in all patients.
- Functional training, utilizing cardiovascular, proprioceptive, and plyometric training techniques, is added with a focus on return to sport-specific activities.
Months 3 to 5
- Full motion is maintained during this phase.
- Strengthening may progress to wider arcs of motion with increased resistance, although trochlear repairs are still restricted from deep flexion exercises.
- Functional training is advanced within the guidelines established for weight bearing and strengthening.
Months 6+
- The final phase continues until a full return to activities is allowed. This may be as soon as 12 months for small and moderate-sized condylar lesions, and as much as 18 months in larger condylar lesions or following trochlear repairs. The progression is governed by the individual’s healing response and symptom profile.
- Weight bearing is progressed from walking, to jogging, and finally running.
- Strengthening and functional training are progressed to achieve a functional level at or above 85% of the uninvolved extremity.
Tips and Tricks
- Biopsy should be performed only when there is clear intention to treat a cartilage lesion with ACI because of the significant resources associated with biopsy and cell processing
- If more than 16 to 24 weeks has passed from the time of cartilage biopsy, a brief arthroscopic evaluation may be required if symptoms worsen to confirm that the lesion still meets the criteria for ACI
- A commercially available lower extremity positioning device can be helpful in maintaining the extreme knee flexion necessary for exposure, particularly for posterior lesions
- Medial femoral condylar defects can be approached through smaller incisions than trochlear or lateral condylar defects because of the position and mobility of the patella. Posteriorly located lesions require additional hyperflexion of the knee, and may require a larger arthrotomy with subluxation or dislocation of the patella to facilitate exposure
- If the defect lies close to the border of the articular surface, it may be better to leave mildly injured articular cartilage at the edge of a lesion to maintain a contained defect, rather than remove it and create an uncontained defect
- It is important to oversize the defect by 2 mm around the periphery either when templating or when harvesting the periosteal patch. This compensates for periosteal shrinkage after harvest and prevents having too small of a patch to span the defect. Remember, excess can always be trimmed, but the patch cannot be enlarged after harvest
- When properly sized and sutured, the patch should sit across the defect like a drum skin and should not lie in contact with the floor of the defect. This ensures a space underneath for placement of the chondrocyte cells
- Uncontained defects along the articular edge require the patch to be secured to the surrounding synovium, the edge of the cruciate ligament, or through small drill holes made with a Kirschner wire. Alternatively, small microanchors can be used with the 6–0 suture used to replace the suture that normally comes with the anchor
- A two-barreled syringe allows for controlled mixing of the fibrin glue preparations. Once combined, allow a few seconds for the mixture to begin setting, and then move along steadily to prevent clogging of the syringe tip. Remember you will need an additional tip to seal the patch opening at the end of the procedure
- When handling the cell vial, remember, the outside of the vial is not sterile. To avoid contamination make certain everyone knows his or her role and is familiar with the process of resuspension and cell withdrawal. Do a dry run prior to the procedure to reinforce the steps involved. Any contamination or loss of cells may compromise the entire procedure.
Pitfalls and How to Avoid Them
- The cartilage biopsy must be of sufficient size and depth. Superficial biopsies will yield fewer cells per unit area and may compromise cell processing. Loose or ectopic articular cartilage originating from the defect is not suitable, as it may be biologically compromised.
- Curettes must be well maintained with a sharp edge to provide the best results. To create vertical walls, outline the defect with a fresh No. 15 blade scalpel and then pass the curette full thickness through the cartilage, starting at the peripheral outline and working toward the center of the defect. Use a gentle scraping motion to debride the defect. This will limit any bleeding into the defect bed.
- Epinephrine is the first choice for hemostasis. There may be a detrimental effect of thrombin on the chondrocytes, so thrombin should be limited only to persistent points of bleeding and should be well irrigated after the bleeding is controlled. Use of electrocautery in a cutting mode with a needle tip should be a last resort.
- If the periosteum tears during harvest, it can be repaired during suturing, or a second patch may be harvested from an adjacent area. It should be noted that the periosteum tends to become thinner with age and as one moves distally on the tibia.
- Label the outer surface of the periosteal patch with a marking pen. This will facilitate distinguishing the inner cambium layer from the outer surface. If you fail to mark the outer surface, the cambium layer can be distinguished by its shiny surface, whereas the outer layer may have small pieces of subcutaneous tissue still attached.
- Once the cryoprecipitate mixes with the thrombin/calcium chloride solution, the fibrin quickly congeals. Have extra tips available for the fibrin glue, as they easily become clogged. Do not force a clogged tip.
- Symptoms of pain, chronic effusions, locking, or catching may indicate that the rehabilitation program may be progressing too quickly for the patient. Reduce activities to a level tolerated by the patient, and return to gradual progression.
Conclusion
Treatment of articular cartilage injuries remains a difficult problem. For relatively young patients, the option of waiting for the inevitable knee arthroplasty has never been an appealing prospect. Surgical procedures to treat these lesions have evolved from early marrow stimulating techniques with poor long-term efficacy, to more recent methods promoting repair or replacement with hyaline cartilage tissue in an effort to provide better longevity. The results of autologous chondrocyte implantation are encouraging for lesions of the femoral articular surface and continue to improve as our experience with the procedure increases.1, 2, 9 The procedure clearly offers a viable, cost-effective alternative to many procedures currently available, and with future advances in cell technology, even greater improvement on today’s techniques can be expected.10, 11
References
1 Brittberg M, Lindahl A, Nilsson A, et al. Treatment of deep cartilage defects in the knee with autologous chondrocyte implantation. N Engl J Med 1994;331:889–895
2 Peterson L, Minas T, Brittberg M, et al. Two- to 9-year outcome after autologous chondrocyte transplantation of the knee. Clin Orthop 2000;374:212–234
3 Outerbridge RE. The etiology of chondromalacia patellae. J Bone Joint Surg Br 1961;43:752–767
4 Rosenberg TD, Pardos LE, Parher RD, Coward DB, Scott SM. The 45-degree posteroanterior flexion weight-bearing radiograph of the knee. J Bone Joint Surg Am 1988;70:1479–1483
5 Linklater JM, Potter HG. Imaging of chondral defects. In: Fu FH, Miller MD, eds. Operative Techniques in Orthopaedics. Philadelphia: WB Saunders; 1997: 279–288
6 Minas T, Peterson L. Chondrocyte transplantation. In: Fu FH, Miller MD, eds. Operative Techniques in Orthopaedics. Philadelphia: WB Saunders; 1997: 323–333
7 O’Driscoll SW, Keeley FW, Salter RB, et al. Durability of regenerated articular cartilage produced by free autogenous periosteal grafts in major full-thickness defects in joint surfaces under the influence of continuous passive motion. J Bone Joint Surg Am 1988;70:595–606
8 O’Driscoll SW, Salter R. The induction of neochondrogenesis in free intra-articular periosteal autografts under the influence of continuous passive motion. J Bone Joint Surg Am 1984;66:1248–1257
9 Cartilage Repair Registry. Cambridge, MA: Genzyme Corp., 2002
10 Minas T. Chondrocyte implantation in the repair of chondral lesions of the knee: economics and quality of life. Am J Orthop 1998;27:739–744
11 Lavernia CJ, Guzman JF, Gachupin-Garcia A. Costeffectiveness and quality of life in knee arthroplasty. Clin Orthop 1997;345:134–139
< div class='tao-gold-member'>
Related posts:
 Multiligament Injuries
 Lateral Closing Wedge Osteotomy
 Posterior Cruciate Ligament Reconstruction Using the Tibial Inlay Technique
 Posterolateral Knee Reconstruction
 Proximal/Distal Realignment for Patellar Instability
 Posterior Cruciate Ligament Reconstruction: All-Inside Arthroscopic Technique and Tibial Inlay Technique with Two-Strand Quadriceps Tendon-Patellar Bone Graft


