16
Anterior Cruciate Ligament Revision
Indications
- Recurrent symptomatic instability
Cause of Failure: Determine Cause of Failure
- Trauma
- Errors in surgical technique
a. Inappropriate placement of the femoral or tibial tunnel
b. Inadequate notchplasty
c. Improper tensioning of the graft
- Failure of graft incorporation
Early failure within the first 5 weeks postoperatively most likely due to insufficient fixation of the graft
- Reconstruction of the anterior cruciate ligament (ACL) alone in complex knee instabilities (e.g., posterolateral corner and posteromedial instability)
- Loss of motion or arthrofibrosis; loss of extension is typically more problematic than a loss of flexion.
a. Nonanatomic graft placement
b. Surgical reconstruction performed acutely prior to regaining motion
c. Cyclops lesion
d. Prolonged immobilization
e. Infection
f. Concurrent meniscal repair or multiligament repair
Contraindications
- Pain and swelling alone without instability; patients with persistent pain after ACL reconstruction may require other forms of treatment such as an osteotomy.
- Infection
- Significant degenerative joint disease
- Significant knee flexion/extension contracture; may be addressed in staged fashion
- Reflex sympathetic dystrophy
- Inappropriate patient expectations
- Anticipated noncompliance with rehabilitation protocol
Physical Examination
- Range of motion: check prone heel height difference to assess for flexion contracture
- Patellar tracking/mobility/crepitance/instability
- Lachman compare with contralateral side
a. Grade I, 0–5 mm; II, 6–10 mm; and III, 10 mm anterior tibial translation
- Pivot shift
a. 0 is equivalent to the contralateral side; I, glide; II, clunk; III, gross translation
- Anterior drawer
a. Grade I, 0–5 mm; II, 6–10 mm; III, 10 mm anterior tibial translation
- Assess the status of secondary restraints, including rotational and varus/valgus laxity. Check external rotation at 30 and 90 degrees of flexion to assess for posterolateral instability. Check varus/valgus instability at 0 and 30 degrees.
- Assess gait; in particular, look for a varus alignment with lateral thrust (if present, it may require realignment).
- Any evidence of infection must be fully evaluated.
- Assess soft tissue compliance/mobility in zones of previous incisions (it is rare to need a tissue expander).
Diagnostic Tests
- Plain radiographs are important in assessing the type of hardware present, tunnel placement, and presence of osteoarthritic changes.
a. Obtain standing anteroposterior (AP), lateral, 45degree posteroanterior flexion weight bearing, and Merchant views.
b. Obtain standing long cassette views if there is a concern about coronal malalignment.
- A computed tomography (CT) scan is not routinely obtained, except to further define excessive tunnel expansion that is evident on plain films. If a prosthetic graft is being revised, obtain a CT scan.
- KT-1000/2000 (MedMetric, San Diego, CA) testing. A side-to-side difference greater than 5 mm is suggestive, but not diagnostic, of failure.
Special Considerations
- Review index procedure operation note.
- Know the hardware present. Have a variety of screwdrivers available for screw removal.1
- Does hardware need to be removed, or can it be bypassed?
- If posterolateral rotatory instability is diagnosed preoperatively, be prepared to surgically treat it depending on the magnitude of the instability.
- If previous medial meniscectomy, consider a role for a meniscal transplant.
Preoperative Planning and Timing of Surgery
- Incisions
a. Consider skin bridges resulting from prior incisions.
b. Consider future surgical exposure.
c. It is rare to need tissue expanders.
- Critically evaluate the location of present tunnels relative to the ideal position and the type of preexisting hardware. The removal of hardware is not always necessary, as frequently the tunnels were placed in an incorrect position.
- Fluoroscopy may be needed for hardware removal.
- Determine if bone grafting is necessary due to cystic widening (Fig. 16-1) or tunnel confluence. It may be possible to do a single-stage grafting if one uses allograft, or it may require a two-stage procedure using iliac crest bone graft. If bone grafting is necessary, the reconstruction can be performed 12 to 16 weeks later.
- Choice of graft (for surgical technique of harvest, see primary ACL reconstruction section): The central third of the patellar tendon should not be reharvested.2
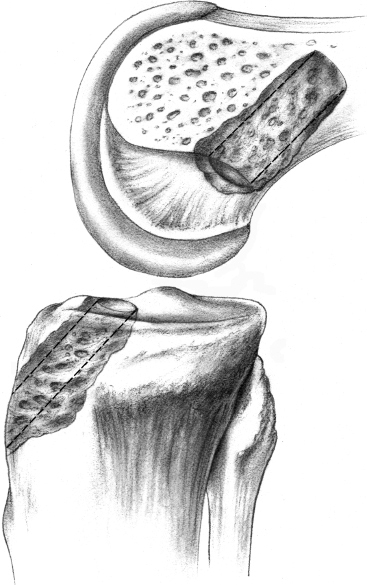
Figure 16-1 Enlarged tibial tunnel.
a. Autograft
i. Bone-patellar tendon-bone
• Ipsilateral
• Contralateral
ii. Hamstring tendon
iii. Quadriceps tendon
b. Fresh frozen allograft
i. Bone-patellar tendon-bone
ii. Achilles tendon
iii. Hamstring tendon
iv. Quadriceps tendon
- Decide on the type of graft fixation and consider possible augmentation of fixation.
- The patient must have normal range of motion, or the first goal should be restoration of motion.
- If the graft was synthetic, the entire graft should be removed.
Special Instruments, Positions, and Anesthesia
- General anesthesia
- Position patient supine with the waist flexed to reduce lumbar extension.
- Place operative leg in leg holder with tourniquet. Do not inflate tourniquet unless bleeding obstructs visualization. It is essential to be able to flex the patient’s knee to 110 degrees for placement of the femoral screw.
- Place contralateral leg in padded foot holder with hip and knee slightly flexed to prevent common peroneal nerve and femoral nerve palsy.
Examination Under Anesthesia
- Reassess and grade pivot shift, Lachman, and other instabilities, including posterolateral rotatory, medial, and posterior.
- Always compare with the contralateral knee.
- Perform examination prior to placing leg in leg holder.
- Include the examination findings in the operation report.
Surgical Procedure: Endoscopic Technique
Diagnostic Arthroscopy
- Establish a superomedial or superolateral portal for outflow.
- Use an inferolateral portal for arthroscope placement and an inferomedial portal as the working portal.
a. Assessment of patellofemoral joint
b. Assessment of associated chondral lesions
c. Evaluation/treatment of meniscal pathology
d. Evaluation of intercondylar notch: notch stenosis, intercondylar osteophytes, empty wall sign, vertical strut sign,3 low roof, status of posterior cruciate ligament (PCL)
Removal of Hardware
During preoperative planning, decide what hardware must be removed at the start of the case and remove it accordingly from the tibia and/or femur.
Notch Preparation
- Begin with remnant soft tissue debridement to improve visualization. Remove all of the remaining ACL graft tissue with a combination of arthroscopic scissors, arthroscopic osteotome, arthroscopic electrocautery, and a motorized 5.5 mm full-radius resector. If a synthetic graft is used, it can entail an intensive process.
- The total width of the intercondylar notch varies, but generally 20 to 22 mm of width is necessary to avoid graft impingement.
- Clear the lateral wall of the notch back to “over the top” (OTT) position.
- Perform notchplasty via anterior medial portal as necessary with 1/4-inch curved arthroscopic osteotome and a 5 mm spherical burr.
- The goal is to allow visualization of the entire lateral intercondylar wall and OTT position, and prevent a cyclops lesion.
- Identify OTT position and ensure that one is not on “residents’ ridge” by hooking the OTT position with a probe.
Tibial Tunnel
- If the tibial tunnel is in a good position, remove the tibial screw so the tunnel may be reused. The screw can be left in place if it is in the incorrect position and thus would not be in the path of the new tunnel.
- A medially based rectangular periosteal flap is made just medial to the tibial tubercle and proximal to the pes anserinus tendons.
- Place a tibial aiming device through the anteromedial portal or an accessory portal in the midpatellar region that is inferior to the anteromedial portal. Allografts frequently require an accessory inferomedial portal.
- Set the guide between 45 and 55 degrees. This should be at least 25 mm below the joint line, superior to the insertion of the pes anserinus tendons, and directed toward the femoral anatomic attachment site (FAAS).
- Position the guide in the sagittal plane using the posterior edge of the anterior horn of the lateral meniscus as the exit site for the pin that will be drilled. The guide should be centrally placed to allow passage of the graft between the PCL and the lateral wall of the notch. It should be 7 mm anterior to the PCL.
- Drill the guide pin through the guide; verify arthroscopically that it is posterior (3 to 5 mm) to the intercondylar notch with the knee extended. This tunnel may be confluent with the primary ACL reconstruction’s initial hole. If a completely new hole can be drilled with the graft in the ideal position, this is preferred.
- Overream the pin with an 11 mm cannulated reamer.
- Contour the posterior and posterolateral tunnel on the articular side of the tibia with a scalloped shaver and rasp to smooth the edges. Make certain this entrance is clear.
- Fully evaluate the nature of the tunnel with the index tunnel. If the tunnel is confluent with the index procedures tunnel, the graft can be prepared accordingly, using a larger plug if necessary, or a bone graft may need to be used. A matchstick-shaped bone graft can be fashioned from the unused allograft to fill the extra space.
- Place the scope retrograde through the tibial tunnel to assess whether the tibial socket is intact and whether additional soft tissue is adherent within the tunnel requiring debridement.
Femoral Tunnel Placement
- If the primary femoral tunnel is in the ideal position, it may be reused. If the intraarticular opening is in a good position, a diverging tunnel may be used (Fig. 16-2).
- If the primary tunnel is anterior, then leave the hardware in place and drill a new hole posterior (Fig. 16-3).
- If the tunnel has to be expanded farther posterior, resulting in an enlarged tunnel, use a larger bone plug (allograft) or used stacked interference screws (autograft) (Fig. 16-4).
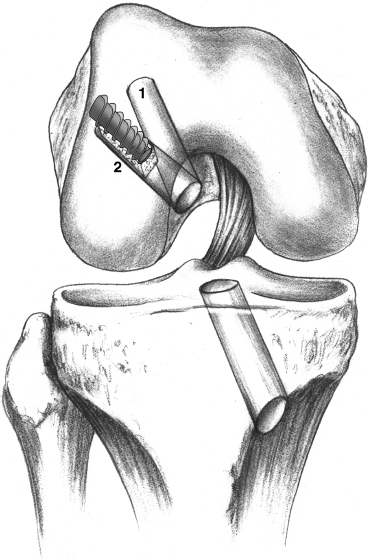
Figure 16-2 Diverging tunnel.
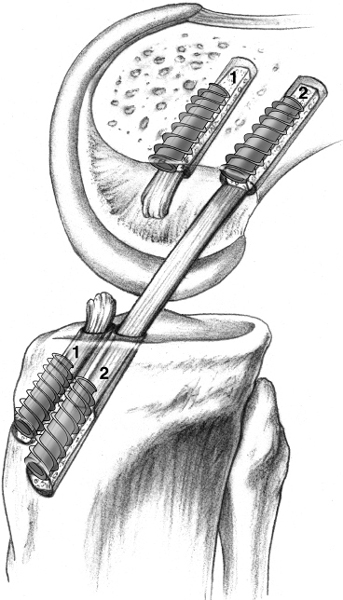
Figure 16-3 Anterior-placed femoral tunnel.
- If the tunnel placement was too posterior and the posterior wall is deficient, conversion to a two-incision technique is required to obtain secure fixation or consideration of an EndoButton (Smith and Nephew, Andover, MA) with possible aperture fixation.
- The femoral tunnel should be at the 11 o’clock position on the right knee and the 1 o’clock position on the left knee. If the primary tunnel is too vertical, then use the diverging tunnel technique (Fig. 16-5).
- Reinsert scope, flush, and clear for visualization.
- Meticulously clear soft tissue from the OTT position and confirm with a probe.
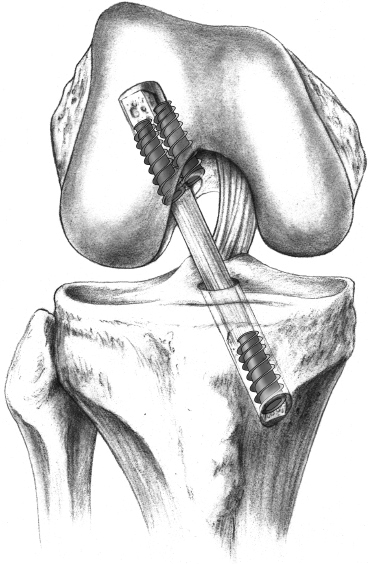
Figure 16-4 Stacked femoral screws.
- With the pump turned off and the knee “dry,” place the femoral offset guide through the tibial tunnel. The guide allows for 1 to 2 mm of posterior wall to remain after reaming (thus, if a 10 mm tunnel is desired, use a 7 mm offset guide to leave 2 mm of posterior wall). This is the anatomic position of the ACL. The guide must be oriented toward the 11 o’clock position (right) or the 1 o’clock position (left). If unable to achieve via transtibial placement, consider placing the guide through an accessory inferomedial portal with the knee hyperflexed. Use a probe to hold the PCL out of the way while performing this step.
- Drill guide pin through the femoral offset guide to a depth of 3 to 4 cm.
- Next, overdrill with the selected reamer (when using a patellar tendon graft, a 10 mm reamer is a good choice); the length of the tunnel should be 5 to 8 mm longer than the length of the femoral bone plug. Ream 5 to 7 mm to create an “endoscopic footprint.” Back the reamer out and use a probe to check the status of the posterior wall. If the posterior wall is intact, complete reaming to the desired depth.
- If the index procedure’s femoral screw is encountered, it will have to be removed if the reamer will not pass it.
- Remove bone debris by removing the reamer from the hole while still rotating forward and by placing the shaver up the tibial tunnel into the femoral hole.
- Complete the final notchplasty and smooth the entrance site. The femoral tunnel should appear circular at the entrance. Smoothing the anterior edge of the tunnel facilitates graft placement.
- To assess both of the tunnels, place the arthroscope up the tibial tunnel and rotate it 360 degrees to visualize the entire tunnel and see what part of it may be soft tissue from the previous tibial tunnel. Also visualize the femoral tunnel and confirm that the posterior wall is intact (at least 1 mm remains).
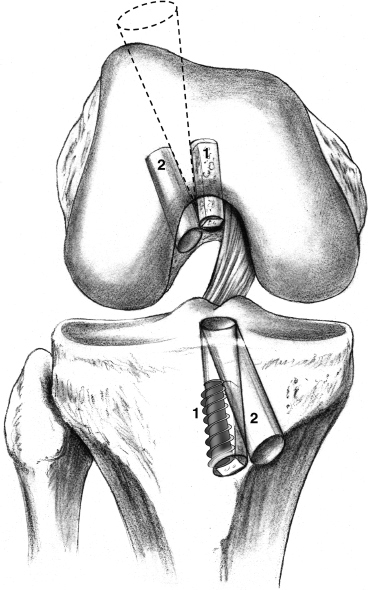
Figure 16-5 Initial tunnel too vertical.
Graft Preparation for Allograft Patellar Tendon or Autograft Patellar Tendon
- Clear excess fat pad and soft tissue from the graft. Measure the graft construct length (95 to 105 mm). The length of soft tissue (N) affects the angle selected on the tibial aiming device. N + 10 degrees is generally sufficient to reduce significant graft construct mismatch.
- The bone plugs should be approximately 25 mm in length. Contour bone plugs to fit easily through a 10 mm sizer tube. If the tunnels are enlarged, the bone plugs can be kept larger to fill the defect.
- Mark the femoral side bone plug-tendon interface on the cancellous surface (with a sterile marking pen). This step helps determine the complete seating of the bone plug in the femoral tunnel.
- Drill two 1/16-inch holes through the tibial bone plug parallel to the cortical and cancellous surfaces. Pass a No. 5 braided polyester suture through each hole.
- No suture is necessary in the femoral tunnel as a push-in, not pull-through, technique is used.
Graft Placement: The Push-In Technique
- Orient cancellous surface of grafts anteriorly with the tendonous/cortical portion posterior for the femoral tunnel.
- Push longer bone plug (without sutures) up tibial tunnel with a two-pronged pusher into notch area with the patient’s knee flexed 80 to 90 degrees.
- Use a small curved hemostat through the inferior medial portal to grasp the graft at the junction of the proximal and middle portion of the plug. Guide the plug into the femoral socket. Push the bone plug flush to the femoral articular entrance. Hold in position and assess for graft construct mismatch at the tibial site. If acceptable, push the graft 3 to 5 mm into the femoral tunnel to act as skid for placement of the guide pin, which is placed with the knee hyperflexed. Place the pin at the 11 o’clock to the 11:15 position anterior to the bone plug. Hyperflex the knee and advance pin until it bottoms out within the femoral socket. Completely seat the graft in the femur. Use the pen mark on the bone tendon junction to help determine if it is completely seated.
Femoral Graft Fixation
- Document that the femoral bone plug is fully seated in the femoral tunnel with the probe.
- Place a cannulated interference screw (7 25 mm) through the anteromedial or accessory inferomedial portal, visualize arthroscopically, and maintain the hyperflexion of the knee to 110 to 120 degrees (the difference between the inferomedial portal angle that the guidewire is through and the tibial tunnel angle of the graft) and seat the screw. Observe the graft soft tissue for rotation or twisting as the screw inserts.
- Failure to hyperflex the patient’s knee to 110 degrees can cause screw breakout through the posterior femoral cortex and nonparallel screw/graft placement.
Tibial Fixation
- Cycle the knee through full range of motion (FROM); note excursion of the tibial bone plug. While cycling the knee 90 degrees to full extension, expect the graft to shorten 1 to 2 mm while passing through the final 20 to 30 degrees toward full extension (“gross isometry” test).
- The graft generally is rotated 180 degrees, which places the tibial cortex anterior. The screw is placed on the cortex for better fixation. Placement anterior prevents wandering and divergence, which decreases fixation. Anterior screw placement will posteriorize the graft, and if the screw tip extends beyond the tendo-osseous junction, it is less likely to injure the graft if placed anteriorly.
- Assess tibial bone plug length. Stabilize the graft with a hemostat to prevent twisting. If within the tunnel, anchor with an interference screw placed anteriorly on the cortical side. Generally use a 9 × 20 mm cannulated metal interference screw.
- If there is excess graft length and the graft is protruding more than 40%, one can rotate the graft up to 540 degrees or perform a free bone block technique (Fig. 16-6):
a. The free bone block technique requires removal of the graft from the knee. The bone block from the tibial side of the graft is removed from the tendon.
b. A Krackow suture is placed in the distal half of the tendon prior to placing it within the joint.
c. The femoral side is placed back in the tunnel and fixed with the interference screw.
d. Place the free bone block up the tibial tunnel and fix it against the tendon with an interference screw while maintaining tension on the graft via an intratendinous suture.
e. The use of this technique can be determined prior to placement of the femoral plug, or the graft can be taken out for preparation of the free bone block technique as described (see Fig. 16-3).
- Anchor the graft in full extension/hyperextension, placing 10 to 15 lb of tension on the tibial side with a force applied to direct the tibia posteriorly in the form of a posterior Lachman.
- Cycle the knee through FROM; assess Lachman, pivot shift, and anterior drawer.
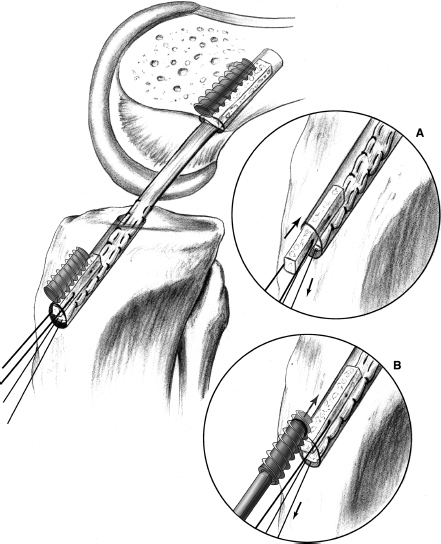
Figure 16-6Free bone block technique. (A) Free bone block is placed up along the tendon. (B) Interference screw is placed along the bone plug.
- Reinsert an arthroscope and inspect graft tension, orientation, hardware, and graft impingement. There should be 3 to 5 mm of clearance between the graft and the roof of the notch in full knee extension.
- Consider auxiliary fixation of osteopenic bone (e.g., screw and post). If there is aperture expansion on the tibial cortex, consider a second interference screw for additional fixation.
Wound Closure
- If a tourniquet was used, deflate it and obtain hemostasis prior to closure.
- Loosely approximate patellar tendon defect with 2–0 Vicryl with knee flexed at 70 degrees.
- If patellar tendon autograft was used, then bone graft with the remaining bone fragments.
- Close layer 1 (crucial fascia) over the patellar tendon.
- Close the layer over the tibial tunnel/hardware.
- Close the subcutaneous layer.
- Close the skin with running subcuticular nylon. Close the portals with a simple stitch.
- Steri-Strip the wound, inject the deep tissues and knee joint with Marcaine, and place a gauze pad, a single Kerlix, and a knee cryotherapy device.
Postoperative Care
- ACL revision can be conducted on an outpatient basis with the patient receiving oral pain medication and an intraarticular injection of a long-acting local anesthetic such as Marcaine.
- A cryotherapy device is applied immediately and used for 1 to 2 weeks.
- A brace to protect the knee and maintain full extension is applied.
- Full range of motion is allowed.
- The patient progresses to weight bearing as tolerated with the brace locked in extension.
Pearls and Pitfalls
- Counsel the patient with regard to realistic expectations after a revision ACL reconstruction, as the results do not compare favorably with a primary reconstruction. It can be considered a salvage procedure.
- Be prepared to do a two-incision procedure if the hardware or tunnels prevent the endoscopic technique or the posterior femoral cortex is incompetent.
- Assess and create the femoral and tibial tunnels before sizing the graft. This allows customization of the graft for each individual revision case.
- Graft length mismatch can be a problem when using an allograft. Specify the length of graft desired when the graft order is placed. The average patellar tendon length is 45 ± 3 mm.
- The allograft should be nonirradiated.4 Irradiation with doses >3 megarads has been shown to affect the material properties of the graft.5, 6
- If the femoral bone is soft, consider an oversized femoral interference screw.
- A repeat notchplasty often is necessary because of regrowth by as much as 1 cm after an ACL reconstruction.7 It is important to realize both the roof and lateral wall can cause impingement.
- Be prepared to do a two-incision procedure if the hardware or tunnels prevent the endoscopic technique or the posterior femoral cortex is incompetent.
Rehabilitation and Return to Sports
- With secure fixation the rehabilitation is similar to that of a primary ACL reconstruction with occasional individual modification. An accelerated rehabilitation program is implemented the day of surgery.8
- Surgery is performed on an outpatient basis, and patients are seen in physical therapy before leaving the hospital. An emphasis is placed on achieving full extension, with hyperextension eventually equaling that of the opposite knee.
- Weight bearing is allowed as tolerated with the knee in full extension and in a hinged knee brace. Quad sets, straight leg raises, and prone hangs are initiated on the first day. A formalized physical therapy program is instituted beginning 5 to 7 days postoperatively. In general, bicycling is begun by 1 week, stair climbing machines at 4 to 6 weeks, light jogging at 12 weeks, and a gradual return to sports at 4 to 6 months.
- A custom ACL orthosis is worn for sports for the first year.
Conclusion
Although the results of revision do not compare favorably to those of a primary ACL, with careful planning and attention to each step a stable knee can predictably be achieved in 80 to 85% of patients.
References
1 Bach BR, Jr. Special report: observations on interference screw morphologies. Arthroscopy 2000; 16:E10
2 Noyes FR, Barber-Westin SD. Revision anterior cruciate surgery with use of bone-patellar tendon-bone autogenous grafts. J Bone Joint Surg Am 2001;83-A:1131–1143
3 Bach BR, Jr, Warren RF. “Empty wall” and “vertical strut” signs of ACL insufficiency. Arthroscopy 1989;5:137–140
4 Fideler BM, Vangsness CT, Jr, Lu B, Orlando C, Moore T. Gamma irradiation: effects on biomechanical properties of human bone-patellar tendon-bone allografts. Am J Sports Med 1995;23:643–646
5 Butler DL NF, Walz KA, et al. Biomechanics of human knee ligament allograft treatment. Trans Orthop Res Soc 1987;240:128
6 Gibbons MJ, Butler DL, Grood ES, Bylski-Austrow DI, Levy MS, Noyes FR. Effects of gamma irradiation on the initial mechanical and material properties of goat bone-patellar tendon-bone allografts. J Orthop Res 1991;9:209–218
7 Safran MR, Harner CD. Revision ACL surgery: technique and results utilizing allografts. Instr Course Lect 1995;44:407–415
8 Shelbourne KD, Nitz P. Accelerated rehabilitation after anterior cruciate ligament reconstruction. Am J Sports Med 1990;18:292–299
< div class='tao-gold-member'>
Related posts:
 Multiligament Injuries
 Lateral Closing Wedge Osteotomy
 Posterior Cruciate Ligament Reconstruction Using the Tibial Inlay Technique
 Posterolateral Knee Reconstruction
 Proximal/Distal Realignment for Patellar Instability
 Posterior Cruciate Ligament Reconstruction: All-Inside Arthroscopic Technique and Tibial Inlay Technique with Two-Strand Quadriceps Tendon-Patellar Bone Graft


