14
Anterior Cruciate Ligament Reconstruction: Hamstring Tendon Autograf
Indications
- A patient with an acute or chronic anterior cruciate ligament (ACL) insufficiency who either is involved in high-risk sports activities or has symptomatic instability
- In patients with an acute injury not involved in high-risk activities, concerted rehabilitation and/or derotational bracing are viable options; however, if symptomatic instability results, reconstruction should be performed.
- The patient must understand the risk of meniscal and articular cartilage injury with each bout of recurrent instability.
Contraindications
- Previous surgery on the medial side of the knee (such as meniscal repair) may interfere with harvest of the hamstring tendons.
- Acutely inflamed knee with significantly limited range of motion may contribute to postoperative stiffness.
Physical Examination Findings
- The vast majority of ACL disruptions can be diagnosed by physical examination alone.
- Common exceptions include the patient with significant muscular guarding, a mechanically locked knee, or an exceptionally large extremity.
- Comparisons should always be made to the contralateral noninjured side.
- Neurovascular integrity must be documented.
- Range of motion of the knee must be carefully evaluated.
- The Lachman test is one of the most reliable tests to determine the integrity of the ACL. Both the translational quantity and the presence of an end point are important to determine.
- The pivot shift is also extremely important to document; however, patient guarding can easily obscure the findings of this test in the unanesthetized patient.
- The anterior drawer can also be used to help confirm the diagnosis.
- A complete knee examination is always done to look for concomitant injuries.
Diagnostic Tests
- Some form of radiographic imaging is required after this injury. This could simply be radiographs of the knee or a magnetic resonance imaging scan (Fig. 14-1) of the knee if there is a question of the ACL or other injuries.
- If there is any question of vascular injury, an emergent arteriogram or its equivalent should be performed.
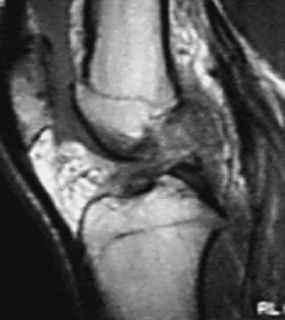
Figure 14-1 A magnetic resonance image of a disrupted anterior cruciate ligament (ACL).
Differential Diagnoses and Concomitant Injuries
- Meniscal tears
- Articular cartilage injuries
- Medial collateral ligament injury
- Patella dislocation
- Posterior cruciate ligament injury
- Tibial plateau fractures
Preoperative Planning and Timing of Surgery
- Reconstruction should not be done until the patient’s inflammatory response from the injury has been reduced by reestablishing near full range of motion, allowing combined medial collateral ligament (MCL) injuries to heal, and allowing effusions to decrease. In most cases this takes place within 6 weeks after the injury.
- In the case of the locked knee, ACL reconstruction should be staged. The mechanical block should be removed with arthroscopic surgery, followed by reestablishing the knee range of motion prior to ACL reconstruction.
- If the hamstring tendons are not of adequate size for reconstruction, an alternative surgical plan must be considered: a central third patella autograft, an allograft, or using tissue from the contralateral extremity.
Anesthetic Options
- General anesthetic
- Spinal
- Epidural
- Femoral nerve block, especially for postoperative anesthesia
Patient and Equipment Position
- A tourniquet is applied to the proximal thigh.
- A compression stocking is applied to the contralateral lower extremity to prevent venous pooling of blood and reduce the incidence of venous thrombosis in the contralateral extremity.
- The patient is in the supine position with the knee joint positioned at the operating table break to allow knee flexion.
- A thigh post is placed along the lateral thigh at about mid-thigh position to resist the application of valgus stress. This still allows the extremity to be free to maximize the variety of positions required for the procedures.
- The arthroscopy tower is on the opposite side of the table from the operated knee to facilitate viewing by the surgeon. The arthroscopic pump can be placed in a position of convenience based on the operating room dimensions and layout.
Examination Under Anesthesia
- Examination with the patient under anesthesia is critical because the patient’s muscle tone is removed from the equation. Again, it is essential that a comparison be made to the contralateral knee in this circumstance as well.
- The same tests performed on the unanesthetized patient are done under anesthesia.
- If there is a significant increase or difference in the side-to-side pivot shift and Lachman tests, the ACL is reconstructed, even if there is a partial injury to the ligament. In this circumstance of clear ACL deficiency, the ACL graft is harvested prior to diagnostic arthroscopy.
Surgical Procedure
Incision
- Because hamstring harvest is so critical, the tourniquet is inflated with the knee maximally flexed with the extremity exsanguinated.
- The pes anserinus is palpated, and a 3 cm longitudinal incision is made over it; this incision is made so it can be extended proximally for harvest of the central third of the patella tendon if that were needed (Fig. 14-2).
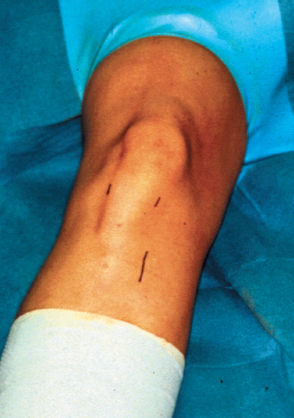
Figure 14-2 A 3 cm longitudinal incision made over the pes anserinus enables harvest of the hamstring tendons and drilling of the tunnels.
- The lateral arthroscopic portal is made just adjacent to the lateral border of the patella tendon and just superior to the joint line.
- The medial portal is established after the arthroscope has been placed in the lateral portal.
- A spinal needle is then introduced in the anticipated position of the medial portal, just adjacent to the medial border of the patella tendon. The portal placement can be fine-tuned by using the spinal needle to establish the exact position prior to making the incision.
- A superolateral portal is utilized for outflow. This is established 1 to 2 cm superior and lateral to the patella.
Pathologic Surgical Findings
- The injured ACL must be visualized and palpated (Fig. 14-3) during arthroscopy.
- Meniscal and chondral injuries are commonly seen at surgery.
Intraoperative Decisions Based on Pathology
- If a partial ACL injury is present, the decision to reconstruct the ligament should be based more on the examination under anesthesia than on the diagnostic arthroscopy, which can be confusing when examining a partially injured ligament with a lax remnant.
- A decision often must be made to repair or remove torn meniscal tissue. This should be based on the location of the tear, the condition of the torn tissue, the chronicity of the tear, and the age of the patient. In the setting of ACL reconstruction, meniscal repair is a more viable option.
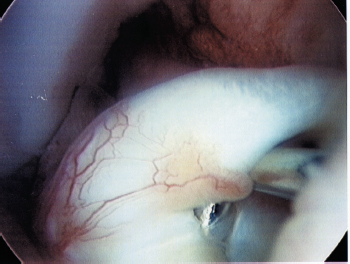
Figure 14-3 Arthroscopic image of the injured anterior cruciate ligament.
Hamstring Tendon Harvest
- After the tourniquet is inflated, the pes anserinus is identified through a longitudinal incision. The sartorius fascia is identified and then incised between the gracilis and the semitendinosus in line with their fibers.
- The sartorius fascia is then dissected off the surface of the semitendinosus and the gracilis. This fascia is thin and often adherent to the superficial surface of the hamstring tendons.
- The semitendinosus and gracilis are then released as a combined unit as distal as possible on the tibia. The division of the two tendons can be identified on the undersurface of the two tendons. Once this division is identified, the natural split is extended distally.
- A separate clamp is then placed on the free end of each of the tendons. The tendons are then pulled with the clamp to deliver as much of the tendon outside the wound. This is done with the patient’s extremity in the figure-four position. This allows for clear identification of the gastrocnemius attachments of the tendons.
- The attachments are then released (Fig. 14-4). The tendons are then palpated proximally to make certain there are no remaining attachments or adhesions.
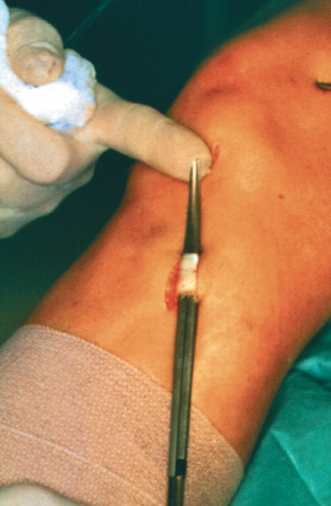
Figure 14-4 The semitendinosus and gracilis are elevated and visualized prior to their release from the tibia.
- At this point the tendon stripper is passed in line with the tendons.
Graft Preparation
- The harvested hamstring tendons are then stripped of all muscle tissue and trimmed to the same length.
- The hamstring tendons are then looped over themselves to double their thickness.
- The total length optimally should be at least 10 cm when the grafts are doubled.
- At this point a No. 2 Bunnell nonabsorbable suture is placed in the last 2 to 3 cm of each of the tendon ends. Care is taken to pull all the slack out of each suture pass.
- The looped semitendinosus and the looped gracilis tendons are then pulled through a tunnel sizer. The diameter is usually between 7 and 9 mm in diameter; this should be a very snug fit.
- The tendons can then be placed on a tensioning device to allow potential creep to be taken out of the system.
- The tendons must be kept moist to prevent desiccation; this is done with saline-soaked gauze.
Tunnel Preparation
- An arthroscopic pump is utilized for joint distention, joint irrigation, and joint hemostasis.
- Dilute epinephrine is placed in the bags of arthroscopic fluid to aid in hemostasis.
- The tourniquet is rarely used for this portion of the surgery and deflated after the graft harvest.
- Once the portals are established, soft tissue is debrided from the origin and insertion of the native ACL with a large-diameter motorized shaver. All remaining native ACL tissue is removed as well.
- In the acute situation a notchplasty is rarely required. However, the soft tissue must be adequately removed to allow visualization of the over-the-top position on the femur. This may require removal of a small amount of bone.
- In the chronic situation where bone has overgrown in the femoral notch, a formal notchplasty may be required.
- A tibial aiming guide is used to place the tibial guidewire in the posterior central portion of the tibial footprint.
- The starting point on the tibia is at a point 45 degrees off the midline.
- The guide is usually set between 45 and 50 degrees of angulation. If the graft is on the shorter side, the angle can be slightly decreased to ensure that the graft exits the tibial tunnel.
- The guidewire is then overdrilled with the appropriate-size (based on the graft diameter) drill or reamer.
- A cannulated soft tissue plug is then placed in the tibial tunnel to prevent leakage of fluid and maintain joint distention.
- The patient’s knee should be held in about 90 degrees of flexion while drilling the femoral tunnel.
- If the tibial tunnel has been drilled at a more shallow angle, however, more than 90 degrees of knee flexion may be required for proper femoral tunnel angulation.
- If the knee is held in less than 90 degrees of flexion, there is a greater chance of blowing out the posterior femoral cortex, and the guidewire will exit too proximal on the femur, likely out of the sterile field.
- The guidewire is placed transtibial through a femoral offset guide, with no more than a 5 mm offset (Fig. 14-5); it is fine if the posterior wall is blown out on the femur unless interference screw fixation is planned. The guidewire is drilled through the anterolateral femoral cortex and stopped at this point. The wire does not yet exit the skin.
- Approximately 25 to 30 mm of hamstring graft is typically placed in the femoral tunnel. With EndoButton (Smith and Nephew, Andover, MA) femoral fixation, an extra 10 mm is drilled beyond the anticipated amount of tissue placed in the femoral tunnel to allow flipping of the EndoButton. Therefore, the depth is typically to 35 to 40 mm with the appropriate-size drill or reamer (Fig. 14-6). Care must be taken not to drill through the anterolateral cortex with this larger drill. If this occurs, the EndoButton cannot be used, and an alternative mode of fixation must be employed.
- The remainder of the tunnel is drilled with a 4.5 mm drill; this tunnel exits completely through the anterolateral cortex (Fig. 14-7).
- The apertures of each of these tunnels are then chamfered smooth with the shaver where friction is going to be exerted on the graft. This includes the posterior aspect of the tibial tunnel and the anterior aspect of the femoral tunnel.
- The total length of the femoral tunnel is measured with a depth gauge (Fig. 14-8). This length is subtracted from the amount of graft planned to be placed in the femoral tunnel (25 to 30 mm). This resulting number is the length of the EndoTape (Smith and Nephew) required to span the distance from the anterolateral cortex to the start of the graft material (Fig. 14-9). If closed loop EndoTape is used, about 3 to 4 mm is added to this number to account for the looped graft around the tape.
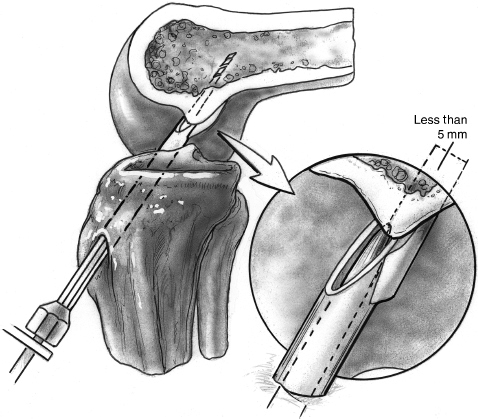
Figure 14-5 The guidewire is placed transtibial through the femoral offset guide, with no more than 5 mm offset.
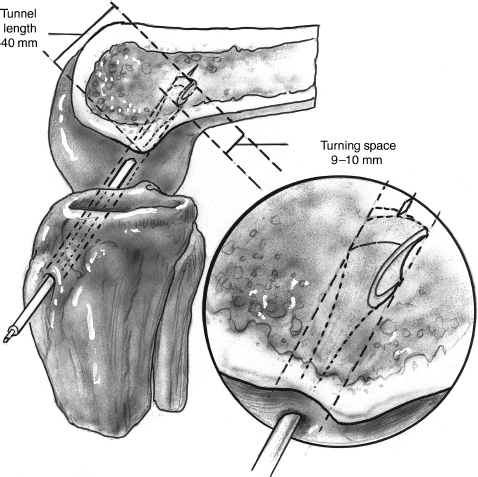
Figure 14-6 The femoral tunnel is drilled to a depth of 35 to 40 mm with an acorn-type bit.
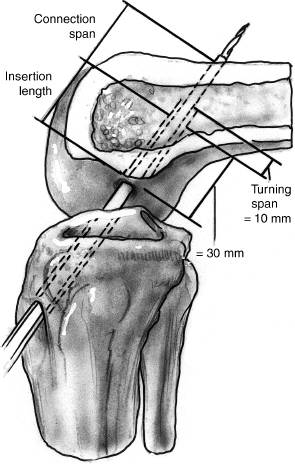
Figure 14-7 Thereafter, continue the tunnel with a 4.5 mm drill, exiting completely through the anterolateral cortex.
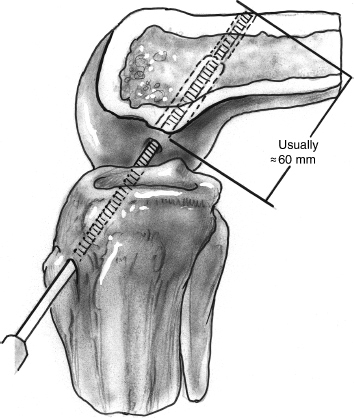
Figure 14-8 A depth gauge measures the total length of the femoral tunnel to allow calculation of the appropriate-length EndoButton (Closed Loop).
Graft Passage and Fixation
- The appropriate-size closed loop EndoTape is selected.
- The hamstring tendons are passed through the loop of EndoTape, and the lengths of all the graft strands are equalized.
- If interference screw fixation is planned, it is recommended to tubulize the graft or bring all the strands together with a running absorbable suture; this will help keep the strands from wrapping around the interference screw as it is inserted.
- Two marks are made on the graft relative to the aperture of the femoral tunnel, one at the point where the EndoButton should be flipped and a second at the point where the graft will finally come to rest after the EndoButton has been flipped. This again is typically at 25 to 30 mm.
- A No. 5 and No. 2 suture are placed in the outer holes of the EndoButton for graft flippage. The length of these sutures should be maximized.
- A transtibial slotted guidewire is placed through the tunnels and exits outside the anterolateral thigh. The No. 5 and No. 2 flipping sutures are pulled through the knee with the guidewire.
- The graft is then pulled into position with the No. 5 suture. The EndoButton should be visualized as it is pulled through the knee to make certain the No. 5 suture end of the EndoButton is leading. Once the mark is hit on the graft, the EndoButton is flipped by pulling the No. 2 suture. The graft is then pulled back into position, and the second mark should be visualized at the aperture of the femoral tunnel.
- The knee is then cycled through a range of motion at least 20 times with maximal tension on the ends of the graft exiting the tibial tunnel. The graft can be evaluated for isometry at this point.
- A second No. 2 suture can be placed in the outer hole of the EndoButton and can be left to trail out of the tibial tunnel. This suture would facilitate removal of the EndoButton if that were needed for some reason.
- With the knee in 30 degrees of flexion, with maximal one-arm tension, an Intrafix sheath (DePuy Mitek, Norwood, MA) is placed within the tunnel between the four strands of the graft. A guidewire is placed prior to placing the sheath to confirm proper orientation of the sheath and prevent divergence. A 7 to 9 mm Intrafix screw is then placed and confirmed to be flush with the tibia.
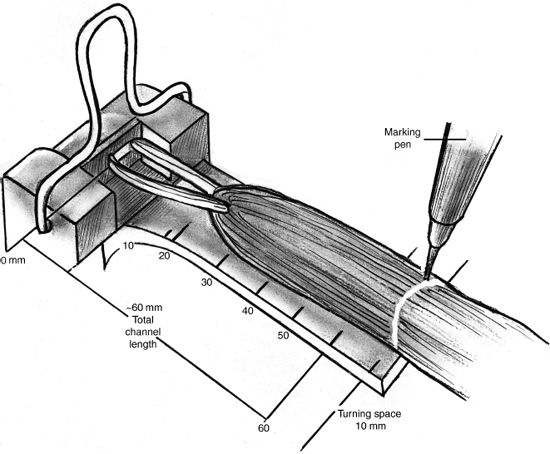
Figure 14-9 Determine the length of the EndoButton CL required to span the distance between the anterolateral cortex and the start of the graft material (subtract 25 to 30 mm from the total length of the femoral tunnel).
Dressings, Braces, Splints, or Casts
- A simple sterile nonadherent dressing with a compression stocking is placed after surgery.
- A CryoCuff (Aircast, Summit, NJ) is placed directly over the dressing, and a full-length hinged knee brace locked at 30 degrees of flexion for the first week is placed while the patient is still in the operating room.
Pitfalls and Technical Errors
- Graft harvesting can be problematic when the surgeon is gaining experience with the anatomy of the pes anserinus and the hamstring tendons. It is mandatory that the surgeon receive training on this harvest technique and practice on a cadaver specimen.
- Some of the problems harvesting the tendons include the failure to identify the semitendinosus and gracilis distally as they coalesce; in this case more proximal identification is helpful.
- Another problem stems from not releasing the attachments of the tendons to the gastrocnemius, resulting in premature amputation of the tendon at this attachment.
- Another error could stem from not passing the tendon stripper parallel to the direction of the tendon, resulting in premature amputation of the tendon.
- Finally, it is helpful if the tendon stripper is not too sharp.
- Tunnel malposition, typically with the femoral or tibial tunnel too anterior, can result in graft impingement, leading to failure or loss of extension. Malposition can also reduce the isometry of the graft, resulting in failure.
- Stiffness can result, especially if the surgery is done too early or the rehabilitation program is inadequate.
- Donor-site morbidity is uncommon after hamstring harvest. The patient may often have a sensation of a pulled hamstring with a pop and ecchymosis distally where the harvested hamstring is attempting to scar. This usually happens within the first 6 weeks as the patient becomes more active.
Postoperative Pain Control
- ACL reconstruction can be successfully done as outpatient surgery with adequate postoperative pain management.
- Medication allergies must be carefully documented.
- Typically the knee joint is infiltrated with a combination of long-acting local anesthetic such as 1/4% Marcaine (15 cc) with 2 mg of morphine. The incision and portals are also infiltrated with Marcaine.
- A dose of 30 mg of Toradol is used intraoperatively. An antiemetic is also administered preoperatively or intraoperatively.
- A cold therapy cuff is used to circulate ice water with gravity pressure. It is recharged every hour. The cuff is connected to the cold source for 15 minutes and disconnected for 45 minutes every hour to prevent frostbite.
- The patient is also started on oral antiinflammatory medication the day after surgery; this is continued for the first month unless there is a problem with tolerance.
Rehabilitation
- During the first week after surgery the patient works on calf pumps and quadriceps isometric sets. Controlled knee range-of-motion exercises with the brace removed are also started. The patient may bear weight as tolerated with the brace locked in 30 degrees of flexion.
- The knee brace flexion is unlocked after the first week to match the degree of knee flexion the patient has obtained. Brace flexion is increased to match the increases in knee range of motion. The 30-degree extension stop is maintained. The knee brace is discarded when quadriceps control has returned, typically 4 weeks after surgery.
- The patient is under the supervision of a physical therapist for a minimum of 12 weeks.
Return to Sports
- The patient is restricted from high-risk activities until 9 months after surgery.
- If a patient goes back to sports activities prior to that, a derotation brace is mandatory.
References
1 Barrett GR, Papendick L, Miller C. EndoButton button endoscopic fixation technique in anterior cruciate ligament reconstruction. Arthroscopy 1995;11:340–343
2 Rodeo SA, Arnoczky SP, Torzilli PA, Hidaka C, Warren RF. Tendon-healing in a bone tunnel. A biomechanical and histological study in the dog. J Bone Surg Am 1933;75 (12): 1795–1803.
3 Simonian PT, Behr CT, Stechschulte DJ, Wickiwiecz TL, Warren RF. Potential pitfall of the EndoButton. Arthroscopy 1998;14:66–69
4 Simonian PT, Levine RE, Wright TM, Wickiewicz TL, Warren RF. Response of hamstring and patellar tendon grafts for anterior cruciate ligament reconstruction during cyclic tensile loading. Am J Knee Surg 2000;13:8–12
5 Simonian PT, Sussmann PS, Baldini TH, Crockett HC, Wickiewicz TL. Interference screw position and hamstring graft location for anterior cruciate ligament reconstruction. Arthroscopy 1998;14:459–464
< div class='tao-gold-member'>


