The shoulder is the most mobile joint in the body. It is surrounded by two sleeves of muscle: the outer sleeve, or deltoid muscle; and the inner sleeve, or rotator cuff, which is critical for the stability of the joint. The two most common shoulder pathologies that necessitate surgery are instability, such as recurrent anterior dislocation of the shoulder (see Fig. 1-29), and degenerative lesions of the rotator cuff.
Eight surgical approaches are described in this chapter: anterior and posterior approaches to the shoulder, anterolateral approach to the acromioclavicular joint and subacromial space, anterior approach to the clavicle, lateral and minimal access lateral approach to the proximal humerus, and two arthroscopic approaches—anterior and posterior. Of these, the anterior approach is the “work-horse” incision of the shoulder, providing excellent exposure of both the joint and its anterior coverings. The anterolateral approach is used mainly to expose the acromioclavicular joint and subacromial structures, especially the rotator cuff. The lateral approach and minimal access lateral approach also expose the rotator cuff but their main use is in the treatment of fractures of the proximal humerus. The posterior approach, which is used rarely, is effective in treating recurrent posterior dislocations and is also used for open reduction and internal fixation of fractures of the posterior glenoid and fractures of the scapula neck. The arthroscopic approaches to the shoulder (anterior and posterior) provide excellent visualization of the internal structures of the joint.
The surgical anatomy of the area is divided into three sections: anterior, anterolateral, and posterior. A description of each area is found immediately after its respective operative section in this chapter.
Anterior Approach to the Clavicle
The anterior approach to the clavicle provides exposure of the entire bone allowing:
Open reduction and internal fixation of fractures
Reconstruction of the sternoclavicular and the acromioclavicular joints in case of dislocation
Drainage of sepsis
Biopsy and excision of tumors
Osteotomy for malunion
The brachial plexus and subacromial vessels can also be approached via this surgical approach. Osteotomy of the clavicle is required (see page 16, Fig. 1-20).
Bleeding from subcutaneous vessels and vessels in the platysma muscle is very common. Because of the proximity of great vessels, such superficial bleeding must be controlled to ensure adequate visualization of the structures.
Position of the Patient
Place the patient supine on the operating table. Break the table and elevate the head end, so as to elevate the shoulder area. Place a sandbag between the medial border of the scapula and the spine. This will allow the shoulder to drop back and often this maneuver reduces fractures of the middle third.
Landmarks and Incision
The sternal notch is the most medial landmark of the incision. From the sternal notch, palpate the clavicle laterally to the acromioclavicular joint, palpating the subcutaneous surface of the clavicle.
Make an incision following the S-shaped clavicular anatomy, beginning from the medial end. The site and length of the incision depends on the clinical indication for surgery (Fig. 1-1).
 |
Figure 1-1 Make a longitudinal incision overlying the subcutaneous surface of the clavicle. The site and length of the incision are determined by the pathology to be treated and the implant to be used. |
P.3
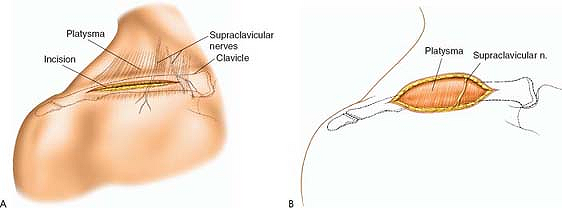 |
Figure 1-2 (A) Deepen the incision in the line of the skin incision to expose the platysma muscle. Note the presence of several cutaneous nerves. (B) Deepen the incision through the platysma muscle in the line of the skin incision to expose the subcutaneous surface of the clavicle. |
Internervous Plane
Because the approach is directly onto the subcutaneous surface of the clavicle, there is no internervous plane. However, the incision cuts across numerous small subcutaneous nerves, which cross the operating field from superior to inferior running in the substance of the platysma muscle.
Superficial Surgical Dissection
Deepen the skin incision through the platysma to reach the subcutaneous surface of the clavicle. Take care to diathermy the numerous vessels present within this muscle (Fig. 1-2).
Deep Surgical Dissection
Gently strip soft tissues off the subcutaneous surface of the clavicle in an epi-periosteal plane. Take care to preserve as much soft tissue attachments as possible, particularly in cases of fracture fixation.
Dangers
Nerves
The brachial plexus with the subcutaneous artery lies immediately inferior to the clavicle throughout its length, especially in the middle third (Fig. 1-3). To ensure that the plexus is uninjured, remain on the subcutaneous surface of the clavicle. If dissection is required inferior to the bone, develop a plane between the periosteum of the clavicle and the subclavius muscle. Also, be aware when drilling for fixation of fractures that penetration of the bone should be minimized in its inferior surface because of the close proximity of the nerves and vessels.29
Vessels
The subacromial artery and vein lies immediately inferior to the clavicle. Avoid dissection inferior to the clavicle, if possible. Dissection onto the subcutaneous surface and the posterior surface is safe.
How to Enlarge the Approach
The exposure can be enlarged longitudinally along the whole length of the clavicle as required (see Extensile Measures in this chapter).
The approach can be extended distally into the anterolateral approach to the proximal humerus and mid shaft of the humerus using the deltopectoral interval (see Fig. 1-20).
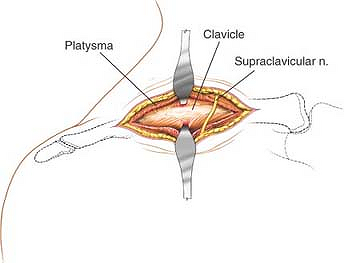 |
Figure 1-3 The brachial plexus, the second part of the subclavian vessels, underlie the middle third of the clavicle. |
P.4
Anterior Approach to the Shoulder Joint
The anterior surgical approach offers good wide exposure of the shoulder joint, allowing repairs to be made of its anterior, inferior, and superior coverings. Among its many uses, the anterior approach permits the following:
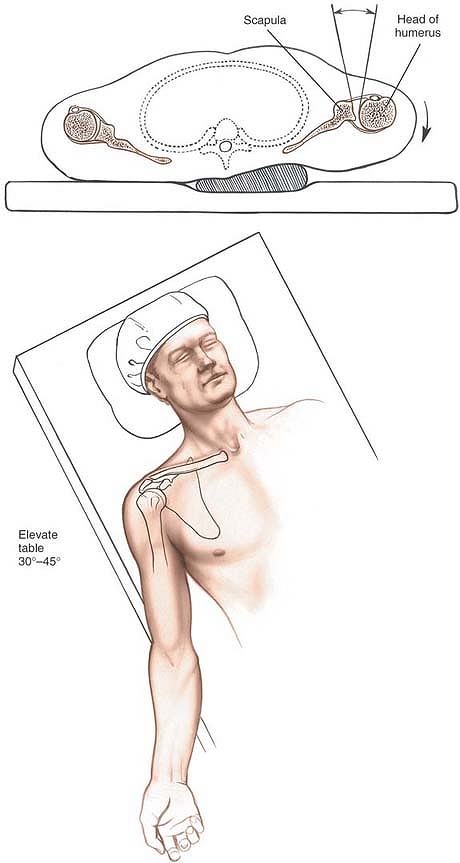 |
Figure 1-4 Position of the patient for the anterior approach to the shoulder. Elevate the table to 45°. A sandbag placed under the spine at the medial end of the scapula will allow the shoulder to rotate externally and open the anterior part of the joint. |
Reconstruction of recurrent dislocations1,2,3,4,5,6
Drainage of sepsis
Biopsy and excision of tumors
Repair or stabilization of the tendon of the long head of the biceps7
P.5
Shoulder arthroplasties, which usually are inserted through modified anterior incisions8
Fixation of fractures of the proximal humerus
The anterior approach is notorious for the amount of bleeding that occurs from skin and subcutaneous tissues during superficial dissection. The bleeding must be controlled before the deeper layers are dissected. Failure to do so may obscure important anatomic structures and endanger their integrity.
Position of the Patient
Place the patient in a supine position on the operating table. Wedge a sandbag under the spine and medial border of the scapula to push the affected side forward while allowing the arm to fall backward, opening up the front of the joint (Fig. 1-4). Elevate the head of the table 30° to 45° to reduce venous pressure, and thereby decrease bleeding, and to allow the blood to drain away from the operative field during surgery. If a headrest is used, make sure that it is padded properly to prevent the development of a pressure sore on the occiput. Drape the arm free, because it will have to be moved during the approach. If image intensification is to be used during surgery, ensure that adequate images can be obtained prior to prepping and draping the patient.
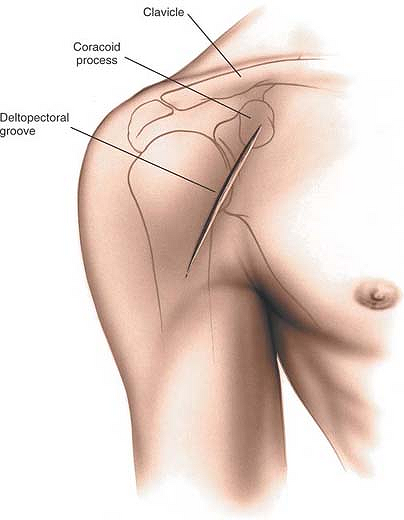 |
Figure 1-5 Make a straight incision in the deltopectoral groove, starting at the level of the coracoid process. |
Landmarks and Incision
Landmarks
Coracoid Process. At the deepest point in the clavicular concavity, the surgeon should drop his or her fingers distally about 1 in. from the anterior edge of the clavicle and press laterally and posteriorly in an oblique line until the coracoid process is felt. The process faces anterolaterally; because it lies deep under the cover of the pectoralis major, it can be felt only by firm palpation.
Deltopectoral Groove. The deltopectoral groove is easier to see than to feel, especially in thin patients. The cephalic vein, which runs in the groove, sometimes is visible.
Incisions
The anterior aspect of the shoulder can be approached through either of two skin incisions.
P.6
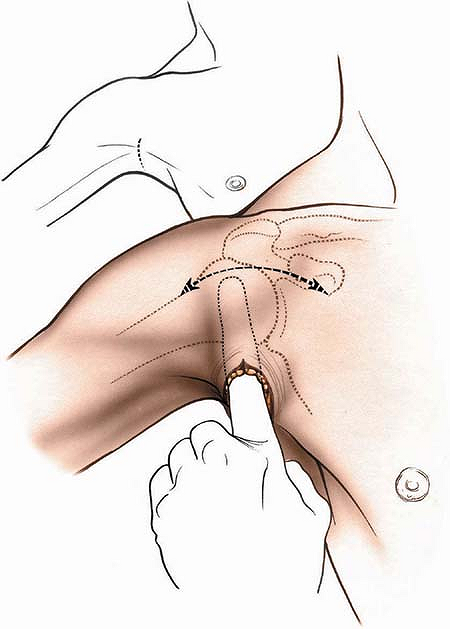 |
Figure 1-6 Make an incision in the axilla. Dissect subcutaneously to mobilize skin. |
Anterior Incision. Make a 10- to 15-cm straight incision, following the line of the deltopectoral groove. The incision should begin just above the coracoid process (Fig. 1-5).
Axillary Incision. With the patient supine, abduct the shoulder 90° and rotate it externally. Mark the anterior axillary skin fold with a sterile pen. Make a vertical incision 8 to 10 cm long, starting at the midpoint of the anterior axillary fold and extending posteriorly into the axilla.9 The skin flaps should be undermined extensively with a finger, especially superiorly in the area of the deltopectoral groove, using the cephalic vein as a guide to ensure correct position in the vertical plane. Retract the skin flaps upward and laterally so that the incision comes to lie over the deltopectoral groove (Figs. 1-6 and 1-7).
The axillary incision has a significant cosmetic advantage over the anterior incision, both because it is hidden in the axilla and because the resulting scar is covered by hair. In addition, the suture line remains free from tension while it heals; thus, the scar has little opportunity to spread. The only situation in which this incision may be contraindicated is when, in extremely muscular patients, the skin flaps cannot be moved enough to allow adequate exposure of the muscular structures that lie in front of the shoulder. If adequate exposure cannot be obtained through the axillary incision, it should be extended superiorly into the deltopectoral groove.
P.7
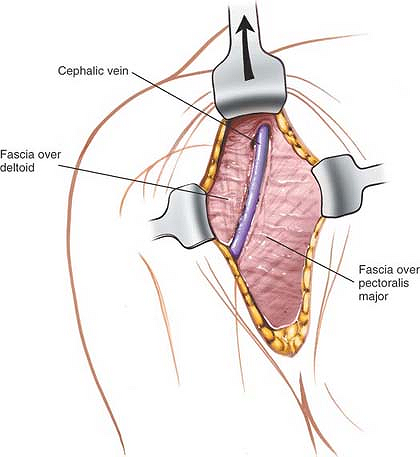 |
Figure 1-7 Retract the axillary incision cephalad to expose the cephalic vein and the deltopectoral groove. |
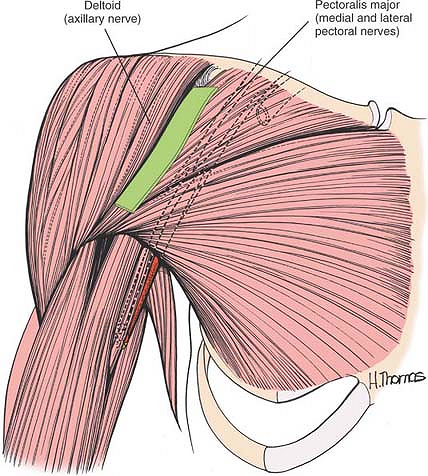 |
Figure 1-8 The internervous plane lies between the deltoid muscle (axillary nerve) and the pectoralis major muscle (medial and lateral pectoral nerves). |
P.8
 |
Figure 1-9 Develop the groove between the fascia overlying the pectoralis major and the fascia overlying the deltoid. The cephalic vein will be of help in locating the groove. |
Internervous Plane
The internervous plane lies between the deltoid muscle, which is supplied by the axillary nerve, and the pectoralis major muscle, which is supplied by the medial and lateral pectoral nerves (Fig. 1-8).
Superficial Surgical Dissection
Find the deltopectoral groove, with its cephalic vein (Fig. 1-9). Retract the pectoralis major medially and the deltoid laterally, splitting the two muscles apart. The vein may be retracted either medially or laterally. Taking a small cuff of deltoid with the vein may reduce the number of bleeding tributaries that require ligation, but it leaves a small amount of denervated muscle. For that reason, it is not recommended as a routine practice.
Deep Surgical Dissection
The short head of the biceps (which is supplied by the musculocutaneous nerve) and the coracobrachialis (which is supplied by the musculocutaneous nerve) must be displaced medially before access can be gained to the anterior aspect of the shoulder joint. Simple medial retraction after division of the overlying fascia may be enough for procedures such as the Magnuson-Stack subscapularis tendon advancement3 or the Putti-Platt subscapularis2 and capsule imbrication, but if more exposure is necessary, or if the coracoid process is to be transposed,5 the two muscles can be detached with the tip of the coracoid process. To release them, detach the tip of the coracoid process with an osteotome. The bone can be replaced later either with a screw or with sutures. If a screw is used, the coracoid process must be drilled and tapped before the osteotomy is carried out. Otherwise, the small piece of coracoid may split during drilling, and anatomic reduction can be obtained only with extreme difficulty (Figs. 1-10 and 1-11).
The axillary artery is surrounded by the cords of the brachial plexus, which lie behind the pectoralis minor muscle. Abduction of the arm causes these neurovascular structures to become tight and brings them close
to the tip of the coracoid and the operative site. Therefore, the arm should be kept adducted while work is being done around the coracoid process (Fig. 1-12).1
P.9
P.10
to the tip of the coracoid and the operative site. Therefore, the arm should be kept adducted while work is being done around the coracoid process (Fig. 1-12).1
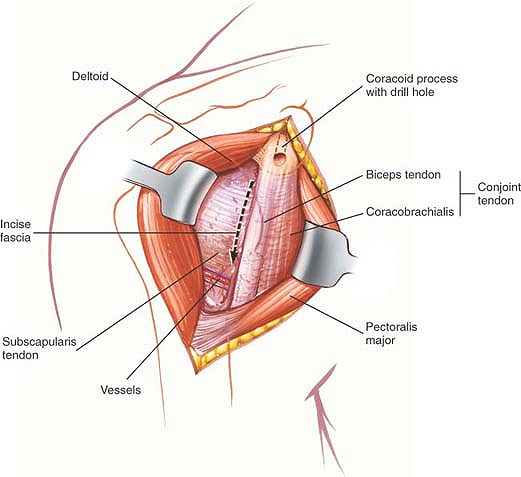 |
Figure 1-10 Retract the pectoralis major medially and the deltoid laterally to expose the conjoined tendon of the short head of the biceps and coracobrachialis muscle. Drill the tip of the coracoid process before cutting it. Incise the fascia on the lateral aspect of the conjoint tendon. Note the leash of vessels at the inferior end of the subscapularis muscle. |
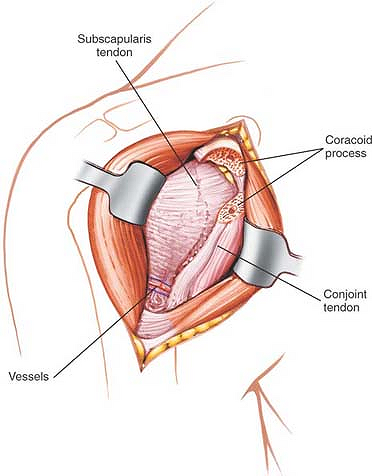 |
Figure 1-11 Cut through the predrilled coracoid process. Retract the conjoint tendon medially to give greater exposure to the subscapularis tendon. |
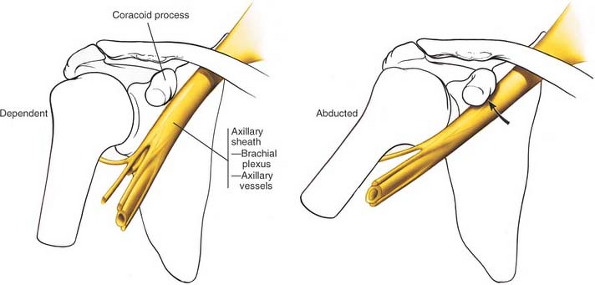 |
Figure 1-12 Protect the axillary sheath during coracoid osteotomy by having the arm in the dependent position; abduction of the arm will draw the sheath against the coracoid process. |
Retract the coracoid (with its attached muscles) medially. Divide the fascia that fans out from the conjoined tendons of the coracobrachialis and the short head of the biceps on the lateral side of the coracobrachialis—the safe side of the muscle, because the musculocutaneous nerve enters the coracobrachialis on its medial side. Use care in retracting the coracoid with its attached muscles; overzealous downward retraction can cause a neurapraxia of the musculocutaneous nerve. If the coracoid process is left intact, the attached coracoid muscles protect the nerve from traction injury (Fig. 1-13).
Beneath the conjoined tendons of the coracobrachialis and the short head of the biceps lie the transversely running fibers of the subscapularis muscle, which forms the only remaining anterior covering of the shoulder joint capsule (Fig. 1-14).1 As the muscle crosses the glenoid cavity, a bursa separates it from the joint capsule; that bursa may communicate with the shoulder joint. In cases of multiple anterior dislocations, adhesions often exist between the muscle and the joint capsule, making it difficult, if not impossible, to find the layer between the two. Apply external rotation to the arm to stretch the subscapularis, bringing the muscle belly into the wound and making its superior and inferior borders easier to define. External rotation of the humerus also increases the distance between the subscapularis and the axillary nerve as it disappears below the lower border of the muscle (see Fig. 1-14).
The most easily identified landmarks on the inferior border of the subscapularis are a series of small vessels that run transversely and often require ligation or cauterization. The vessels run as a triad: a small artery with its two surrounding venae comitantes, one above and one below the artery (Fig. 1-15). The superior border of the subscapularis muscle is indistinct and blends in with the fibers of the supraspinatus muscle.
Pass a blunt instrument between the capsule and the subscapularis, moving upward (see Fig. 1-15). Tag the muscle belly with stay sutures to prevent it from disappearing medially when it is cut and to allow easy reattachment of the muscle to its new insertion onto the humerus. Then divide the subscapularis 1 in from its insertion onto the lesser tuberosity of the humerus (Fig. 1-16). Note that some of its muscle fibers insert onto the joint capsule itself; the capsule frequently may be opened inadvertently when the muscle is divided, because the two layers cannot always be defined.
Alternatively, rotate the shoulder internally and identify the insertion of the tendon of the subscapularis onto the humerus. Detach this insertion with a small flake of bone using a fine osteotome. This will allow more lateral reattachment of the muscle in a prepared channel in the bone, using staples.
Incise the capsule longitudinally to enter the joint wherever the selected repair must be performed. Each type of repair has its own specific location for incision (Fig. 1-17).
If the approach is used for treatment of fractures, the deep surgical dissection has often been performed
by the trauma. Fractures of the greater and lesser tuberosities usually have their musculo-tenderness insertions preserved and the unopposed pull of the muscles causes displacement and rotation of the bony fragments. Attachment of sutures to the tendon allows manipulation and reduction of the tuberosities. Try to preserve any remaining blood supply to the head fragment if possible to reduce the risk of avascular necrosis. The biceps tendon, which runs in the groove between the greater and lesser tuberosities, is usually preserved and can act as a key surgical landmark for bony reconstruction.
P.11
P.12
P.13
by the trauma. Fractures of the greater and lesser tuberosities usually have their musculo-tenderness insertions preserved and the unopposed pull of the muscles causes displacement and rotation of the bony fragments. Attachment of sutures to the tendon allows manipulation and reduction of the tuberosities. Try to preserve any remaining blood supply to the head fragment if possible to reduce the risk of avascular necrosis. The biceps tendon, which runs in the groove between the greater and lesser tuberosities, is usually preserved and can act as a key surgical landmark for bony reconstruction.
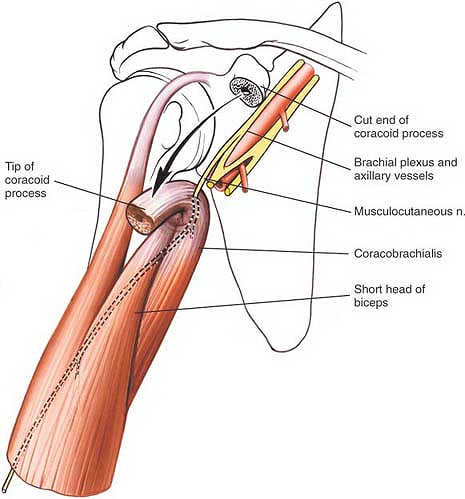 |
Figure 1-13 Vigorous retraction of the conjoint tendon distally can injure the musculocutaneous nerve, causing neurapraxia or avulsion. |
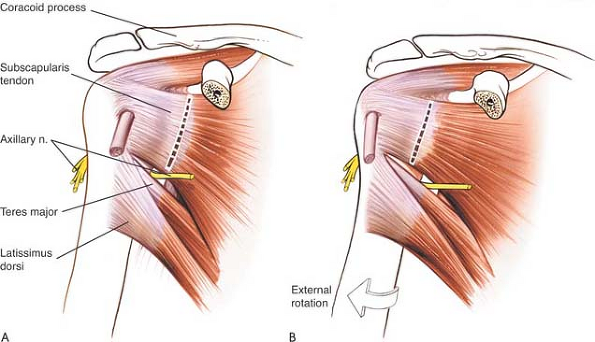 |
Figure 1-14 (A) The subscapularis muscle lies in the deep part of the wound. It is to be incised perpendicular to its fibers, close to its tendon. The axillary nerve passes anteroposteriorly through the quadrangular space. (B) External rotation of the arm during incision into the subscapularis tendon will draw the point of incision away from the axillary nerve. |
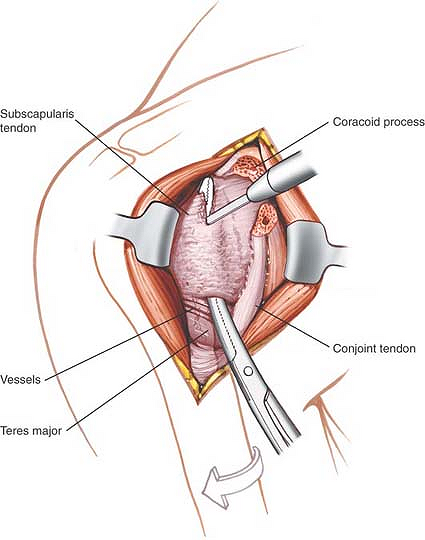 |
Figure 1-15 Insert a curved artery clamp under the subscapularis muscle. A leash of vessels at the caudal end of the wound marks the lower border of the subscapularis. |
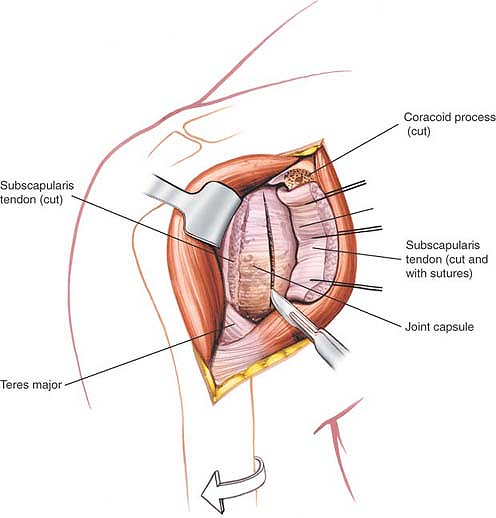 |
Figure 1-16 Incise the end of the subscapularis. Tag and place stay sutures into the muscle to prevent it from retracting medially. Some of the subscapularis fibers insert directly into the joint capsule. |
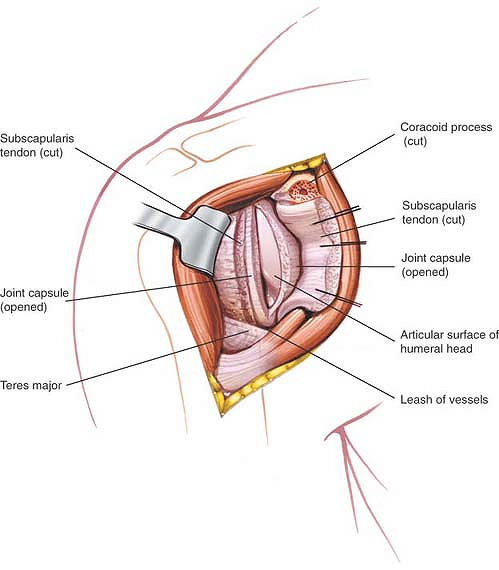 |
Figure 1-17 Incise the joint capsule longitudinally to expose the humeral head and the glenoid cavity. |
Dangers
Nerves
The musculocutaneous nerve enters the body of the coracobrachialis about 5 to 8 cm distal to the muscle’s origin at the coracoid process. Because the nerve enters the muscle from its medial side, all dissection must remain on the lateral side of the muscle. Great care should be taken not to retract the muscle inferiorly, to avoid stretching the nerve and causing paralysis of the elbow flexors (see Fig. 1-13).
Vessels
The cephalic vein should be preserved, if possible, although ligation leads to few problems. A traumatized cephalic vein should be ligated to prevent the slight danger of thromboembolism.
How to Enlarge the Approach
Local Measures
The exposure can be enlarged in the following four ways:
Extend the skin incision superiorly by curving it laterally along the lower border of the clavicle. Detach the deltoid from its origin on the outer surface of the clavicle for 2 to 4 cm to permit better lateral retraction of the muscle (Fig. 1-18).
P.14
Unfortunately, because reattaching the deltoid may be difficult, this maneuver is not recommended for routine use. If further deltoid retraction is required, it may be best to detach part of the muscle’s insertion onto the humerus.
Figure 1-18 Remove the origins of the deltoid from the anterior portion of the clavicle to expose the joint further proximally. Identify the coracoacromial ligament.
Lengthen the skin incision inferiorly along the deltopectoral groove to separate the pectoralis major from the deltoid further inferiorly and to improve the exposure without having to detach the deltoid origin.
Use a suitable retractor (such as the Bankart skid) for the humeral head. A humeral head retractor is the key to excellent exposure of the inside of the glenoid fossa once the joint has been opened (Fig. 1-19).
Rotate the shoulder internally and externally to bring different elements of the anterior shoulder coverings into view.
Extensile Measures
Proximal Extension. To expose the brachial plexus and axillary artery, and to gain control of arterial bleeding from the axillary artery, extend the skin incision superomedially, crossing the middle third of the clavicle. Next, dissect the middle third of the clavicle subperiosteally and perform osteotomy of the bone, removing the middle third. Cut the subclavius muscle, which runs transversely under the clavicle. Retract the trapezius superiorly and the pectoralis major and pectoralis minor inferiorly to reveal the underlying axillary artery and the surrounding brachial plexus (Fig. 1-20). Take care not to damage the musculocutaneous nerve, which is the most superficial nerve in the brachial plexus.
Distal Extension. The approach can be extended into an anterolateral approach to the humerus.
Extend the skin incision down the deltopectoral groove, then curve it inferiorly, following the lateral border of the biceps. Deep dissection consists of moving the biceps brachii medially to reveal the underlying brachialis, which then can be split along the line of its fibers to provide access to the humerus. For details of this approach, see Chapter 2.
P.15
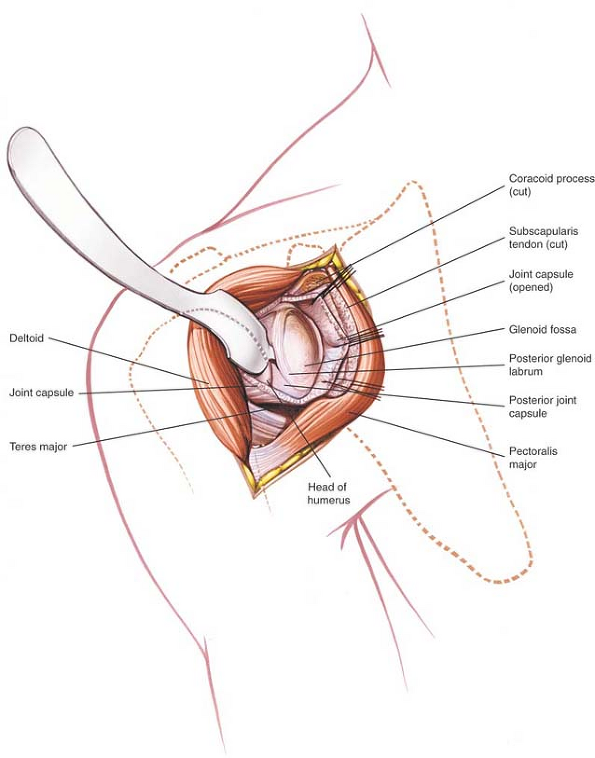 |
Figure 1-19 A Bankart skid is used to retract the humeral head to expose the glenoid cavity and its labrum. |
P.16
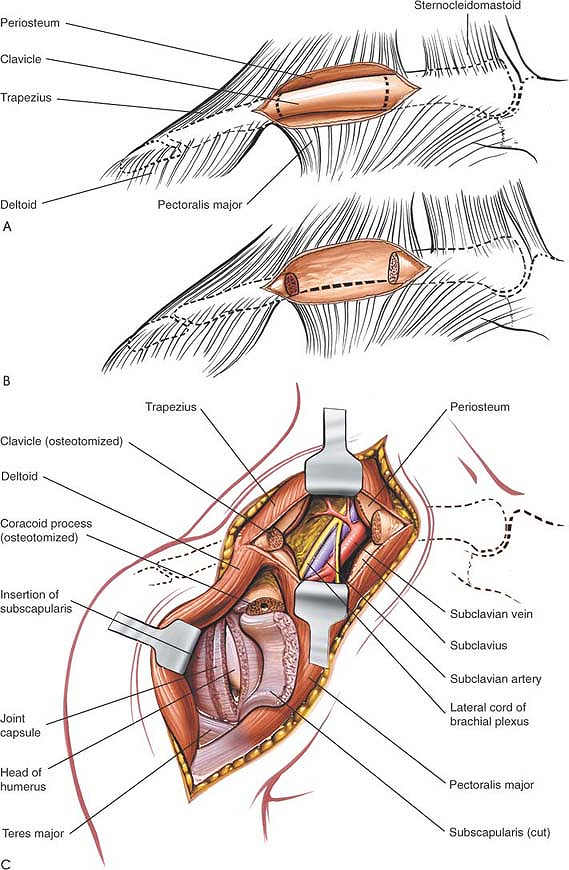 |
Figure 1-20 (A, B) Extend the incision superomedially. Expose and resect the middle third of the clavicle subperiosteally. (C) Expose the brachial plexus and axillary artery. |
P.17
Applied Surgical Anatomy of the Anterior Approach to the Shoulder Joint
Overview
All approaches to the shoulder involve penetrating the two muscular coverings, or sleeves, over the joint. The outer sleeve is the deltoid muscle. The inner sleeve is the rotator cuff, which consists of four muscles: the supraspinatus, infraspinatus, teres minor, and subscapularis (Fig. 1-21).
Anteriorly, gaining access to the shoulder joint involves reflecting the outer sleeve laterally and incising the inner sleeve, specifically the subscapularis.
The deltoid, together with the pectoralis major and the latissimus dorsi (the two great muscles of the axillary fold), supplies most of the power that is required for shoulder movement. The muscles of the inner sleeve all can act as prime movers of the humerus, but their most important action is to control the humeral head within the glenoid cavity while the other muscles are carrying out major movements.
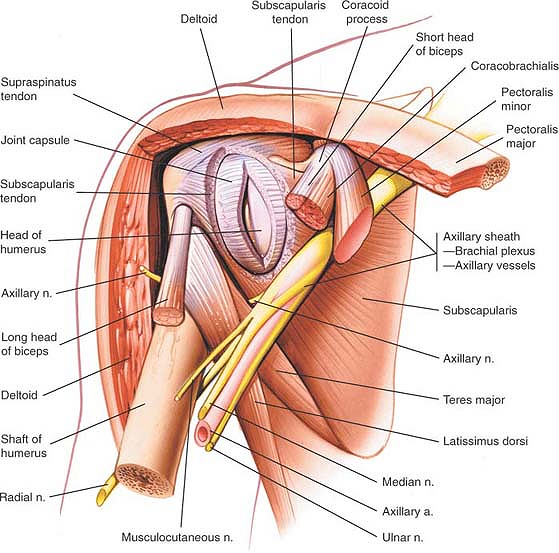 |
Figure 1-21 Anatomy of the anterior portion of the shoulder. |
The supraspinatus has a key role as a prime mover of the humerus in initiating abduction. The teres minor and infraspinatus muscles are the only important external rotators of the shoulder. Pathology of this joint nearly always is associated with this inner group of muscles; their function is critical not only to the coordination of joint movement, but also to the stability of the shoulder joint itself. Degenerative lesions of the rotator cuff are extremely common with increasing age.
Fracture patterns and bone displacement are dictated by the soft tissue attachments of elements of the rotator cuff to the greater and lesser tuberosities.
A third group of muscles intervenes between the two muscular sleeves when the joint is approached from the front. These muscles (the short head of the biceps, the coracobrachialis, and the pectoralis minor)
require medial retraction for exposure of the inner sleeve. They all are attached to the coracoid process (see Fig. 1-21).
P.18
require medial retraction for exposure of the inner sleeve. They all are attached to the coracoid process (see Fig. 1-21).
Landmarks and Incision
Landmarks
The coracoid process of the scapula is an accessible bony protuberance that lies at the upper end of the deltopectoral groove and is the landmark for incisions based on that groove. It also is a critical landmark for injections and arthroscopic examinations of the shoulder joint. Hook shaped, the coracoid process sometimes is described as resembling a crow’s beak, as is implied by its name, corax. The tip of the coracoid process projects forward, laterally, and inferiorly toward the glenoid cavity. Therefore, it is palpated best by posterior and medial pressure. Be aware that palpation of the coracoid process often is painful; therefore, tenderness over this site is not diagnostic of local pathology. Attached to the coracoid process are the five clinically important structures described below (Fig. 1-22).
Coracoacromial Ligament. The tough, fibrous coracoacromial ligament is triangular and connects the horizontal portion of the coracoid process to the tip of the acromion. It is one of the few ligaments that connects two parts of the same bone. The coracoid process, the acromion, and the coracoacromial ligament form the coracoacromial arch. This structure may be implicated in the pathology of the impingement syndrome. The function of the coracoacromial ligament is unclear. Resection of the coracoacromial ligament, which is frequently carried out in subacromial decompression, does not appear to be associated with significant long-term clinical problems.
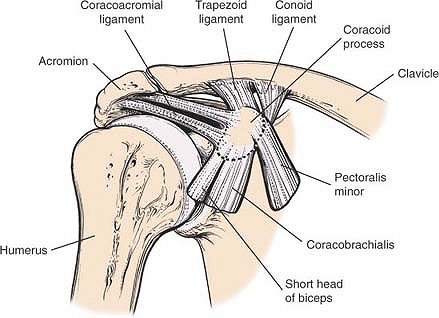 |
Figure 1-22 Five clinically important structures are attached to the coracoid process. |
Conoid and Trapezoid Ligaments. The conoid and trapezoid ligaments are extremely strong. The conoid ligament, which resembles an inverted cone, extends upward from the upper surface of the clavicle. The trapezoid ligament runs from the upper surface of the coracoid process and extends superiorly and laterally to the trapezoid ridge on the undersurface of the clavicle. These two structures are the main accessory ligaments of the acromioclavicular joint. They are extremely difficult to repair in cases of acromioclavicular dislocation and, once they are torn, are difficult to identify as individual structures.
Conjoined Tendons of the Coracobrachialis and Biceps Brachii. See Figure 1-25.
Pectoralis Minor Muscle. See Applied Surgical Anatomy of the Anterior Approach in this chapter.
Incision
Because a skin incision that runs down the deltopectoral groove cuts almost transversely across the cleavage lines of the skin, it often leaves a broad scar, even if a subcuticular skin closure is used. An incision in the axilla runs with the cleavage line of the skin and leaves a much narrower scar. The latter scar is almost invisible, because it is hidden in the axillary fold and is covered by hair.
P.19
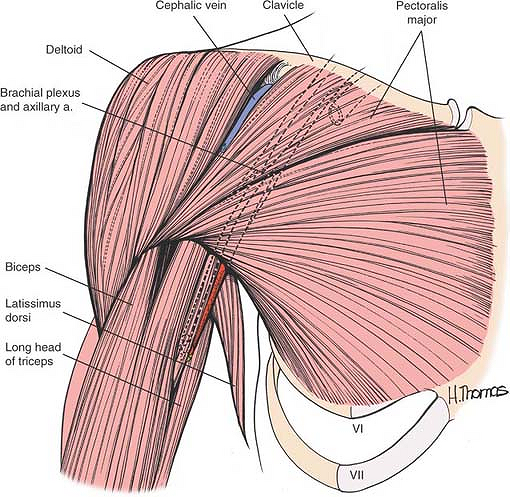 |
Figure 1-23 The superficial anatomy of the anterior shoulder, revealing the deltopectoral groove and the neurovascular bundle. |
Superficial Surgical Dissection
Three major structures are involved in the superficial surgical dissection of the anterior approach to the shoulder joint: the deltoid muscle laterally, the pectoralis major muscle medially, and the cephalic vein, which lies between them in the deltopectoral groove (Fig. 1-23).
Deltoid Muscle
The anterior fibers of the deltoid muscle run parallel to each other, without fibrous septa between them. Because sutures placed in this kind of muscle fiber tend to tear out, it is difficult to reattach the deltoid to the clavicle. Sutures must be placed through the full thickness of the muscle, including its fascial coverings, to effect a strong reattachment. The attachment should be protected from active stress for 4 weeks to allow for adequate healing.
The anterior portion of the deltoid can be denervated only if the entire anterior part of the muscle is stripped and retracted vigorously in a lateral direction (Fig. 1-24).
Pectoralis Major Muscle
The two nerve supplies of the pectoralis major allow the muscle to be split without the loss of innervation to either part, making possible muscle transfers such as the Clark procedure, in which the distal part of the muscle is separated from the proximal part and is inserted into the biceps tendon in the arm (see Fig. 1-24).10
Cephalic Vein
The cephalic vein drains into the axillary vein after passing through the clavipectoral fascia. On occasion, it may be absent. Few complications result from its ligation (see Fig. 1-23).
Deep Surgical Dissection
The coracobrachialis and the short head of the biceps brachii share a common origin from the tip of the coracoid process. They also share a common nerve supply, the musculocutaneous nerve. These muscles form an intermediate layer during the surgical approach (Fig. 1-25).
P.20
 |
Figure 1-24 The anterior portion of the deltoid has been resected from its origin, revealing the insertion of the pectoralis major muscle and the subscapularis tendon, supraspinatus tendon, and coracoacromial ligament. |
Coracobrachialis Muscle
The coracobrachialis muscle is largely vestigial and has little function. Extremely variable in size, it is the counterpart in the arm of the adductors in the thigh.
The coracobrachialis used to have three heads of origin. The musculocutaneous nerve passes between two of the original heads, which now are fused during development. Its course represents one of the few instances in which a nerve appears to pass through a muscle. When a nerve does this, it always is passing between two heads of origin (see Fig. 1-25).
Biceps Brachii Muscle
The tendon of the long head of the biceps is an anatomic curiosity; it is one of only two tendons to pass through a synovial cavity. The joint capsule of the shoulder is incomplete inferiorly, so the tendon can escape under the transverse ligament. From there, it runs in the bicipital groove of the humerus. It is easy to palpate the tendon in the groove as long as the arm is rotated externally (see Fig. 1-27). The biceps tendon is a common site of inflammatory changes, partly because it is capable of tremendous excursion, moving some 6 cm between full abduction and full adduction of the shoulder. This continual movement may produce attrition between the tendon and the bicipital groove. The tendon also may rupture, producing a characteristic change in the contour of the muscle.
The biceps can slip medially out of the bicipital groove. This dislocation usually is painful,11 although it sometimes is found during postmortem examinations of individuals who have had no known shoulder symptomatology.12
Considerable variability exists in the depth of the bicipital groove and in the angle that its medial wall makes with its floor.13 Shallow grooves with flat
medial walls may be predisposed to such tendon dislocation. Nevertheless, the transverse humeral ligament (retinaculum), which is the chief stabilizer for the tendon, must be ruptured before the tendon can be displaced. The tendon is a useful surgical landmark in the reconstruction of complex proximal humeral fractures.
P.21
P.22
P.23
medial walls may be predisposed to such tendon dislocation. Nevertheless, the transverse humeral ligament (retinaculum), which is the chief stabilizer for the tendon, must be ruptured before the tendon can be displaced. The tendon is a useful surgical landmark in the reconstruction of complex proximal humeral fractures.
 |
Figure 1-25 The pectoralis major and deltoid muscles have been removed completely, revealing the two heads of the biceps tendon, the rotator cuff, the coracoacromial ligament, and the neurovascular bundle. |
 |
Figure 1-26 The neurovascular bundle lying on the subscapularis is revealed. The axillary nerve exists through the quadrangular space, and the radial nerve exists through the triangular space. Deltoid. Origin. Anterior border of lateral third of clavicle. Outer border of acromion and inferior lip of crest of scapular spine. Insertion. Deltoid tubercle of humerus. Action. Abduction of shoulder. Anterior fibers act as flexors of shoulder; posterior fibers act as extensors of shoulder. Nerve supply. Axillary nerve. Pectoralis Major. Origin. From two heads. Clavicular head: from medial half of clavicle. Sternocostal head: from manubrium and body of sternum, upper six costal cartilages, and aponeurosis of external oblique. Insertion. Lateral lip of bicipital groove of humerus. Action. Adduction of arm. Nerve supply. Medial and lateral pectoral nerves. (A separate branch of the lateral pectoral groove supplies the clavicular fibers.) Coracobrachialis. Origin. Tip of coracoid process. Insertion. Middle of medial border of humerus. Action. Weak flexor of arm and weak adductor of arm. Nerve supply. Musculocutaneous nerve. Biceps Brachii. Origin. Short head from tip of coracoid process. Long head from supraglenoid tubercle of scapula. Insertion. Bicipital tuberosity of radius. Action. Flexor of elbow. Supinator of forearm. Weak flexor of shoulder. Nerve supply. Musculocutaneous nerve. Pectoralis Minor. Origin. Outer borders of third, fourth, fifth, and sixth ribs. Insertion. Coracoid process of scapula. Action. Lowers lateral angle of scapula. Protracts scapula. Nerve supply. Medial pectoral nerve. |
 |
Figure 1-27 The fibrous joint capsule inserts into the humerus around the articular margin of the neck. Inspect inferiorly where it inserts below that articular margin. The capsule bridges the gap across the bicipital groove, forming a structure known as the transverse ligament. Subscapularis. Origin. Medial four fifths of anterior surface of scapula. Insertion. Lesser tuberosity of humerus. Action. Internal rotator of humerus. Nerve supply. Upper and lower subscapularis nerves. |
Pectoralis Minor Muscle
The only surgical importance of the pectoralis minor muscle lies in its neurovascular relations. The second part of the axillary artery and the cords of the brachial plexus lie directly behind the muscle and below the coracoid process (see Fig. 1-25).
Subscapularis Muscle
The deep layer of the dissection is formed by the subscapularis muscle, which covers the shoulder joint capsule.
The subscapularis, which is the anterior portion of the rotator cuff, inserts partly into the capsule of the joint. The muscle tendon undergoes degeneration in the same way as do other muscles of the rotator cuff, but to a lesser extent. The problem rarely is severe or symptomatic, because there are other internal rotators of the shoulder and the loss of subscapularis action is not functionally disabling. The subscapularis may be stretched in cases of anterior dislocations of the shoulder or it may be contracted as a result of previous surgery.13
The subscapularis limits external rotation, helping to prevent anterior dislocations; it also may block anterior dislocation physically because of its size and its position in front of the shoulder joint. Because the two subscapular nerves enter the subscapularis medially, incising it 2.5 cm from its insertion does not denervate the muscle (Fig. 1-26).
Superiorly, the muscle is connected intimately to the supraspinatus. The plane of cleavage between the two muscles, which represents a true internervous plane between the suprascapular and subscapular nerves, may be difficult to define, especially near the
insertions of the muscles. The tendon of the long head of the biceps corresponds to the interval between the muscles and can be used as a surgical guideline to that interval.
P.24
insertions of the muscles. The tendon of the long head of the biceps corresponds to the interval between the muscles and can be used as a surgical guideline to that interval.
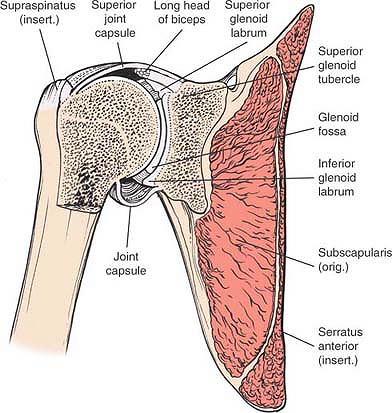 |
Figure 1-28 Cross section of the joint. The joint capsule is redundant inferiorly to allow abduction. The long head of the biceps tendon traverses the joint. The tendon is surrounded by synovium and, therefore, is anatomically intracapsular but extrasynovial. |
Shoulder Joint Capsule
The shoulder joint has an enormous range of motion. The capsule is loose and redundant, particularly inferiorly and anteriorly. The area of the fibrous capsule itself is about twice the surface area of the humeral head (see Fig. 1-26). Anteriorly, the capsule is attached to the scapula via the border of the glenoid labrum and the bone next to it. The anterior part of the capsule usually has a small gap that allows the synovial lining of the joint to communicate with the bursa underlying the subscapularis.14,15 This bursa extends across the front of the neck of the scapula toward the coracoid process (Fig. 1-27).
Posteriorly and inferiorly, the capsule is attached to the border of the labrum. A second gap may exist at this point to allow communication between the synovial lining of the joint and the infraspinatus bursa.
The fibrous capsule inserts into the humerus around the articular margins of the neck, except inferiorly, where the insertion is 1 cm below the articular margin. The capsule bridges the gap across the bicipital groove, forming a structure known as the transverse ligament. The long head of the biceps enters the joint beneath this ligament (see Fig. 1-27).
Related posts:


Stay updated, free articles. Join our Telegram channel

Full access? Get Clinical Tree


