Wrist Arthroscopy Basics: Anatomy, Portals, and Diagnostic Arthroscopy
Mark Morishige
Robert C. Dews
Larry D. Field
Felix H. Savoie III
Wrist arthroscopy has been utilized for the past 30 years since it was first described by Chen in 1979 (1). Then it provided only a partial evaluation of the articular surfaces and few investigators routinely utilized it. Not until 1986 when Whipple et al. (2) advocated distraction techniques and precise portal placement did an extensive evaluation of the wrist joint become an option. Still, diagnosis was the primary function and therapeutic indications were minimal.
Since that time, arthroscopy of the wrist has evolved into one of the most reliable and productive means of diagnosing, qualifying, and treating wrist pathology, and it has rapidly obtained widespread acceptance. Diagnostic and therapeutic arthroscopy have advanced our knowledge of the wrist by increasing understanding of both anatomy and function, thus facilitating anatomic repair of previously unrecognized pathology. Continued advances in instrumentation and technology will improve the ability to perform challenging and innovative procedures as the principles of open surgery become adapted to arthroscopy (3).
CLINICAL EVALUATION
Pertinent History
A meticulous history is essential prior to arthroscopic evaluation of the wrist. The history helps the examiner focus the physical examination toward the suspected pathology. It should include duration of symptoms, location, intensity, aggravating or relieving factors, and the effects of treatment modalities already utilized as well as the past medical and surgical history, medications, allergies, and family history. Sports and repetitive activities should also be identified. The mechanism of injury including the position of the hand, direction of force, and resultant area of pain must be fully detailed during the evaluation. The patient’s age and sex should also be considered. Young patients (<40 years) are more prone to posttraumatic carpal injuries, whereas older patients are more susceptible to systemic and degenerative processes. The medical and family history are helpful for diagnosing patients with systemic and hereditary disorders that can present in the wrist. Laboratory values are often helpful in this situation. The effect of the wrist pain on the patient’s work and leisure activities is also important.
Physical Examination
Physical examination is the most accurate method to diagnose wrist pathology (4). It begins with a systematic inspection of swelling, erythema, warmth, nodules, skin lesions, and deformities or prior surgical incisions. If possible, tenderness is localized to a specific anatomic structure. Wrist range of motion should be noted, paying careful attention to any snapping or clicking. “Clicks,” which may indicate carpal instability, can sometimes be felt throughout the wrist range of motion but are usually not significant unless they reproduce the patient’s clinical symptoms.
All joints must be palpated and evaluated with the appropriate use of provocative tests. Radially, the grind test can assess carpal metacarpal (CMC) thumb arthritis. Arthritis of the scaphotrapeziotrapezoid joint should also be evaluated. Anatomic snuffbox tenderness may indicate scaphoid or scapholunate ligament pathology. This ligament can be further assessed with Watson’s (5) “scaphoid shift test.” Ulnarly, the shear or ballottement test can indicate lunotriquetral instability by manipulating the two bones relative to each other. Ulnocarpal abutment and triangular fibrocartilage complex (TFCC) tears are considered with pain just distal to the ulnar styloid and reproduction of symptoms after axial loading and ulnar wrist deviation. Instability of the midcarpal joint is suggested by the “catch-up” clunk produced when the wrist is moved from radial to ulnar deviation during axial loading. Pain or crepitation during compression of the distal radioulnar joint (DRUJ) suggests instability or arthritic changes there. Volarly, tenderness with palpation of the pisiform or hook of the hamate may represent pisotriquetral arthritis or a hamate fracture.
Diagnostic Imaging
The initial radiographic evaluation should consist of three views of the wrist: standard posteroanterior (PA), oblique, and lateral views. They should be examined for fractures, alignment, and congruence of joint spaces, as well as evidence of arthritic changes and mineralization. The lateral view is important for assessment of the carpal alignment. A scapholunate angle of greater than 60° suggests possible scapholunate instability, and an angle of less than 30° suggests ulnar-sided wrist instability. Additional radiographs may be needed depending on the clinical scenario. The “clenched fist” view improves visualization of scapholunate pathology, and the “carpal tunnel view” can better elucidate the bony structures of the carpal tunnel.
Musculoskeletal ultrasound may prove useful for the evaluation of soft-tissue abnormalities such as tendinopathy, ganglia, and synovial cysts but is highly operator dependent.
Arthrography is helpful to evaluate the integrity of capsular structures and interosseous ligaments, especially the scapholunate, lunotriquetral, and TFCC (6). It may show localized synovitis or abnormal leaks between normally “compartmentalized” spaces.
CT provides the best assessment of osseous and articular morphology. It can provide images in any plane (such as the oblique axis of the scaphoid) and gives clear detail to fractures that are difficult to visualize with plain radiographs, such as the hook of the hamate.
MRI provides important detail about the soft tissues of the wrist and bony vascularity. Avascular necrosis of carpal bones, such as the lunate and scaphoid, as well as occult ganglions, soft-tissue tumors, tendinitis, and joint effusions, are well visualized. MRI has been shown to have a 90% sensitivity when evaluating tears of the TFCC. Accuracy also approaches 90% when evaluating the scapholunate ligament but drops to 50% for lunotriquetral tears (7). The most definitive study seems to be the MR arthrogram that begin with a radiocarpal injection following by a DRUJ injection (8).
TREATMENT
Nonoperative
Prior to arthroscopy, nonoperative measures should usually be exhausted. Temporarily immobilization of the wrist in a splint or brace and anti-inflammatory medication may be helpful. Diagnostic and therapeutic injections can frequently provide some benefit. A physical therapy regimen for wrist range of motion and strengthening may prove definitive for some wrist pathology.
Operative Indications
Wrist arthroscopy has been a useful tool for diagnosis in patients with wrist pain, motion loss, and weakness where noninvasive diagnostic and treatment protocols have failed. It is also useful in patients with well-defined pathology such as nonunions, Kienbock disease, scapholunate or lunotriquetral dissociations where evaluation of the articular surfaces are of prognostic and therapeutic importance. Many definitive treatments can be performed at the time of arthroscopy such as loose body removal, synovectomy, intra-articular adhesion release, lavage of septic wrist, and debridement of chondral lesions as well as hypertrophic or torn ligaments and tears of the TFCC. It provides a useful adjunct in the reduction of distal radius and scaphoid fractures and has been used for dorsal ganglion excision. More recently, midcarpal, DRUJ, and volar portals have expanded the arthroscope’s use for evaluation and treatment of midcarpal chondral lesions of the hamate, articular damage to the ulnar head or extensive synovitis. These portals also improve visualization of volar articular surfaces and dorsal capsular structures (9). Bone excision procedures such as radial styloidectomy and partial resection of distal ulna (wafer procedures) have been performed. Arthroscopy has even been described for advanced procedures such as proximal row carpectomy, excision of proximal pole of the scaphoid, excision of Kienbock disease, and capitolunate arthrodesis (10, 11).
Contraindications to wrist arthroscopy are mainly limited to conditions of trauma or swelling, which distorts the normal anatomy or significantly damages capsular integrity leading to fluid extravasation.
TECHNIQUE—SURFACE ANATOMY
The wrist is made up of the eight carpal bones each with multiple articular surfaces as well as the intrinsic and extrinsic ligaments, and TFCC surrounded by tendons and neurovascular structures (10, 11). A thorough understanding of the relationship between the surface anatomy of the wrist and these underlying structures is essential for accurate arthroscopic portal placement and adequate arthroscopy. Understanding these relationships will help to prevent injury to the cutaneous nerves, tendons, and vascular structures as well as minimize the risk to the articular surfaces in the wrist. It will also help to perform increasingly complicated arthroscopic wrist procedures.
The surface anatomy should be mapped and labeled prior to making the first portal incision. Bony landmarks that should be familiar include Lister’s tubercle, the radius and ulna with their styloids, the radiocarpal joint level, the radial border of third ray, and central portion of the forth ray. In addition, the capitate sulcus or “soft spot” should be palpated.
The extensor retinaculum is an oblique structure spanning the dorsal distal radius and ulna. It compartmentalizes the 12 extensor tendons into 6 compartments and prevents bowstringing (Fig. 40.1). The extensor pollicis longus (EPL) is the only tendon in the third compartment and is easily palpated especially after application of traction. The EPL should be marked as it passes just ulnar to Lister’s tubercle. The area bordered by the EPL and
extensor pollicis brevis (EPB) together and the extensor carpi radialis longus (ECRL) define the margins of the anatomic snuffbox. The extensor digitorum communis (EDC) is just ulnar to EPL. The extensor carpi ulnaris (ECU), and the ECRL and extensor carpi radialis brevis (ECRB) tendons are easily palpated and should be drawn as well. The intersection of these tendons and the bony structures allows accurate placement of arthroscopic portals.
extensor pollicis brevis (EPB) together and the extensor carpi radialis longus (ECRL) define the margins of the anatomic snuffbox. The extensor digitorum communis (EDC) is just ulnar to EPL. The extensor carpi ulnaris (ECU), and the ECRL and extensor carpi radialis brevis (ECRB) tendons are easily palpated and should be drawn as well. The intersection of these tendons and the bony structures allows accurate placement of arthroscopic portals.
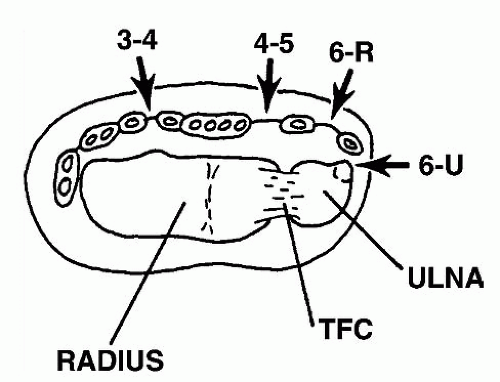 FIGURE 40.1. Cross-sectional anatomy of the dorsal compartments. (From Geissler WB, Freeland AE, Weiss AP, et al. Techniques of wrist arthroscopy. Instr Course Lect. 2000;49:225-237, used with permission.) |
AUTHORS’ PREFERRED TREATMENT
Arthroscopic Technique: Setup
Regional or general anesthesia may be used. The patient is positioned supine with the operative extremity on an arm table. The OR table is angled so that the surgeon is positioned above the arm table near the patient’s head, and the assistant is positioned directly across the arm table within the patient’s axilla (Fig. 40.2). A nonsterile tourniquet is applied and the arm and hand is prepped and draped with the forearm in a vertical position (Fig. 40.3).
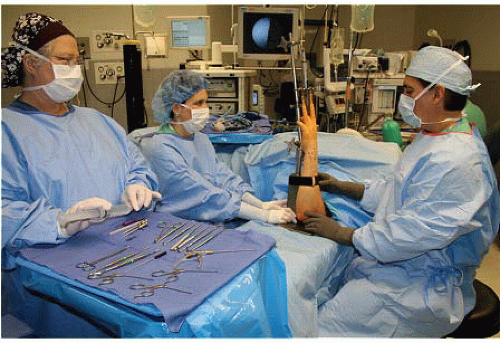 FIGURE 40.2. OR setup with position of assistant and surgical assistant. |
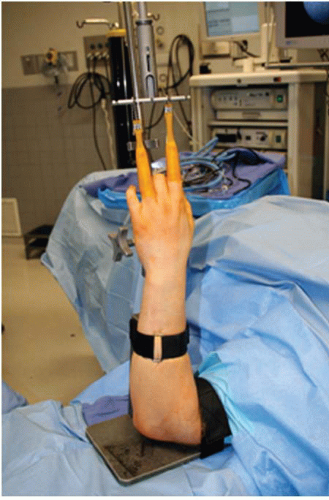 FIGURE 40.3. Draping and tower placement. |
Distraction is essential to improve visualization and provide adequate space for maneuverability during wrist arthroscopy. Several distraction options currently exist. A dedicated sterile or nonsterile traction tower is a popular choice (Fig. 40.4). Alternatives include the use of horizontal traction with a pulley and weight system as well as nonsterile traction boom devices.
We prefer a sterile traction tower with nylon finger traps. This provides convenient application of wrist
distraction in flexion, extention, and radial and ulnar deviation. This system allows adjustability to both the distraction force and the position of the wrist. In addition, it permits easy conversion to open procedures if necessary.
distraction in flexion, extention, and radial and ulnar deviation. This system allows adjustability to both the distraction force and the position of the wrist. In addition, it permits easy conversion to open procedures if necessary.
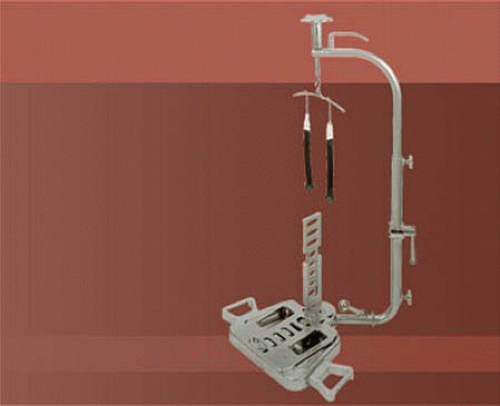 FIGURE 40.4. Traction tower. |
The prepped arm is then placed in an abducted position, and the upper arm is secured to the traction tower. Soft nylon finger traps are used to secure the index and long finger to the tower for most procedures (Fig. 40.5). Soft traps have increased surface area and distribute the force better than wire devices. In the case of poor or fragile skin, additional fingers in the traps can decrease the force to the skin (4). To improve visualization for ulnar-sided pathology, we will frequently use the index and ring fingers. Generally, 5 to 10 pounds of traction is adequate for most procedures.
Arthroscopic Equipment
Proper equipment is essential to perform a quality wrist arthroscopy. This begins with basic equipment such as video arthroscope and monitor with printer and video recorder to document the intra-articular findings. In addition to adequate visualization, a major improvement came with the development of instruments specifically designed for use in small joints. Larger instrumentation used for knee and shoulder arthroscopy is not adequate for procedures in the wrist. A small 2- to 3-mm diameter arthroscope is required to allow adequate mobilization while minimizing the risk of injury to surrounding structures and articular surfaces. In addition to the standard 30° arthroscope, a 70° scope is occasionally useful.
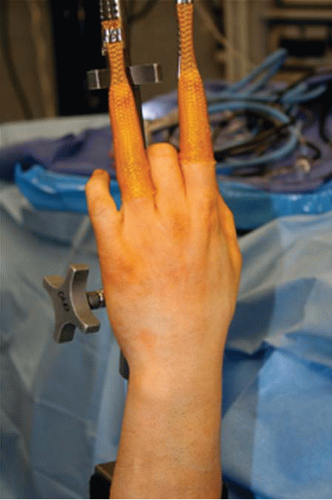 FIGURE 40.5. Soft finger trap placement for ulnar-sided procedure. |
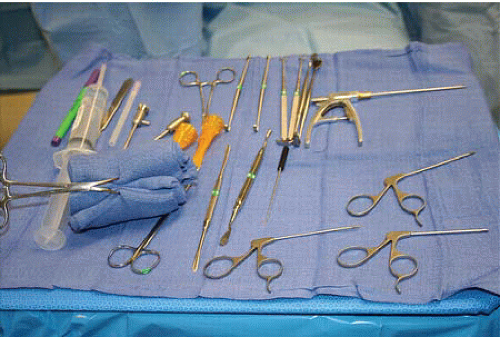 FIGURE 40.6. Mayo setup. |
Other small joint arthroscopy equipment is available and necessary for mastery of wrist arthroscopy (Fig. 40.6). This includes a small joint shaver (2.7 or 2.9 mm) with multiple tips, a wrist probe (1.7 or 2.0 mm), and many smaller versions of large joint arthroscopic instruments (11, 12). As arthroscopy has advanced, more specialized equipment has become available, allowing for advanced surgical procedures. These including TFCC repair kits, retrograde retrievers, ablation shrinkage devices, and fracture fixation devices. Spinal needles and passing sutures are also helpful tools that have been adapted from other arthroscopic repair techniques.
Clear physiologic crystalloid solution such as lactated ringers is preferable because it can be rapidly absorbed into the tissues and prevent excessive distention. Irrigant can be introduced through the sheath of the arthroscope or by separate inflow and outflow portals. Gravity inflow has proven adequate in our practice. Pinch chambers can introduce small boluses of irrigant to clear the visual field (4). Fluid pumps that can precisely control the pressure in the joint are available. However, pressurized injection increases the risk of fluid extravasation into subcutaneous tissues and is usually unnecessary.
Portals
Wrist arthroscopy portals can be organized into radiocarpal, midcarpal, distal radioulnar, and volar portals. Traditionally, arthroscopic viewing portals are described by their relationship to the six extensor compartments of the wrist (Fig. 40.7). There are 11 historical access portals typically used. These include five radiocarpal, four midcarpal, and two distal radioulnar. There are also two additional volar portals that have become increasingly popular.
Precise portal placement allows complete wrist arthroscopy while minimizing iatrogenic injury to the wrist joint and surrounding structures. Incorrect portal placement can result in the damage to neurovascular structures
and the articular cartilage. Marking portals after the application of traction helps prevent distortion and improper portal sites (Fig. 40.8).
and the articular cartilage. Marking portals after the application of traction helps prevent distortion and improper portal sites (Fig. 40.8).
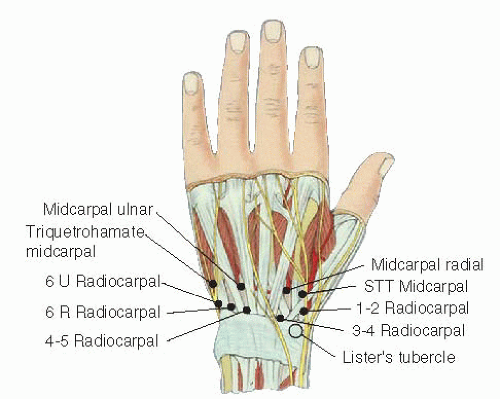 FIGURE 40.7. Dorsal wrist anatomy and portal locations. |
Radiocarpal portals include the 3-4, 4-5, 6-R, 6-U, and 1-2 portals. Radiocarpal portals show smooth carpal articulations, whereas the midcarpal portals will show more irregular articulations (12). Portals are named according to the interspace between extensor compartments. The 3-4 portal divides the third and fourth extensor compartments. The 6-R and 6-U portals are named by their relationship to the ECU, with the 6-R on the radial aspect and the 6-U ulnar (11). Palpation between these compartments will show soft spots of the wrist, which provide the least traumatic entry points into the joint.
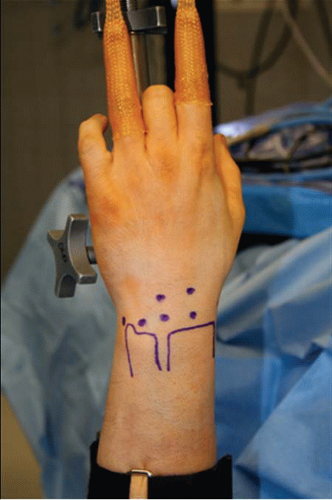 FIGURE 40.8. Skin marking of portals and landmarks. |
3-4 Portal
The 3-4 portal is usually the first portal established and is the primary viewing portal. It is bordered on the radial side by the EPL and ECRB, on the ulnar side by the EDC, on the proximal side by the distal radius, and on the distal side by the scapholunate ligament. The 3-4 portal is placed 1 cm distal to Lister’s tubercle and is located by palpating the distal edge of the radius between the ulnar border of the ECRB and the radial margin of EDC in line with the radial border of the long finger. This is the soft spot between the third and the fourth compartments. A spinal needle can then be inserted at an angle parallel to the radial articular surface. This portal is the workhorse of standard wrist arthroscopy and provides a broad view of most of the radiocarpal joint on the volar side. This portal is relatively safe with branches of the sensory branch of the radial nerve (SBRN) radial, a mean distance of 16 mm and a mean of 26.3 mm from the radial artery (13).
4-5 Portal
The 4-5 portal is bordered on the radial side by EDC, on the ulnar side by the extensor digiti quinti (EDQ), proximally by the attachment of the radius and the TFCC, and distally by the lunate. It is established 1 cm ulnar and slightly more proximal to the 3-4 portal due to the inclination of the radius (11). It can be found by palpating the soft spot directly ulnar to the EDC. A spinal needle should then be placed just proximal to the lunate. Entry through this portal places instruments directly adjacent to the midportion of the TFCC (14). The 4-5 portal is typically the main working portal for instrumentation on the ulnar side of the wrist. It may also be used as a viewing portal for ulnarsided structures. This portal has minimal neurovascular risk unless there is an aberrant branch of the SBRN (13).
Related posts:


Stay updated, free articles. Join our Telegram channel

Full access? Get Clinical Tree


