Upper Extremity Fractures in Children
David L. Skaggs
Steven Frick
INJURIES OF THE SHOULDER AND HUMERUS
The clavicle, scapula, and humerus articulate to form the shoulder. The clavicle is flat laterally, triangular medially, and has a double curve that is convex anteriorly in the medial third and convex posteriorly in the lateral third. The scapula is a large, flat, triangular bone that is connected to the trunk by muscles only and to the clavicle by the acromioclavicular and coracoclavicular ligaments. The spine arises from the dorsal surface of the scapula and forms the acromion laterally. The coracoid process arises from the anterior surface. The clavicle and scapula are attached at the acromioclavicular joint and held in place by the coracoclavicular ligaments. The clavicle connects the shoulder girdle to the axial skeleton at the sternoclavicular joint. This joint is very mobile and allows the clavicle to move through an arc of 60 degrees and accommodate a wide range of scapular rotations. The shoulder girdle articulates with the humerus through the glenohumeral joint. This joint is a ball-and-socket joint that is supported primarily by the articular capsule and surrounding muscle. Thus, the shoulder mechanism functions as a universal joint, allowing freedom of motion in all planes.
Fractures around the shoulder are generally easy to treat and infrequently require reduction or surgical stabilization. The wide range of motion in this region contributes to rapid remodeling and accommodates modest residual deformity.
Shoulder Injuries in Infants.
Difficult birth can result in injury to the infant’s shoulder (1). The most common injuries are fracture of the clavicle and brachial plexus palsy. The differential diagnosis should also include proximal humeral physeal separation, septic arthritis of the shoulder, osteomyelitis, and nonaccidental injuries. Lack of arm movement in the neonatal period is the most common clinical finding for each of these problems. Pain, swelling, and crepitus may be noted when fracture has occurred. Often, fracture of the clavicle at birth is undetected until swelling subsides, and the firm mass of healing callus is noticed in the midshaft of the clavicle. Parental reassurance and gentle handling are all that are required for managing fracture of the clavicle at birth. Clavicle fracture is occasionally confused with congenital pseudarthrosis of the clavicle. Pseudarthrosis can be distinguished from fracture of the clavicle at birth by the absence of pain and by radiographic features of established pseudarthrosis. Pseudarthrosis also typically occurs only on the right side.
Birth trauma may also result in Salter-Harris type I physeal separation of the proximal humerus. This injury may be difficult to diagnose radiographically because the proximal humeral epiphysis does not ossify until 3 to 6 months of age. Ultrasonography, MRI, or joint aspiration may facilitate diagnosis in questionable cases. Treatment is simple immobilization for 2 to 3 weeks; union and remodeling will occur.
Clavicle Injuries
Clavicle Diaphysis Fracture.
The clavicle is frequently fractured in children, and the most common portion injured
is the shaft. The mechanism of injury is usually a fall on the shoulder or excessive lateral compression of the shoulder girdle. The subclavian vessels, brachial plexus, and apex of the lung lie beneath the clavicle but are rarely injured at the time of fracture.
is the shaft. The mechanism of injury is usually a fall on the shoulder or excessive lateral compression of the shoulder girdle. The subclavian vessels, brachial plexus, and apex of the lung lie beneath the clavicle but are rarely injured at the time of fracture.
Treatment of clavicle shaft fractures in children and adolescents is supportive; reduction is not attempted, except for fractures with extreme displacement. A figure-eight harness and/or a sling may be used until the patient is able to move the arm comfortably. Sports are avoided for approximately 8 weeks. Uneventful, rapid healing is the rule, although displaced fractures may heal with a visible subcutaneous prominence. Parents should be advised that, regardless of alignment, healing will produce a bump that will remodel over the course of several months to years. Indications for surgery are rare but include open fractures, severe displacement with the bone end impaled through the trapezius, and irreducible tenting of the skin by the bone fragments. Even in these severe cases, internal fixation is rarely required. Recently, adults with clavicle fractures that are severely displaced and/or shortened have been found to have dissatisfaction and decreased function after nonoperative treatment (2), resulting in recommendations for operative treatment of fractures with >100% displacement or shortening >2 cm. The treatment of clavicle fractures in adolescents approaching skeletal maturity is evolving, with some recommending surgical treatment for widely displaced or shortened fractures. Some practitioners favor operative treatment in teenage athletes to facilitate rehabilitation and perhaps earlier return to sport, especially in cases where the clavicle fracture is on the dominant side of a throwing athlete. Two recent papers have noted that children and adolescents can be treated successfully with plate fixation with very low complication rates (3, 4). In adolescent patients, a “wait-and-see” approach identified four patients with displaced clavicle fractures who developed symptomatic malunions. All four had good results after osteotomy and plate fixation. Nonunion after clavicle fracture has been reported in adolescents, but it responds to bone grafting and plating (5).
Medial Clavicle Fracture and Sternoclavicular Separation.
The medial clavicular ossification center appears at approximately 17 years of age, but the physis does not close until 20 to 25 years of age (6). Therefore, displacements of the medial end of the clavicle are usually physeal separations that mimic sternoclavicular dislocation (7). These are usually Salter-Harris type I or II injuries, although the epiphyseal fragment is not visualized well on radiographs. The direction of displacement can be anterior, superior, or posterior. Posterior displacement by fracture or dislocation can cause dysphagia or respiratory compromise. Physical examination and plain radiography are unreliable in assessing displacement. These injuries are frequently missed, and a high index of suspicion for sternoclavicular injury is needed in patients with pain and tenderness in the region. Apical lordotic radiographs are helpful, but computed tomography (CT) scans best visualize the injury. Anterior or superior displacement is usually treated nonoperatively. Posteriorly displaced medial clavicle fractures or sternoclavicular dislocations are usually treated operatively to relieve compression of mediastinal structures. Some have recommended nonoperative treatment of medial physeal injuries with reliance on remodeling (8), while others have recommended open reduction and repair (9, 10).
OPERATIVE MANAGEMENT OF STERNOCLAVICULAR DISLOCATIONS AND MEDIAL CLAVICLE PHYSEAL FRACTURES
Indications for Operative Management.
Posterior or retrosternal displacement of the medial clavicle can cause injury to or compress the great vessels, trachea, or esophagus, and thus reduction is indicated.
Preoperative axial imaging should be carefully assessed for injury to major vessels by the posteriorly displaced clavicle, as lacerations of the pulmonary artery and brachiocephalic vein have been reported (Fig. 33-1). Because of the potential for hemorrhage, it is recommended that reduction be attempted in the operating room under general anesthesia with awareness by a thoracic or a vascular surgeon. Some recommend that a thoracic surgeon be scrubbed in at the time of reduction (8), especially for cases with delayed treatment (>1 week) as the medial end of the clavicle may be adherent to adjacent vascular structures. Fractures with anterior or superior displacement are usually managed nonoperatively.
Closed reduction is attempted in acute injuries by longitudinal traction, abduction, and shoulder extension of the involved arm and is often successful. If reduction is not achieved, direct anterior traction can be applied to the clavicle by hooking a couple of fingers posterior to the subcutaneous midportion, or by percutaneously grasping it with a pointed reduction clamp. In posteriorly displaced dislocations, the reduction can be unstable because of the posteriorly directed
slope of the sternal notch. If the surgeon believes a stable reduction is achieved, postoperative axial imaging should be obtained to document maintenance of reduction. Attempted closed reduction is not recommended in late presenting cases. If the reduction is unstable, or with late presentation, open reduction and fixation is performed.
slope of the sternal notch. If the surgeon believes a stable reduction is achieved, postoperative axial imaging should be obtained to document maintenance of reduction. Attempted closed reduction is not recommended in late presenting cases. If the reduction is unstable, or with late presentation, open reduction and fixation is performed.
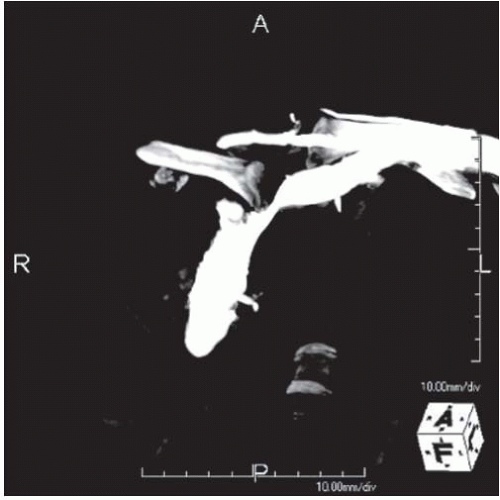 FIGURE 33-1. CT reconstruction demonstrates retrosternal dislocation of clavicle compressing the brachiocephalic vein. |
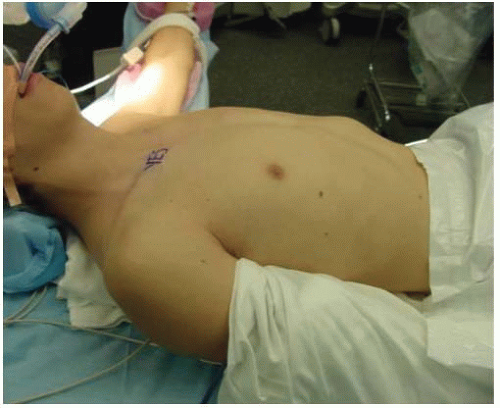 FIGURE 33-2. The patient is placed supine with a bump under the ipsilateral scapula. |
The patient is placed supine with a bump under the ipsilateral scapula (Fig. 33-2). The surgical preparation extends from the midneck to abdomen, and across the chest to include the contralateral acromioclavicular joint. This wide prep allows for emergent access to the chest if needed and allows for palpation of the contralateral clavicle to help assess reduction (Fig. 33-3).
Catastrophic, life-threatening bleeding can potentially occur intraoperatively, but is not reported in the literature. Having a thoracic or vascular surgeon on standby and emergency thoracotomy instruments available is recommended (8, 9, 19) The ipsilateral upper extremity can be prepped into the surgical field if desired to allow traction through the arm and stability testing with range of motion of the shoulder after fixation.
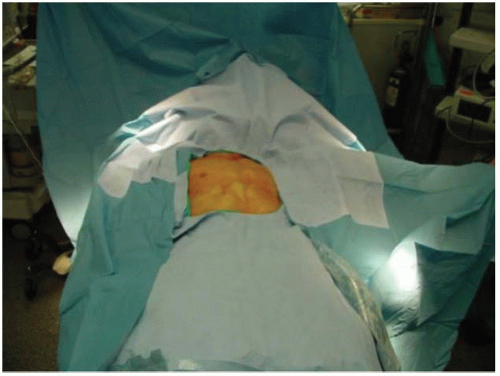 FIGURE 33-3. The surgical preparation extends from the midneck to abdomen, and across the chest to include the contralateral acromioclavicular joint. |
The medial clavicle is approached through a transverse incision extending from the middle third-medial third junction of the clavicle to just past the midpoint of the sternal notch. Subcutaneous dissection is performed through the platysma to the level of the periosteum, and then the periosteum is incised from lateral to medial directly anterior over the clavicle. As the dissection proceeds medially, the periosteum will remain intact and attached to the medial clavicular epiphysis in physeal injuries and should be preserved. In dislocations, the periosteum will often be attached anteriorly to the fibrocartilaginous disc of the sternoclavicular joint.
In acute injuries that are easily reduced, at this point a blunt-tip clamp can be placed around the clavicle and used to manipulate and reduce the medial clavicle (Fig 33-4).
In late presenting cases, the clavicle will be stuck behind the sternum, and vigorous traction to attempt to reduce it is not recommended (Fig. 33-5). Instead, careful subperiosteal circumferential dissection around the clavicle near the middle third-medial third junction can be performed, and a clamp can then be placed around the clavicle more laterally. This will aid in stabilizing the clavicle for careful subperiosteal dissection with an elevator working from lateral to medial. As the dissection proceeds, it is helpful to place small blunt retractors posterior to the clavicle from both above and below, and use them to gently lift the clavicle anteriorly as the dissection proceeds medially. In chronic cases, the displaced medial end of the clavicle can be quite deep behind the sternum, and traction to pull the medial end laterally and anteriorly should not be applied until the most medial aspect of the clavicle is visualized and exposed. During reduction of dislocations, it is important to realize that only about the inferior one-third to one-half of the medial clavicle articulates with the sternal notch.
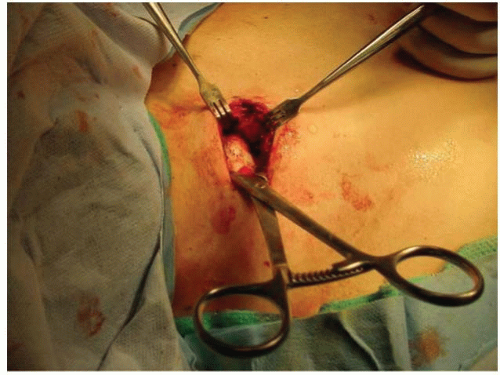 FIGURE 33-4. Intraoperative photograph (with head to left) of blunt-tip clamp around medial right clavicle. The metaphysis is displaced posteriorly and cephalad from the epiphysis, which is visible between the two Senn rake retractors. |
Once the medial clavicle is reduced, fixation is recommended to maintain the reduction (Fig. 33-6). Suture fixation, wire fixation, and tendon weave through bone tunnels have all been recommended. Serious complications from pin migration are reported and can be fatal; thus, use of pins is not recommended (8). Because of the excellent healing potential in adolescents, tendon augmentation is not usually needed. For physeal injuries, suture or sternal wire fixation from the metaphysis to the epiphysis (medial clavicular head) is adequate. For dislocations, drill holes through sternum are used with figure-of-eight heavy suture to the anterior medial clavicle. After repair, the adequacy of reduction and stability are assessed under direct visualization. The stability is tested by direct posterior pressure (and range of motion of the ipsilateral shoulder if desired). Intraoperative fluoroscopy is generally not helpful.
The periosteum is often thick and is then closed over the clavicle to augment the fixation. The platysma, subcutaneous layer, and skin are then closed. The patient is placed in a sling for 4 weeks, and for 6 weeks the patient avoids crossarm adduction and heavy lifting with the involved extremity.
Lateral Clavicle Fracture and Acromioclavicular Separation.
The mechanism of injury to the distal clavicle is similar to adult acromioclavicular separation. A fall onto the point of the shoulder drives the acromion and scapula distally. This results in distal clavicular physeal separation. This is because the distal epiphysis of the clavicle remains a cartilaginous cap until the age of 20 years or older (6), whereas the acromioclavicular and coracoclavicular ligaments are firmly attached to the thick periosteum of the clavicle. Typically, the lateral metaphysis displaces through the injured dorsal periosteum, leaving the ligaments intact and the epiphyseal end of the clavicle reduced in the acromioclavicular joint (11) (Fig. 33-7). Because these injuries represent physeal disruption with herniation of bone from the periosteal tube, tremendous potential for healing and remodeling exists.
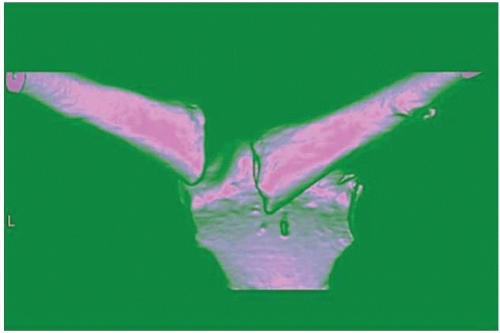 FIGURE 33-5. Three-dimensional CT of chronic retrosternal dislocation of clavicle that crosses midline. |
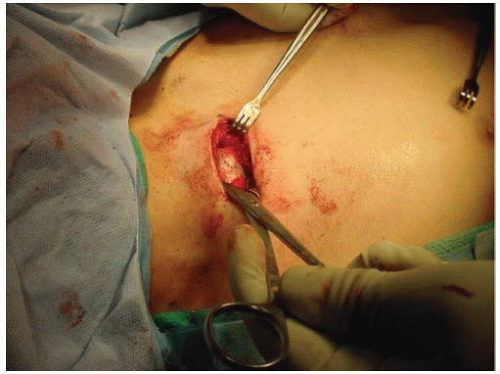 FIGURE 33-6. Lifting the clamp on medial clavicle anteriorly reduces the metaphysis to the epiphysis (beneath Senn rake retractor) prior to figure-of-eight suture fixation. |
Treatment of most distal clavicle fractures consists of support with a sling or shoulder immobilizer for 3 weeks. Reduction and fixation are unnecessary, except for the rare instance in which the clavicle is severely displaced in an older adolescent (12).
True acromioclavicular separation is very rare before the age of 16. Fracture or physeal separation of the distal clavicle is more common, and has been called pseudodislocation of the acromioclavicular joint (13). Tenderness over the acromioclavicular joint and prominence of the lateral end of the clavicle are present with fracture, physeal separation, and joint separation. Radiographs demonstrate increased distance between the coracoid process and the clavicle, compared with the opposite side. When true joint separation occurs, the injury may be a sprain, subluxation, or dislocation. These have been classified as grades I to VI, depending on the severity of injury to the acromioclavicular and coracoclavicular ligaments (14, 15 and 16).
Treatment of grades I to III is usually conservative, without attempting reduction. It is unnecessary to determine the degree of separation by stress radiography with handheld weights. A sling or shoulder immobilizer is used for 3 weeks, followed by a graduated exercise program. Even in competitive athletes, shoulder strength and range of motion are typically not impaired after rehabilitation (17, 18 and 19). In complete separations (type III), the clavicle remains prominent but is usually asymptomatic. The occasional patient who develops late symptoms of pain and stiffness may be relieved by resection of the distal clavicle (18), with ligament reconstruction. In grade IV separations, the distal clavicle is posteriorly displaced through the trapezius fascia, and open reduction and stabilization is recommended (Figs. 33-8, 33-9 and 33-10).
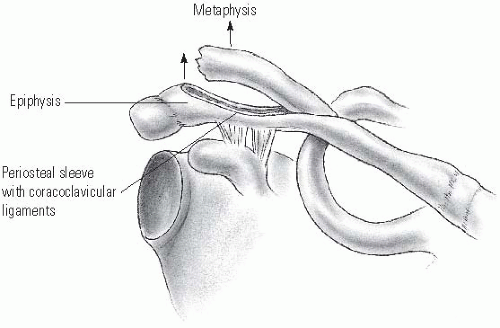 FIGURE 33-7. Lateral clavicle fracture separation. The swelling and dorsal prominence of the clavicle may suggest an acromioclavicular separation. However, the distal epiphysis of the clavicle and the acromioclavicular joint remain reduced. New bone forms from the periosteum, with subsequent remodeling of the prominence. (From Ogden J. Distal clavicular physeal injury. Clin Orthop 1984;188:68, with permission.) |
In grade V separations, the clavicle is displaced 100% to 300% superiorly, and the clavicle lies subcutaneously. In grade VI injuries, the clavicle is displaced inferiorly beneath the acromion or coracoid. In grade V and VI separations, surgical reduction and stabilization is recommended (16).
Scapular Fracture.
Fracture of the scapula, although rare in children, should be suspected whenever there is shoulder tenderness or swelling after trauma. These fractures are usually the result of a severe, direct blow of high energy. Therefore, initial evaluation should include a diligent search for more serious chest injuries, such as rib fractures, pulmonary or cardiac contusion, and injury to the mediastinum. If associated with injuries to the clavicle, scapulothoracic dissociation should be suspected, and a careful assessment of the vascular and neurologic function of the ipsilateral upper extremity should be performed. Fractures of the scapula can involve the body, glenoid, or acromion. Avulsion fractures of the scapula have also been reported and are a result of indirect trauma (20). The CT scan is helpful for evaluating scapular fractures and associated injuries.
Treatment of most scapular fractures consists of immobilization with a sling and swathe, followed by early shoulder motion after pain has subsided. The scapular body is encased in thick muscles, so displacement is rare and well tolerated after healing (12). Fractures of the acromion or coracoid require surgery only when severely displaced. Glenoid fractures are the most likely to require reduction and internal fixation. Intra-articular fractures with substantial displacement should be restored to anatomic positions. Large glenoid rim fractures can be associated with
traumatic dislocations. An anterior approach is recommended for anterior glenoid fractures, and a posterior approach is used for scapular neck and glenoid fossa fractures (21).
traumatic dislocations. An anterior approach is recommended for anterior glenoid fractures, and a posterior approach is used for scapular neck and glenoid fossa fractures (21).
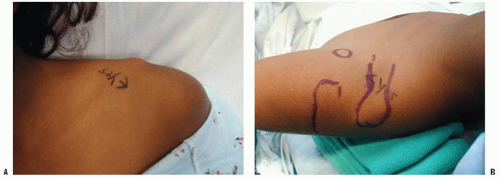 FIGURE 33-8. A: Clinical photograph from front of a 11-year-old struck by car with type IV posteriorly displaced acromial clavicular pseudodislocation. B: Clinical photograph of same patient from back showing posterior displacement of lateral clavicle into trapezius (type IV). |
Shoulder Dislocation.
Less than 2% of glenohumeral dislocations occur in patients younger than 10 years (22). Atraumatic shoulder dislocations and chronic shoulder instability are discussed elsewhere in this book. Traumatic shoulder dislocation in the adolescent age group is more common. Approximately 20% of all shoulder dislocations occur in persons between the ages of 10 and 20 years. Most displace anteriorly and produce a detachment of the anteroinferior capsule from the glenoid neck (i.e., Bankart lesion).
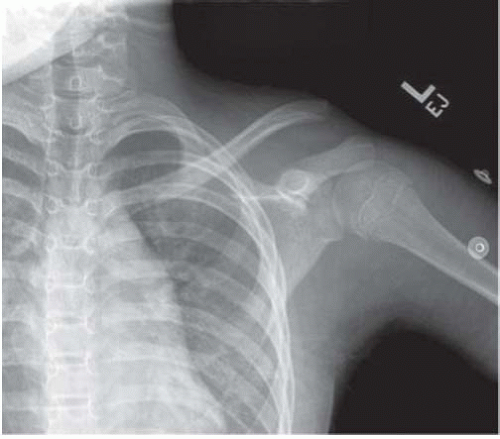 FIGURE 33-9. AP injury radiograph of the patient in Figure 33-8. |
Treatment of traumatic shoulder dislocation in children and adolescents is nonsurgical, with gentle closed reduction. This is accomplished by providing adequate pain relief, muscle relaxation, and gravity-assisted arm traction in the prone position. An alternative method is the modified Hippocratic method in which traction is applied to the arm while countertraction is applied using a folded sheet around the torso. After reduction, a shoulder immobilizer or sling is used for 2 to 3 weeks before initiating shoulder muscle strengthening. The most frequent complication is recurrent dislocation, which has an incidence between 60% and 85%, usually within 2 years of the primary dislocation (23, 24). Posterior dislocations of the shoulder may also recur and require surgical stabilization in children (25). A more detailed discussion of this injury and its treatment is found elsewhere in this book.
Proximal Humerus Fractures.
Proximal humeral growth accounts for 80% of the length of the humerus. The proximal humeral physis is an undulating structure that forms a tentlike peak in the posteromedial humerus quadrant, near
the center of the humeral head. The glenohumeral joint capsule extends to the metaphysis medially. Therefore, a portion of the metaphysis is intracapsular. The proximal humeral physis remains open in girls until 14 to 17 years of age and in boys until 16 to 18 years of age.
the center of the humeral head. The glenohumeral joint capsule extends to the metaphysis medially. Therefore, a portion of the metaphysis is intracapsular. The proximal humeral physis remains open in girls until 14 to 17 years of age and in boys until 16 to 18 years of age.
 FIGURE 33-10. AP radiograph of patient after open reduction, suture fixation through clavicle and under coracoid to repair coracoclavicular ligaments, and suture of periosteal tube over clavicle. |
Mechanisms of injury that would produce a shoulder dislocation in adults usually result in a proximal humeral fracture in children and adolescents. These are usually Salter-Harris type II epiphyseal separations or metaphyseal fractures. Metaphyseal fractures are more common before the age of 10, and epiphyseal separations are more common in adolescents. The distal fragment usually displaces in the anterior direction because the periosteum is thinner and weaker in this region. Posteriorly, the periosteal sleeve is thicker and remains intact. The proximal fragment is flexed and externally rotated because of the pull of the rotator cuff, whereas the distal fragment is displaced proximally because of the pull of the deltoid muscle. Adduction of the distal fragment is caused by the pectoralis major muscle. Remarkably, this is a relatively benign injury because of the rapid rate of remodeling with growth and the wide range of shoulder motion (26, 27).
The long head of the biceps may be interposed between the fracture fragments and may impede reduction (28).
Most of these fractures are minimally displaced or minimally angulated. They are managed in a shoulder immobilizer for 3 to 4 weeks, followed by range-of-motion exercises and gradually increased activity.
Severely displaced fractures pose a greater dilemma for the treating physician. The alarming radiographic appearance invites overtreatment. These fractures are difficult to reduce and maintain in a reduced position by closed methods. Traction and cast immobilization are not recommended because these techniques are inconvenient, cumbersome, and have not been shown to improve results. Current options for management include immobilization without attempting reduction, or reduction under sedation or anesthesia with assessment of postreduction stability, and percutaneous fixation if unstable. Redisplacement after immobilization without pin fixation is common. Authors who have studied these options have concluded that most severely displaced fractures should be treated by sling and swathe immobilization (26, 27, 29). Complete displacement, 3 cm overriding, and 60 degrees of angulation may be accepted in patients who are more than 2 years from skeletal maturity. Up to 45 degrees of angulation can be accepted until physeal closure (28) (Fig. 33-11). Closed or open reduction under anesthesia with percutaneous pinning may be indicated for fractures in older adolescents, open fractures, associated vascular injuries, and severe displacement (12) (Fig. 33-12). Some practitioners also believe that injuries to the dominant arm of a throwing athlete should also be treated with reduction and fixation.
OPERATIVE MANAGEMENT OF DISPLACED PROXIMAL HUMERUS FRACTURES
Indications for Operative Management.
The indications for operative management of adolescent proximal humeral fractures are controversial, as some studies report excellent functional outcomes with nonoperative management of displaced and angulated fractures, even in older adolescents (27). Dobbs et al. (28) used >2/3 width displacement (Neer grade III or IV) and angulation >45 degrees in older adolescents (>12 years) as indications for attempted closed reduction under general anesthesia. If a successful reduction could be obtained (to grade II or less displacement and <45 degrees angulation), then stability was tested. If unstable, the fracture was treated with percutaneous pin fixation and immobilization. If an acceptable reduction could not be achieved closed, an open reduction was performed using a deltopectoral approach.
Closed Reduction Method.
In most fractures, the distal fragment will be displaced anteriorly through the thinner periosteum, and the proximal fragment will be abducted and externally rotated by its muscular attachments. After adequate analgesia and/or anesthesia, longitudinal traction is applied to the injured extremity, and the distal humeral fragment is flexed, abducted, and externally rotated. Posteriorly directed pressure during flexion on the distal fragment will push it back inside the soft-tissue envelope, and then abduction and external rotation will reduce the fragment. Fluoroscopy is useful to assess the position of the fracture fragments during reduction. Once reduced, an axial load is applied to compress the fracture with the arm still abducted and externally rotated, and the arm is then returned to the patient’s side. If the fracture redisplaces to an unacceptable degree with the arm at the side, then repeat reduction and percutaneous pin fixation is warranted. If the fracture remains reduced, the patient is placed in a sling and swathe. For minor amounts of residual varus, an abduction pillow at the side with the sling and swathe may be used.
For unstable fractures and irreducible fractures, the patient should be taken to the operating room for general anesthesia. The patient is positioned supine at the edge of a completely radiolucent table to facilitate fluoroscopy. A bump is placed beneath the ipsilateral scapula. The arm and shoulder are sterilely prepared and draped, and repeat closed reduction is attempted. If an adequate reduction is obtained, it is stabilized with two large pins placed percutaneously. The image intensifier can be brought in from cephalad over the patient’s injured shoulder, or from the opposite side if the unit is large enough to rotate around for oblique and lateral views. Because of the risk of migration with use of smooth pins, some prefer pins with threaded tips, and it is recommended to place a large bend in the end of the pins left outside the skin. The axillary nerve is at risk, and runs from posterior to anterior around the proximal humerus in a zone 5 to 7 cm distal to the tip of the acromion. Pins should thus start distal to this, and are placed from the lateral proximal humeral metaphysis and directed up and into the humeral epiphysis. The first pin starts anterolaterally, and then a second pin is placed anterior or posterior to the first, with an attempt to get some divergence or spread of the pins in the epiphysis to enhance stability. Larger pins are preferred (≥0.062 in.) (Fig. 33-13).
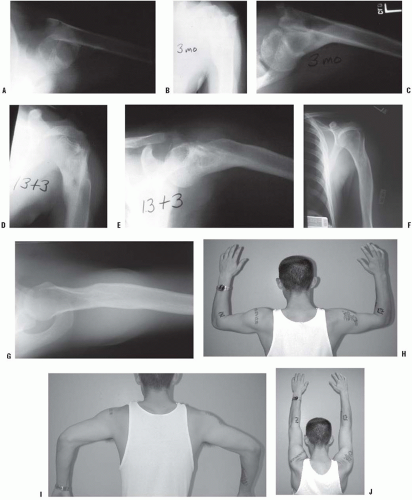 FIGURE 33-11. Proximal humeral fracture separation in a boy aged 12 years, 3 months. A: The initial fracture displacement was treated with sling and swath. B, C: Three months after injury, healing and early remodeling are evident. D, E: One year after injury, remodeling continues. F, G: Four years after injury, remodeling is complete. H-J: The patient has recovered full range of motion, but has a 1-cm arm-length discrepancy. |
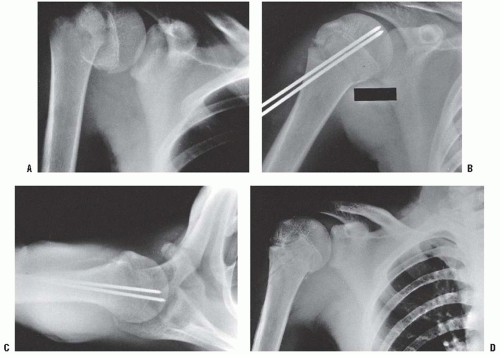 FIGURE 33-12. Salter-Harris type II fracture of the proximal humerus in a 15-year-old adolescent. A: Displaced fracture with 70 degrees of angulation. The proximal fragment is abducted and externally rotated because of the rotator cuff attachments. The shaft is displaced proximally by the pull of the deltoid muscle and is generally adducted by the action of the pectoralis muscle. The distal fragment is also internally rotated if the arm is placed in a sling. B, C: AP and lateral radiographs after CRPP. The arm is externally rotated and abducted with longitudinal traction to achieve this position. D: Final alignment after removal of the pins 4 weeks later. |
There often is a posteromedial Thurston-Holland fragment, and if large enough one pin can stay below the physis and engage this fragment. If adequate stability cannot be obtained with pins placed distal and lateral, a proximal to distal pin can be placed lateral to the acromion, through the greater tuberosity, across the fracture, and engage the medial metaphysis of the distal fragment. Some prefer to use cannulated screws for improved bone purchase and less likelihood of implant migration, but there are no comparative studies available. If screws crossing the physis are used, screw removal may be indicated if substantial growth potential remains.
If an acceptable reduction cannot be obtained, an open reduction is performed through a deltopectoral interval approach. The long head of the biceps tendon or periosteum may be interposed obstructing an accurate reduction. After reduction, fixation is achieved percutaneously as noted above (Fig. 33-14).
After fixation, the arm is immobilized with a sling and swathe for 3 to 4 weeks, at which time radiographs are taken to assess healing, and the pins are removed. Graduated range-of-motion and strengthening exercises are begun.
Humeral Shaft Fracture.
Fractures of the humeral shaft may occur at birth because of difficult delivery. Other humeral shaft fractures in children younger than 3 years are often the result of nonaccidental injury (30). In any instance of delay in seeking medical attention, inconsistent history of injury, or evidence of concurrent injuries, there is an increased likelihood of inflicted trauma. However, there is no particular pattern of fracture that is diagnostic of child abuse. Fractures seen in older children are usually the result of blunt trauma. The radial nerve is susceptible to injury because it is fixed by the intramuscular septum as it passes lateral to the humerus at the junction of the middle and distal thirds. In fractures with radial nerve palsy, the prognosis for neurologic recovery is excellent. Nerve injury with closed fractures of the humerus should be observed for 3 to 5 months before considering intervention.
Closed management is recommended for most humeral shaft fractures. Infants may be treated with gentle positioning and swaddling, with a small coaptation splint, or the arm may be splinted in extension, using a small splint or a tongue blade and tape. Prompt healing and marked remodeling of angular
deformity and shortening can be expected in infants and young children, with up to 65 degrees of angulation remodeling documented in infants (31). Older children may be treated with a coaptation splint and a sling to maintain alignment of the arm. A hanging arm cast or fracture brace collar and cuff may also be used. Occasionally, an abduction splint or pillow may be used to control varus alignment. In older children and adolescents, complete displacement and 2 cm of shortening are acceptable. In the proximal shaft, one can accept 25 to 30 degrees of angulation. Fracture deformity closer to the elbow is more visible. Up to 20 degrees of angulation is acceptable in the middle third and 15 degrees in the distal third of the humeral shaft (32). Greater degrees of deformity are usually unacceptable cosmetically, although they may remodel without causing functional problems. Indications for surgery include open fractures, multiple injuries, and ipsilateral forearm fractures in adolescents (i.e., “floating elbow”). Fixation techniques include the use of flexible intramedullary (IM) nails and compression plating. Open or comminuted fractures can be stabilized with an external fixator until union is complete or until fracture stability and wound healing permit converting to splint immobilization.
deformity and shortening can be expected in infants and young children, with up to 65 degrees of angulation remodeling documented in infants (31). Older children may be treated with a coaptation splint and a sling to maintain alignment of the arm. A hanging arm cast or fracture brace collar and cuff may also be used. Occasionally, an abduction splint or pillow may be used to control varus alignment. In older children and adolescents, complete displacement and 2 cm of shortening are acceptable. In the proximal shaft, one can accept 25 to 30 degrees of angulation. Fracture deformity closer to the elbow is more visible. Up to 20 degrees of angulation is acceptable in the middle third and 15 degrees in the distal third of the humeral shaft (32). Greater degrees of deformity are usually unacceptable cosmetically, although they may remodel without causing functional problems. Indications for surgery include open fractures, multiple injuries, and ipsilateral forearm fractures in adolescents (i.e., “floating elbow”). Fixation techniques include the use of flexible intramedullary (IM) nails and compression plating. Open or comminuted fractures can be stabilized with an external fixator until union is complete or until fracture stability and wound healing permit converting to splint immobilization.
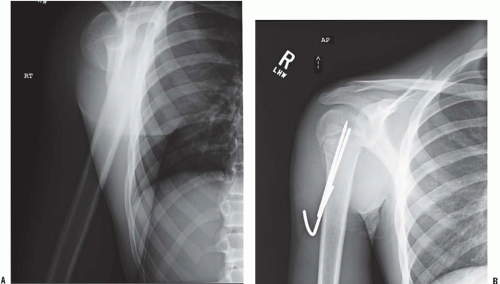 FIGURE 33-13. A, B: Radiographs of severely displaced fracture that was unstable after reduction and stabilized with distal to proximal pins, with pins bent outside skin. |
 FIGURE 33-14. Rare open proximal humeral physeal fracture treated with open reduction and fixation with two screws, 3 weeks after fixation. |
CLOSED REDUCTION AND INTRAMEDULLARY FIXATION OF HUMERAL SHAFT FRACTURE
Indications: Clinical situations where maintaining alignment may be difficult, including multiple trauma, multiple fractures in the same extremity, humeral fracture associated with severe head injury, and pathologic fracture.
The humeral shaft may be stabilized with flexible nails by retrograde or antegrade insertion, and each has its relative
indications depending on the location of the fracture. There are a large number of reports of IM nailing of humeral fractures in adults (33, 34 and 35), but little published in North America on this technique for children.
indications depending on the location of the fracture. There are a large number of reports of IM nailing of humeral fractures in adults (33, 34 and 35), but little published in North America on this technique for children.
Retrograde insertion is suitable for fractures of the diaphyseal and proximal humerus. The insertion point for this method is usually through the dorsal surface of the humerus just proximal to the olecranon fossa, but can also be from the lateral column if the IM canal is small and a single nail is used.
Antegrade insertion is accomplished by passing a single rod through a portal in the region of the greater tuberosity. In this technique, either a flexible rod or a more rigid rod can be used. A larger deltoid-splitting incision can be used to create a portal large enough for two flexible rods to be inserted if needed for more stability. This incision requires care to avoid injury to the axillary nerve, the location of which in a child may not be obvious to the surgeon who seldom uses this approach (Figs. 33-15, 33-16, 33-17, 33-18, 33-19, 33-20 and 33-21).
Postoperative Care.
Usually the reduction is sufficiently stable to permit use of a sling or a shoulder immobilizer; however, a coaptation splint or above-elbow cast may be applied. Healing is usually sufficient within 3 to 4 weeks to initiate range-of-motion exercises. The rods are removed electively after healing is complete.
FRACTURES AND DISLOCATIONS AROUND THE ELBOW
It is wise to assume the worst when evaluating the child with an elbow injury. Only full range of motion, complete absence of swelling, and normal radiographs warrant the diagnosis of elbow sprain or contusion. Any swelling or restriction of movement necessitates thorough evaluation, sometimes with comparison radiographs of the opposite elbow whenever there is doubt regarding normal anatomy. A clinical rule of thumb is that if a child can fully extend the elbow with minimal discomfort, an elbow fracture is unlikely. Small fractures that appear to be avulsions should be accurately diagnosed, because they may indicate a major injury such as an associated elbow dislocation. Arthrography, ultrasonography, and MRI have been used to successfully diagnose occult elbow trauma in children (36, 37 and 38). These techniques should be considered whenever there is doubt regarding the diagnosis.
Precisely defining the fracture patterns is a challenge in young children because of the large cartilage composition about the elbow. There are also multiple ossification centers that appear at different ages (Fig. 33-22). The capitellum is the first to appear, at 6 to 12 months of age, followed by the radial head and the medial epicondyle at 4 to 5 years of age. The trochlea and olecranon ossify at 8 to 9 years, and the lateral epicondyle appears at 10 to 11 years. The lateral epicondyle, trochlea, and capitellum coalesce to form a single epiphysis by 12 years of age. Ossification centers are intra-articular except for the medial and lateral epicondyles. The radial head, trochlea, and olecranon may appear as multiple ossification centers that may be mistaken for a fracture.
The elbow is a complex joint, and it has three major articulations: the radiohumeral, ulnohumeral, and radioulnar joints. There are two fat pads: one in the olecranon fossa posteriorly, and the other in the coronoid fossa anteriorly. Displacement of the posterior fat pad may be visible on radiographs after elbow trauma. This is a reliable indication of an intra-articular effusion (39). The anterior fat pad is sometimes seen under normal conditions and does not necessarily indicate joint effusion. Most of the distal humerus has good collateral circulation; however, caution should be exercised to avoid disrupting the posterior blood supply of the capetellum and trochlea during surgical exposure of fractures (40). The trochlea and medial condyle are particularly vulnerable to avascular necrosis because they are perfused by nonanastomotic nutrient vessels that enter the bone posteriorly and medially (41).
The clinical carrying angle of the normal elbow is a slight valgus alignment, averaging approximately 7 degrees. There are several helpful radiographic lines and angles that can be measured to determine if there is adequate postinjury alignment; a comparison view of the other elbow may be valuable as a reference (Fig. 33-23). All measurements are subject to the inaccuracies caused by elbow positioning, and this should be kept in mind when making clinical decisions. The Baumann angle is used to assess the varus attitude of the distal humerus, usually after a supracondylar elbow fracture. It is the angle formed between the capitellar physeal line and a line perpendicular to the long axis of the humerus. This angle normally should be within 5 to 8 degrees of the same angle in the contralateral elbow. An anteroposterior (AP) view of the distal humerus, positioned parallel to the radiographic plate, is necessary to reduce the variation of the Baumann angle that occurs when the arm is rotated. Ten degrees of rotation produces a 6-degree change in the angle (42). Sagittal alignment may be determined by the lateral capitellar angle, which indicates the normal forward-flexed position of the capitellum. This angle averages 30 to 40 degrees. The anterior humeral line is an easier means of assessing sagittal alignment. A line along the anterior humeral cortex should pass through the capitellum. While in the past many have said that the line must pass through the center of the capitellum, Herman et al. (43) recently reported that in children <4 years old the line passes through the anterior third 40% of the time, and in children over 4 years 22% of the time. If the capitellum is posterior to this line a displaced supracondylar, lateral condylar, or transphyseal fracture is likely.
Supracondylar Fracture.
This is the most common elbow fracture. The usual mechanism of injury is a hyperextension load on the elbow from falling on the outstretched arm. The distal fragment displaces posteriorly (i.e., extension) in more than 95% of fractures. The medial and lateral columns of the distal humerus are connected by a very thin area of bone at the olecranon fossa. The central thinning and the surrounding narrow columns predispose this area to fracture. As the elbow is forced into hyperextension, the olecranon impinges in the fossa, serving as the fulcrum for the fracture. The collateral ligaments and the anterior joint capsule also resist hyperextension, transmitting the stress to the distal humerus and initiating the fracture (44) (Fig. 33-24). Flexion-type supracondylar fractures result most often from a direct fall onto the olecranon of a flexed elbow.
Closed Reduction and Intramedullary Fixation of Humeral Shaft Fracture (Figs. 33-15, 33-16, 33-17, 33-18, 33-19 and 33-20)
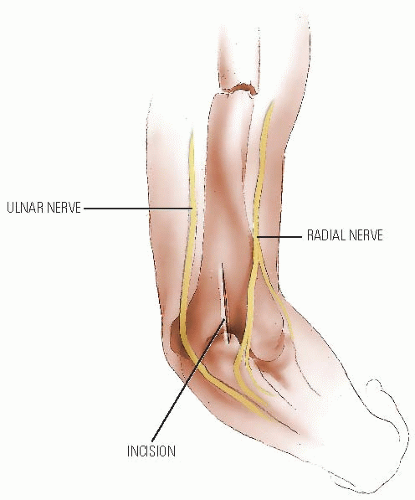 FIGURE 33-15. Closed Reduction and Intramedullary Fixation of Humeral Shaft Fracture. For both the retrograde and antegrade procedures, the patient is placed on a completely radiolucent operating table to allow access for the image intensifier. If the table has a metal edge, the patient is positioned with the injured shoulder in the middle of the table so that the metal does not block the view of the image intensifier. In retrograde nailing, a tourniquet can be used. Before beginning the operation, it is advisable to confirm that the fracture can be reduced and that the image intensifier can visualize the entire humerus. For retrograde nailing with a central entry portal, the arm is positioned across the body. A posterior midline incision is made extending from the olecranon fossa proximally for about 4 to 6 cm, depending on the child’s size. The incision is made sharply down through the triceps fascia, and the muscle fibers are split by blunt dissection to expose the posterior surface of the humerus. The only major structure that must concern the surgeon is the radial nerve. In the adult, the nerve lies about 10 cm proximal to the lateral epicondyle, but this distance is proportionally less in the child. The incision should not extend so far proximally that it encounters the nerve unless the surgeon desires to explore the nerve. |
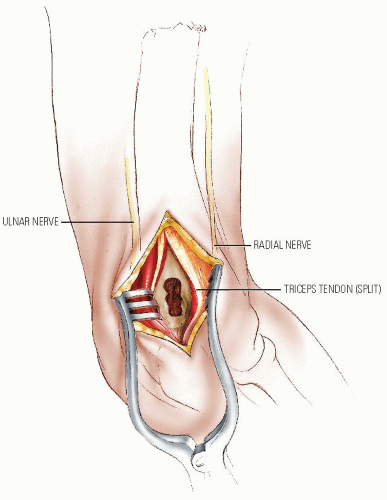 FIGURE 33-16. The superior lip of the olecranon fossa is identified, and a drill hole is made in the cortex far enough above the fossa to enter the medullary canal. In the adult this is 2 to 3 cm, but it is proportionally less in the child. |
 FIGURE 33-17. The correct size of steel rods is estimated by holding a rod next to the humerus and viewing both with the image intensifier. A small bend is placed in the distal part of the rod. The rod is inserted and driven to the fracture site. The fracture is reduced and the rod driven across into the proximal fragment. If needed for stability, a second rod (A) can then be inserted. It is important to have the nails end in different areas proximally to provide stability in rotation. Ideally, one nail end goes into the greater tuberosity and the other toward the articular surface of the humeral head. Positioning of the rod is accomplished using the bend in the rod to drive it during insertion under fluoroscopic guidance. For stainless steel rods with eyelets, a wire can be passed through the eyelets of the rods with the rods 1 cm from final insertion, and then the rods are driven in completely. Only the eyelets should be protruding outside of the cortex. The wire (B) is twisted tight, binding the rods together. For titanium nails, the rods are completely seated and then a rod cutter is used to cut them, leaving enough rod protruding for nail removal if desired. A final check with the image intensifier is made to make sure that the nails are positioned correctly and that the fracture is not distracted. |
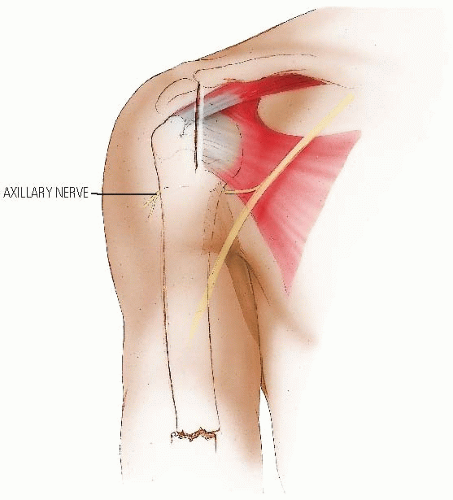 FIGURE 33-18. For the antegrade fixation, a small incision is made over the anterior deltoid. The incision is extended distally from the tip of the acromion for a distance of 2.5 to 3 cm. The main structure to be aware of is the axillary nerve, which crosses at the distal end of this incision. |
 FIGURE 33-19. A: The deltoid fibers are split by blunt dissection to expose the periosteum of the shaft, which is opened. A drill hole large enough to admit a rod is made in the anterolateral metaphyseal area of the humerus just below the tip of the greater tuberosity. B: The hole is enlarged to accommodate two rods if needed. |
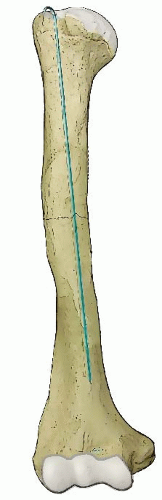 FIGURE 33-20. If speed in completing the procedure is an important factor or only a single rod to help maintain alignment is desired, the incision can be smaller. The rotator cuff is split, and a straight rod is inserted through the tip of the greater tuberosity. This does not provide rotational stability and allows less fixation of the fracture in general, but it helps maintain alignment. Because of the rod-tip location, impingement occurs and the rod will need to be removed. |
The classification system most commonly used is that of Gartland, who described three stages of displacement (45): type I, nondisplaced or minimally displaced; type II, angulated with moderate disruption but with a portion of the cortex maintaining end-to-end contact; and type III, completely displaced. A type IV fracture with multidirectional instability resulting from an incompetent periosteal hinge has been described (46). In this fracture, the distal fragment may fall into flexion or extension, and is often determined under anesthesia at the time of surgery. This pattern of instability may be due to the initial injury or may occur iatrogenically during attempted reduction. Fractures with medial impaction may appear to be nondisplaced but may result in cubitus varus attributable to unacceptable angulation (47). After complete fracture, a small amount of rotational malalignment allows tilting of the fragments because of the thin cross-sectional area in the supracondylar region. This may also lead to malunion with cubitus varus or, less commonly, cubitus valgus.
Associated injuries include nerve injuries, vascular injuries, and other fractures of the upper extremity, including the ipsilateral forearm. The incidence of nerve injury is approximately 15%; most often, nerve injury is a neuropraxia that resolves spontaneously within 4 months. The nerve that gets injured is related to the position of the displaced fragment (48). Median nerve injuries, including injury to the anterior interosseous nerve, are more common with posterolateral displacement of the distal fragment. Radial nerve injuries are seen more often with posteromedial displacement. Ulnar nerve injuries are seen most commonly with flexiontype injuries, and ulnar nerve entrapment has been reported in three of six of flexion-type injuries treated with open reduction (49).
Treatment.
Nondisplaced or minimally displaced fractures may be treated with an above-elbow cast for 3 weeks. Any medial buckling or impaction of the medial metaphysis may indicate a fracture that requires reduction. This fracture is a diagnostic trap because the collapse of the medial column may be very subtle (Figs. 33-25 and 33-26).
The Baumann angle should be measured, and if >80 degrees, varus is likely present that warrants closed reduction and percutaneous pinning (CRPP). It is difficult to maintain the reduction by cast immobilization alone, and residual deformity will not reliably remodel (47).
Type II supracondylar fractures are usually extension injuries, with an intact or nondisplaced posterior cortex. Type II fractures, in which the capitellum is posterior to the anterior humeral line, have an unacceptable amount of extension. While many of these are stable after closed reduction and casting in 90 to 100 degrees of flexion, just over 20% of fractures treated without operative stabilization may be expected to lose reduction and require delayed surgery (50, 51). Flexing an elbow with a supracondylar fracture increases compartment pressure (52) and decreases brachial artery flow (53). Thus, when 90 degrees or more of flexion is required for maintenance of reduction, percutaneous pinning is recommended. In contrast, a large consecutive series of type II supracondylar fractures treated with CRPP shows predictably good results with no complications other than minor pin tract infections (54). Based on the above data, we recommend CRPP for type II supracondylar fractures in which the anterior humeral line does not touch the capitellum.
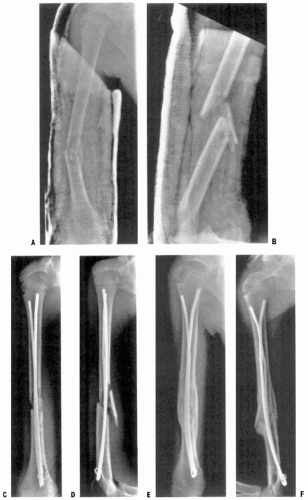 FIGURE 33-21 A, B: Radiographs of a 12-year-old boy with multiple trauma, including fracture of the humerus. C, D: Radiographs taken at the conclusion of the surgery showing the alignment. E, F: Healing after 8 weeks. |
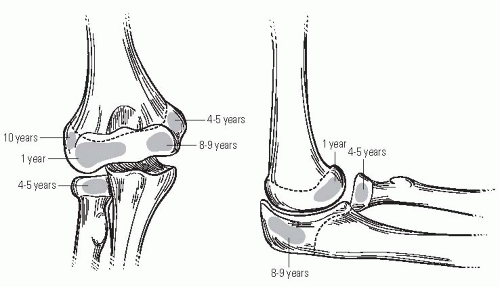 FIGURE 33-22. Secondary ossification centers of the elbow, with a range of ages of appearance. (From Skaggs DL, Flynn JM. Staying out of trouble in pediatric orthopaedics. Philadelphia, PA: Lippincott Williams & Wilkins, 2006, with permission.) |
Type III supracondylar fractures are displaced with no cortical continuity. The first step is assessment of hand perfusion and nerve function. Neurologic and vascular problems are frequent, and urgent treatment may be required if vascular compromise is present. Primary CRPP is the preferred treatment for type III injuries (55) (Fig. 33-27). Displaced supracondylar fractures treated by closed reduction and casting have a higher incidence of residual deformity than those treated with reduction and pinning (55). Closed reduction and casting also has a higher risk of Volkmann ischemic contracture than treatment with early pinning (55).
Type IV supracondylar fractures are the most unstable type, with the distal fragment able to displace into flexion and extension. A technique for closed reduction of these unstable fractures has been described in which pins are first placed in the distal fragment, and the intraoperative fluoroscopy unit is rotated to obtain AP and lateral images rather than rotate the patient’s arm and risk losing reduction (46).
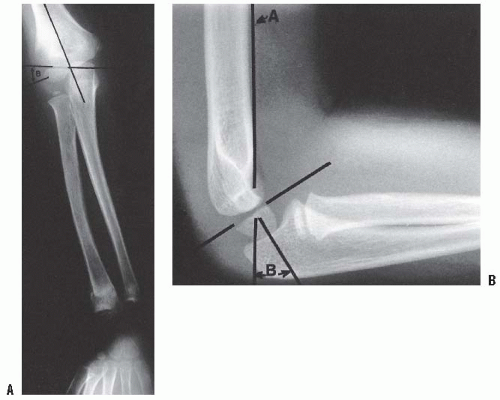 FIGURE 33-23. Radiographic lines of the distal humerus. A: The Baumann angle is formed between the capitellar physeal line and a line perpendicular to the long axis of the humerus. As this angle becomes smaller, more elbow varus will occur. This angle should be compared with that of the contralateral, uninjured elbow with a similar AP view of the distal humerus. B: Line A is the anterior humeral line, which atypically passes through the middle of the capitellum. Angle B demonstrates the anterior angulation of the capitellum relative to the humeral shaft. This is approximately 30 degrees. As angle B becomes smaller, the fracture site is moved into extension. Fracture alignment with the capitellum behind the anterior humeral line produces a hyperextension deformity and a loss of elbow flexion. |
Biomechanical studies have found that two divergent lateral pins have similar or superior stability to crossed pins, and that three pins (either three lateral or two lateral and one medial) are stronger (56, 57). Clinical experience suggests two lateral pins are sufficient for stabilization for type II fractures, and three lateral pins are good for type III fractures (58, 59), but a randomized prospective study of 28 patients using two lateral pins versus cross pins found both techniques were effective in the treatment of type III fractures with no significant differences in outcomes noted
between groups (59). We prefer laterally placed pins without a medial pin except in unusual circumstances (60). When a medial pin is used, one should be aware that elbow flexion of 120 degrees results in ulnar nerve subluxation anterior to the medial epicondyle in over 50% of children which increases the risk of damage during pinning (61). When possible, it is advisable to place the lateral pin(s) first to provide provisional stability so that the medial pin can be inserted with the elbow in less than full flexion, placing the ulnar nerve farther posterior (62).
between groups (59). We prefer laterally placed pins without a medial pin except in unusual circumstances (60). When a medial pin is used, one should be aware that elbow flexion of 120 degrees results in ulnar nerve subluxation anterior to the medial epicondyle in over 50% of children which increases the risk of damage during pinning (61). When possible, it is advisable to place the lateral pin(s) first to provide provisional stability so that the medial pin can be inserted with the elbow in less than full flexion, placing the ulnar nerve farther posterior (62).
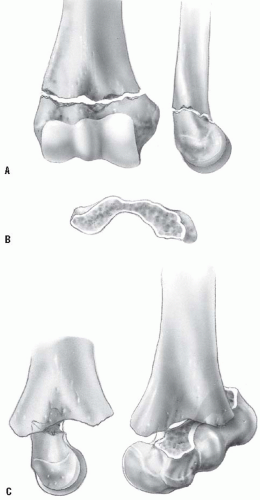 FIGURE 33-24. The typical orientation of the fracture line in the supracondylar fracture. A: Sagittal rotation of the distal fragment generally results in posterior angulation, although, less commonly, it can be flexed. B: The cross-sectional area through the fracture demonstrates the thin cross-sectional area of the supracondylar region. C: Any horizontal rotation tilts the distal fragment. Typically, medial tilting occurs, producing cubitus varus. The lateral projection readily demonstrates this horizontal rotation, producing a fishtail deformity. In this instance, the distal portion of the proximal fragment is obliquely profiled, although there is a true lateral view of the distal humeral fragment. |
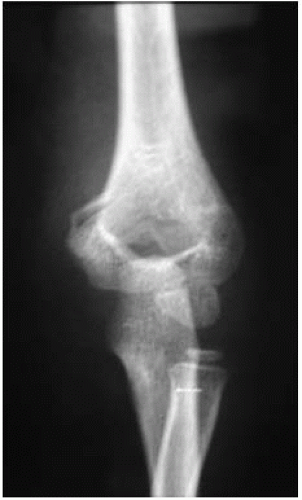 FIGURE 33-25. Medial comminution is a subtle radiographic finding and indicates a more unstable variant that may collapse into varus if not treated appropriately. (From Skaggs DL, Flynn JM. Staying out of trouble in pediatric orthopaedics. Philadelphia, PA: Lippincott Williams & Wilkins, 2006, with permission.) |
Several retrospective studies suggest the operative treatment of supracondylar fractures may safely be delayed (62, 63), though delay of great than 8 hours in type III fractures may increase the need for an open reduction (64). However, these are all retrospective studies in busy pediatric centers in which surgeons may have appropriately selected
which fractures require urgent treatment. Indications for urgent surgery include a poorly perfused hand, excessive swelling, firm compartments, significant antecubital ecchymosis, a median nerve injury that may mask a developing compartment syndrome, and skin puckering suggesting extensive soft-tissue injury (65).
which fractures require urgent treatment. Indications for urgent surgery include a poorly perfused hand, excessive swelling, firm compartments, significant antecubital ecchymosis, a median nerve injury that may mask a developing compartment syndrome, and skin puckering suggesting extensive soft-tissue injury (65).
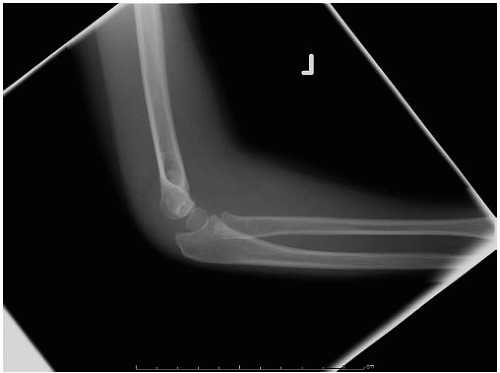 FIGURE 33-26. Note the lateral view does not show significant displacement. This view alone would suggest nonoperative treatment may be sufficient. |
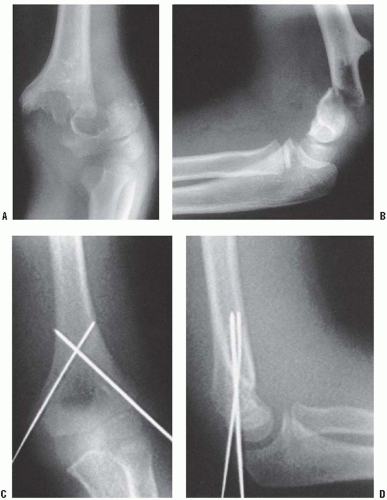 FIGURE 33-27. Type III supracondylar humerus fracture. A: This type III fracture demonstrates lateral displacement. B: The lateral projection also shows flexion of the distal fragment. The treatment of this less common position is the same as that for extension fractures. The posterior periosteum is torn, and hyperflexion of the elbow will excessively forward flex the distal fragment. The elbow is best pinned at slightly <90 degrees of flexion because it is technically difficult to pin the elbow in extension. C, D: AP and lateral postreduction and pinning films. |
CLOSED REDUCTION AND PERCUTANEOUS PINNING OF SUPRACONDYLAR FRACTURE OF THE HUMERUS
To understand the importance of accurate reduction, it is necessary to understand both the anatomy of the humerus at the fracture site and the mechanics of how the deformity occurs (Figs. 33-28, 33-29, 33-30, 33-31, 33-32, 33-33, 33-34, 33-35, 33-36, 33-37 and 33-38).
Postoperative Care.
Oral analgesics are usually sufficient for pain relief. An increasing need for intravenous narcotics may indicate impending compartment syndrome (66). Immobilization is continued for 3 to 4 weeks, at which time the pins are removed and x-rays may be taken. Invariably, some periosteal new bone extending across the fracture is visible. Fracture callous is often minimal, and this is not an indication for longer casting. Parents are taught range-of-motion exercises and flexion and extension should be normalizing by 6 weeks after the cast is removed, at which time a follow-up visit may be scheduled if there are any concerns (67). It is important to have nearly full return of elbow extension to allow for comparison of the carrying angle of the injured side to the opposite side. Elbow motion may continue to improve over 1 year postoperative at which time 98% should return to normal (68).
Closed Reduction and Percutaneous Pinning of the Supracondylar Fracture of the Humerus (Figs. 33-28, 33-29, 33-30, 33-31, 33-32, 33-33, 33-34, 33-35 and 33-36)
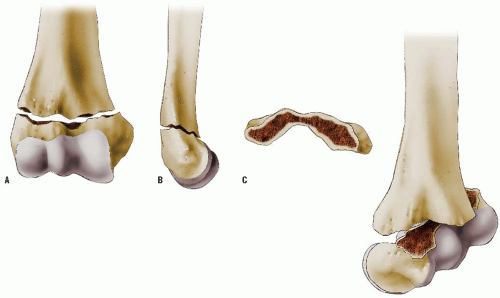 FIGURE 33-28. Closed Reduction and Percutaneous Pinning of the Supracondylar Fracture of the Humerus. The supracondylar fracture of the humerus (A) occurs through the thinnest portion of the bone: the area of the coronoid fossa anteriorly and the coracoid fossa posteriorly. A cross section of this area (B) demonstrates the medial and lateral bone masses, with the central portion being but a thin strip of bone. If the reduction (C) does not achieve and maintain rotational correction, there will not be stability of the reduction and the distal fragment may tilt and angulate, producing deformity. This rotational deformity can be seen clinically in cases of angular deformity. Because of the large range of rotation in the shoulder joint, this rotational deformity is not apparent cosmetically or functionally. |
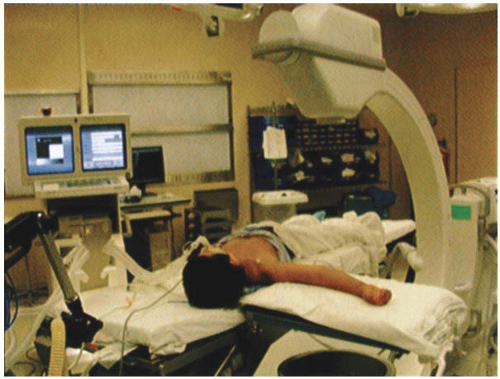 FIGURE 33-29. Proper positioning of the patient, the image intensifier, and the surgical assistant greatly simplifies the procedure. We prefer to use a short arm board though the recording tube of the image intensifier may be used. Having the fluoroscopy monitor on the opposite side of the bed allows the surgeon to easily visualize the monitor. The patient is shifted to the side of the table so that the shoulder is at the edge, and with very small children the head may lie partway on the arm board. The fluoroscopy unit is brought parallel to the operating room table from the foot with the assistant surgeon standing at the end and upper edge of the arm board. The arm is prepped and draped with an extremity sheet. |
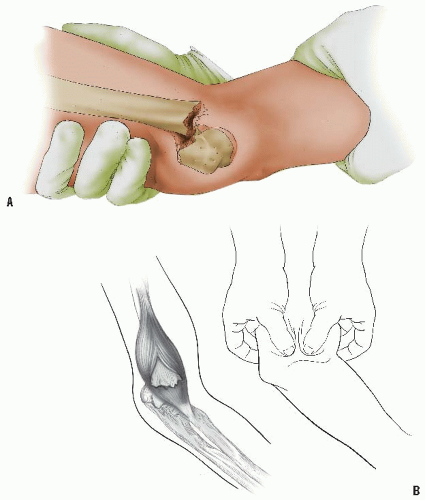 FIGURE 33-30. A: The first step in the reduction is the application of traction to the arm. With the elbow flexed about 15 degrees to prevent the neurologic and vascular structures from tethering over the proximal fracture fragment, the surgeon applies traction by grasping the forearm while the assistant applies counter traction within an open hand in the axilla. In most extension supracondylar fractures, there is an intact periosteum posteriorly that aids in the reduction by providing a stable fulcrum against which to work. B: When the proximal fragment has penetrated the brachialis muscle, the reduction will not be possible until the fragment is disengaged from the muscle. Using a milking maneuver, it is often possible to free the bone. (Part B from Tolo VT, Skaggs DL, eds. Master techniques in orthopaedic surgery: pediatrics. Philadelphia, PA: Lippincott Williams & Wilkins, 2008, with permission.) |
 FIGURE 33-31. The second step is the correction of the medial or lateral displacement using the image intensifier during the reduction. This is an important step before the surfaces of the two bony fragments are brought into contact because after they are reduced it is impossible to slide one over the other. |
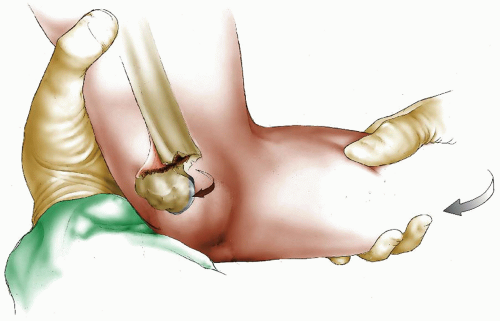 FIGURE 33-32. The third step is to correct the rotation. This must be done before the two fragments are brought into apposition. If the rotation is not correct, the fragments must be disengaged before another attempt at correction of the rotation. In most cases, the distal fragment requires external rotation. |
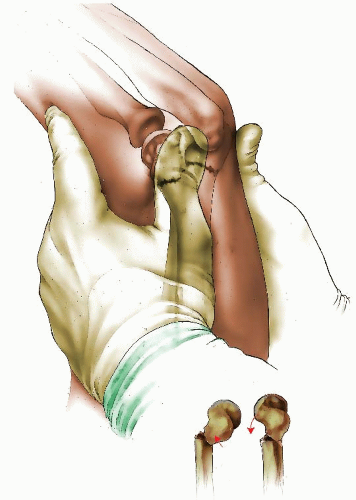 FIGURE 33-33. With the rotation and the medial and lateral displacement corrected, the posterior displacement can be corrected. At this point, the forearm may be pronated (if medially displaced) or supinated (if laterally displaced) to tighten the remaining medial or lateral periosteal hinge. The surgeon then pushes anteriorly on the olecranon and the elbow is then flexed, which reduces the fracture. One may push more on the medial side or lateral side if rotational deformity is present. If the fingers nearly touch the shoulder, it is likely that the extension deformity is fully corrected. The fracture reduction is maintained by keeping the elbow in a hyperflexed position, which may be held with a sterile self-adherent wrap. (From Coban-3M, St. Paul, MN.) If during the reduction maneuver the fracture does not stay reduced, and a “rubbery” feeling is encountered instead of the desired “bone on bone” feeling, the median nerve, brachial artery, or other soft tissue may be trapped within the fracture site. If this occurs, an open reduction may be necessary. |
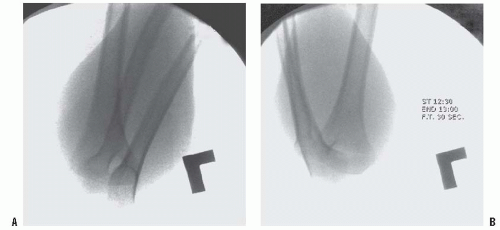 FIGURE 33-34. The reduction is then checked by fluoroscopic images in AP, lateral, and oblique planes. Verify four points to check for a good reduction: (i) the anterior humeral line intersects the capitellum (see Fig. 33-23), (ii) the Baumann angle is >10 degrees (see Fig. 33-23), (iii) the medial and lateral column are intact on oblique views by rotating the arm about 45 degrees in each direction. The AP view is the least helpful because the overlying forearm obscures the bony detail of the humerus, so this should be checked carefully after pins are placed and the arm can be extended. The arm is held acutely flexed while the lateral view is examined. If the diameters of the two fragments at the fracture site are different, malrotation is present. Anatomic reduction is preferred, but this may be difficult to achieve in some cases. We consider the anterior humeral line crossing the capitellum and Baumann angle >10 degrees (or within 5 to 8 degrees of the angle on the contralateral side) to be the most important criteria for acceptable reduction. As long as fixation is secure, it is the authors’ opinion that one may accept up to one-third translation of the distal fragment and 30 degrees of malrotation along the axis of the humerus. (From Tolo VT, Skaggs DL, eds. Master techniques in orthopaedic surgery: pediatrics. Philadelphia, PA: Lippincott Williams & Wilkins, 2008, with permission.) |
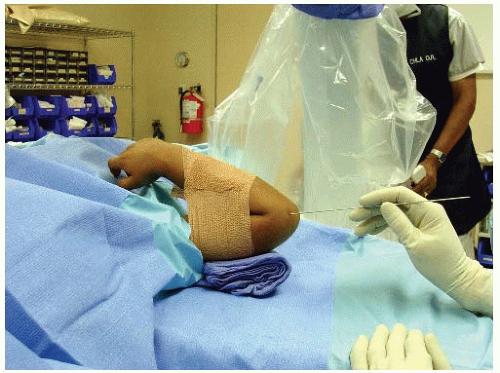 FIGURE 33-35. Fracture reduction is maintained by taping elbow in hyperflexed position. The wire may be pushed through the skin and into the cartilage, using the cartilage of the distal lateral condyle as a pincushion that will hold the K-wire in place while you carefully examine the AP and lateral images. When the reduction is achieved, the percutaneous pins are inserted from the lateral side while the elbow remains hyperflexed. Usually, 0.062-mm K-wires (Zimmer, Warsaw, IN) are adequate for the fixation, though larger or smaller pins may be used depending on the size of the child. (Reproduced with permission of Children’s Orthopaedic Center, Los Angeles, CA.) |
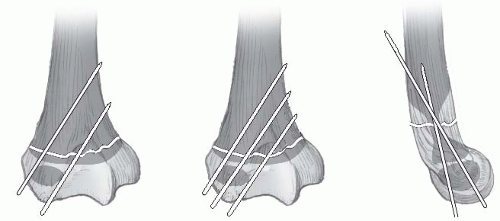 FIGURE 33-36. The aim of pin placement is to maximally separate the pins at the fracture site to engage both the medial and lateral columns. Whether the pins are divergent or parallel, or which pin is placed first is of little importance. Care must be taken to ensure there is sufficient bone engaged in the proximal and distal fragments. It is acceptable to cross the olecranon fossa, which adds two more cortices to improve fixation, but note this means the elbow cannot be fully extended until the pins are removed. In the sagittal plane, to engage the most bone with the K-wire in the distal fragment, the K-wire may go through the capitellum. The reduced capitellum lies slightly anterior to the plane of the fracture; thus, the pin may start a bit anterior to the plane of the fracture and angulate about 10 to 15 degrees posteriorly to maximize osseous purchase. A key element to insure a correctly placed pin is to feel the pin go through the proximal cortex. If this feeling is not clearly appreciated, careful fluoroscopic imaging often reveals the pin did not engage the proximal fragment. As a general rule, we recommend two pins for Gartland-type II fractures, and three pins for Gartland-type III fractures. Even though two good pins are probably sufficient, placing three pins increases the odds of actually having two good ones. While three lateral pins generally provide adequate fixation, an occasional oblique fracture or exceptionally unstable fracture may be amenable to a medial pin. If a medial pin is used, the lateral pin(s) are placed first, then the elbow is extended to about 45 degrees prior to pin placement, as flexion of the elbow often causes subluxation of the ulnar nerve over the medial epicondyle. If the surgeon is uncertain about the location of the ulnar nerve, a small incision over the medial epicondyle may be made. (From Tolo VT, Skaggs DL, eds. Master techniques in orthopaedic surgery: pediatrics. Philadelphia, PA: Lippincott Williams & Wilkins, 2008, with permission.) |
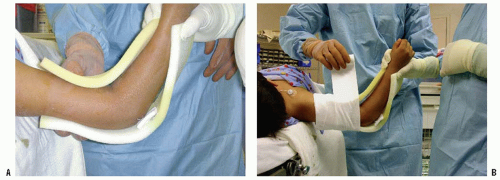 FIGURE 33-37. Sterile foam is placed directly on skin. If there is any circumferential dressing placed under the foam, it may be restricting. The elbow is flexed about 45 degrees if swollen to about 75 degrees if not swollen. Fiberglass casting material may be used over the foam as it is lighter, stronger, and allows for better x-rays than plaster casting. (Reproduced with permission of Children’s Orthopaedic Center, Los Angeles, CA.) (From Tolo VT, Skaggs DL, eds. Master techniques in orthopaedic surgery: pediatrics. Philadelphia, PA: Lippincott Williams & Wilkins, 2008, with permission.) |
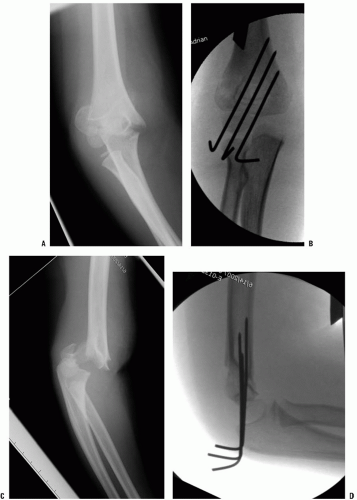 FIGURE 33-38. A, B: A typical grade III supracondylar fracture of the humerus. Ideally, the lateral pin could be a bit more lateral so as to be in the middle of the lateral column. It is important that all pins are past the proximal cortex by feel; these pins may ideally have been driven in a little further to make certain of this. C, D: The AP and lateral views after reduction. Note that the fracture is near anatomic and the alignment is excellent though the Baumann angle is close to 10 degrees, the pins engage the opposite cortex, and both pins are in the distal fragment. (Reproduced with permission of Children’s Orthopaedic Center, Los Angeles, CA.) |
Special Case: Flexion-type Supracondylar Humerus Fractures.
Flexion-type fractures account for about 2% of supracondylar fractures, and most often arise from a fall directly on the elbow. On the lateral radiograph, the capitellum is anterior to the anterior humeral line. The reduction maneuver consists of elbow extension, which creates a challenge for placement of pins. As in the type IV extension-type fractures, surgical tips include placing the pins in the distal fragment first and rotating the fluoroscopy unit to obtain a lateral x-ray rather than the arm.
OPEN REDUCTION OF SUPRACONDYLAR FRACTURE OF THE HUMERUS
The rare irreducible fracture may be managed with open reduction. An anterior surgical interval is recommended if the neurovascular structures need to be exposed and in general is the most utilitarian. Medial and/or lateral approaches may be used as well if the surgeon is approaching from the side of torn periosteum. The posterior approach should be used rarely because it disrupts any remaining intact periosteum and may disrupt the primary vascular supply to the distal humeral fragment (40, 41) (Figs. 33-39, 33-40 and 33-41).
Postoperative Care.
The postoperative care is the similar as for closed reduction, with an additional week usually necessary for healing. In addition, as there may be an increased risk of stiffness and scarring following an open reduction, range-of-motion exercises should be stressed, with use of formal therapy if needed.
Complications.
In the event of a pulseless extremity, prompt reduction of the supracondylar fracture usually restores arterial flow (69, 70) (Fig. 33-42). If the hand is well perfused but pulseless, the great majority of the time fracture reduction is sufficient treatment. In contrast, patients presenting with a pulseless and poorly perfused hand have a nearly 50% chance of requiring vascular surgery and nearly 25% chance of developing a compartment syndrome (71).
Complete vascular disruption is uncommon because the thick local muscle envelope protects the artery. Vascular evaluation after reduction requires differentiation of the pulseless extremity that is pink and viable from one that is cold and pale with vascular insufficiency. The child who has a well-perfused hand but an absent radial pulse after satisfactory closed reduction does not necessarily require routine exploration of the brachial artery (48, 69, 71, 72 and 73). The pulse usually returns within 48 hours, and collateral circulation is generally sufficient even if it does not. Likewise, the absence of a Doppler-detected pulse at the wrist is not an absolute indication for arterial exploration. When the hand is warm and normal in color with brisk capillary refill and normal oxygen saturation, the authors recommend careful observation in hospital with noncircumferential immobilization and <60 degrees elbow flexion for 48 hours, as we have seen delayed loss of vascular perfusion on occasion in these patients. There is no convincing evidence of a clinical problem with cold intolerance or exercise-induced muscle fatigue for the hand surviving on collateral vascularity, but long-term studies addressing the problem are lacking (73).
For persistent true vascular insufficiency (e.g., avascular, cold, pale hand), especially if there is nerve palsy or inadequate reduction, anterior open reduction is recommended. Frequently, the neurovascular bundle is found kinked at the fracture site, and liberation of the artery restores the pulse. There may also be evidence of brachial artery injury. Vascular reconstruction should be performed if the hand remains avascular despite local measures (e.g., release of tether, lidocaine, warming). The fracture should be stabilized before vascular repair. After reconstruction, there is a significant rate of asymptomatic reocclusion and residual stenosis, although the hand remains well perfused (73).
Nerve injury associated with supracondylar fracture rarely requires exploration (Fig. 33-43). Patients with preoperative nerve injury should undergo reduction and fixation as described. Exploration of the nerve is not necessary when the reduction is anatomic. However, failure to obtain anatomic reduction, especially with a “rubbery” feeling during attempted reduction, may indicate that the nerve is interposed at the fracture site, and exploration may be indicated.
Postoperative neurologic deficit that was not noted preoperatively may represent a preexisting nerve deficit that was undetected at the time of the initial examination (highlighting the importance of a careful preoperative examination), or an iatrogenic injury sustained during reduction. Median and radial nerve injuries most often result from the initial trauma and may be observed when the reduction is anatomic. Postoperative nerve deficits in the setting of a gap at the fracture site may warrant operative exploration. Postoperative ulnar nerve deficits are more often iatrogenic resulting from placement of the medial pin (48, 74, 75). When iatrogenic ulnar neuropathy is suspected, it is the authors’ opinion that the medial pin should be removed without exploration. However, if the fracture is not yet healed, be certain to first add more lateral pins to maintain fracture stability once the medial pin is removed. Spontaneous recovery of most neural injuries following elbow fracture is expected within 2 to 6 months. If there has been no recovery of function by 4 to 6 months after injury, then exploration is indicated. The results of late neurolysis or repair are usually favorable in children (76).
Cubitus varus is the most common significant late complication of supracondylar fracture. This deformity typically represents fracture malunion and rarely results from partial growth arrest of the medial condylar growth plate. Malunion may be avoided by careful attention to anatomic reduction and secure fixation at the time of initial management. Cubitus varus is generally considered a cosmetically acceptable deformity, but increased risk of lateral condyle fracture, tardy ulnar palsy, posterolateral rotary instability of the elbow, and posterior shoulder instability has also been reported (77, 78, 79 and 80). Osteotomy to correct deformity may be performed at any age, but complications are not uncommon (81). Simple uniplanar closing-wedge osteotomies have the lowest complication rates, but lateral condylar prominence may compromise the cosmetic result (81, 82). A variation of a Wiltse osteotomy may obviate that problem, as described below (83).
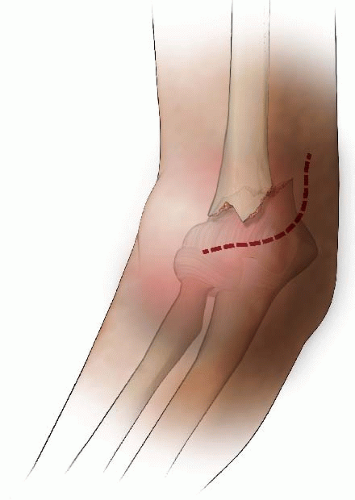 FIGURE 33-39. Open Reduction of Supracondylar Fracture of the Humerus.The incision is transverse in the flexion crease of the elbow about 4 to 5 cm long and may be extended proximally over the anteriormedial aspect of the arm (dashed line). Extreme care must be taken in dissecting as the neurovascular bundle may be immediately superficial as it is pushed against the skin by the proximal fragment. |
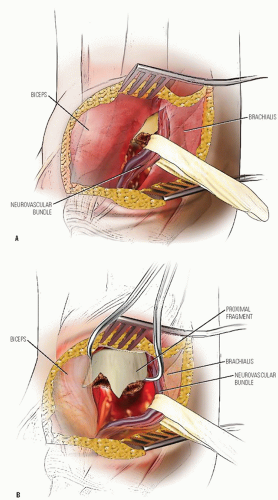 FIGURE 33-40. For purposes of visualization, these figures demonstrate utilizing the entire incision. After exploration of the fatty tissues, the proximal spike of bone is the first structure identified because it is often subcutaneous or covered by only a thin veil of tissue and portions of the brachialis muscle (A). Before proceeding with further exposure of the bone, it is desirable to identify the neurovascular bundle by careful dissection across the anterior aspect of the metaphyseal fragment until the bundle is identified (dotted line) If a solid, bone-on-bone anatomic reduction is achieved after simply freeing the proximal fragment of the humerus from the brachialis, and there is no vascular compromise, exposure of the median nerve and brachial artery may not be necessary, but in general this exposure is worthwhile. Just medial to the biceps tendon, the brachial artery may be present, with the median nerve just medial to the artery. The bony spike may be anywhere between these structures. In addition, the traumatized vessels in children are very small and can easily be confused with small veins in the antecubital space. Caution is necessary to avoid dividing important vessels. B: In many cases in which there is vascular compromise to the limb, the adventitia of the artery is caught on the proximal spike of bone, acutely kinking the vessel. If not found there, the bundle may lie interposed between the two fracture fragments. If the artery cannot be located in a patient presenting with a pulseless, poorly perfused hand, search for the lacerated ends of the artery that may have retracted. |
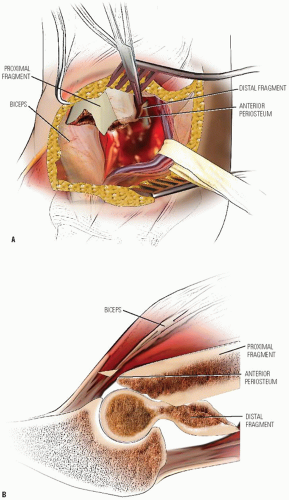 FIGURE 33-41. After the vessel is free and identified, it is gently retracted (A). If the surgeon is certain of the identification of the neurovascular bundle and can retract it far enough for the next step, it is not necessary to dissect it any further. The next step is to identify the distal fragment. This may be the most difficult step for the surgeon who is performing this procedure for the first or second time. The distal fragment is posterior and often deeper than expected; easy to palpate but difficult to visualize. Reduction is often challenging because the periosteum that is torn off the anterior metaphysis of the humerus is folded over the fractured surface of the distal fragment (B). The proximal fragment has essentially “button-holed” through the periosteum, which has closed around the distal fragment and trapped the proximal fragment. This is now the main block to reduction. With the neurovascular bundle safely retracted medially and the proximal fragment retracted laterally, the distal fragment can be exposed. With a forceps or hemostat, the cut edge of the periosteum is grasped and carefully cut along the fractured edge of the distal fragment to open the buttonhole (A). After the buttonhole is freed sufficiently, the distal fragment can be brought anteriorly and reduced. As much of the periosteum is torn, fracture reduction is at times less stable following an open reduction than it is in a closed reduction, so use at least three pins in most cases. |
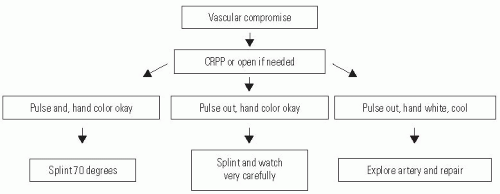 FIGURE 33-42. Management of a supracondylar humerus fracture with vascular compromise. This algorithm shows management of a supracondylar humerus fracture associated with vascular compromise. (CRPP, closed reduction and percutaneous pinning.) |
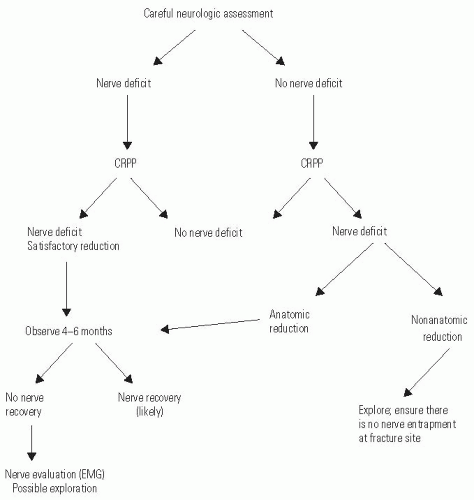 FIGURE 33-43. Management strategy with supracondylar humerus fracture and neurologic deficit. (CRPP, closed reduction and percutaneous pinning; EMG, electromyogram.) |
SUPRACONDYLAR HUMERAL OSTEOTOMY FOR CORRECTION OF CUBITUS VARUS
Careful examination of the contralateral elbow in both planes is an essential step in preoperative planning, perhaps even more important than radiographic markers. Goals of surgery
are to make the carrying angle of the injured elbow as close as possible to the normal elbow, so this difference must be carefully measured preoperatively to plan for the angle of wedge to be removed in the coronal plane. Preoperative templating, created from AP radiographs of bilateral upper extremities, determines the angle of wedge to be removed. The difference in elbow extension between elbows clinically is a guide for what angle wedge in the sagittal plane to be removed (Figs. 33-44, 33-45 and 33-46).
are to make the carrying angle of the injured elbow as close as possible to the normal elbow, so this difference must be carefully measured preoperatively to plan for the angle of wedge to be removed in the coronal plane. Preoperative templating, created from AP radiographs of bilateral upper extremities, determines the angle of wedge to be removed. The difference in elbow extension between elbows clinically is a guide for what angle wedge in the sagittal plane to be removed (Figs. 33-44, 33-45 and 33-46).
Related posts:


Stay updated, free articles. Join our Telegram channel

Full access? Get Clinical Tree


