Michael J. Christie
Triflange Cup
INTRODUCTION
Revision hip arthroplasty in patients with severe acetabular bone loss remains a formidable challenge in hip reconstruction. To achieve a successful acetabular reconstruction, the implant must be stable on viable host bone strong enough to accept the loads of ambulation. If the implant does not achieve adequate bony stability, then the reconstruction is doomed to failure. Acetabular bone loss compromises both the amount of viable host bone and its strength. In the clinical setting of severe osteolysis, many times the remaining bone around the rim of the acetabulum is present but severely compromised to accept the loads of weight bearing.
The classic technique of acetabular reconstruction uses a “defect matching” technique whereby the acetabulum is filled with a larger hemispherical cup or by an augment to achieve stabil-ity on host bone. If the defect is small and there is adequate bone remaining, the defect shape is matched by simply reaming the defect until a hemispherical component is stably fixed on the remaining acetabular rim. Defect-matching techniques used for revision acetabuloplasty with less than catastrophic bone loss have had excellent results at long term.1
For defects that are too large or too eccentric for a hemispherical cup, for example, a large superior rim defect, an oblong or “double-bubble” cup may more closely match the defect. Results using oblong components have been excellent when the supporting bone is adequate.2,3 Failures occur when these implants are used in situations that exceed the indications of the implant, such as in the cases of pelvic discontinuity.2 Alternatively, the defect can be converted to more hemispheri-cal configuration by the addition of structural allograft or trabecular metal augments. While it is too early to know the long-term success rate of trabecular metal augments, the published results with allograft show high rates of failure at long term.4–8
There are some defects that are simply too large to allow predictable stable fixation using defect-matching techniques. These defects must be “bridged” by the implant in order to bring the implant into stable contact with the host bone.9–11 While the goals of surgery remain the same, the objective of bridging techniques is to achieve stability on the pelvic bone beyond the acetabulum and the remnants of its rim.
Acetabular reconstruction using an antiprotrusio cage is the classic method of bridging large defects. These cages are shaped by the operating surgeon to match the patient’s pelvic anatomy. Because these cages need to be shaped in the operating room, they must be flexible enough to allow bending. Therefore, this construct is intrinsically weak and prone to long-term failure unless additional support is obtained. It is most effective when combined with structural allograft.10 These “off-the-shelf” cages are also absent biological ingrowth surfaces, so there is no opportunity for bony ingrowth using these constructs.
The triflange acetabular component is a unique solution for bridging large acetabular defects. The flanges are strong enough for long-term stability without underlying support and allows for a bio-logic ingrowth surface on host iliac and ischial bone. This chapter discusses the use of triflange acetabular components to address these catastrophic defects. The design of the implants, the surgical technique, and the outcomes are reviewed.
INDICATIONS
The triflange cup is indicated in cases of severe acetabular bone loss that exceed the limits of defect-matching techniques (Fig. 16.1). The indications are identical to the indications for using antiprotrusio cages. We consider the indications for the triflange cup as most but not all AAOS Type III combined defects, all cases of pelvic discontinuity (AAOS Type IV), and all cases of pelvic radiation osteonecrosis. Using the Paprosky classification of acetabular defects, the indications for the triflange cup include most Paprosky 3A and 3B defects.
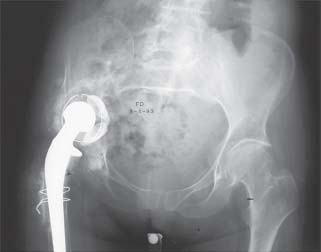
FIGURE 16-1. Failed cemented acetabular component with superior migration and massive acetabular bone loss.
The decision to use a triflange cup must be made preoperatively since the component is custom designed and manufactured to fit the individual patient’s pelvis. While major acetabular bone loss is often obvious, it is heralded by dissociation of the acetabular component from the acetabulum; dislocation of the component into the pelvis; resorption of allografts; and broken screws, plates, and antiprotrusio rings (Fig. 16.2A,B). From our experience, multiple acetabular revisions or revisions in women with smaller pelves are risk factors for needing a triflange cup. In more subtle cases, standard radiographic views of the pelvis, augmented by additional views (Judet, inlet/outlet), alert the surgeon to defect size and the presence of pelvic dis-continuity. If the acetabular component has dislocated into the pelvis, or if the superior and inferior pubic rami are rotated relative to the ipsilateral iliac wing and the contralateral hip, then it must be assumed that there is a pelvic discontinuity (Fig. 16.3).
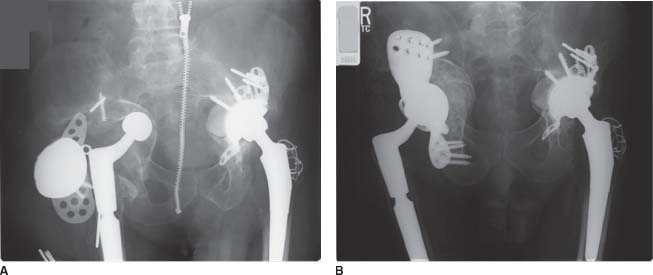
FIGURE 16-2. A,B: Severe acetabular bone loss with a failed antiprotrusio cage. Two-year post-op radio-graph with reconstruction using a triflange cup.
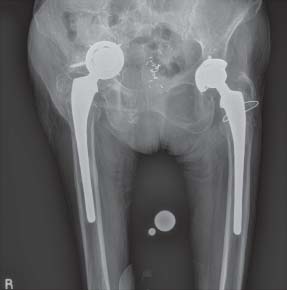
FIGURE 16-3. Pelvic discontinuity. Note the asymmetry of the obturator foramen on the AP view that is a result of the upper and lower portions of the acetabulum being dissociated.
Additional imaging with three-dimensional computed tomography reconstruction may further help determine the extent of acetabular bone loss (Fig. 16.4). If three-dimensional images do not provide enough information to fully evaluate the bone loss, then a 1:1 hemipelvic model is created (Fig. 16.5). This model will provide the surgeon the best representation of the bone available to support the reconstruction. This model can also be used for a mock surgical procedure to evaluate whether a defect-matching technique can be used to reconstruct the acetabulum.
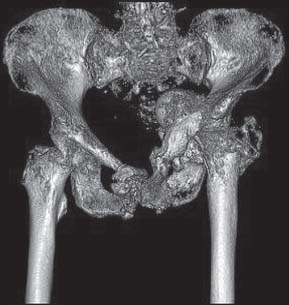
FIGURE 16-4. Three-dimensional reconstruction of CT scan of the pelvis. Most software allows the surgeon to subtract the femur and rotate the image to assess bone loss more easily.
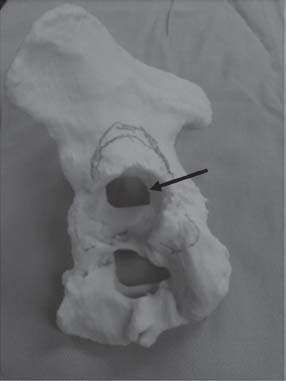
FIGURE 16-5. Lateral view of a 1:1 bone model of the hemipelvis with large medial wall defect (black arrow).
CONTRAINDICATIONS
The triflange cup has proven to be a reliable option for patients with catastrophic bone loss.14,15 However, the time necessary to design and build the implant, the design complexity with required surgeon input, and the implant cost render it unsuitable when a simpler method of reconstruction will work. The three-dimensional reconstructions are very effective in determining which cases of bone loss can be solved with defect-matching solutions.
Infection is an absolute contraindication. Bone loss in and of itself has not been a contraindication. No patient has been denied reconstruction with a triflange due to the severity of the bone loss.
SURGICAL TECHNIQUE
Component Design The design phase of the triflange cup is the most critical step in the surgical technique. Since the implant is custom made, surgeon input on bone removal, flange size and location, hip center location, and cup face orientation are required before the implant is made. Careful consideration and contemplation of the various design decisions is necessary during the design phase because there are no possible alterations during surgery, with the exception of the modular insert choices.
The design process begins with a CT scan done on a modeling protocol. It is often helpful to have the radiology technician review the protocol with a design engineer from the manufacturer prior to the scan. The CT scan should capture both hemipelvises. It should begin one slice above the ilium and end one slice below the ischium to ensure that the entire pelvis is captured. A standard CT artifact algorithm should be used to avoid enhancing metallic scatter in the scan region. In order to produce an adequately detailed model, slice thickness should not exceed 3 mm.
Once the scan is complete, it is sent to the manufacturer, and a three-dimensional model is created. This complex task first requires the removal from the scan of the failed acetabular component, bone cement, screws, plates, and old grafts. Despite this complexity, the results are surprisingly accurate.16 The surgeon can then review the reconstructed hemipelvis on the computer or a 1:1 model can be constructed using stereolithography. The model is sent to the surgeon, who marks the thin, fragile periacetabular bone to be removed at surgery and draws the outline of the flange geome-try on the model (Fig. 16.6). Remember, cup stability and fixation no longer come from the deficient rim of remaining acetabular bone but from the better bone of the ilium, ischium, and pubis. The implant bridges the defect.
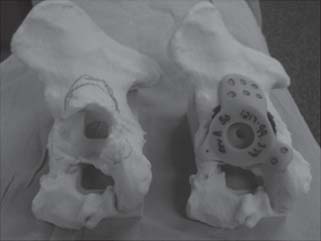
FIGURE 16-6. Bone model with flanges marked by the surgeon in red and the first mock up of the triflange custom cup. Positioning of the flanges, number and location of screw holes, hip center of rotation, and cup face orien-tation must be addressed at this stage of the design process.
The iliac flange is the most important. The iliac bone is the best, and this flange has the largest surface available for contact. We generally plan for five to six screws in excellent bone through this flange. The ischial flange is the next most important flange. When using a posterior approach, this flange sits under the sciatic nerve. Consideration of the flange geometry is important. The ischial flange should extend far enough and be broad enough to accept three to four screws. The edges should be rounded and of low profile to avoid the possibility of sciatic nerve irritation. The pubic flange is generally small, roughly triangular in shape, and without a screw hole. It provides the “third leg on the stool” for stability.
The surgeon-marked pelvic model is returned to the manufacturer for the first pass at the construction of an implant model. At this point, it is important to let the engineer know if the surgical plan is to reestablish a near anatomic position of the head center or if head center will be raised (cephalad) or lowered (caudal). This will depend more on the planned retention or revision of the femoral component than on the acetabular bone loss.
The engineer returns the pelvic model with any areas of bone removed or machined (with acetabular reamers) marked in bright red for surgeon reference. The pelvic model is later sterilized and referenced intraoperatively. The model of the proposed triflange cup is sent along with the pelvic model. The surgeon reviews the size and location of the three flanges and changes are marked on the model for engineer referencing. Special attention should be made to the contour of the flanges and how the flanges will interact with the soft tissues. Smooth transitions and rounded edges are important where the sciatic nerve may pass. To maximize initial implant stability, the iliac flange should fit over the two planes formed by the gluteal ridge, and the iliac screw holes should begin at the inferior edge of the remaining structurally sound ilium.
Cup stability on the pelvic model is assessed. The flanges should fit intimately against the pelvic bone. The construct should feel stable to superior/inferior and anterior/posterior loading. Often, increasing the diameter of the central hemispherical portion will greatly improve overall stability. Although the central hemispherical portion does not have to intimately contact the remaining acetabulum, the component should have inherent stability when placed on the model. Our original designs attempted to fill the acetabular volume and have circumferential rim contact. The attempt to attain simultaneous rim and flange contact results in a component that is nearly impossible to insert without injury to the abductor muscles and superior gluteal nerve. The hemispherical portion of the cup should have a large enough diameter that the cup resists any movement of the implant on the hemipelvis. Implants produced more recently have been designed with smaller central portions and have done as well clinically as the larger original designs. We believe the cup derives its stability primarily from the flanges. Our current designs are created without dome screw holes although there is a central, threaded dome hole to allow attachment of an impactor. The impactor handle can be helpful in manipulating the cup as it is positioned on the pelvis.
Hip center location and the cup face orientation are critically important. The head center is chosen based on patient-specific considerations, including leg-length discrepancy and planned retention or revision of the femoral component. The vertical head center is first selected by approximating the anatomic position of the head center using the superior aspect of the obturator foramen as a reference point. The remnants of the anterior and posterior columns help center the head in the coronal plane. Cup face orientation is targeted at 25 to 35 degrees from the interteardrop line. Anteversion and abduction are initially established using the plane of the obturator foramen as a guide. Throughout the design process, a full pelvic sawbones model is used as a reference.
In cases of pelvic discontinuity, the obturator foramen is not an accurate reference point because the inferior segment of the pelvis rotates away from the anatomic position around the pubic symphysis. In these cases, the referenced bone model, the radiograph, and the iliac wing are used to establish cup face orientation. Establishing cup face orientation remains the most difficult part of the design process, precisely because the reference points are often so ambiguous.
Once the design is finalized, the pelvic and implant models are returned to the engineer to begin manufacture. It is not uncommon for the design process to go through several iterations before the design is satisfactory. The surgeon must take the time necessary to ensure that the component design is satisfactory before approving it.
Manufacture generally takes about 4 to 6 weeks after approval of a design. The central cup face and modular locking mechanism are created first. The flanges are then machined out of a titanium block. The screw holes are added. The pelvic side of the component is plasma sprayed, and the hydroxyapatite coating is applied. The cup is then sterilized and shipped.
Component Implantation Whenever the pelvis must be exposed beyond the immediate acetabular rim, a more extensile approach must be used. The incision tends to be longer since the surgeon must be able to see enough of the bone beyond the acetabular deficiency to ensure good contact with healthy bone and to see that the implant is seated at the planned position. Although the imposing size of the triflange cup may suggest that implantation will be difficult, the necessary exposure is identical to that used to place an antiprotrusio cage or a structural allograft. A standard posterior approach is used most often. This can be combined with an extended trochanteric osteotomy if necessary for femoral component revision.
Surgical Approach After the incision is made, the soft tissue planes are reestablished. The tensor fascia is separated from the underlying gluteus medius and vastus lateralis fascia. The sciatic nerve must be identified and protected. It is located as it crosses over the ischium and then traced distally beneath the gluteus maximus insertion and into the hamstrings. Proximally, it is traced into the sciatic notch. It must be identified and mobilized since the ischial flange fits intimately on the “sciatic” surface of the ischium. Since bone contact is critical for implant stability, the nerve must be mobilized enough that the flange can be correctly placed without traction or compression injury. This is usually easily accomplished, but the surgical planes may be confused and the nerve may be enveloped in scar. In this situation, it is important to identify the nerve more distally (deep to the gluteus maximus insertion or directly over the ischium) and trace it proximally. Occasionally, an external neurolysis is necessary.
Once the sciatic nerve is mobilized, a posterior arthrotomy is made. The periarticular scar is removed and the hip is mobilized. The hip is dislocated and the femoral component is inspected. If the femoral component is to be revised, it is removed at this stage. We often use an extended trochanteric osteotomy to facilitate femoral component revision. If the component is retained, it is to be mobilized and retracted anteriorly under the gluteus minimus and anterior to the acetabulum. The gluteus minimus and gluteus maximus are elevated off the ilium. Care is taken to avoid significant traction on the superior gluteal nerve contained in the neurovascular bundle exiting the superior aspect of the sciatic notch. Enough mobilization must occur to allow the iliac flange to slide under the muscle. A small pocket is then created anterior to the pubis for the pubic flange. From the lateral decubitus position, the pubis is usually straight down toward the operating table.
The ischium must be exposed to allow placement of the ischial flange. The soft tissue is elevated off the remaining posterior column extending from the inferior edge of the sciatic notch past the ischium. It is important to take this tissue as a sleeve. The dissection off the ischium includes part of the hamstring origin so that the ischial bone beneath is exposed.
The pelvic model is repeatedly referenced. It is sterilized preoperatively and kept in the sterile field for review during the procedure. The areas of the model marked in red denote bone that has been planned for removal or machining. The bone must be removed to match the pelvic model so that the implant will fit as planned.
Component position on the model should be reviewed prior to implantation. The iliac flange is inserted first. The leg is abducted and translated cephalad, relaxing the hip abductors. The iliac flange slides between the ilium and the gluteus minimus. Care should be taken to avoid undue traction on the superior gluteal nerve posteriorly. The component is then rotated so that the pubic flange slides into the pocket created anteriorly. The hip is then extended and the knee flexed to relax the posterior soft tissues. The ischial flange is then pushed into position. Care should be taken to avoid trapping the sciatic nerve under the flange. The nerve has been mobilized with the surrounding sleeve of soft tissue. Releasing the soft tissue at the inferior corner of the acetabulum will often create additional mobilization of the posterior sleeve.
The triflange cup is then gently impacted into its seated position. The model is again referenced to ensure that the flanges are at the design position. If the component does not seat as expected, it is most likely malrotated, the planned bone removal (areas marked in red on model) is not complete, or morselized bone graft placed in the medial defect is preventing the cup from seating. Due to the potential interference from the morselized graft, we place the graft after the cup is fixed into position. There are usually large gaps posteriorly between the component and the pelvis where the acetabulum is deficient, allowing graft to be backfilled without difficulty.
Once the cup is seated, the screws are inserted. The ischial screws are always inserted first. The bone of the ischium is most affected by osteolysis. There is often a large cavitary defect in the ischium and screw fixation is compromised. If necessary, to improve fixation, a cavitary lesion in the ischium can be filled with bone cement. Screws placed through the hardened cement attain excellent fixation. Usually three or four ischial screws are placed followed by four to six iliac screws. All screws are 5.0-mm screws or larger, and a standard 3.2-mm dill bit is utilized. During iliac screw insertion, care must be taken to avoid traction injury to the superior gluteal nerve. For the iliac screws above the most distal row, drilling and insertion can occur directly through the gluteus minimus and medius muscles. Because the iliac bone is usually well-preserved, these screws attain excellent purchase. Since the edges of the flange are obscured by the gluteus maximus and minimus, palpation is the most effective way to determine if the flange is wellseated. Morselized graft is then packed behind the cup. This graft does not contribute to cup support or fixation but may aid in remodeling of the acetabular defect over time.
The modular insert is then inserted. In patients with poor abductor function (denervation, detachment, or absent greater trochanter), a constrained liner is used. In other cases, large headball diameters and alternative bearings are considered.
Component Implantation in Cases of Pelvic Discontinuity In patients with pelvic discontinuity, the upper and lower halves of the hemipelvis may be rotated through the discontinuity. Since the pelvis was scanned and the model made with the patient supine, the relationship between the two halves of the hemipelvis often changes when the patient is in the lateral decubitus position.
Although the sequence of implant insertion is unchanged due to this rotation, the flanges often do not initially seat at their design positions. The ischial screws must be inserted first and the ischial flange placed at its design position. With the ischial screws in place, the iliac flange is often rotated off of the ilium, but as the first iliac lag screw is inserted, the screw taking purchase into the ilium will rotate the flange with the connected inferior half of the hemipelvis into the correct orientation relative to superior half. The remaining iliac screws are then inserted.
RESULTS
We have implanted 225 triflange cups since 1992, mostly as part of a revision total hip arthroplasty (THA) but including 16 implanted during complex primary THA (7.1%). Of these 225 components, 4 have been explanted and 1 additional component is considered failed due to radiographic evidence of component migration (2.2%). Three components were explanted for sepsis, one for early sepsis at approximately 4 months and two for late sepsis, both at over 10 years postimplantation. Of these three, one has been rerevised to a new triflange and two are pending reimplantation. One component was rerevised to a new triflange at 11 years for failure of the liner locking mechanism after numerous dislocations (Fig. 16.7A,B). The new component was designed with a more anatomic cup face orientation, and now at 2 years post re-revision, the patient has not had any subsequent dislocations. The triflange deemed a mechanical failure was placed during primary THA for insufficiency fracture of the right ilium, status postradiation of iliac metastasis of breast cancer. Most recent radiographs show progressive vertical migration of the component and loosening of the ischial screws. Clinically, the patient is a minimal ambulator and declines revision.
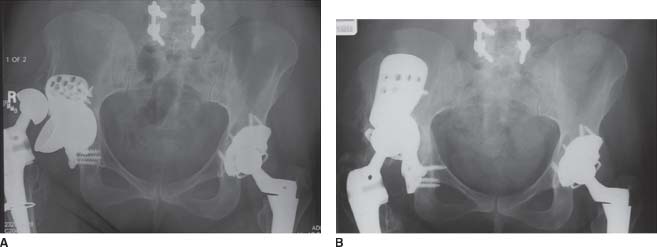
FIGURE 16-7. A: Patient with failed liner locking mechanism after numerous hip dislocations. B: Two years postoperative from hip reconstruction using another triflange cup with a more anatomic cup face orientation.
Thirty-seven hips (34 patients) were followed for a mean of 11 years (range, 8 to 16 years) after THA with implantation of a custom triflange component. Two surgeries were primaries and 35 were revisions. Three of these components were explanted, as noted above, two at 10 years follow-up and one at 11 years follow-up. The remaining 34 hips (31 patients) demonstrated no radiographic evidence of failure, including the absence of broken screws or late migration of the component (Fig. 16.8A,B).
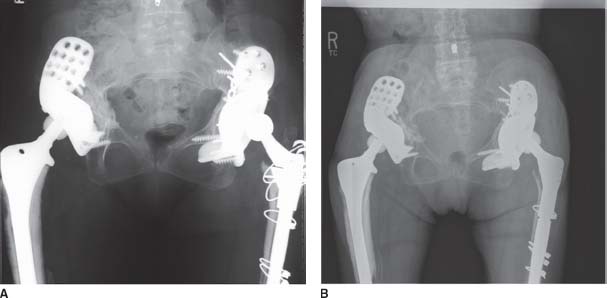
FIGURE 16-8. A: Bilateral triflange reconstructions. Six weeks postoperative on the right hip. B: The patient is 10 years postoperative on the right and 13 years on the left with stable implants.
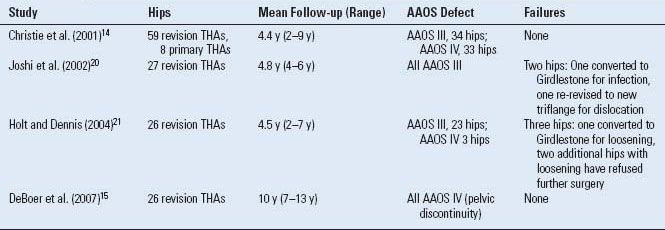
We have also published the long-term results of the triflange cup in patients with pelvic discontinuity15 (Table 16.1). Twenty-eight consecutive patients (30 hips) with pelvic discontinuity associated with a failed THA were reviewed. Two patients were lost and eight died with <7 years follow-up, leaving 20 hips in 18 patients followed for a mean of 10 years (range, 7 to 13 years). Eighteen of the twenty hips had evidence of healing of the discontinuity, and seventeen of the twenty hips demonstrated osseous remodeling of the medial pelvic wall. Six of twenty had small, nonprogressive radiolucent lines at the time of the latest follow-up. No hip demonstrated evidence of loosening, migration, or broken screws. The headball-liner interface was not easily distinguished in many cases, but there was evidence in four hips of eccentric position of the headball within the liner, indicating polyethylene wear.
TABLE 16.1 Published Results Using the Triflange Cup for Acetabular Reconstruction
Stay updated, free articles. Join our Telegram channel

Full access? Get Clinical Tree


