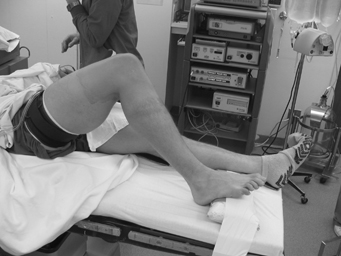
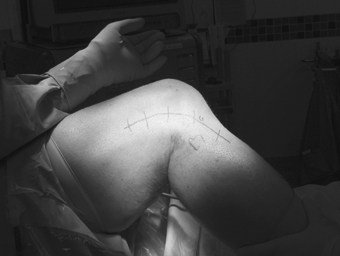
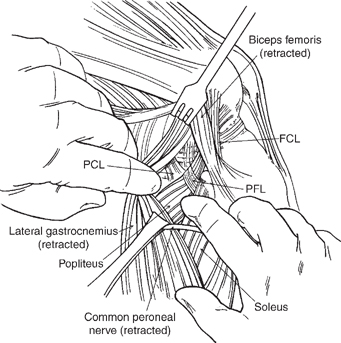
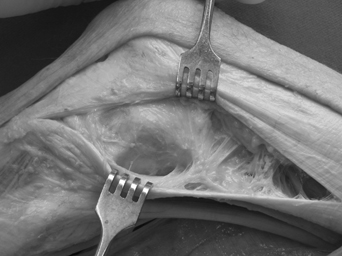
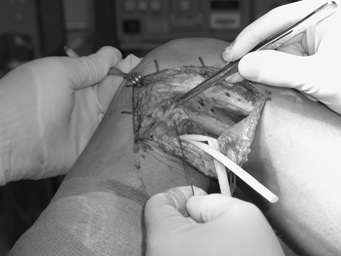
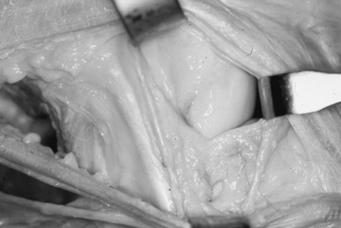
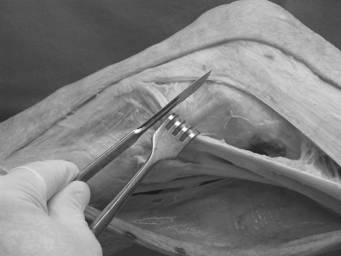
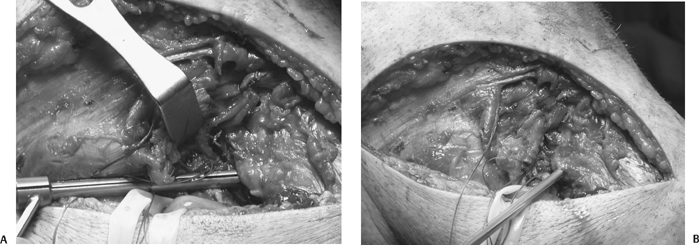
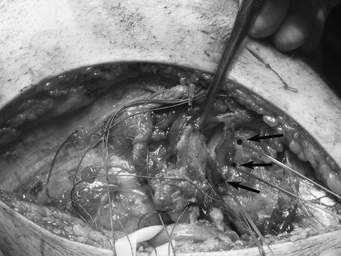
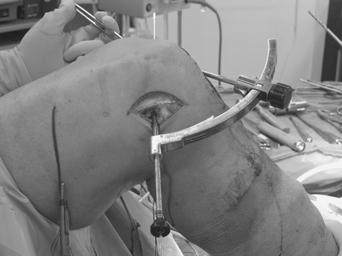
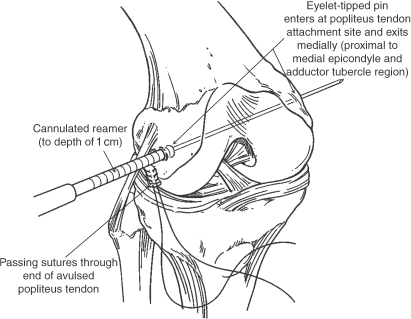
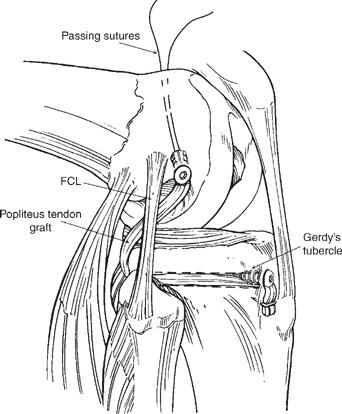
7 The recommended treatment for grade 1 to 2, or partial, posterolateral knee injuries is almost always nonsurgical.1 For isolated injuries, the treatment is usually immobilization of the knee in extension for 3 weeks to allow healing of the injured tissues. After 3 weeks, patients are allowed to work on regaining their range of motion. Depending on the amount of laxity present, patients may either bear weight in extension for mild injuries or may be non–weight-bearing for the initial 6 weeks while they are working on this rehabilitation protocol. Patients begin a functional rehabilitation program starting at 6 weeks postinjury, working primarily on endurance exercises and avoiding any aggressive hamstring work at this time. The main exercises are an exercise bike, gentle leg presses to a maximum of 70 degrees of knee flexion, and a functional walking program. At 3 months postinjury, patients are allowed to increase their activities as tolerated based on their overall strength levels. I recommend that patients who still have problems with pain or instability with this nonoperative treatment program should be reevaluated to determine if they have residual posterolateral instability that was either initially not recognized or did not heal. In addition, they should be carefully examined to make sure there is not another etiology of their symptoms that was not detected in the presence of their initial injury. My usual protocol in those instances, where it does appear that they have some residual laxity, is to place the patient into a medial compartment unloader brace and assess whether he or she has an improvement of the subjective symptoms, as well as to obtain bilateral varus stress radiographs to quantitate if the clinical exam of varus instability in fact may be underestimating the amount of true instability to varus opening. I have found the unloader brace to be very useful in determining those patients who I may have otherwise treated nonoperatively due to my inability to clinically detect the amount of knee instability that they may have with functional activities. Overall, these patients who I felt initially had only a grade 2 posterolateral corner knee injury that should be treated nonoperatively may in fact have had a grade III posterolateral corner knee injury, and all of these patients I treated who had alleviation of their symptoms in the unloader brace have had good functional results after a posterolateral knee reconstructive procedure. In general, my patients have not had any significant functional limitations with isolated popliteus complex injuries, which have an increase in posterolateral rotation in flexion primarily. Most patients with isolated posterolateral knee injuries have functional limitations when there is an increase in varus laxity. Another etiology of functional limitation for these patients who may have these underlying injuries is the tears of the popliteomeniscal fascicles, and patients have associated pain from the resultant meniscal hypermobility. Some patients have increased lateral meniscal hypermobility when their popliteomeniscal fascicles are torn. As noted in Chapter 5, these patients are best diagnosed by putting the knee into a “figure-four” position to see if they have reproduction of their lateral compartment knee pain. In those patients that do, it may be appropriate to proceed with a diagnostic arthroscopy to determine if there is any lateral meniscal hypermobility to probing. If there is, it is recommended that an open or arthroscopic repair of the popliteomeniscal fascicles to the lateral meniscus be performed.2 Overall, the vast majority of patients who have isolated grade 1 or 2 posterolateral corner injuries recover well and return to full activities within 3 to 4 months after injury. Patients who are found to have grade 1 to 2 posterolateral corner injuries combined with an anterior cruciate ligament (ACL) or posterior cruciate ligament (PCL) tear need to be closely evaluated for the amount of instability that is caused by this combined injury pattern. In the vast majority of patients, it is recommended that the underlying cruciate ligament tear that has caused the instability be repaired or reconstructed and that the grade I to II posterolateral corner injury be treated nonoperatively and a protocol similar to that for isolated tears. In those instances where the clinical exam may suggest increased laxity to a degree more than one would expect, it may be appropriate to obtain PCL stress radiographs or varus stress radiographs to determine the amount of instability. As was noted Chapter 6, increasing amounts of varus instability put extra stress on an ACL reconstructive graft, whereas both increased varus laxity and a combined posterolateral rotatory instability (coupled posterior and external rotation forces) place extra stress on a PCL reconstructive graft. In those instances where there is found to be increased amounts of varus laxity or where there are side-to-side differences in posterior translation of the PCL that on the stress radiographs exceeds 10 to 12 mm, it may be better to err on the side of being conservative and repair or reconstruct the posterolateral corner injury rather than treating it nonoperatively and running the risk of having the graft stretch out because of the extra forces on it due to this combined instability pattern. It has been well documented in the literature that grade 3 posterolateral corner injuries have a low likelihood of healing nonoperatively, and that surgical intervention is necessary to ensure the best clinical outcome.3,4 It has also been demonstrated that the results of an acute repair are much improved compared with attempts at chronic repairs or reconstructive procedures.5–7 Thus I recommend that an acute repair or reconstruction be performed in isolated grade 3 posterolateral corner injuries in all patients in whom it is feasible. In patients who have had degloving-type injuries of the skin over the posterolateral corner of their knee, open lacerations, or significant abrasions, it is more prudent to wait until these injuries heal prior to undergoing surgery. One issue in particular to be concerned about is subcutaneous degloving injuries. When a significant subcutaneous hematoma is found upon making the initial incision in these patients, there is a higher rate of infection due to the poorer blood supply to the skin flap. If this circumstance is encountered in an acute injury, it may be more prudent to abort the surgical treatment until the skin has a better chance to heal. In these and other instances in which there may be issues with healing, vascularity, or infection, waiting until these issues have resolved prior to proceeding with a surgical repair or reconstructive procedure is recommended. Surgical repairs or reconstructions of grade III isolated posterolateral corner injuries should be done as soon as possible after injury, once it appears that the skin and soft tissues can safely undergo a surgical procedure. It has been the recommendation of the International Society of Arthroscopy, Knee Surgery, and Orthopaedic Sports Medicine (ISAKOS) Closed Knee Meeting on the Posterior Cruciate Ligament (and Posterolateral Knee) (Florence, Italy, November 2002) that these surgical procedures be performed within the first 2 weeks after a posterolateral injury. In some busy referral practices the patients may not come in until later. But I strongly recommend that these injuries should be addressed in the initial 2- week period after injury because the procedures are easier both on the patient and on the surgeon during this time interval. It is well recognized that approximately 3 weeks after injury, significant scar tissue planes can develop along the posterolateral knee that makes it very difficult to identify the superficial layer of the iliotibial band, the biceps femoris complex, and especially the common peroneal nerve. As I have reiterated to my residents and fellows in these circumstances, during this surgical approach, scar can look like nerve and the common peroneal nerve can look like scar, which requires meticulous attention and can increase the surgical time significantly while one is dissecting out the common peroneal nerve to allow it to be retracted out of the surgical field. In addition, operating soon after injury ensures that individual anatomic structures can be easily identified and can hold sutures sufficiently to allow for early protected range of motion after a repair. I have found that at about 3 weeks after injury, most of the main structures of the posterolateral knee do not hold sutures well and become necrotic, which makes it very difficult to allow for early range of motion after this type of repair. In addition, it becomes necessary to perform either augmentations or reconstructions of these structures after this point in time rather than repairing the native structures. Proper intraoperative positioning is essential to performing these procedures. I use a sandbag taped to the bed, with a bump under the patient’s hip, to allow the patient’s knee to rest at about 70 degrees of knee flexion. It is important that the knee is balanced and can sit in this position without the need for an assistant to hold it. In this manner, the assistant can then concentrate on retracting skin and tissue flaps out of the operative field rather than also having to concentrate on balancing the knee (Fig. 7-1). The skin incision consists of a lateral hockey-stick–shaped incision centered over Gerdy’s tubercle. It follows the posterior border of the superificial layer of the iliotibial band and then continues distally over the anterior compartment of the knee parallel to the anterior tibial crest8 (Fig. 7-2). The skin incision is drawn on the skin with a surgical marker with the knee flexed to about 70 degrees. I extend the knee after the skin incision is drawn to verify that the incision is basically a straight line in full extension. Figure 7-1 The ideal position of a patient’s extremity on the examining table for a posterolateral knee surgical approach. A sandbag is taped to the bed, a bump is placed under the hip, and the knee is balanced at 70 degrees of knee flexion. After the skin is incised, the subcutaneous tissues are then dissected down to expose the superificial layer of the iliotibial band. Sharp Sein (V. Mueller, Deerfield, Illinois) retractors are used by an assistant to apply tension at the skin margins to allow for improved identification of the subcutaneous tissues over the superficial layer of the iliotibial band. In the majority of acute cases, there may be some serous drainage from the subcutaneous tissues at the time of the skin incision. This usually occurs in combined posterolateral and cruciate ligament knee injuries, but I have also seen it in some isolated posterolateral knee injuries. This tissue edema indicates that there was a rather significant trauma over this part of the knee. I have not found these patients to have any increased problems with skin healing or postoperative drainage. Once the superficial layer of the iliotibial band is identified, a posteriorly based subfascial flap is then meticulously dissected posteriorly over the musculature of the short head of the biceps femoris, down to the long head of the biceps femoris, and the proximal anterior compartment musculature of the leg (Fig. 7-3). In those instances where these structures are injured, the proximal part of the dissection is performed first to find the normal tissues and then performed distally to identify the avulsed, and possibly proximally retracted ends, of the biceps femoris complex off the fibula. It is important to identify the normal structures proximally and dissect distally to avoid injury to a potentially displaced course of the common peroneal nerve. After the skin flap is reflected, it is possible to view the entire lateral superficial fascia from the iliotibial band to the biceps femoris muscles. In those patients with a large avulsion of structures off the femur, tibia, or fibula, I recommend that the injury planes be followed in the surgical dissection to identify the specific structures that have been damaged. In those instances in which the superficial layer of the iliotibial band and the biceps femoris complex are intact, I then proceed with performing a common peroneal neurolysis. I prefer to use an Adson (V. Mueller, Deerfield, Illinois) pointed hemostat to dissect along the soft tissue posterior to the long head of the biceps femoris to facilitate identifying the common peroneal nerve. These hemostats have a fine tip, which allows for meticulous dissection of the scar tissue away from the nerve without causing a lot of trauma to the surrounding tissues during this approach. In most of these acute injuries, there can be scar tissue formation already developing in this area, and it’s important to go through the scar tissues slowly to make sure that one identifies the common peroneal nerve and document if there is hemorrhage, a bulbous appearance, or possibly an avulsion of the nerve due to the injury (Fig. 7-4). An assistant incises the tissues, layer by layer, that I lift up with the Atsen pointed hemostat during this part of the procedure. In most instances, the common peroneal nerve can be found by palpation, and sometimes the lateral band of adipose tissue that covers it can still be seen, to guide the surgeon to its course. Figure 7-4 Common peroneal nerve neurolysis with hemostat around nerve, forceps holding surrounding aponeurotic tissue (left knee). In those instances where there is such a significant amount of scar tissue that it is difficult to determine its course, I would then try either to find the common peroneal nerve more proximally to where it just crosses under the long head of the biceps femoris or to identify its course approximately 2 cm distal to the fibular head where it courses deep to the peroneal longus musculature and then follow its course proximally. The standard deep approach incisions include two fascial incisions, a horizontal splitting incision in the anterior arm of the long head of the biceps femoris, and a vertical lateral capsular incision. It is important to use only those deep approach incisions that are felt to be necessary based on the location of pain or swelling, arthroscopic or magnetic resonance imaging (MRI) identification of a specific injury, or the plane of injury identified during the surgical approach to this area. These incisions have been found to allow for consistent access to all of the individual anatomic structures of the posterolateral knee. The first fascial incision is performed concurrently with a common peroneal nerve neurolysis to allow for retraction of the nerve and to gain access to the fibular styloid attachments and posterior aspect of the knee. I almost always perform a common peroneal nerve neurolysis to gain access to the structures over the posterolateral corner of the knee. I have never had a case of postoperative neuropraxia in a normal-appearing nerve or of pain or dysesthesias developing due to scarring of the nerve at any time postoperatively. Once I have dissected out the common peroneal nerve sufficiently, I place a small Penrose drain around it to allow it to be gently retracted out of the field while we are working in that area. I prefer not to attach a hemostat to the Penrose drain because it could inadvertently result in the nerve being put under traction by an unwary or tired assistant while I am working on other associated knee injuries. I also like to have the scrub nurse or an assistant hold the foot at this point to see if the nerve is being irritated during the neurolysis. In those cases when it is very irritable and there is significant ankle dorsiflexion firing, I slow down the nerve dissection and try to not cause further nerve irritation. The interval between the lateral gastrocnemius tendon/muscle complex and the soleus muscle is then entered by blunt dissection with one’s fingers. Through this interval, one can palpate the popliteofibular ligament and its attachment on the posteromedial aspect of the fibular styloid, the musculotendinous junction of the popliteus, as well as all the way over to the PCL attachment facet of the tibia (Fig. 7-5). In cases where there is significant scar tissue in this interval, an Adson pointed hemostat can be utilized to open a window in this scar tissue to allow one’s fingers to enter this interval. This surgical approach allows one to gain access to the posteromedial aspect of the fibular styloid when the popliteofibular ligament needs to be repaired or reconstructed, as well as to the coronary ligament to the posterior horn of the lateral meniscus when this also needs to be repaired acutely. The second, and main, fascial splitting incision is performed through the superficial layer of the iliotibial band. This incision is performed from just proximal to the supracondylar flare of the femur, in line with the fibers of the superficial layer of the iliotibial band, and extends distally through this superficial layer to Gerdy’s tubercle (Fig. 7-6). I usually place a small mosquito hemostat under the superficial layer of the iliotibial band as I make this incision so that I do not harm any deeper structures while incising it. This splitting incision allows the superficial layer of the iliotibial band to be retracted both anteriorly and posteriorly, and one can then gain access to the attachment sites of the fibular collateral ligament, lateral gastrocnemius tendon, and popliteus tendon on the femur, as well as to the mid-third lateral capsular ligament and posterolateral capsule of the knee. Figure 7-5 The surgical development of the interval between the lateral gastrocnemius and soleus muscles. Through this interval, one’s finger can palpate for a tear of the popliteofibular ligament (PFL), the popliteus tendon, and the posterior cruciate ligament (PCL) at its attachment on the PCL facet on the posterior aspect of the tibia (lateral view, right knee). FCL, fibular collateral ligament. Figure 7-6 The iliotibial band splitting incision, left knee (superficial layer held in retractors). Figure 7-7 Entering through the biceps bursa, the fibular collateral ligament is identified and a traction suture is placed into the ligament (lateral view, left knee). A small horizontal incision is then made through the anterior arm of the long head of the biceps femoris, where it crosses the fibular collateral ligament, about 1 cm proximal to the fibular head. This incision enters the biceps bursa and allows for identification of the attachment site of the fibular collateral ligament on the lateral aspect of the fibular head. The fibular attachment of the fibular collateral ligament is easily identified through this incision (Fig. 7-7). I place a small suture into the fibular collateral ligament and tug on it at this point to identify any significant laxity, as well as to identify its attachment site on the femur in those cases where it has not been completely torn. The tension applied through this traction stitch usually allows visualizing the entire course of the fibular collateral ligament at this point. The biceps bursa covers about 25% of the fibular collateral ligament, and I have found many distal injuries to be easily identified through this interval. In addition, in those instances where it has been avulsed off the femur and it is very difficult to identify it through scar tissue formation proximally, utilizing the suture to tug on the fibular collateral ligament makes it easier to identify its course proximally and to minimize dissection to find its course. A less commonly used fascial splitting incision is performed in the interval between the posterior border of the iliotibial band and the short head of the biceps femoris. Through this incision, one can see the attachment site of the anterior arm of the short head of the biceps femoris as well as attachment site of the lateral capsule on the tibia.8,9 Although we did use it as a major incision to gain access to posterolateral knee injuries in the past, I rarely use it currently as I have found the other incisions allow me to gain access to all of the injured structures as my experience and familiarity with these injury patterns grow. I have found this incision to be primarily useful in acute cases where there has been a tibial-based lateral avulsion injury of the meniscotibial portion of the mid-third lateral capsular ligament and a concurrent tear of the anterior arm of the short head of the biceps femoris. This bony or soft tissue Segond avulsion variant is usually easily identified on axial or coronal MRI images.10 At this time, I have usually identified the injury pattern of most of the individual structures of the posterolateral corner of the knee. I also usually have not used a tourniquet because there is usually little bleeding encountered with this approach in the acute injury phase. Once these structures have been identified, I perform a diagnostic arthroscopy of the knee to assess the intraarticular status of the posterolateral corner. Standard arthroscopic portals are placed to allow for fluid inflow and outflow. The lateral working portal is placed adjacent to the patellar tendon, with the medial arthroscopic portal placed just medial to the patellar tendon and at the joint line. A 30-degree arthroscope is utilized in this instance. The first lateral compartment observation is to determine the amount of lateral compartment opening. In my series, I have found that there is always greater than 1 cm of lateral compartment opening when there is a grade 3 posterolateral corner injury present,11 and the posterior horn of the lateral meniscus is well visualized. During this portion of the arthroscopy it is important to determine whether this is a meniscofemoral- or a meniscotibial-based injury. Placing a varus stress on the knee with an arthroscope in the lateral compartment will allow one to see whether the meniscus moves with the femur or with the tibia, and one can focus the further surgical incisions based on this observation. If the meniscus stays with the tibia, it usually indicates a femoral-based avulsion or intrasubstance stretch injury of the popliteus tendon and probably also the fibular collateral ligament. When the meniscus stays with the femur, it usually indicates a significant lateral capsular or Segond-variant soft tissue or bony avulsion pattern.10,12 One can also determine the amount of injury that is present and start to think about postoperative rehabilitation limitations to maximize healing and outcome. An arthroscopic probe is utilized to probe the circumference of the lateral meniscus to determine if there is any meniscal hypermobility or tearing (Fig. 7-8). Most of the time, there are either no tears or a peripheral tear of the lateral meniscus. I have had to perform a lateral meniscectomy most commonly with combined ACL and posterolateral knee injuries. In addition, the integrity of the coronary ligament to the posterior horn of the lateral meniscus is assessed to determine if a direct open repair, through the interval between the lateral gastrocnemius and the soleus, will be necessary during the open repair portion of the procedure. Once the lateral meniscus has been totally evaluated, the 30-degree arthroscope is placed in the lateral gutter with the knee flexed at about 30 degrees and in slight valgus to visualize the popliteus attachment on the femur as well as to assess the integrity of the popliteomeniscal fascicles. In general, I have found that the popliteus tendon tends to sit right up against the capsule and not to retract distally when it has been torn off the femur. To properly evaluate the femoral attachment of the popliteus tendon at this time, one must observe it while both an internal and external rotation torque is applied to the tibia. I have found the femoral attachment to look fairly normal in some circumstances when first inserting the arthroscope into the lateral compartment, and then found it to completely disengage off its femoral attachment site with application of an external rotation force. In my study, I found it to be torn off the femur in 33% of patients with a grade 3 posterolateral corner injury. The rest of the injuries were intrasubstance stretch or musculotendinous junction avulsion injuries. In addition, up to 75% of patients have some tearing of the anteroinferior popliteomeniscal fascicle to the lateral meniscus. The amount of hypermobility caused by tearing of the structure can be assessed by probing the lateral meniscus at this location. As I noted in the section on clinically relevant biomechanics, the anteroinferior popliteomeniscal fascicle is the larger meniscal attachment fascicle and it seems to provide the most stability to the lateral meniscus. It is important to document potential lateral meniscal hypermobility due to tears of this structure by directly probing it at this time. Figure 7-8 Probing for lateral meniscal pathology peripherally for any laxity at the popliteal hiatus (normal popliteomeniscal fascicles, right knee). In those instances where the popliteus tendon has been found to be avulsed off the femur, or if there is any lateral meniscal hypermobility because of the tear of the popliteomeniscal fascicles, a lateral capsular arthrotomy incision is then made after the arthroscopic evaluation of the knee has been completed to allow access to repair these structures. Once the lateral compartment has been assessed for injuries, and other intraarticular structure injuries are resected, repaired, or reconstructed, attention can be turned to the repair or reconstruction of the torn posterolateral structures. The lateral capsular arthrotomy incision is made by retracting the edges of the superficial layer of the iliotibial band both anteriorly and posteriorly at the lateral joint line. A vertical incision is then made through the meniscofemoral portion of the mid-third lateral capsular ligament, approximately 1 cm anterior to the course of the fibular collateral ligament (Fig. 7-9). With the knee flexed to 70 degrees, the normal course of the fibular collateral ligament is parallel to and in line with the fibular shaft.8 In those knees in which the fibular collateral ligament is not well identified, due to injury, when one is tugging on the suture placed into the fibular collateral ligament through the biceps bursa distally, the knife handle can be placed along the course of the shaft of the fibula in this location, with the knee flexed to 70 degrees, and the incision made 1 cm anterior to this fibular shaft (Fig. 7-10). Of course, it is important to verify that the torn fibular collateral ligament is not caught in scar tissue when this incision is made so it is not inadvertently cut during this approach. Figure 7-9 Lateral capsular arthrotomy incision. The popliteus tendon, popliteomeniscal fascicles, lateral meniscus, and inferior lateral genicular artery are identified through this approach (retractors holding incised meniscofemoral capsule) (right knee). Figure 7-10 Location of the lateral capsular incision. The knee is flexed to 70 degrees, the knife blade is placed along the fibular shaft, and the incision is made 1 cm anterior to this landmark (left knee). The lateral capsular incision has to be made carefully so the deep structures are not cut. The incision in this location should be just slightly anterior to the popliteus tendon attachment on the femur. Distal extension of the incision is then performed down to the level of the lateral meniscus. It is important to make sure that one does not incise into the substance of the lateral meniscus while making this incision by holding one edge of the capsule away from the lateral meniscus with a surgical forceps to obtain optimal visualization. In addition, it is important to coagulate or ligate the inferior lateral genicular artery where it crosses within the substance of the lateral capsule at the level of the lateral meniscus at this location to prevent significant postoperative bleeding. Sharp Sein retractors can then be placed into the incised edges of the lateral capsule and retracted apart to allow for identification of the popliteus tendon, lateral meniscus, and the popliteomeniscal fascicles. A whip stitch can be placed in the substance of the popliteus tendon at this time for performing a recess procedure if it has been torn off its femoral attachment. In addition, a direct repair of the popliteomeniscal fascicles back to the lateral meniscus can also be performed. Once these various injuries have been identified in the acute situation, attention is now turned toward repair of specific anatomic structures or groups of structures to their native attachment sites. In addition, if these have been found to be nonrepairable tears, such as midsubstance tears of the fibular collateral ligament or popliteus tendon, plans are set into motion to use local uninjured tissue, hamstring autografts, or allografts to reconstruct these structures. The necessary instruments for these respective procedures should be obtained (if they have not been obtained already) at this time. Avulsions of the popliteofibular ligament, the direct arms of the short and long heads of the biceps femoris, the anterior arm of the long head of the biceps femoris, and the fibular collateral ligament off the fibular head and styloid should be repaired directly back to their anatomic attachment sites. Although many of my older colleagues perform a direct suture repair of these avulsed structures through drill holes, I have found that the use of suture anchors in these locations has many advantages. First, multiple suture anchors can be placed in the fibular head and styloid to repair all the specific avulsed structures back to their attachment sites (Fig. 7-11). Second, because the suture anchors can be placed directly at the attachment sites of these individual structures, the structures can be placed back in their native location and a strong secure fixation can be obtained. This step is very important because it can allow for early protected range of motion without any increased risk of stretching out of the surgical repair. The main posterolateral structures that attach to the lateral aspect of the tibia include the anterior arm of the short head of the biceps femoris, the meniscotibial portion of the mid-third lateral capsular ligament, the capsulo-osseous layer of the iliotibial band, and the superficial layer of the iliotibial band’s attachment site at Gerdy’s tubercle. In most instances, the structures tend to avulse or peel directly off the bone in a bony or soft tissue Segond-type avulsion injury. Figure 7-11 Placement of suture anchors in the fibular styloid (A) and head (B) to repair an avulsed long head of the biceps femoris, short head of the biceps femoris, popliteofibular ligament, and fibular collateral ligament anatomically (right knee). I have found that the metaphyseal bone in the tibia in this location is usually soft and often does not sufficiently hold a suture anchor in most instances. Well-placed suture anchors in this location can sometimes be tugged directly out of the bone when one attempts to verify good secure purchase of the anchor in the bone. For this reason, I often use a No. 5 nonabsorbable suture on a large needle that is placed directly into the bone to repair these structures back to the anatomic locations. The entry and exit sites of the needle are about 1.5 to 2 cm apart in these instances. Because it may be difficult to place the meniscotibial portion of the mid-third lateral capsular ligament back exactly along this location when there is a large peeling off of the lateral soft tissues, suture anchors just distal to the articular margin of the tibia in this location may be placed, in addition to the direct suture repair further distal along the lateral tibia to bone, to obtain an anatomic repair at this location. Suture anchors placed right at the distal margin of the articular cartilage hold well in this location, but they need to be aimed so the tips of the anchors do not engage the subchondral bone and overlying articular cartilage (Fig. 7-12). In a similar fashion, suture anchors are usually necessary to repair the iliotibial band back to Gerdy’s tubercle when it is avulsed off. In addition, injuries at this location are usually combined with a midsubstance injury that may need a spanning soft tissue portion of an Achilles allograft or autogenous hamstring graft to cover the area of the defect. In most instances where there has been a midstance injury to the superficial layer of the iliotibial band, a patch of allograft or autograft tissue must be sewn in place both to fill in the defect and to reinforce the remaining rim of injured tissue from these severe injuries. The posterolateral structures that can be torn off the femur for these injuries include the lateral gastrocnemius tendon, the meniscofemoral portion of the posterior capsule, the meniscofemoral portion of the mid-third lateral capsular ligament, the fibular collateral ligament, and the popliteus tendon. Injuries to these structures can readily be visualized through the iliotibial band fascial splitting incision. Suture anchors can be readily used to reattach the lateral gastrocnemius tendon and the portions of the posterior and lateral capsule to their anatomic femoral attachment sites when they are torn at these locations. However, I have not found the use of suture anchors to be secure enough for the avulsions of the fibular collateral ligament and the popliteus tendon off the femur to allow for early range of motion. It has been almost a decade since I attempted this type of direct anatomic repair because I found that I just couldn’t make the fibular collateral ligament or the popliteus tendon tight enough against the bone to feel confident that it would heal in this location; gapping of the attachment of these structures was often visualized when a range of motion was assessed. As I noted elsewhere,9 I have used an adaptation of Roli Jakob’s chronic popliteus tendon recess procedure to perform a recess procedure of the fibular collateral ligament or popliteus tendon when it has been torn off the femur in acute injuries.13 In acute instances, the recess procedure is performed by first placing a nonabsorbable No. 2 suture through the avulsed end of the fibular collateral ligament or the popliteus tendon in a whip stitch fashion to obtain a secure purchase. I prefer not to use No. 5 sutures as I have found them to be too bulky and they commonly break when I pull them transversely across the femur with an eyelet passing pin. I then tug on this repair to make sure it is secure enough to allow for fixation as well as to verify that there is no midsubstance injury of the ligament or tendon that was not recognized. In addition, it allows me to determine if there will be enough length to be able to pull the end of the tendon into the tunnel for the recess procedure. Figure 7-13 An acute fibular collateral ligament recess procedure with Beath pin placement, demonstrating its course is placed proximal to the adductor tubercle and not through the notch (right knee). Once the passing stitch has been placed and it has been verified that there is sufficient length on both ends of the suture to allow it to be passed through the femur and tied over a button medially, I then use a cruciate ligament guide to place an eyelet-tipped pin through the exact attachment site of the fibular collateral ligament or popliteus tendon and have it exit the femur medially. When placing this eyelet-tipped pin it is important to be sure that the pin comes out proximal to the medial epicondyle and adductor tubercle region (Fig. 7-13). Otherwise, one runs the risk of passing the recess procedure suture through the intercondylar notch. In addition, this pin should come out anterior to the adductor magnus tendon. I usually make a horizontal incision first, prior to placing the cruciate ligament guide on the distal femur in this location, to make sure that I’m coming out in the desired location. This horizontal incision is made slightly proximal to the course of the medial patellofemoral ligament and along the distal border of the vastus medialis obliquus muscle. The incision is extended deeper to between the vastus medialis obliquus muscle and the medial patellofemoral ligament to gain access to the femur. The vastus medialis obliquus muscle is then retracted proximally to allow the passing sutures and surgical button to be tied deep to the muscle fibers at this location. Once the eyelet-tipped passing pin has been placed, a 5- or 6-mm cannulated reamer is then placed over it and reamed to a depth of 1 cm (Fig. 7-14). The passing sutures in the end of the fibular collateral ligament, or the popliteus tendon, are then placed into the eyelet-tipped pin and the pin and passing sutures are pulled out medially. I then verify by pulling on the sutures that I can pull the avulsed structure up into the tunnel created by the reamer in full knee extension. Once I can verify this, the ends of the passing sutures are then placed through a surgical button, which is placed deep to the vastus medialis obliquus muscle, directly against the medial cortex of the femur, and the sutures are tied down in this location with tension to pull the avulsed ligament or tendon up into the recess hole (Fig. 7-15). I prefer to tie the recess procedure sutures near or at full extension so I know that I can obtain full knee extension immediately after surgery. Figure 7-14 Popliteus tendon recess procedure. Illustration demonstrating reaming over the Beath pin, sutures already in the ends of the torn popliteus tendon, and the guide pin in place to pull the sutures medially to tie over a button on the femur. This will recess the end of the torn popliteus into the reamed tunnel (right knee). Figure 7-15 The sutures of a popliteus recess procedure to be tied over a button medially (right knee). I have been very impressed by how secure this type of direct repair can be and I have confidence in allowing patients to initiate early motion after a recess procedure. I have not had any problems with laxity developing in these patients if all the above steps are closely followed. The main soft tissues that can be repaired directly with intrasubstance injuries are the popliteomeniscal fascicles and the coronary ligament to the lateral meniscus. Other minor soft tissues that should be repaired in acute injuries include the lateral aponeurotic attachments from the biceps femoris muscles to the fibular collateral ligament and intrasubstance injuries of the deep and capsulo- osseous layers of the iliotibial band off the femur. The popliteomeniscal fascicles can be repaired through the mid-third lateral capsular arthrotomy incision. A direct suture repair of the anteroinferior and posterosuperior popliteomeniscal fascicles can be made to the popliteus tendon through this location. I prefer to use a direct horizontal mattress suture repair with a nonabsorbable 0 suture so that I know that early motion can be initiated after this repair. Tears of the coronary ligament to the posterior horn of the lateral meniscus are much more difficult to access. It is important to make sure that the lateral gastrocnemius is properly retracted posteriorly when using this approach to protect the neurovascular bundle. In those cases where the tourniquet is not inflated, I would recommend that one palpate the popliteal artery to verify its location prior to suturing the meniscus back to the avulsed capsule. A direct suture repair of a coronary ligament tear is performed by passing the suture needle through the popliteal aponeurosis to the lateral meniscus, into the substance of the lateral meniscus, and then down into the distal tibial attachment site of the coronary ligament (Fig. 7-16). I make sure that the assistant is retracting the lateral gastrocnemius and neurovascular bundle posteriorly during this time. I attempt to place the curved needle into the lateral meniscus directly on my first pass and then to have it pass down into the more distal portion of the coronary ligament. A second free needle driver may be used to grasp the tip of the needle as it exits the posterior tissues, while the original needle driver holds the base of the needle in place. This helps to make sure the needles do not get lost in the posterior soft tissues. In that regard, I am certain that I can pull the lateral meniscus back toward the tibia and prevent any residual laxity of this structure, which could result in hyperextension of the knee or hypermobility of the posterior horn of the lateral meniscus. Multiple sutures along the course of this tear should be placed and then tied with the knee flexed to be able to obtain a good secure repair. Midsubstance tears of the popliteus tendon or musculotendinous junction avulsions are usually not amenable to a direct suture repair. In these instances, in the acute situation, I usually harvest an ipsilateral semitendinosus tendon and use it to reconstruct the popliteus tendon. In this instance, a small 2- to 3-cm-long vertical incision is placed just distal and medial to the tibial tubercle to identify the gracilis and semitendinosus attachments on the tibia. Once the proximal aspect of the pes anserine attachment sites have been identified, an incision is made through the sartorius fascia to identify the semitendinosus tendon in this location and then it is harvested using a hamstring stripper. I prefer to leave the gracilis in place to avoid any potential saphenous nerve irritation and to obtain the thicker of the two main hamstring grafts. The tendon is then taken down off the tibia, and the muscle that is obtained as part of the harvesting is then dissected off. Both ends of the semitendinosus tendon are then tubulized, using a No. 2 and No. 5 suture, to allow it to be utilized to reconstruct the popliteus tendon. Figure 7-16 A coronary ligament repair of the lateral meniscus performed through the interval between the lateral gastrocnemius tendon and the soleus muscles. A direct repair is performed with a suture, grabbing the lateral meniscus with a needle (lateral meniscus ghosted in) (lateral view, right knee). The femoral attachment site of an acute reconstruction of the popliteus tendon is performed in a similar fashion as the recess procedure. However, I attempt to place at least 25 mm of the hamstring tendon in the femoral tunnel in this location. It can be either fixed in the femur in this location with a bioabsorbable screw or tied medially over a surgical button using a recess type fixation. I should note that if one uses a bioabsorbable screw in this location, the tunnels should be tapped prior to placing the interference screw as the bone is quite hard in this location. Once the graft has been fixed in the femur, it is then passed distally through the popliteal hiatus to exit into the space between the lateral gastrocnemius and soleus muscles at the musculotendinous junction of the popliteus. A second tunnel is then drilled in the tibia to allow for fixation of this graft. There is a small sulcus at the musculotendinous junction in the tibia that can be palpated,14 which is where the tunnel site should exit. A cruciate ligament guide can be used to drill this tunnel. The entry site on the tibia is best placed just distal and medial to Gerdy’s tubercle. The tibia is flat in this location and it’s easy to pass a guide pin here. Guide pins that are placed lateral to this location commonly drift along the lateral aspect of the tibia and a less than ideal bone tunnel may be drilled. A guide pin is drilled from anterior to posterior at this location that will come out posteriorly on the tibia at the musculotendinous junction. It is important to place a posterior retractor in this interval to protect the posterior structures when the guide pin exits. A 7- or 8-mm reamer is then utilized to ream this tunnel. Once the tunnel has been reamed, attention is now turned toward passing the graft out anteriorly from its posterior entry point at the popliteus musculotendinous junction to the anterior tunnel aperture, which is located just distomedial to Gerdy’s tubercle. If there is any native popliteus muscle or if the popliteus musculotendinous junction is still intact in this location, I attempt to weave the graft through this substance and then to pass it out anteriorly on the tibia. The knee is placed in 60 degrees of flexion and neutral rotation while the graft is pulled anteriorly and fixed on the tibia with a bioabsorbable screw. I do not attempt to internally rotate the tibia during fixation as I am concerned it may overconstrain the knee and prevent normal physiologic external rotation. The metaphyseal bone in this location is usually much softer than in the femur and I have not found that I have had to use a tap for the bioabsorbable screw. I also use a small bone staple to back up the bioabsorbable screw in this location, directly over the flat spot distal and medial to Gerdy’s tubercle, for fixation (Fig. 7-17). Midsubstance tears of the fibular collateral ligament can sometimes be repaired and augmented with a strip of the long head of the biceps femoris as a graft. It is important to recognize that this type of surgical repair can only be performed when there is no injury to the long head of the biceps tendon. In those instances where the long head of the biceps tendon can be utilized to supplement a tear of the fibular collateral ligament, a distally based strip of tendon is harvested. It is important to measure the distance between the lateral aspect of the fibular head and its attachment site on the femur to make sure that one obtains a long enough strip of tendon to perform the reconstruction. In most instances, this appears to be about 70 mm long. I recommend separating the tendon longitudinally, prior to amputating it proximally, as this allows for easier handling of this band of harvested tissue. Once this distal-based strip of tendon has been obtained, it needs to be attached on the fibula close to the normal attachment site of the fibular collateral ligament (Fig. 7-18). To do this, a suture anchor is placed at this location and it is tied into the apex of this tendon strip to post it at this location. If one relies solely on the soft tissue fixation of the biceps distally to hold this graft, it will not be an anatomic reconstruction as the anterior arm of the long biceps attaches to the anterior aspect of the fibular head. Passing stitches can then be placed into the proximal aspect of this strip of biceps and then it can be either attached to the femur in a recess type procedure or directly repaired to bone with suture anchors and sutures along the course of the native fibular collateral ligament to supplement an intrasubstance injury.
Treatment of Posterolateral Knee Injuries
♦ Treatment of Grade 1 and Grade 2 Posterolateral Knee Injuries
Combined Cruciate Ligament and Grade 1 to 2 Posterolateral Corner Injuries
♦ Surgical Treatment of Acute Grade III Isolated Posterolateral Knee Injuries
♦ Surgical Approach to the Posterolateral Knee

Arthroscopic Evaluation of the Lateral Compartment of the Knee

Structures That Attach to the Fibular Head and Styloid
Structures That Attach to the Lateral Tibia
♦ Femoral-Based Posterolateral Knee Injuries
Popliteus Tendon or Fibular Collateral Ligament Femoral Recess Procedure
Intrasubstance Injuries
Acute Reconstruction of the Popliteus Tendon with an Autogenous Hamstring Graft

Acute Reconstruction of the Fibular Collateral Ligament
Related posts:
 Mechanism and Presenting History of Posterolateral Knee Injuries
Clinically Relevant Biomechanics of Posterolateral Knee Injuries
Complications Associated with Posterolateral Knee Injuries
History of the Nomenclature and Study of the Anatomy of the Posterolateral Knee
Comprehensive Anatomy of the Structures of the Posterolateral Knee
Clinical Examination of Posterolateral Knee Injuries
Mechanism and Presenting History of Posterolateral Knee Injuries
Clinically Relevant Biomechanics of Posterolateral Knee Injuries
Complications Associated with Posterolateral Knee Injuries
History of the Nomenclature and Study of the Anatomy of the Posterolateral Knee
Comprehensive Anatomy of the Structures of the Posterolateral Knee
Clinical Examination of Posterolateral Knee Injuries


