Chapter
6
Tips, Tricks, and Management Algorithm for Foot and Ankle Injuries
Success mantra for foot and ankle trauma management: Ten commandments of foot and ankle trauma management!
Ankle Fractures
Till date, ankle fractures are one of the most controversial fractures in foot and ankle!
Algorithm of management with respect to timing of patient presentation is described in Flowchart 6.1.
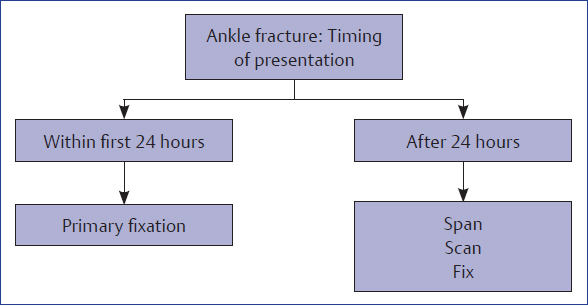
Flowchart 6.1 Algorithm of management as per the timing of presentation of ankle fractures.
Ankle fractures are treated with typical ladder of fixation. Flowchart 6.2 enumerates that ladder.
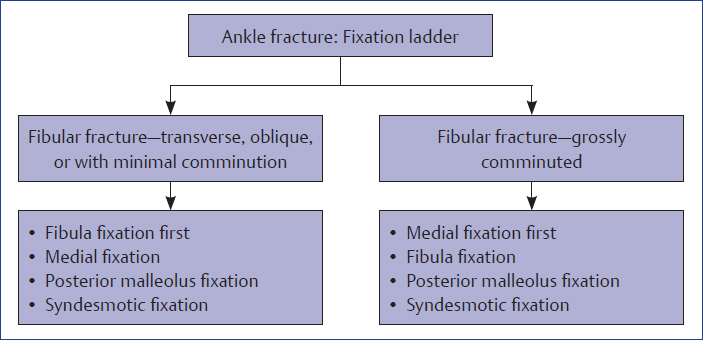
Flowchart 6.2 Ankle fracture fixation ladder.
Ankle fractures associated with deltoid ligament injury are treated differently (Flowchart 6.3).
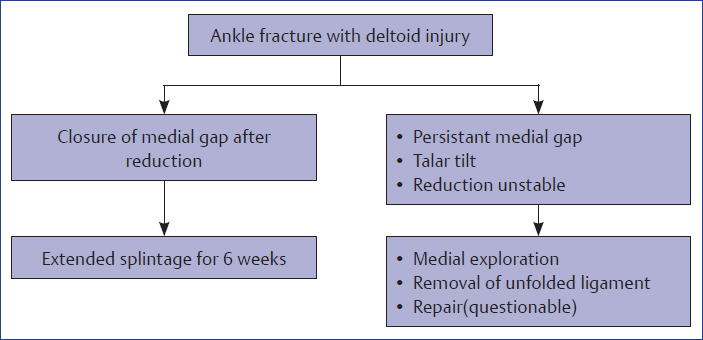
Flowchart 6.3 Treatment of ankle fracture with associated deltoid injury.
Tips and Tricks
♦ Early fixation of fractures (within 24 hours of injury) gives better outcome.
♦ Late-presenting injuries need protocol of span, scan, and plan with waiting up to 1 week.
♦ For late presentations, temporary joint spanning external fixator is used for a few days.
♦ Presence of wrinkles on the skin is a sign for safe intervention.
♦ Early surgical intervention prevents blister formation.
♦ If blisters are already present, wait for it to heal and avoid incising through it.
♦ Avoid use of tourniquet in cases with diabetes mellitus and peripheral vascular disease.
♦ Use of tourniquet is associated with increased postoperative pain and swelling and delayed achievement of range of motion. As far as possible, avoid tourniquet in most of the cases!
♦ Steps of fixation shall be fibular length restoration, medial exploration and fixation, posterior malleolus fixation, followed by syndesmotic assessment and fixation except in cases with gross comminution of fibula.
♦ Fibular length achievement and perfect rotational alignment of fibula are the most important factors for successful end result.
♦ Fixation chronology may be altered depending upon fracture geometry. In cases with fibular comminution, medial exploration and stabilization shall be done first.
• Infrasyndesmotic fibular fractures—screw or tension band wiring
• Transsyndesmotic fibular fractures—plate, screw, or tension band wiring
• Suprasyndesmotic fibular fractures—plate
♦ For all isolated fibular fractures, gravity stress X-ray is a must to assess syndesmotic integrity and need for syndesmotic fixation (Fig. 6.1).
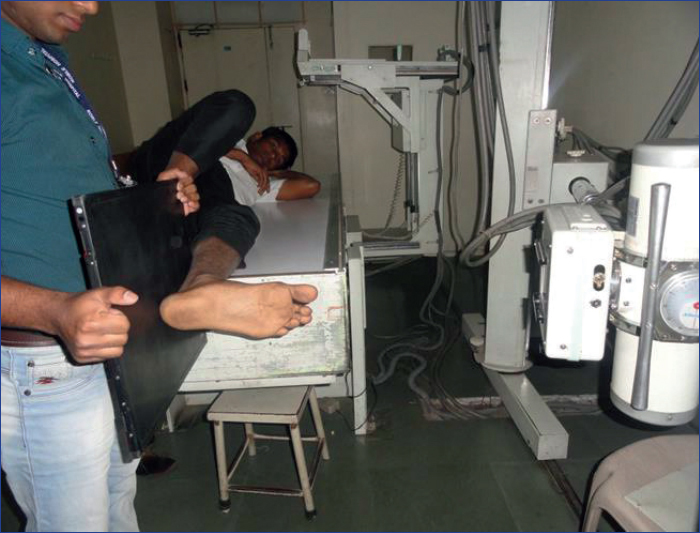
Fig. 6.1 Positioning of patient for taking gravity stress view.
♦ Antiglide plate (plate put on the posterior surface of the fibula) gives strongest fixation and is preferred in osteoporotic situations.
♦ Use of intramedullary nailing should be reserved for selected transverse, suprasyndesmotic fibula fractures only.
♦ Anteriorly taken medial incision provides the opportunity of looking inside the ankle joint to identify osteochondral lesion and is a must (Fig. 6.2).
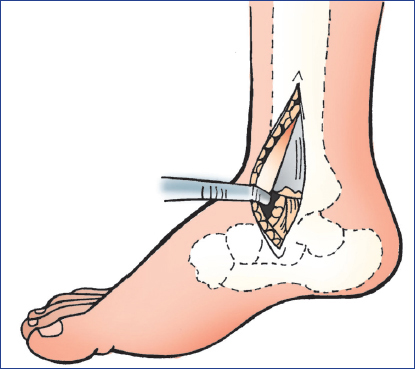
Fig. 6.2 Anteriorly placed medial incision helps in visualizing ankle joint.
♦ Routine repair of deltoid ligament is not indicated.
♦ Explore deltoid ligament to remove its unfolding in cases where either after fibular reduction medial clear joint space remains wide or fibular reduction is difficult to maintain.
♦ Large medial malleolar fragment should be buttressed with a plate (Fig. 6.3).
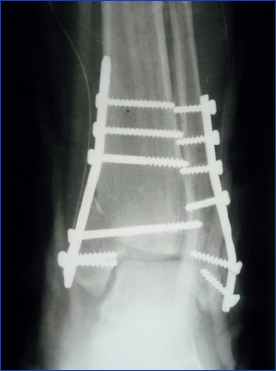
Fig. 6.3 Postoperative X-ray image of a case where large medial fragment was fixed up with buttress plate.
♦ Always fix posterior malleolar fragment irrespective of its size for better reconstruction of incisura. Such a fixation often obviates the need for syndesmotic screw fixation (Fig. 6.4).
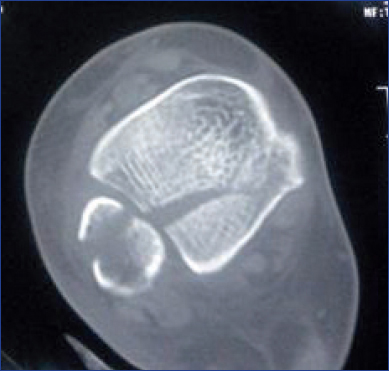
Fig. 6.4 Axial CT image of ankle showing the posterior malleolar fracture extending up to incisura of fibula.
♦ For a large posterior malleolar fragment, use of buttress plate is a must (Fig. 6.5).
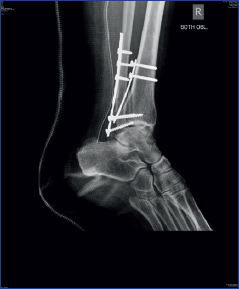
Fig. 6.5 Postoperative radiograph of a case where large posterior malleolus fracture was stabilized with buttress plate.
♦ Ankle fracture protocols:
Preoperative: prepare and drape both the limbs.
Intraoperative: Follow six-step ankle protocol.
• Comparative image-assisted mortise view to look for medial clear space, dime sign, and ankle instability sign
• Hook test: It is done by putting a bone hook in the interosseous membrane of the fibula and the fibula is pulled outward to look for instability at syndesmosis (Fig. 6.6)
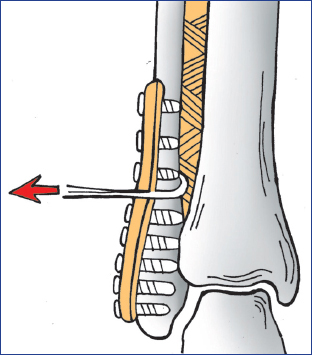
Fig. 6.6 Hook test.
• Tap test: It is performed by pushing tap through one of the screw holes of the fibular plate and separation of fibula from tibia is noted, which is suggestive of syndesmotic instability (Fig. 6.7)
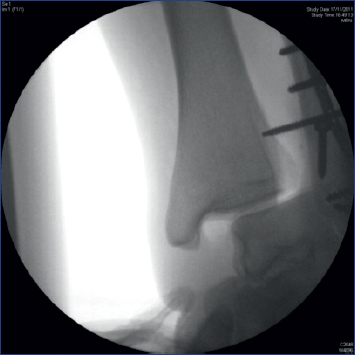
Fig. 6.7 Tap test.
• Anteroposterior ballottement test (Fig. 6.8). In this test fibula is rolled anteroposteriorly over tibia and amount of instability at syndesmosis is noted.
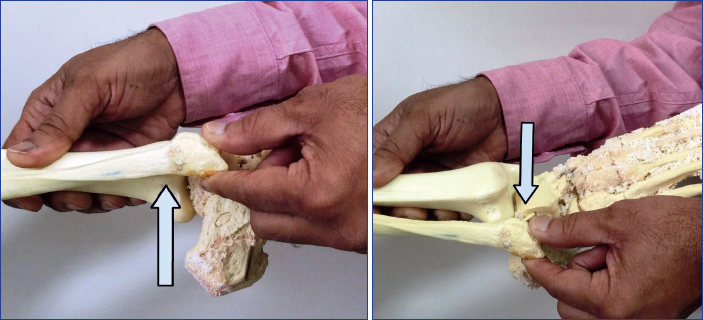
Fig. 6.8 Anteroposterior ballottement test.
• Gravity stress test
♦ When in doubt, it is better to fix syndesmosis.
♦ Author’s preference is use of two 3.5 mm syndesmotic screws with purchase of four cotices and removal only if at the end of three post-operative months ankle dorsiflexion is limited.
♦ Use two screws with four cortices for syndesmotic fixation in unstable situations, diabetics, revision fixation, and osteoporosis for better stability.
♦ Foot should be in neutral position during syndesmotic screw fixation.
♦ In osteoporotic ankle fractures, use of antiglide fibula plate, bicortical screw fixation, and combination fixations are preferred.
♦ Use intramedullary K-wires supported with plate, locking plate, bone substitutes, and cement augmentation for osteoporotic cases.
♦ In neuropathic fractures, stronger, longer, combination, and spanning fixations are preferred. Use of fibula pro tibia screws is advised (Fig. 6.9).
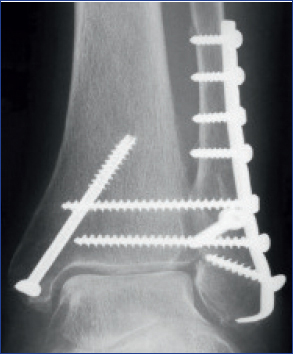
Fig. 6.9 Radiograph showing fibula pro tibia screws.
Ankle Sprain
Every ankle injury is not ankle sprain!
Unresolved ankle sprain is the deadliest enemy of orthopedic surgeon!
Flowcharts 6.4 and 6.5 demonstrate the management of acute and chronic lateral ligament injury.
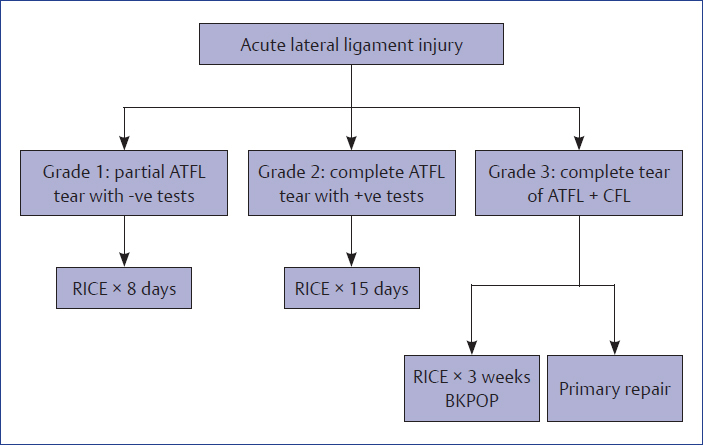
Flowchart 6.4 Management of acute lateral ligament injury. ATFL, anterior talofibular ligament; CFL, calcaneofibular ligament, RICE, rest, ice, compression and elevation; BKPOP, below knee plaster.
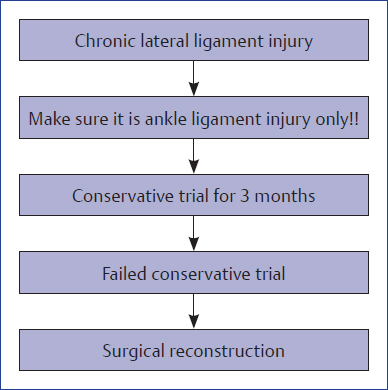
Flowchart 6.5 Management of chronic lateral ligament injury.
Tips and Tricks
♦ Always rule out conditions that can mimic ankle sprain. The following conditions can mimic ankle sprain:
• Fracture of anterior process of calcaneus
• Fracture of lateral process of talus
• Fracture of posterior process of talus
• Osteochondral lesion of talus
• Fracture base fifth metatarsal
• Tendo-Achilles rupture
• Peroneal tendon injuries
• Syndesmotic injury with high fibular fracture
♦ Follow five-phase protocols for ankle sprain management (Flowchart 6.6).
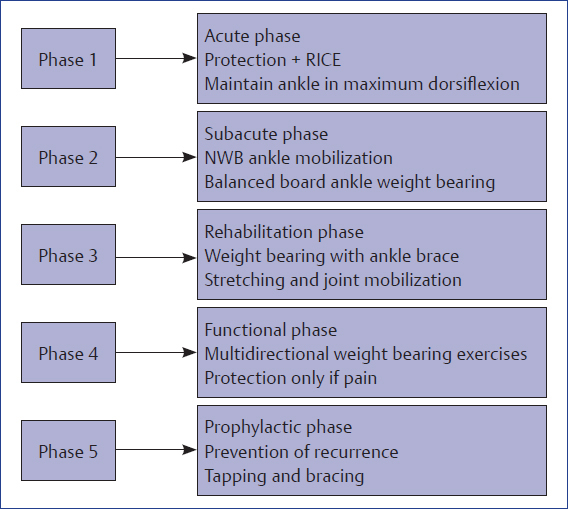
Flowchart 6.6 Protocols for ankle sprain management. RICE, rest, ice, compression and elevation.
Fully activated and strong peronei are the best protection against instability!
♦ Use balanced board, proprioception exercises, and theraband judiciously for rehabilitation of ankle sprain cases.
♦ Reassess every ankle sprain case at the end of 6 weeks because 20% of properly treated ankle sprain cases progress to functional ankle instability.
♦ Get MRI images if symptoms persist beyond 10 weeks.
♦ Anatomical reconstruction of lateral ligament should always be preferred over nonanatomical reconstruction.
♦ At reconstructive lateral ligament surgery, correct bony malalignments like hindfoot varus or forefoot varus.
Syndesmotic Injuries
Syndesmotic injuries are one of the most controversial injuries in foot and ankle!
The following facts have emerged in the present era with respect to management of syndesmotic injuries.
Screws Used in Syndesmotic Injuries
♦ Material: Steel, titanium, and bioabsorbable, all showed comparable results.
♦ Where: Between 2 and 5 cm above plafond (Fig. 6.10).
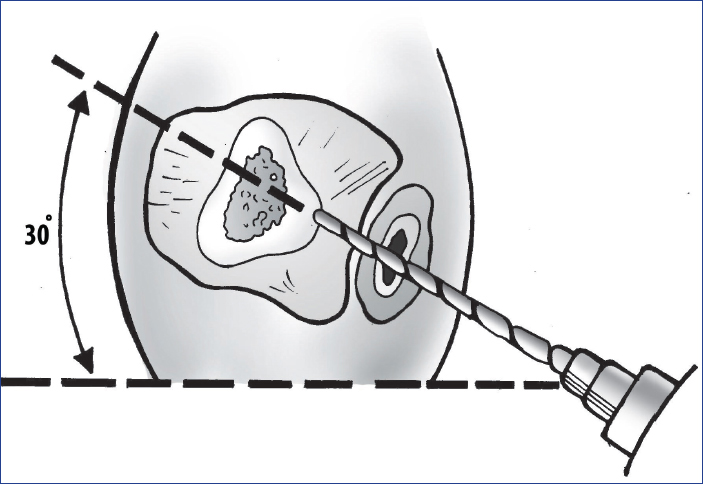
Fig. 6.10 Direction of syndesmotic screw.
♦ Number and size: 2 × 3.5 vs. 1 × 4.5 screws. Early results are good with 3.5 screws, but no difference visible at 1 year.
♦ No difference in outcomes between tricortical or quadricortical screws, but quadricortical screws can be removed easily if they break and are symptomatic.
Diagnosis of Syndesmotic Injury
♦ Four clinical tests:
• Direct palpation causing pain on syndesmosis
• External rotation of foot causing pain
• Calf squeeze causing pain
• Dorsiflexion with syndesmotic squeeze/taping relieving pain after taping than before
♦ External rotation test is most sensitive.
♦ X-rays: AP and mortise views.
♦ Tibiofibular overlap between the lateral border of posterior tibia and the medial border of fibula if it is more than 6 mm on AP and more than 1 mm on mortise views.
♦ Tibiofibular clear space at the medial border of fibula and anterior tibial tubercle if it is more than 6 mm on both views.
♦ Medial clear space in mortise view is less than 4 mm or equal to talotibial plafond space.
♦ Intraoperative tests:
• Cotton test (Hook test): Pull fibula laterally and take AP X-ray
• External rotation test: Hold leg straight and externally rotate the foot and take AP X-ray
• Modified cotton test: Pull fibula posteriorly and take a lateral X-ray
• Ballotment test: Roll fibula antero-posteriorly
♦ Latest method of CT-based assessment: Tibiofibular line can be checked preoperatively/postoperatively/posttreatment (Fig. 6.11).
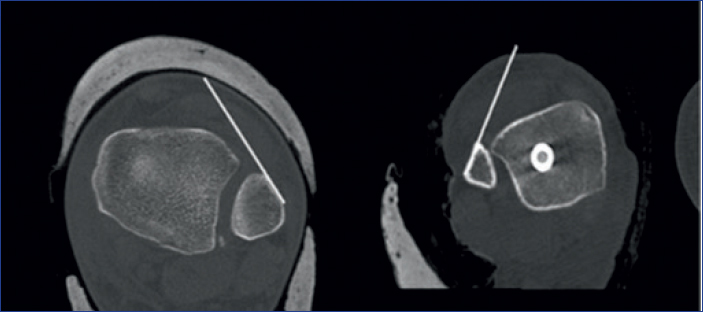
Fig. 6.11 CT image showing the tibiofibular line for diagnosis of syndesmotic injuries.
♦ Line from flat anterolateral surface of fibula to anterior tubercle of tibia measured 1 cm above tibial plafond on axial cut of CT scan. Must be within 2 mm from the anterior surface of tibia.
Tips and Tricks for Syndesmotic Screws
♦ Put a clamp at the same horizontal level. If the clamp is put obliquely, it can pull the fibula out of its anatomical groove
♦ Aim the drill posterior to anterior from the fibula, otherwise one may miss the tibia
♦ Position of the foot is immaterial. Let it stay in the resting position
♦ May allow the syndesmosis to fall back into its original position and allow for the natural movement of distal fibula during ankle movement
♦ Syndesmosis may not be healed by 3 months and removal of screws may lead to loss of position
Pilon Fractures
Flowcharts 6.7 and 6.8 demonstrate various types of closed pilon fractures and their respective treatment options.
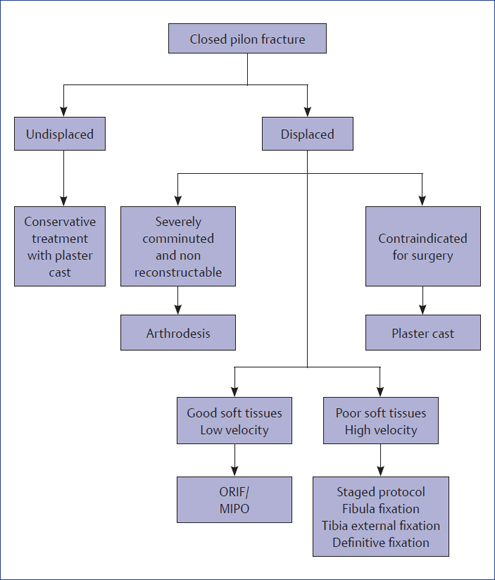
Flowchart 6.7 Types of closed pilon fractures and their respective treatment options. ORIF, open reduction internal fixation; MIPO, minimally invasive plate osteosynthesis
Tips and Tricks
♦ Plan your treatment based on the answers to the following five questions:
• Question 1: Is this a low-velocity injury or a high-velocity injury?
History of mode of injury and presence of associated injuries will answer this question. By and large, sagittal fracture line suggests high-velocity trauma, while coronal fracture line suggests low-velocity trauma
• Question 2: What is the status of soft tissues?
• Question 3: Is this injury reconstructible?
Amount of comminution and bone loss would guide.
• Question 4: Is it displaced injury or undisplaced injury?
• Question 5: Are there any comorbid conditions?
♦ Best fixation for fibula is a plate that maintains the length and rotation. Nail should only be used in short oblique or transverse fibular fractures
♦ Use joint spanning external fixator with a delta frame to give optimum stability. Sometimes soft tissues may not permit definitive internal fixation and continuing the same fixator may be needed and will work as well
♦ Follow the principle of span, scan, and plan
♦ The more minimally invasive you wish to be, the more preoperative planning you need to do
♦ Read, reread, and reread CT scan
♦ Do keep CT scan in operation room
♦ CT scan guides about the direction and placement of screws to build articular block
♦ Always use a direct approach
♦ Always mark future incision sites before putting an external fixator
♦ Placement of plate is always on the unstable side
♦ At least one stiff implant is a must
♦ Use talus as a template for building the reduction
♦ Restoration of articular surface by open reduction, followed by metaphyseal block fixation mostly by minimally invasive biological fixation is the today’s tune
Calcaneus Fractures
Flowchart 6.9 shows the management of extra-articular calcaneal fractures.
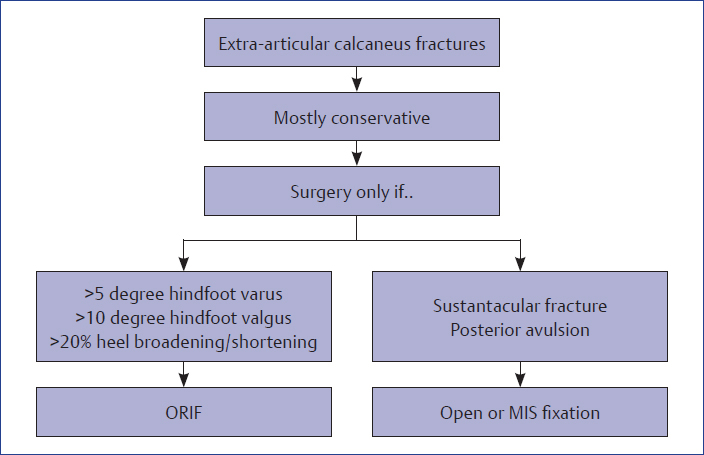
Flowchart 6.9 Management of extra-calcaneal fractures. ORIF, open reduction internal fixation; MIS, minimal invasive surgery.
Related posts:

Stay updated, free articles. Join our Telegram channel

Full access? Get Clinical Tree


