Mean measurement ± SD (mm)
AL
PM
Anteroposterior length
8 ± 2
6 ± 1
Width
9 ± 2
10 ± 2
Center from posterior tibial axis (posteroanterior)
7 ± 2
3 ± 1
Center from medial tibial edge
37 ± 4
38 ± 5
Table 13.2
Femoral attachment data summary
AL | PM | |
|---|---|---|
Parallel to femoral longaxis | ||
Clock position | 9–12 (center: 10:20 ± 30) | 7:30–10:30 (center: 8:30 ± 30) |
Distance from cartilage edge (mm) ± SD | 7 ± 2 | 10 ± 3 |
Parallel to Blumensaat’s Line | ||
Clock position | 9–12:30 (center:11:20 ± 20) | 7:30–12:00 (center:9:45 ± 30) |
Distance from cartilage edge (mm) ± SD | 6 ± 1 | 12 ± 3 |
The importance of graft location and placement on the restoration of function has been a matter of ongoing research (Figs. 13.1 and 13.2). Gill et al. demonstrated that restoration of rotational properties depends heavily on the tibial placement of the PCL graft [5]. Mannor et al. demonstrated that varying the position of the femoral tunnel alters the tension of the graft and subsequently the biomechanical properties of the knee [6]. Markolf et al. also investigated the effect of tunnel placement on knee biomechanics [7]. In a study of ten cadaveric knees, they tested graft positions which were medially and laterally displaced from the tibial footprint by 5 mm. There was no significant change in knee laxities or rotational forces when compared to an anatomically placed tunnel, though the medially displaced graft exhibited greater forces under flexion angles greater than 65°. These studies underline the importance of establishing the femoral and tibial tunnels in an anatomic position and form the basis for future investigation into the clinical impact of PCL graft positioning.
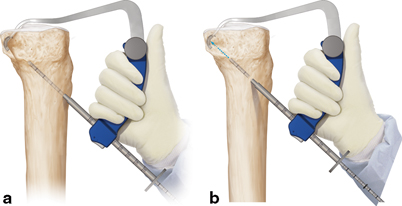
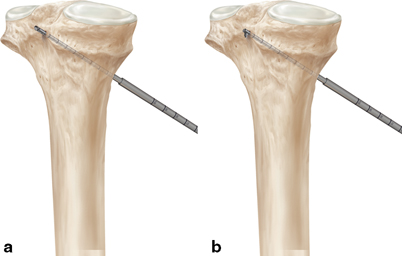
Fig. 13.1
a and b Place the tibial PCL reconstruction guide through the AM portal and over the PCL footprint. The 11 mm marking hook may be used to visually reproduce the footprint, or the 12 and 13 mm laser line markings may be referenced off the anterior edge of the footprint. Choose a FlipCutter II equal to the size according to the measured diameter of your prepared GraftLink soft tissue graft. Insert the FlipCutter until the tip contacts the anterior cortex. Slowly drill the FlipCutter and visualize arthroscopically for posterior cortex penetration (Images provided courtesy of Arthrex, Inc.)
Fig. 13.2
a and b Once the FlipCutter has been confirmed to exit the posterior cortex either arthroscopically or with a combination of arthroscopy and fluoroscopy, push the button on the blue hub, and slide forward to flip the cutting tip into retrograde reaming position. Use a mallet to tap the 7 mm tip of the stepped drill sleeve into bone to facilitate passing suture after the tibial socket has been created. Once the drill sleeve is secure and the appropriate tibial footprint position has been confirmed, reverse-ream a socket of the appropriate depth (depending on graft length) (Images provided courtesy of Arthrex, Inc.)
With the aim of determining reference points for reconstruction, subsequent studies have investigated possible bony landmarks for the PCL femoral insertion.In a study of 20 cadavers, Lopes et al. located an osseous prominence proximal to the femoral footprint of the PCL in 18/20 (90 % ) and coined the term “medial intercondylar ridge.”Additionally, in 8/20 of the specimen, an osseous bridge and obvious change in slope between the AL and PM bundle footprints was noted [8]. Clinically, these anatomical landmarks may be of great utility in finding the anatomically correct placement of the PCL footprint on the femur during reconstruction.
Controversy remains in regard to the degree to which function can be restored through various surgical techniques. Gill et al. showed that under normal physiologic loads, single-bundle reconstruction restores the anteroposterior laxity of the PCL at flexion angles up to 90° [5]. Additionally, Gill et al. showed a nonstatistically significant reduction of external rotation in single-bundle repaired knees [5]. However, the success of single-bundle reconstructions in restoring the rotational component of PCL function is still a matter of contention. In studies by Race et al. [9], Harner et al. [10], and Whiddon et al. [11], in vitro double-bundle PCL reconstruction more closely restored the function of the native PCL. Wijdicks et al. were also able to demonstrate significantly less internal rotation with double-bundle repair at angles of 90 ° or greater [12]. Bergfeld et al., however, found no definitive advantage of double-bundle repair [13].
Indications for Surgery
Though studies have shown mixed results, the general consensus has been that isolated PCL tears can be managed well conservatively.Shelbourne et al. prospectively examined a group of patients with isolated PCL injuries who were treated nonoperatively [14]. With a minimum follow-up of 10 years, radiographically patients were normal or near normal in 89 % of cases. Additionally, the mean International Knee Documentation Committee (IKDC) grade was 73.4.Parolie and Bergfeld examined 25 patients with isolated PCL tears treated nonoperatively and 68 % returned to at least the same level of sport with 80 % reporting satisfactory results [15]. In contrast, Boynton and Titjens et al. showed that in their population of 50 patients with isolated PCL tears treated nonoperatively, 20 % had disabling instability or meniscus pathology [16]. Keller et al. similarly reported poor results in 40 patients with isolated PCL tears. They noted that 90 % had knee pain, 65 % had limited activity secondary to the PCL-deficient knee, and 43 % reported difficulty walking [17]. The mixed results demonstrated by these studies for PCL injuries treated nonoperatively continue to confound recommendations for treatment.
Currently, there is consensus that PCL -deficient knees exhibit a higher incidence of arthrosis and meniscus tears. In a long-term follow-up study, Dejour et al. reported that 89 % of PCL-deficient knees had persistent pain and 50 % had recurrent effusions at 15 years after initial injury [18]. At 25 years, the vast majority of these knees showed degenerative changes, especially in the medial and patellofemoral compartments. With these results, the question persists as to which subtype of PCL tears are best treated with reconstruction and which are those that can be safely treated nonoperatively with minimal risk for negative long-term sequela.
Most PCL tears occur in the context of multi-ligamentous injury. Sekiya et al. demonstrated in a cadaveric study that a grade 3 posterior drawer on physical examination correlated with the presence of a posterolateral corner injury in addition to a complete disruption of the PCL [19]. With isolated transection of the PCL, posterior translation of the tibia relative to the femur was only grade 2, measuring < 10 mm of displacement. This evidence demonstrates that in patients presenting with clinically unstable knees in the face of a grade III injury, other concomitant ligamentous injuries deserve consideration. This underscores the necessity to consider other ligamentous pathology prior to embarking on PCL reconstruction and considering specific surgical techniques.
More agreed-upon indications for surgical reconstruction of PCL injuries include avulsion fractures, a decrease in tibial step-off of 8 mm or greater, and PCL tears with concomitant ligamentous or structural injury [20]. Additionally, for chronic PCL tears, surgery is indicated when the injury becomes symptomatic, or the patient has failed nonoperative treatment with functional instability. In the multi-trauma patient, the vascular status of the injury, the skin condition, the nature of concomitant injuries, as well as the stability of the reduction and the patient all may play a role in operative, nonoperative, and delayed operative intervention.
The All-Inside Technique
The core goals of PCL reconstruction remain the same: to accurately reconstruct the PCL within the footprint, recreate the normal anatomy, restore ligament stability, and restore knee range of motion and function. In respect to these factors, the all-inside PCL reconstruction technique holds multiple distinct advantages over its historic open tibial inlay counterpart. By use of smaller incisions, the all-inside technique can be much less invasive and can avoid additional operative time through use of arthroscopic assisted placement of the tibial tunnel [21]. Furthermore, the all-inside technique is particularly useful in multi-ligamentous reconstruction [21]. The all-inside technique allows the surgeon to drill away from neurovascular structures by use of a reverse-drill technique which leads to less bone removal through potential creation of a socket as opposed to the traditional tunnel. This allows for greater retention of normal host bone and also yields a smaller potential for graft migration.Research has also shown that retrograde socket drilling is more accurate than antegrade drilling. In a study of cadaveric knees, Lubowitz et al. demonstrated that 3.5-mm tibial retrograde socket drilling was significantly more accurate than 2.4-mm antegrade pin placement in approximating the anterior cruciate ligament (ACL) footprint [22].
The strength of the all-inside techniques compared to the open inlay technique is one area of concern. However, with ongoing advancements in arthroscopic technique as well as improved instrumentation, this concern has diminished. Zehms et al. demonstrated in a cadaveric model that a novel arthroscopic double-bundle PCL inlay reconstruction using all-inside techniques provides comparable stability to its open counterpart [23]. Additionally, Kim et al. have demonstrated positive results in employing the all-inside inlay technique [24]. In their study of evaluating all-inside double-bundle reconstruction, they showed less than 3 mm of side-to-side difference in posterior translation.
With the open tibial inlay technique, there is evidence that the posterior capsulotomy may increase the clinical laxity. This is thought to be secondary to violation of the posterior capsular restraint.In a study of 14 cadaveric knees, Ritchie et al. demonstrated an average increase of 0.59 mm in posterior translation after PM capsular sectioning [25]. Park et al. similarly found that the violation of the posterior capsule necessary to perform the open tibial inlay technique increased posterior translation by 0.97 mm at 0° of flexion and 0.94 mm at 120° of knee flexion [26]. Though these increases in tibial translation are relatively small, they deserve attention for the possibility of introducing laxity when a posterior approach is considered.
While there is not sufficient evidence to indicate better PCL stability or improved clinical outcomes with the all-inside techniques, there are many tangible benefits for the surgeon. For instance, by making use of a PM portal, the all-inside techniques allow the ability to fully visualize the distal extent of the PCL tibial insertion. Additionally, as is the case with the open technique, patient positioning and the necessity to retract muscle and the neurovascular structures are eliminated, yielding a more confident and clear visualization of the footprint.
Author’s Preferred Technique
A soft tissue graft is prepared by folding the TightRope® Attachable Button System (ABS) implant and stitching the tails together with #2 FiberLoop® after quadrupling the graft (GraftLink technique video—link http://www.arthrex.com/resources/video/y_WtppuzPE64CAFGbc-3LA/all-inside-pcl-reconstruction-using-the-pcl-graftlink).The graft is prepared to the appropriate length and the ends can be tapered with a stitch to ease graft passage.
An accessory PM portal may first be localized with a spinal needle. Once established, a 2 cm incision is made and screw-in cannula placed under direct visualization in an “outside-in” fashion. An alternative approach would be to make use of the knee obturator for posterior portals device and create the PM portal in an “inside-out” fashion.
The soft tissue still remaining on the PCL footprint is gently debrided with a shaver and/or radiofrequency ablator device placed through the PM portal to expose the full extent of the PCL footprint on the tibia. Care should be taken to protect the neurovascular structures that lie just posterior to the capsule.
The mamillary bodies at the posterior aspect of the tibia can be palpated through the PM portal to confirm anatomic placement. The PCL should be positioned directly between these two bodies and distal on the tibia. The side-specific Anatomic Contour PCL Guide is placed over the back of the tibia through the anteromedial portal and positioned between the mamillary bodies. The arthroscope can be placed in the PM portal to best visualize the footprint. (Fig. 13.1). Fluoroscopic guidance may be used to confirm correct positioning of the posterior guide in the “over-the-top” position and assist with drill trajectory. When in position, the marking hook will guide the FlipCutter® to the ideal location and angle for transtibial PCLR.A small 2–3 cm incision is made in this location and the guide is gently tapped to confirm that it is in cortical bone. Before drilling the FlipCutter®, make note of the osseous length as read by the drill sleeve markings as it enters the guide handle (Fig. 13.2).
Place the FlipCutter® into the drill sleeve and move the rubber grommet back to a distance equal to the interosseous length. This will give an indication of drill depth. With the arthroscope in the PM portal, drill the FlipCutter® until it is visualized just in the joint. Remove the guide and confirm that the FlipCutter® is in the center of the PCL footprint . Tap in the stepped drill sleeveand slide down the rubber grommet until it is flush with the drill guide. “Flipcut” the socket to a depth of at least 20 mm as indicated by the distance on the drill sleeve. After completing the socket, “unflip” the FlipCutter® and remove it from the drill sleeve.Place a #2 FiberStick™ up the sleeve and into the joint for future graft passage (Fig. 13.3).
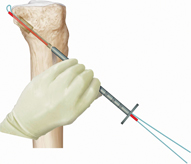
Fig. 13.3
Pass a #2 FiberStickTM through the drill sleeve and into the joint for retrieval. Temporarily secure the tibial passing suture until femoral socket preparation has been completed. (Image provided courtesy of Arthrex, Inc.)
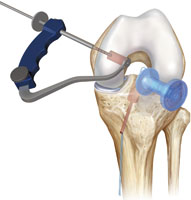
Place the arthroscope back into the anteromedial portal and visualize the femoral footprint of the PCL .Place the All-Inside PCL Femoral Guide in the center of the anterolateral bundle.Drill the FlipCutter® from outside-in, and “FlipCut” the socket to a depth of at least 20 mm as indicated by the distance on the drill sleeve (Fig. 13.4). Place a #2 FiberStick™ down the sleeve and into the joint for future graft passage.Alternatively, the femoral socket can be drilled with a standard reamer from inside-out and a Beath pin used to pass suture retrograde for future graft passage.
 Results of Treatment of Posterior Cruciate Ligament Surgery
 Anatomy and Biomechanics of the Posterior Cruciate Ligament and Their Surgical Implications
 Combined Posterior Cruciate Ligament and Posteromedial Reconstruction
 All-Arthroscopic Tibial Inlay Double-Bundle Posterior Cruciate Ligament Reconstruction
 Clinical and Arthroscopic Evaluation of the Posterior-Cruciate-Ligament- Injured Knee
 Combined PCL, Posteromedial Corner, and Posterolateral Corner Reconstruction


Related posts:
Results of Treatment of Posterior Cruciate Ligament Surgery
Anatomy and Biomechanics of the Posterior Cruciate Ligament and Their Surgical Implications
Combined Posterior Cruciate Ligament and Posteromedial Reconstruction
All-Arthroscopic Tibial Inlay Double-Bundle Posterior Cruciate Ligament Reconstruction
Clinical and Arthroscopic Evaluation of the Posterior-Cruciate-Ligament- Injured Knee
Combined PCL, Posteromedial Corner, and Posterolateral Corner Reconstruction
Stay updated, free articles. Join our Telegram channel
Full access? Get Clinical Tree
