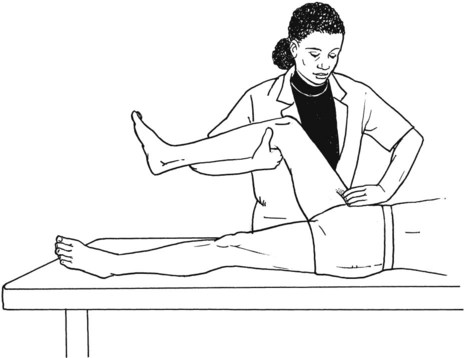
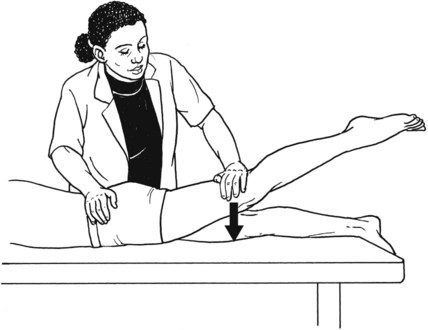
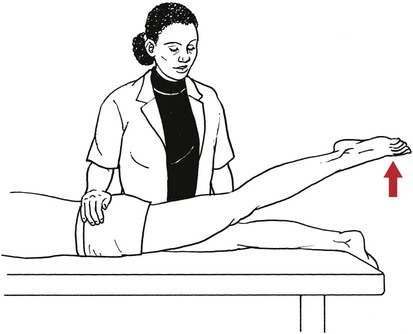
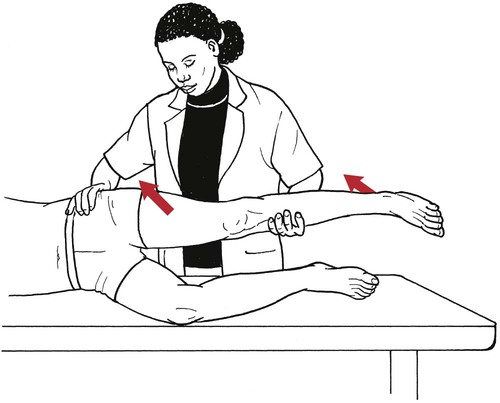
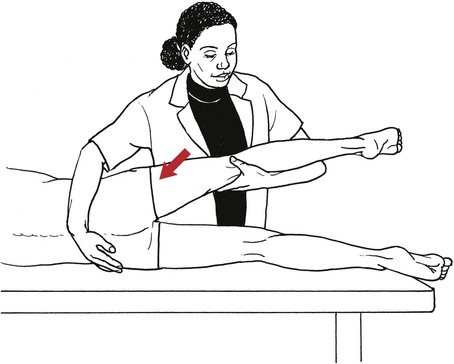
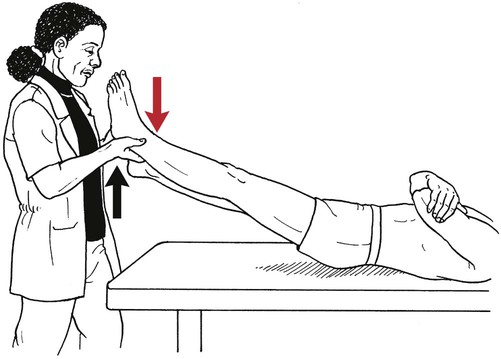
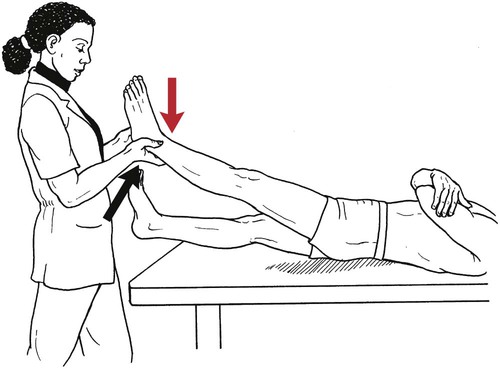
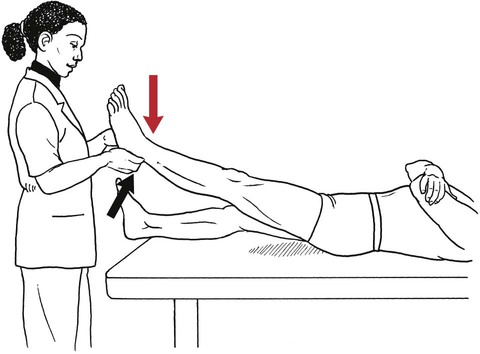
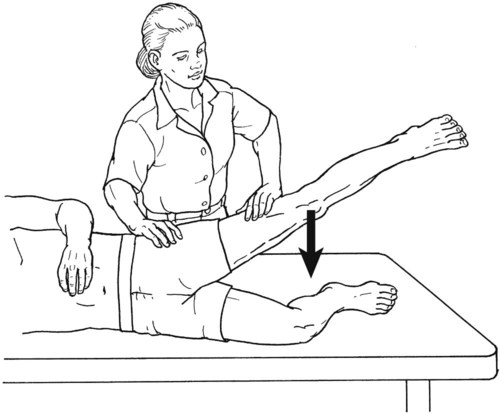
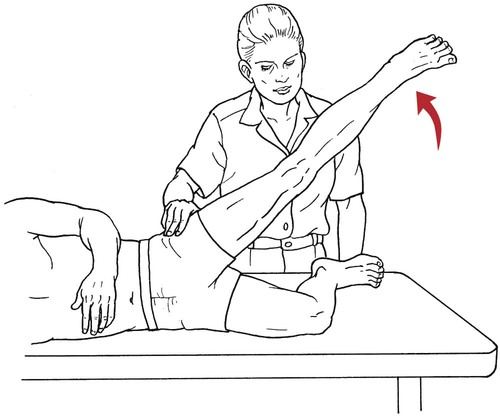
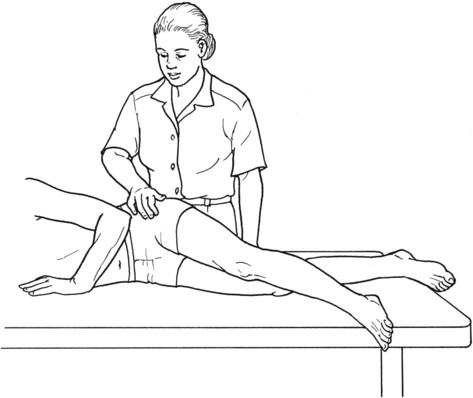
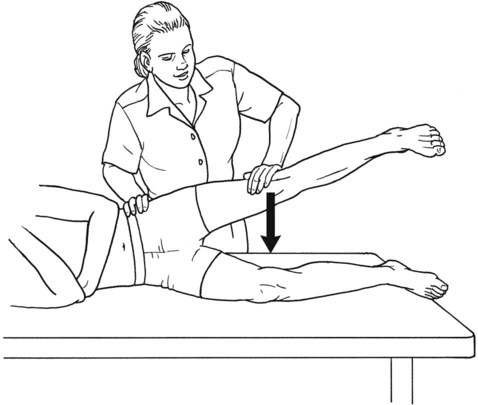
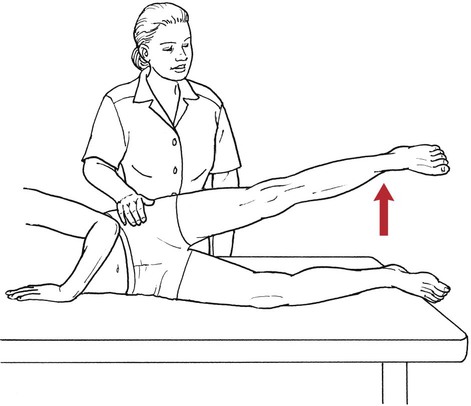
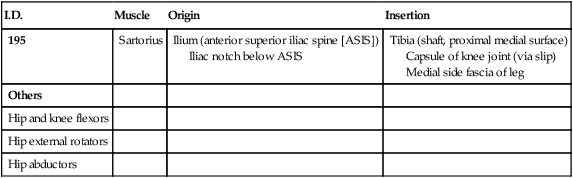
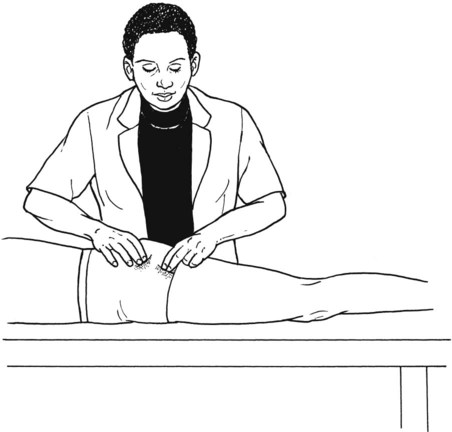
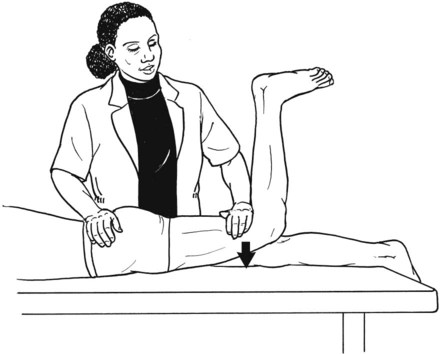
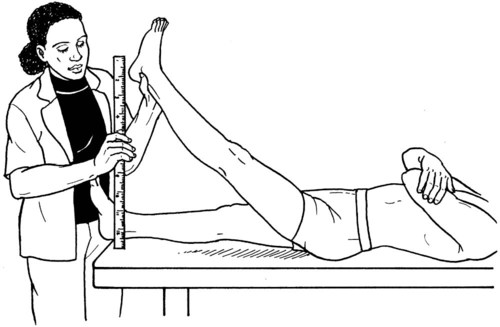
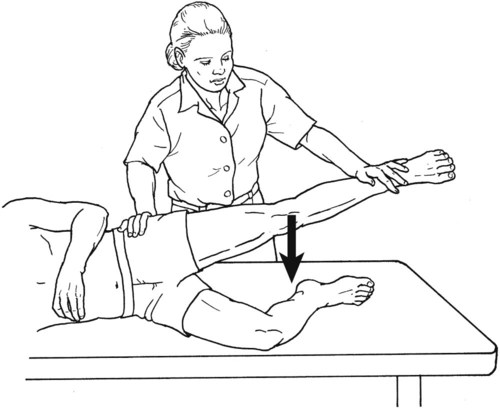
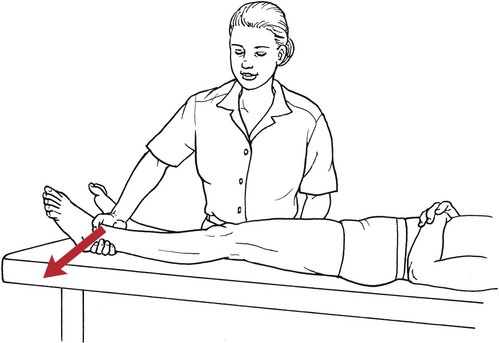
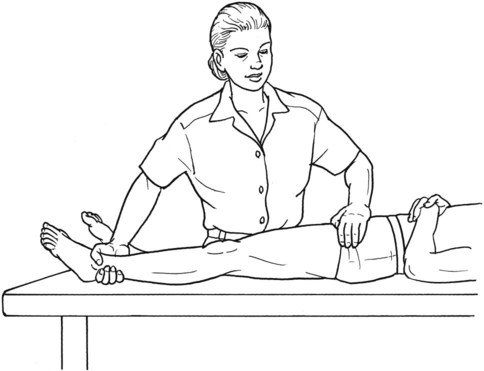
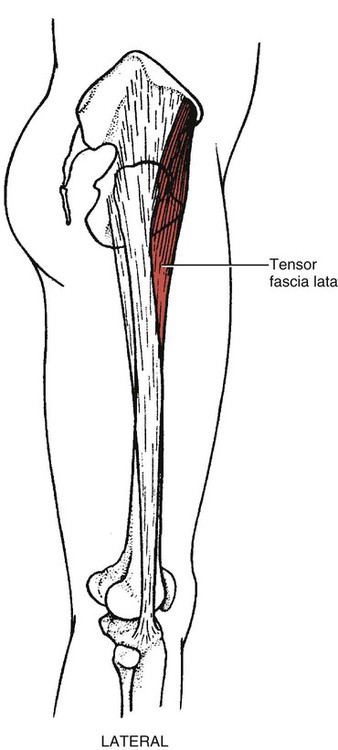
Table 6-1 No palpable contraction of muscle. Substitutions • Use of the sartorius will result in external rotation and abduction of the hip. The sartorius, because it is superficial, will be seen and can be palpated along its entire length (Figure 6-8). • If the tensor fasciae latae substitutes for the hip flexors, internal rotation and abduction of the hip will result. The tensor may be seen and palpated at its origin on the anterior superior iliac spine (ASIS). Table 6-2 HIP FLEXION, ABDUCTION, AND EXTERNAL ROTATION Standing on side to be tested. Cradle test limb under calf with hand supporting limb behind knee. Opposite hand palpates sartorius on medial side of thigh where the muscle crosses the femur (Figure 6-15). Therapist may prefer to palpate near the muscle origin just below the ASIS. (Gluteus maximus and Hamstrings) Table 6-3 Standing at side of limb to be tested at level of pelvis. (Note: Figure 6-20 shows therapist on opposite side to avoid obscuring activity.) The hand providing resistance is placed on the posterior leg just above the ankle. The opposite hand may be used to stabilize or maintain pelvis alignment in the area of the posterior superior spine of the ilium (see Figure 6-20). This is the most demanding test because the lever arm is longest. Standing on side to be tested at level of hips. Palpate hamstrings (deep into tissue with fingers) at the ischial tuberosity (Figure 6-24). Palpate the gluteus maximus with deep finger pressure over the center of the buttocks and also over the upper and lower fibers. Standing at the side to be tested at the level of the pelvis. (Note: The therapist in the illustration is shown on the wrong side to avoid obscuring test positions.) Hand for resistance is contoured over the posterior thigh just above the knee. The opposite hand may stabilize or maintain the alignment of the pelvis (Figure 6-25). For the Grade 3 test, the knee may need to be supported in flexion (by cradling at the ankle). Standing at side of limb to be tested. (Note: Figure 6-28 shows the therapist on the opposite side to avoid obscuring test positions.) The hand used to provide resistance is contoured over the posterior thigh just above the knee. The opposite hand stabilizes the pelvis laterally to maintain hip and pelvis posture (see Figure 6-25). Do not test the patient with hip flexion contractures and weak extensors (less than Grade 3) in the standing position. Position the patient side-lying on the table. Conduct the test as described for the aggregate of extensor muscles (see page 212) or for the isolated gluteus maximus (see page 214). An alternate hip extensor test is the supine hip extension test. This supine test may be substituted to eliminate change of patient position. Grades 5, 4, 3, and 2 have been validated in this position (n = 44 subjects) by measuring maximum hip extension torques recorded via a strain gauge dynamometer.2 Supine with heels off end of table. Arms folded across chest or abdomen. (Do not allow patient to push into table with upper extremities.) The patient’s hip range should be measured to assure approximately 35 inches (approximately 65° of flexion). This is the distance the leg should be lifted during the test (Figure 6-29). (Gluteus medius and Gluteus minimus) Table 6-4 *The greatest percentage of maximum voluntary contraction (MVC) in the gluteus medius was recorded during single limb stance when the subject was simultaneously abducting the opposite leg. This finding validates the gluteus medius as a pelvic stabilizer.3,4 Standing behind patient. Hand used to give resistance is contoured across the lateral surface of the knee. The hand used to palpate the gluteus medius is just proximal to the greater trochanter of the femur (see Figure 6-36). (No resistance is used in a Grade 3 test.) To distinguish a Grade 5 from a Grade 4 result, first apply resistance at the ankle and then at the knee (Figure 6-37). Applying resistance at the ankle creates a longer lever arm, thus requiring more patient effort to resist the movement. If the patient cannot hold the limb in the test position with the resistance at the ankle but can at the knee, the grade is Grade 4. The therapist is reminded always to use the same lever in a given test sequence and in subsequent comparison tests. Standing on side of limb being tested. One hand supports and lifts the limb by holding it under the ankle to raise limb just enough to decrease friction. This hand offers no resistance, nor should it be used to offer assistance to the movement. On some smooth surfaces, such support may not be necessary (Figure 6-39). (Note: Figures 6-39 and 6-40 show therapist on opposite side of patient to avoid obscuring test positions.) The other hand palpates the gluteus medius just proximal to the greater trochanter of the femur (Figure 6-40). Standing at side of limb being tested at level of thigh. One hand supports the limb under the ankle just above the malleoli. The hand should provide neither resistance nor assistance to movement (see Figure 6-40). Palpate the gluteus medius on the lateral aspect of the hip just above the greater trochanter. Substitutions • Hip-hike substitution: Patient may “hike hip” by approximating pelvis to thorax using the lateral trunk muscles, which move the limb through partial abduction range (Figure 6-41). This movement may be detected by observing the lateral trunk and hip (move clothing aside) and palpating the gluteus medius above the trochanter. • External rotation and flexion substitution: The patient may try to externally rotate during the motion of abduction (Figure 6-42). This could allow the oblique action of the hip flexors to substitute for the gluteus medius. • Tensor fasciae latae substitution: If the test is allowed to begin with active hip flexion or with the hip positioned in flexion, there is an opportunity for the tensor fasciae latae to abduct the hip. Table 6-5 Standing at side of limb to be tested. (Note: Figure 6-49 deliberately shows therapist on wrong side to avoid obscuring test positions.) One hand supports the limb under the ankle; this hand will be used to reduce friction with the surface as the patient moves but should neither resist nor assist motion.
Testing the Muscles of the Lower Extremity
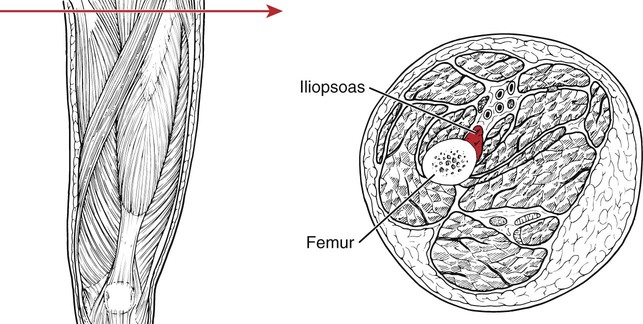
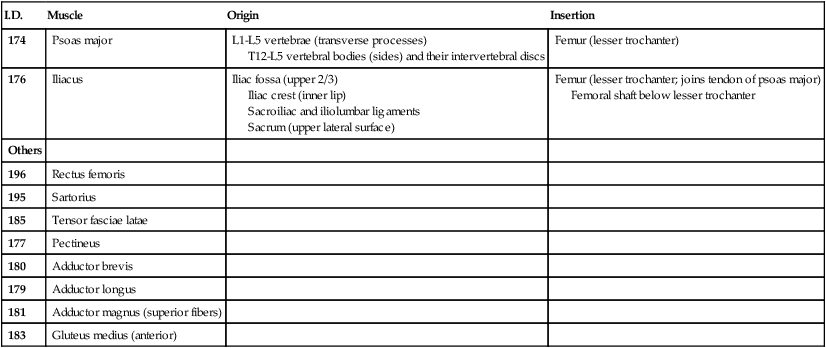
Hip Flexion
I.D.
Muscle
Origin
Insertion
174
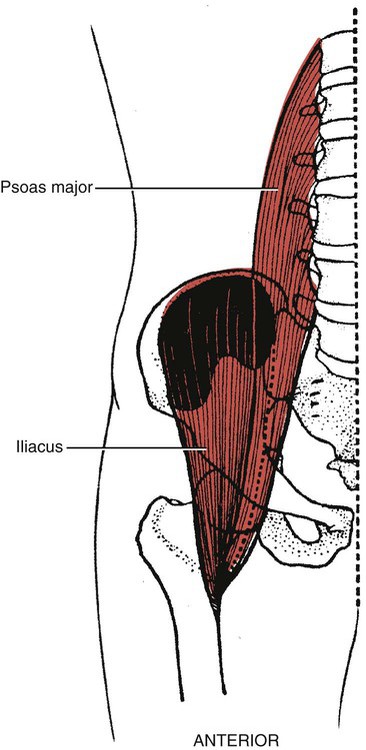
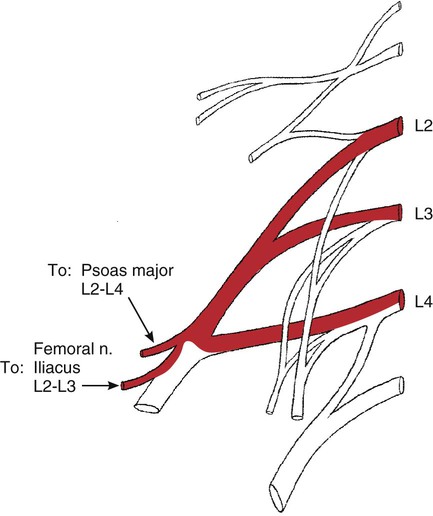
Psoas major
L1-L5 vertebrae (transverse processes)
T12-L5 vertebral bodies (sides) and their intervertebral discs
Femur (lesser trochanter)
176
Iliacus
Iliac fossa (upper 2/3)
Iliac crest (inner lip)
Sacroiliac and iliolumbar ligaments
Sacrum (upper lateral surface)
Femur (lesser trochanter; joins tendon of psoas major)
Femoral shaft below lesser trochanter
Others
196
Rectus femoris
195
Sartorius
185
Tensor fasciae latae
177
Pectineus
180
Adductor brevis
179
Adductor longus
181
Adductor magnus (superior fibers)
183
Gluteus medius (anterior)
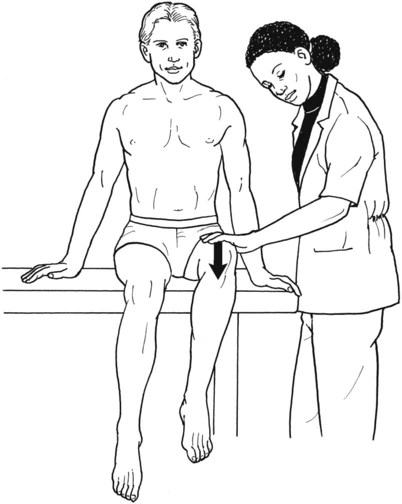
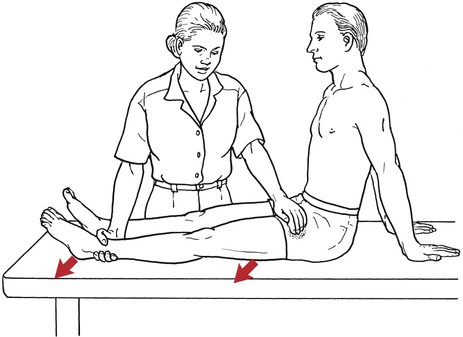
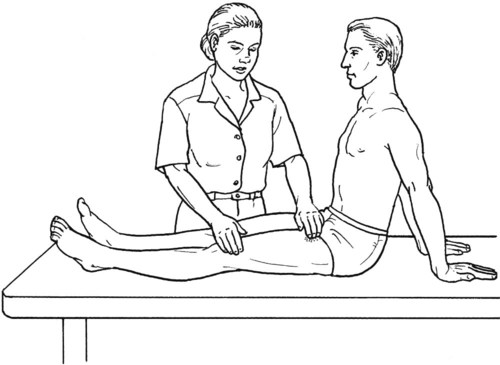
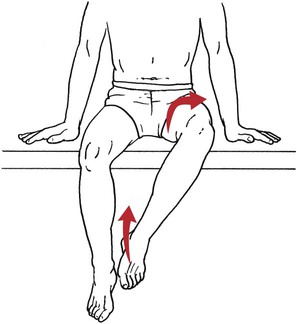
Grade 1 (Trace) and Grade 0 (Zero)
Grading
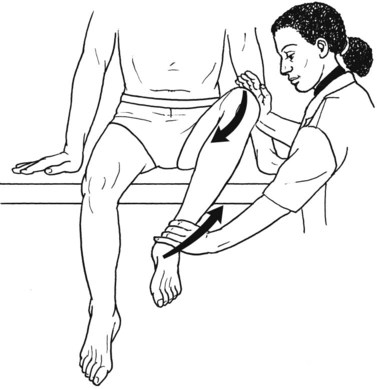
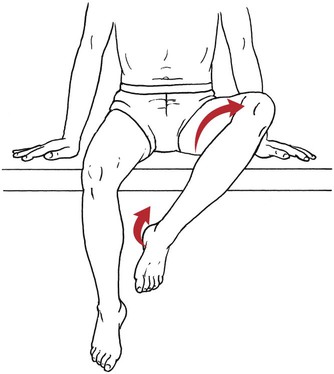
Hip Flexion, Abduction, and External Rotation with Knee Flexion

I.D.
Muscle
Origin
Insertion
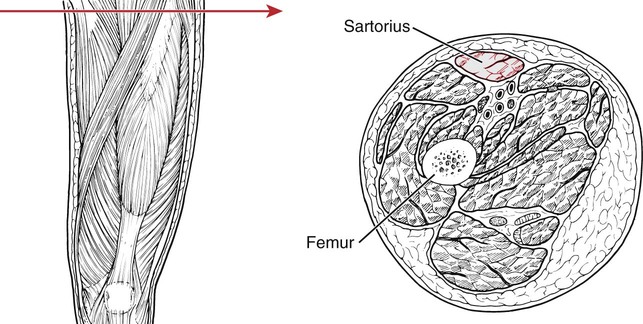
195
Sartorius
Ilium (anterior superior iliac spine [ASIS])
Iliac notch below ASIS
Tibia (shaft, proximal medial surface)
Capsule of knee joint (via slip)
Medial side fascia of leg
Others
Hip and knee flexors
Hip external rotators
Hip abductors
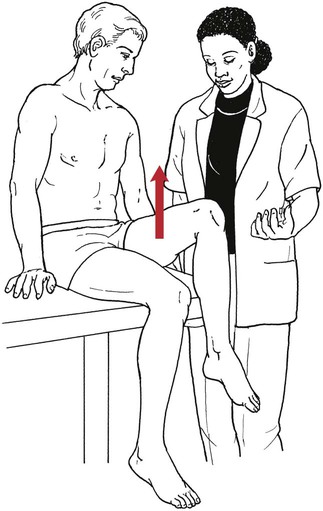
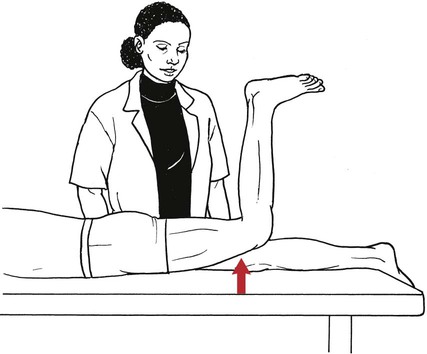
Grade 5 (Normal), Grade 4 (Good), and Grade 3 (Fair)
Grade 1 (Trace) and Grade 0 (Zero)
Position of Therapist:
Hip Extension
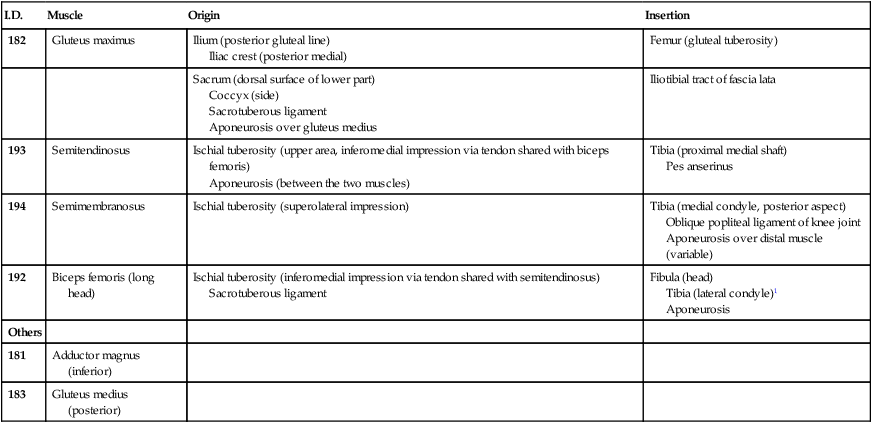
I.D.
Muscle
Origin
Insertion
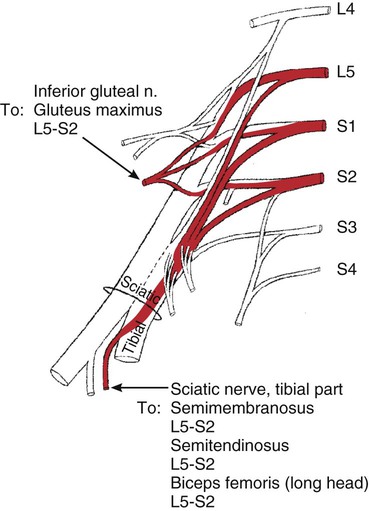
182
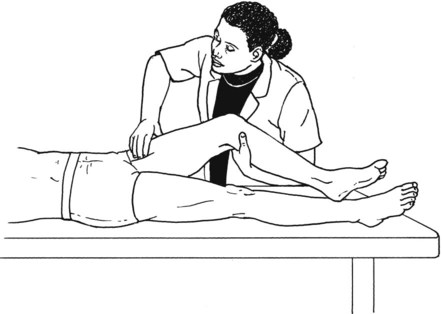
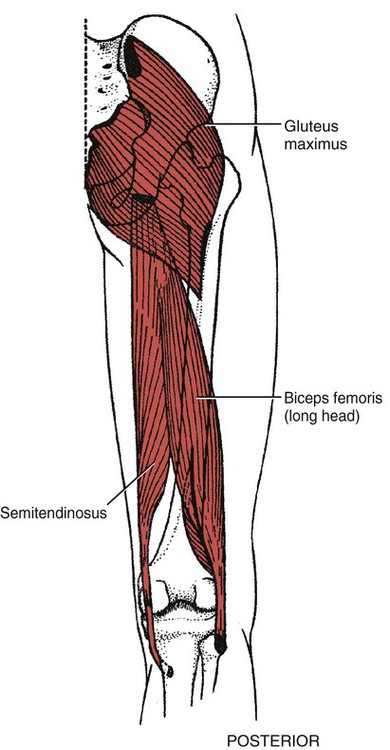
Gluteus maximus
Ilium (posterior gluteal line)
Iliac crest (posterior medial)
Femur (gluteal tuberosity)
Sacrum (dorsal surface of lower part)
Coccyx (side)
Sacrotuberous ligament
Aponeurosis over gluteus medius
Iliotibial tract of fascia lata
193
Semitendinosus
Ischial tuberosity (upper area, inferomedial impression via tendon shared with biceps femoris)
Aponeurosis (between the two muscles)
Tibia (proximal medial shaft)
Pes anserinus
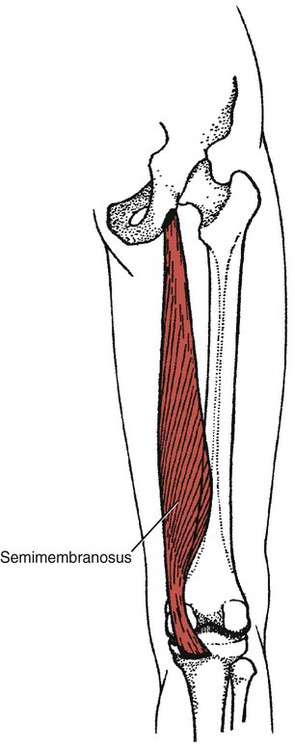
194
Semimembranosus
Ischial tuberosity (superolateral impression)
Tibia (medial condyle, posterior aspect)
Oblique popliteal ligament of knee joint
Aponeurosis over distal muscle (variable)
192
Biceps femoris (long head)
Ischial tuberosity (inferomedial impression via tendon shared with semitendinosus)
Sacrotuberous ligament
Fibula (head)
Tibia (lateral condyle)1
Aponeurosis
Others
181
Adductor magnus (inferior)
183
Gluteus medius (posterior)
Grade 5 (Normal), Grade 4 (Good), and Grade 3 (Fair) (Aggregate of all hip extensor muscles)
Position of Therapist:
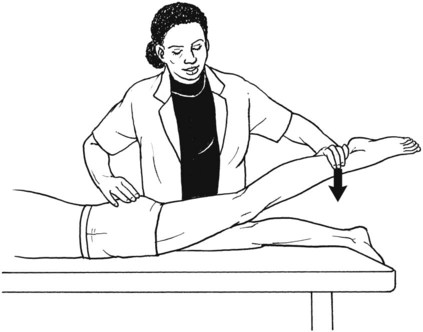
Grade 1 (Trace) and Grade 0 (Zero)
Position of Therapist:
Hip Extension Test to Isolate Gluteus Maximus
Grade 5 (Normal), Grade 4 (Good), and Grade 3 (Fair)
Position of Therapist:
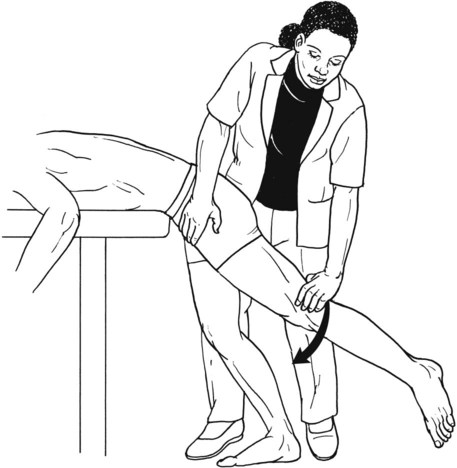
Hip Extension Tests Modified for Hip Flexion Tightness
Grade 5 (Normal), Grade 4 (Good), and Grade 3 (Fair)
Position of Therapist:
Grade 2 (Poor), Grade 1 (Trace), and Grade 0 (Zero)

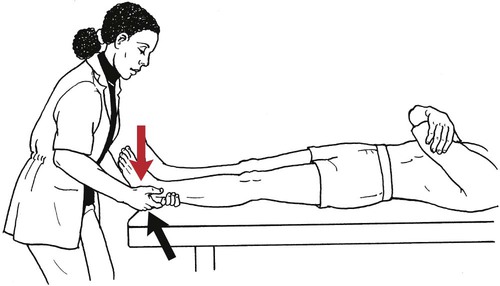
Supine Hip Extension Test
Grade 5 (Normal), Grade 4 (Good), Grade 3 (Fair), and Grade 2 (Poor)
Position of Patient:
Hip Abduction
I.D.
Muscle
Origin
Insertion
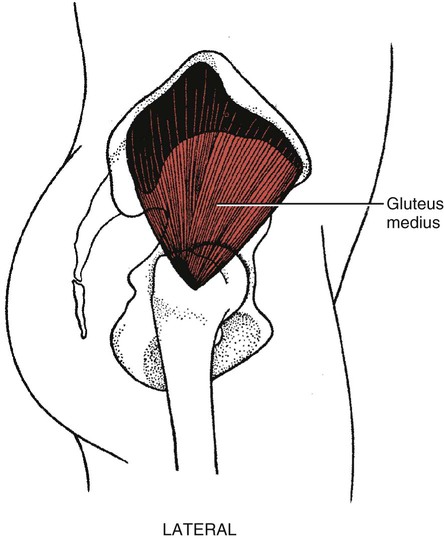
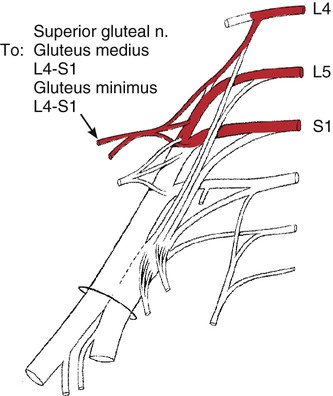
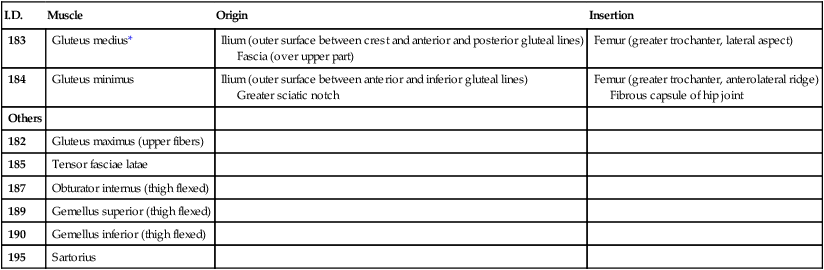
183
Gluteus medius*
Ilium (outer surface between crest and anterior and posterior gluteal lines)
Fascia (over upper part)
Femur (greater trochanter, lateral aspect)
184
Gluteus minimus
Ilium (outer surface between anterior and inferior gluteal lines)
Greater sciatic notch
Femur (greater trochanter, anterolateral ridge)
Fibrous capsule of hip joint
Others
182
Gluteus maximus (upper fibers)
185
Tensor fasciae latae
187
Obturator internus (thigh flexed)
189
Gemellus superior (thigh flexed)
190
Gemellus inferior (thigh flexed)
195
Sartorius
Grade 5 (Normal), Grade 4 (Good), and Grade 3 (Fair)
Position of Therapist:
Grade 2 (Poor)
Position of Therapist:
Grade 1 (Trace) and Grade 0 (Zero)
Position of Therapist:
Grading

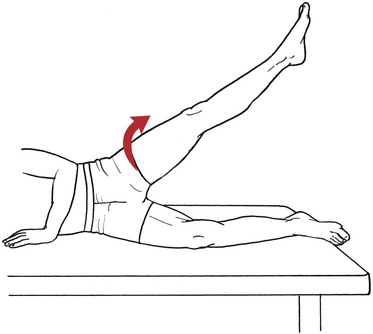
Hip Abduction from Flexed Position
I.D.
Muscle
Origin
Insertion
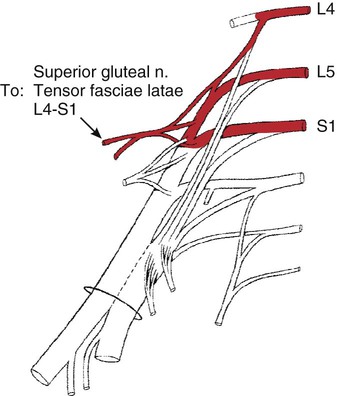
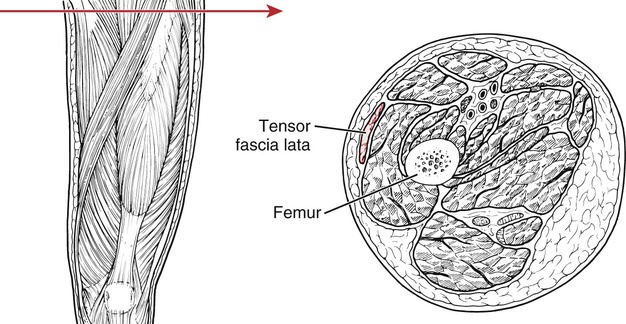
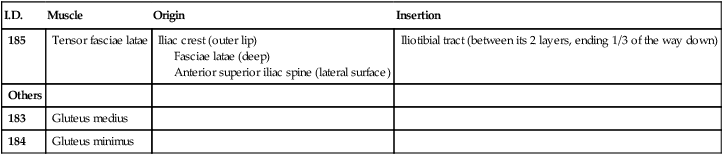
185
Tensor fasciae latae
Iliac crest (outer lip)
Fasciae latae (deep)
Anterior superior iliac spine (lateral surface)
Iliotibial tract (between its 2 layers, ending 1/3 of the way down)
Others
183
Gluteus medius
184
Gluteus minimus
Grade 2 (Poor)
Position of Therapist:
Grade 1 (Trace) and Grade 0 (Zero)