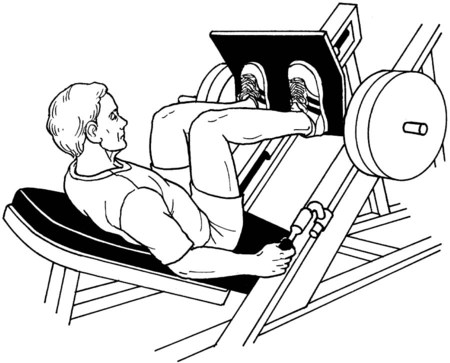
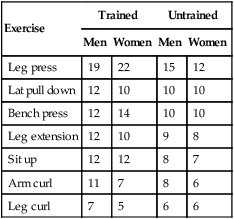
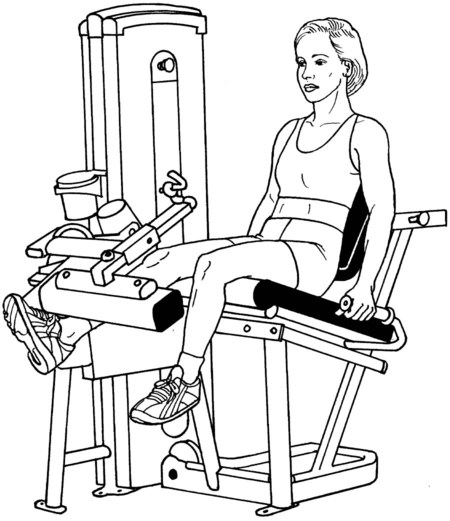
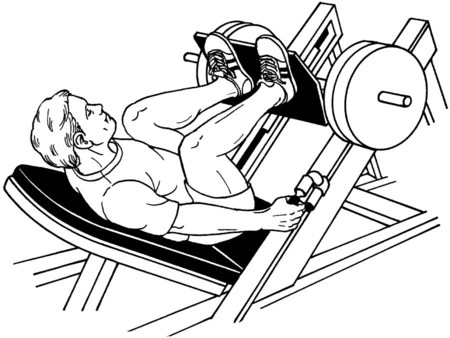
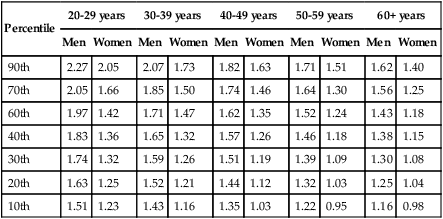
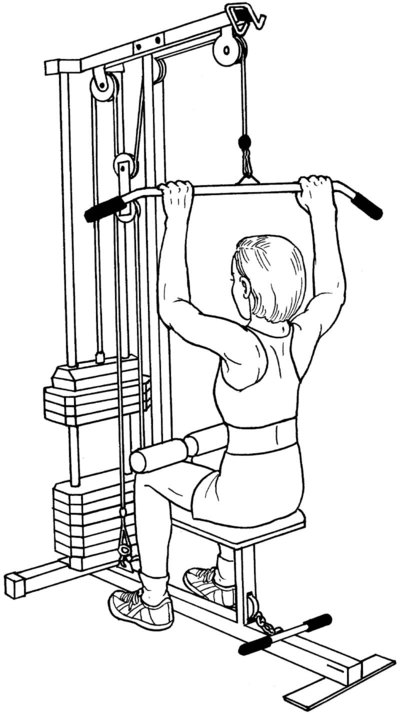
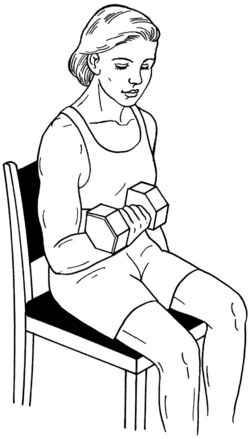
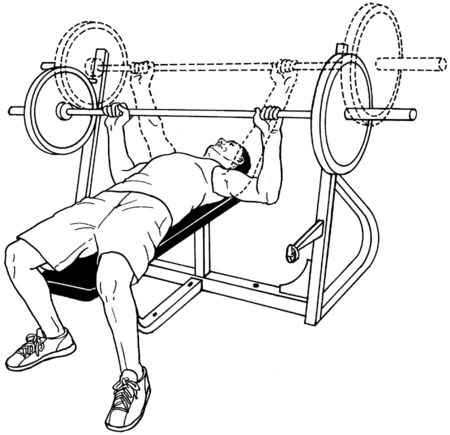
Manual muscle testing is a foundational measure of strength that is widely used across the health professions for both diagnosis and rehabilitation. Yet manual muscle testing has specific limitations, as discussed in Chapter 2. Consequently, alternative strength measures are needed in certain cases such as when strength exceeds a functional threshold, when strength of the patient is greater than that of the therapist, when subtle differences exist between sides or between the agonist and antagonist, or when power or endurance need to be measured. The most commonly used alternatives to manual muscle testing are equipment-based tests. It is presumed that any therapist conducting a strength testing session, particularly one requiring maximal effort from a large muscle group, will perform a prescreening exam for red-flag conditions. Maximal strength testing for the back extensors in a patient with severe osteoporosis, for example, may not be appropriate. Likewise, a patient with unstable blood pressure may have an adverse reaction while exerting maximum effort on a leg press, particularly if the patient—incorrectly—holds his or her breath. It is also presumed that muscular strength will be assessed after the patient has warmed up the muscle before testing. The typical warm-up includes completing three to five sub-maximal contractions at 40% to 50% of maximum using the muscle or muscle group that is being tested.1 Active range of motion should be assessed to determine if adequate joint range and muscle length will allow maximum effort in the correct test position. The one-repetition maximum (1-RM) test is regarded as the “gold standard” of standardized muscle strength testing. The 1-RM refers to the amount of load the patient can move one time (and one time only) through full range in a controlled manner with good form.1 It is a safe technique, perhaps safer than a sub-maximum strength test, even though muscle soreness may occur and blood pressure may spike during a maximum exertion test.2 1-RM tests are highly reliable when specific procedures are followed, more so than any other type of strength assessment.3 Additionally, the fundamental method for establishing 1-RM is the same for each muscle group and thus the 1-RM test is more precise than most. The basic steps for performing a 1-RM are as follows: 1. Warm up by completing three to five sub-maximum repetitions. This warm-up also allows the patient to become familiar with the movement and to correct the form, if needed. 2. Select an initial weight that is within the patient’s perceived capacity equivalent to 75% of capacity. 3. Determine the 1-RM within four repetitions with rest periods of 3 to 5 minutes between tests. 4. Increments of weight should be increased by 5 to 10 pounds until the patient cannot complete a repetition. 5. All repetitions should be performed at a constant and consistent rate of speed. 6. All repetitions should be performed through full range of motion (or the same range of motion if full range is not possible). The final weight that the patient can move successfully is recorded as the definitive 1-RM. A 1-RM test can be estimated from a multiple-RM test (Table 8-1), although this estimation has been shown to be quite variable (Table 8-2).4 As the percent of 1-RM increases, the number of repetitions decreases (Table 8-3). Large muscle group exercises allow the completion of more repetitions than small muscle groups at the same relative intensity.5 Because the volume of work is greater with a 10-RM than a 1-RM, fatigue will be a factor. The 1-RM and multiple-RM tests can be performed using the same equipment. Table 8-1 ESTIMATING 1-RM FROM A MULTIPLE-RM TEST Table 8-2 NUMBER OF REPETITIONS PERFORMED AT 80% OF THE 1-RM4 Table 8-3 MAXIMUM WEIGHT THAT CAN BE LIFTED DECREASES WITH THE NUMBER OF REPETITIONS The number of repetitions performed at a given percent of 1-RM is influenced by the amount of muscle mass used because more repetitions can be performed during the back squat than either the bench press or arm curl.5 The 4- to 6-RM is more accurate than the 10-RM. Variability increases with decreased loads.6 Seated comfortably on a knee extension machine that has been adjusted for leg length. A seat belt may be placed around patient’s pelvis, if needed, to provide stability (Figure 8-1; seat belt not shown in figure). If necessary, padding may be placed beneath the thigh being tested for patient’s comfort. After the patient is comfortably seated on the machine, have him or her place both feet on the footplate, approximately 12 inches apart, directly under the hips. Adjust the seat distance so that the knees are bent to approximately 110°. Have the patient put his or her hands on the grab bars (Figure 8-2). Select the desired weight on the weight stack, put in the pin to keep weights in place and have the patient fully extend the footplate against the chosen resistance. The knees should be fully extended at the end of the push. Note: some leg press machines require the therapist to place weights on either side of the footplate bar (e.g., two 25-pound weights) and lock the weights in place. Record the highest weight the patient can push while fully extending the knees. Helpful Hints • The leg press is the only machine that uses the closed chain approach (distal end of the kinetic chain is fixed). • Foot position low on the plate (see Figure 8-3) elicits greater muscle activity from the quadriceps and gastrocnemius than high foot position (see Figure 8-2), suggesting that the feet should routinely be positioned low on the plate.7 Not all patients, however, can comfortably assume a low-foot position; in terms of importance, comfort should outweigh muscle activation. But be aware that if a patient cannot assume the low foot position, then maximal muscle activation is not likely to occur. • There are established norms for leg press for men and women ages 20 through early 60s, which is hardly comprehensive of all age groups. Nonetheless, it is important to have an understanding of what should be expected in terms of “normal” strength. Norms are expressed as a ratio of force output to body weight. Thus, a typical ratio for a young woman in her 20s is 2.05, meaning that she should be able to generate force equivalent to twice her body weight. Normative data for the leg press and bench press on hundreds of men and women that have been tested by the Cooper Institute are presented in Table 8-4. Table 8-4 LEG PRESS NORMS FOR MEN AND WOMEN IN VARIOUS AGE GROUPS VALUES REFLECT 1-RM/BODY WEIGHT Descriptors for percentile rankings: 90, well above average; 70, above average; 50, average; 30, below average; 10, well below average. Data for men provided by The Cooper Institute for Aerobics Research, The Physical Fitness Specialist Manual. Dallas, TX, 2005. http://hk.humankinetics.com/AdvancedFitnessAssessmentandExercisePrescription/IG/269618.indd.pdf Data for women provided by the Women’s Exercise Research Center, The George Washington University Medical Center, Washington, D.C., 1998. Place the pull-down seat in a position so that the patient’s feet are on the floor during the test. The patient is then seated astride a bench, typically facing the weight stack, with the back unsupported (Figure 8-4). Based on the initial physical therapy screening (e.g., can the patient pull against manual resistance easily?), select a weight stack that is relatively easy, such as 20 pounds for a woman and 40 pounds for a man. Have the patient reach overhead and grab a horizontal bar to which the weight stack is attached. The bar is grasped so that the arms are wide apart and the forearms are in pronation (more difficult) or supination (easier). Hands on the bar should be slightly further apart than the shoulders. After the patient has pulled the bar down to shoulder height in front of the body, the test is considered successful. The position of pulling down in front of the head provides the greatest activation of the latissimus dorsi.8 After a 30- to 60-second rest, the patient is asked to pull the bar down once again, this time with another 5 to 10 pounds added, depending on how easy or difficult the first repetition was. Additional weights are added in 5- to 10-pound increments until the patient reaches failure. Norms for the latissimus pull-down activity are typically 66% of body weight for young men and 50% of body weight for young women.9 Norms for men and women who are middle-aged and older have not been established. This test is feasible for patients of nearly all ages. Based on the patient’s answers to prescreening questions (such as, can you lift a gallon of milk?), the therapist should pick a weight that is reasonably challenging. Normative strength is approximately 25% of body weight for women and 33% of body weight for men.6 Another way to determine a starting point for less fit individuals is to ask the patient if he can easily carry a large bag of groceries (approximately 10 pounds). If the patient responds affirmatively, begin the test with 15 pounds of weight. The patient’s elbow should be straight, with arm at the side. Put the 15-pound weight in the patient’s hand and have the patient flex the elbow through full range of motion (Figure 8-5). If this movement is easy, select a 20-pound weight for the next repetition. After 20 pounds have been successfully lifted through full range of motion, select a 25-pound weight for the next repetition. If this movement is successful but difficult, increase the weight by 2.5 pounds. When the weight cannot be lifted through full range in a controlled manner, or if muscle failure occurs, the test is terminated and the last weight that was successfully lifted is the patient’s 1-RM. Recall that 30 to 60 seconds of rest should be provided between repetitions. Hand placement should be gripping the bar with both hands placed slightly wider than shoulder width and the forearms in pronation (Figure 8-6). The bench press bar is lifted until the elbows are fully extended and the shoulders are at 90° of flexion. After the patient successfully completes the test, additional weight in 5- to 10-pound increments is added. Provide the patient 30 to 60 seconds of rest between lifts. Test failure is observed when the patient is unable to complete full range of motion.
Alternatives to Manual Muscle Testing
Introduction
General Testing Considerations
One-repetition Maximum Test
Technique
Multiple-repetition Maximum Test
Given a 1-RM of 100 pounds:
1-RM
2-RM
3-RM
4-RM
5-RM
6-RM
7-RM
8-RM
9-RM
10-RM
Multiple-RM loads are:
100
95
93
90
87
85
83
80
77
75

Exercise
Trained
Untrained
Men
Women
Men
Women
Leg press
19
22
15
12
Lat pull down
12
10
10
10
Bench press
12
14
10
10
Leg extension
12
10
9
8
Sit up
12
12
8
7
Arm curl
11
7
8
6
Leg curl
7
5
6
6
Given:
1-RM
2-RM
3-RM
4-RM
5-RM
6-RM
7-RM
8-RM
9-RM
10-RM
The load would be: (in pounds)
100
95
93
90
87
85
83
80
77
75
Number of repetitions
1
2
3
4
5
6
7
8
9
10

Equipment-Based TESTING
Unilateral Knee Extension Test
Position of Patient:
Leg Press Test
Testing Procedure:
Scoring
Percentile
20-29 years
30-39 years
40-49 years
50-59 years
60+ years
Men
Women
Men
Women
Men
Women
Men
Women
Men
Women
90th
2.27
2.05
2.07
1.73
1.82
1.63
1.71
1.51
1.62
1.40
70th
2.05
1.66
1.85
1.50
1.74
1.46
1.64
1.30
1.56
1.25
60th
1.97
1.42
1.71
1.47
1.62
1.35
1.52
1.24
1.43
1.18
40th
1.83
1.36
1.65
1.32
1.57
1.26
1.46
1.18
1.38
1.15
30th
1.74
1.32
1.59
1.26
1.51
1.19
1.39
1.09
1.30
1.08
20th
1.63
1.25
1.52
1.21
1.44
1.12
1.32
1.03
1.25
1.04
10th
1.51
1.23
1.43
1.16
1.35
1.03
1.22
0.95
1.16
0.98
Latissimus Dorsi Pull-down Test
Testing Procedure:
Free Weights Testing
Elbow Flexion Test
Testing Procedure:
Bench Press Test
Testing Procedure:
![]()
Stay updated, free articles. Join our Telegram channel

Full access? Get Clinical Tree