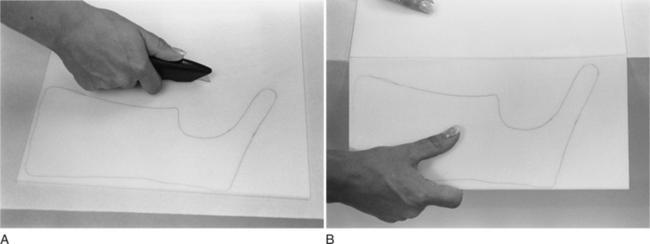
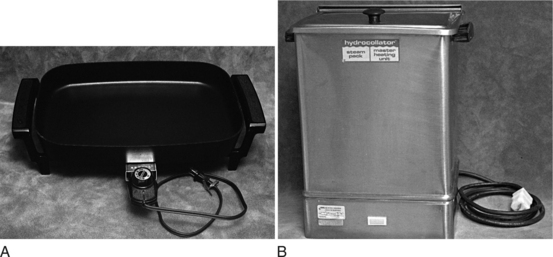
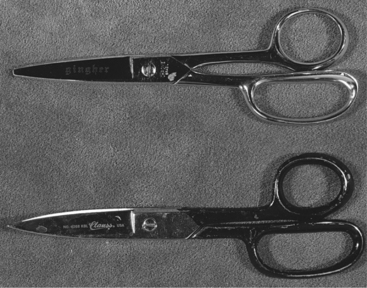
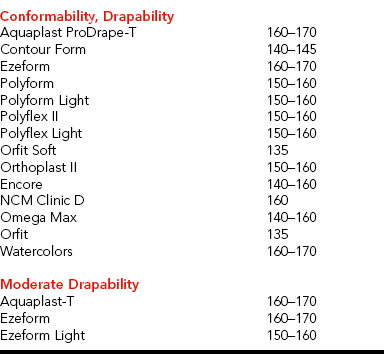
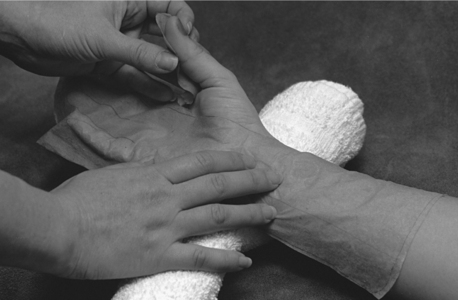
CHAPTER 3 1 Identify splint material properties. 2 Recognize tools commonly used in the splinting process. 3 Identify various methods to optimally prepare a client for splinting. 4 Explain the process of cutting and molding a splint. 5 List common splinting items that should be available to a therapist for splint provision. 6 List the advantages and disadvantages of using prefabricated splints. 7 Explain the reasons for selecting a soft splint over a prefabricated splint. 8 Explain three ways to adjust a static progressive force on prefabricated splints. 9 Relate an example of how a person’s occupational performance might influence prefabricated splint selection. 10 Summarize the American Occupational Therapy Association’s (AOTA’s) position on occupational therapists’ use of physical agent modalities (PAMs). 11 Define conduction and convection. 12 Describe the indications, contraindications, and safety precautions for the use of PAMs in preparation for splinting. Low-temperature thermoplastic (LTT) materials are the most commonly used to fabricate splints. The materials are considered “low temperature” because they soften in water heated between 135° and 180°F and the therapist can usually safely place them directly against a person’s skin while the plastic is still moldable. These compare to high-temperature thermoplastics that become soft when warmed to greater than 250°F and cannot touch a person’s skin while moldable without causing a thermal injury. When LTT is heated, it becomes pliable, and then hardens to its original rigidity after cooling. The first commonly available low-temperature thermoplastic material was Orthoplast. Currently, many types of thermoplastic materials are available from several companies. Types of materials used in clinics vary on the basis of patient population, diagnoses, therapists’ preferences, and availability. Thermoplastic materials are elastic, plastic, a combination of plastic and rubberlike, and rubberlike [North Coast Medical 2006]. Thermoplastic materials that are elastic based have some amount of memory. (Memory is addressed in the properties discussion of this section.) Typically, elastic thermoplastic has a coating to prevent the material from adhering to itself. (Most thermoplastics have a nonstick coating, but there are a few that specify they do not.) Elastic materials have a longer working time than other types of materials and tend to shrink during the cooling phase. Some LTT materials are engineered to include an antimicrobial protection. Splints can create a moist surface on the skin where mold and mildew can form [Sammons et al. 2006]. When skin cells and perspiration remain in a relatively oxygen-free environment for hours at a time, it is conducive to microbe growth and results in odor. Daily isopropyl alcohol cleansing of the inside surface of the splint will effectively combat this problem. Splinting materials containing the antimicrobial protection offer a defense against microorganisms. The antimicrobial protection does not wash or peel off. Each type of thermoplastic material has unique properties [Lee 1995] categorized by handling and performance characteristics. Handling characteristics refer to the thermoplastic material properties when heated and softened, and performance characteristics refer to the thermoplastic material properties after the material has cooled and hardened. Memory is a property that describes a material’s ability to return to its preheated (original) shape, size, and thickness when reheated. The property ranges from 100% to little or no memory capabilities [North Coast Medical 1999]. Materials with 100% memory will return to their original size and thickness when reheated. Materials with little to no memory will not recover their original thickness and size when reheated. Drapability is the degree of ease with which a material conforms to the underlying shape without manual assistance. The degree of drapability varies among different types of material. The duration of heating is important. The longer the material heats the softer it becomes and the more vulnerable it becomes to gravity and stretch. When a material with drapability is placed on a surface, gravity assists the material in draping and contouring to the underlying surface. Material exhibiting drapability must be handled with care after heating. A therapist should avoid holding the plastic in a manner in which gravity affects the plastic and results in a stretched, thin piece of plastic. Therefore, this type of plastic is best positioned on a clean countertop during cutting. Material with high drapability is difficult to use for large splints and is most successful on a cooperative person who can place the body part in a gravity-assisted position. All thermoplastic material, whether coated or uncoated, forms stronger bonds if surfaces are prepared with a solvent or bonding agent (which removes the coating from the material). A bonding agent or solvent is a chemical that can be brushed onto both pieces of the softened plastic to be bonded. In some cases, therapists roughen the two surfaces that will have contact with each other. This procedure, called scoring, can be carefully done with the end of a scissors, an awl, or a utility knife. After surfaces have been scored, they are softened, brushed with a bonding agent, and adhered together. Self-adherence is an important characteristic for mobilization splinting when one must secure outriggers to splint bases (see Chapter 11) and when the plastic must attach to itself to provide support—for example, when wrapping around the thumb as in a thumb spica splint (see Chapter 8). Conformability is a performance characteristic that refers to the ability of thermoplastic material to fit intimately into contoured areas. Material that is easily draped and has a high degree of conformability can pick up fingerprints and crease marks (as well as therapists’ fingerprints). Splints that are intimately conformed to persons are more comfortable because they distribute pressure best and reduce the likelihood of the splint migrating on the extremity. Materials that have a high degree of rigidity are strong and resistant to repeated stress. Rigidity is especially important when therapists make medium to large splints (such as splints for elbows or forearms). Large splints require rigid material to support the weight at larger joints. In smaller splints, rigidity is important if the plastic must stabilize a joint. Rigidity can be enhanced by contouring a splint intimately to the underlying body shape [Wilton 1997]. Most LTT materials cannot tolerate the repeated forces involved in weight bearing on a splint, as in foot orthoses. Most foot orthoses will have fatigue cracks within a few weeks [McKee and Morgan 1998]. Theoretically, perforations in material allow for air exchange to the underlying skin. Various perforation patterns are available (e.g., mini-, maxi-, and micro-perforated) [PSR 2006]. Perforated materials are also designed to reduce the weight of splints. Several precautions must be taken if one is working with perforated materials [Wilton 1997]. Perforated material should not be stretched because stretching will enlarge the holes in the plastic and thereby decrease its strength and pressure distribution. When cutting a pattern out of perforated material, therapists should attempt to cut between the perforations to prevent uneven or sharp edges. If this cannot be avoided, the edges of the splint should be smoothed. Finish refers to the texture of the end product. Some thermoplastics have a smooth finish, whereas others have a grainy texture. Generally, coated materials are easier to keep clean because the coating resists soiling [McKee and Morgan 1998]. The color of the thermoplastic material may affect a person’s acceptance and satisfaction with the splint and compliance with the wearing schedule. Darker-colored splints tend to show less soiling and appear cleaner than white splints. Brightly colored splints tend to be popular with children and youth. Colored materials may be used to help a person with unilateral neglect call attention to one side of the body [McKee and Morgan 1998]. In addition, colored splints are easily seen and therefore useful in preventing loss in institutional settings. For example, it is easier to see a blue splint in white bed linen than to see a white splint in white bed linen. A common thickness for thermoplastic material is Laboratory Exercise 3-1 Low-temperature Thermoplastics Name of thermoplastic material:______________________________________________ Table 3-1 Thermoplastic Property Guidelines* Courtesy Serena Berger, Smith & Nephew Rolyan, Inc., Germantown, Wisconsin, and North Coast Medical, Inc., San Jose, California. As shown inFigure 3-1, moistening the paper and applying it to the person’s hand helps the therapist determine which adjustments are required. Patterns made from aluminum foil work well to contour the pattern to the extremity. If the pattern is too large in areas, the therapist can make adjustments by marking the pattern with a pen and cutting or folding the paper. Sometimes it is necessary to make a new pattern or to retrace a pattern that is too small or that requires major adjustments. The therapist ensures that the pattern fits the person before tracing it onto and cutting it out of the thermoplastic material. It is well worth the time to make an accurate pattern because any ill-fitting pattern directly affects the finished product. Figure 3-1 To make pattern adjustments, moisten the paper and apply it to the extremity during fitting. Throughout this book, detailed instructions are provided for making different splint patterns. One should keep in mind that therapists with experience and competency may find it unnecessary to identify all landmarks as indicated by the detailed instructions. Form 3-1 lists suggestions helpful to a beginning splintmaker when drawing and fitting patterns. FORM 3-1 *Hints for Drawing and Fitting a Splint Pattern • Half the circumference of body parts for the width of troughs • Two-thirds the length of the forearm • The length and width of metacarpal or palmar bars • The correct use of hand creases for landmarks • The amount of support to the wrist, fingers, and thenar and hypothenar eminencies *See Appendix B for a perforated copy of this form. Once the pattern is outlined on a sheet of material, a rectangle slightly larger than the pattern is cut with a utility knife (Figure 3-2). After the cut is made, the material is folded over the edge of a countertop. If unbroken, the material can be turned over to the other side and folded over the countertop’s edge. Any unbroken line can then be cut with a utility knife or scissors. Thermoplastic material is softened in an electric fry pan, commercially available splint pan, or hydrocollator filled with water heated to approximately 135° to 180°F (Figure 3-3). (Some materials can be heated in a microwave oven or in a fry pan without water.) To ensure temperature consistency, the temperature dial should be marked to indicate the correct setting of 160°F by using a hook-and-loop (Velcro) dot or piece of tape. When softening materials vertically in a hydrocollator, the therapist must realize the potential for problems associated with material stretching due to gravity’s effects. If a fry pan is used, the water height in the pan should be a minimum of three-fourths full (approximately 2 inches deep). Adequate water height allows a therapist to submerge portions of the splint later when making adjustments. If the thermoplastic material is larger than the fry pan, a portion of the material should be heated. When the material is soft, a paper towel is placed on the heated portion and the rest of the material is folded on the paper towel. A nonstick mesh may be placed in the bottom of a fry pan to prevent the plastic from sticking to any materials or particles. However, it can create a mesh imprint on the plastic. When the thermoplastic piece is large (and especially when it is a high-stretch material), it is a great advantage to lift the thermoplastic material out of the splint pan on the mesh. This keeps the plastic flat and minimizes stretch. After removing the thermoplastic material from the water with a spatula or on the mesh, the therapist cuts the material with either round- or flat-edged scissors (Figure 3-4). The therapist uses sharp scissors and cuts with long blade strokes (as opposed to using only the tips of the scissors). Scissors should be sharpened at least once each year, and possibly more often, depending on use. Dedicating scissors for specific materials will prolong the edge of the blade. For example, one pair of scissors should be used to cut plastic, another for paper, another for adhesive-backed products, and so on. Sharp scissors in a variety of sizes are helpful for difficult contoured cutting and trimming. Splinting solvent or adhesive removers will remove adhesive that builds up on scissor blades. After the pattern is cut from the material, it is reheated. During reheating, the therapist positions the person to the desired joint position(s). If the therapist anticipates positioning challenges and needs to spend time solving problems, positioning should be done before the material is reheated to prevent the material from overheating [personal communication, K. Schultz-Johnson, 1999]. During this time frame, the therapist explains that the material will be warm and that if it is too intolerable the client should notify the therapist. The therapist completes any pre-padding of boney prominences and covers dressings and padding (the LTT will stick to these if not covered with stockinette) prior to the molding process. Therapists may choose to hasten the cooling process to maintain joint position and splint shape. Several options are available. First, a therapist can use an environmentally friendly cold spray. Cold spray is an agent that serves as a surface coolant. Cold spray should not be used near persons who have severe allergies or who have respiratory problems. Because the spray is flammable, it should be properly stored. A second option is to dip the person’s extremity with the splint into a tub of cold water. This must be done cautiously with persons who have hypertonicity because the cold temperature could cause a rapid increase in the amount of tone, thus altering joint position. Similar to using a tub of cold water, the therapist may carefully walk the person wearing the splint to a sink and run cold water over the splint. Third, a therapist can use frozen Theraband and wrap it around the splint to hasten cooling. An Ace bandage immersed in ice water and then wrapped around the splint may also speed cooling [Wilton 1997]. However, Ace bandages often leave their imprints on the splinting material.
Splinting Processes, Tools, and Techniques
Thermoplastic Splinting Materials
Thermoplastic Material Content and Properties
Handling Characteristics
Drapability
Bonding
Performance Characteristics
Rigidity
Perforations
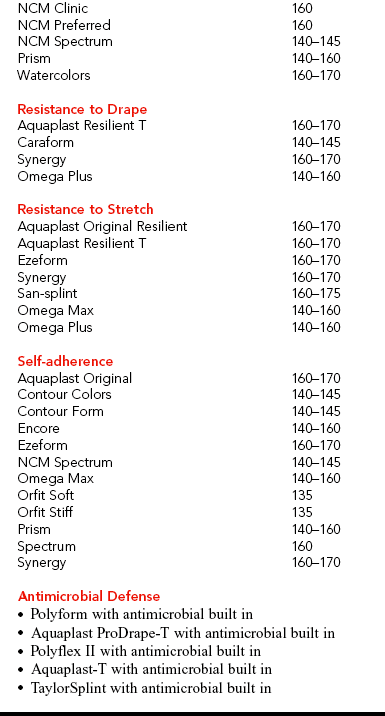
Finish, Colors, and Thickness
 inch. However, if the weight of the entire splint is a concern a thinner plastic may be used—reducing the bulkiness of the splint and possibly increasing the person’s comfort and improving compliance with the wearing schedule. Some thermoplastic materials are available in thicknesses of 1/16, 3/32, and 3/16 inch. Thinner thermoplastic materials are commonly used for small splints and for arthritis and pediatric splints, whereas the 3/16-inch thickness is commonly used for lower extremity splints and fracture braces [Melvin 1989, Sammons et al. 2006]. Therapists should keep in mind that plastics thinner than
  inch will soften and harden more quickly than thicker materials. Therefore, therapists who are novices in splinting may find it easier to splint with
  -inch-thick materials than with thinner materials [McKee and Morgan 1998].Table 3-1 lists property guidelines for thermoplastic materials. (See also Laboratory Exercise 3-1.)


Process: Making the Splint
Fitting the Pattern to the Client
 Explain the pattern-making process to the person.
 Ask or assist the person to remove any jewelry from the area to be splinted.
 Wash the area to be splinted if it is dirty.
 To trace the outline of the person’s extremity, keep the pencil at a 90-degree angle to the paper.
 Folding the paper towel to mark adjustments in the pattern can help with evaluation of the pattern.
 When evaluating the pattern fit of a forearm-based splint on the person, look for the following:
Tracing, Heating, and Cutting
Heating the Thermoplastic Material
Cutting the Thermoplastic Material
Reheating the Thermoplastic Material
Molding the Splint to the Client
![]()
Stay updated, free articles. Join our Telegram channel

Full access? Get Clinical Tree


Musculoskeletal Key
Fastest Musculoskeletal Insight Engine
 inch thick is sufficiently heated, it is usually pliable for approximately 3 to 5 minutes (S. Berger, personal communication, 1995). Some materials will allow up to 4 to 6 minutes of working time. Materials thinner than
  inch and those that are perforated heat and cool more quickly.