Fig. 11.1
Methods of assessing strength. (a) Jamar dynamometer for grip strength. (b) Key pinch. (c) Two-point pinch. (d) Three-point pinch
Pinch Strength
In order to measure the pinch strength, an appropriate calibrated measuring device is used: the pinch dynamometer. Three different positions are measured during three trials (mean value) and bilaterally. The subject sits with the elbow at 90° and the forearm in a neutral position. The pinch strength measurement is recorded after applying pressure for at least 2 s.
The key pinch: The dynamometer is placed between the pulp of the thumb and the side of the middle phalanx of the index finger (Fig. 11.1b).
The distal pinch: The dynamometer is placed between the pulp of the index finger and the pulp of the thumb (two-point pinch) (Fig. 11.1c).
The three-point pinch: The dynamometer is placed between the pulps of the index, long finger, and thumb (Fig. 11.1d).
11.1.2.2 Evaluation of Sensitivity
Sensitivity tests allow objective measurement of the degree of denervation or reinnervation and the adaptation of the treatment depending on the evolution of the patient. Several methods for assessing sensitivity are available:
Semmes-Weinstein Monofilaments
This repetitive, noninvasive, and reproducible test, independent of the practitioner, is the most accurate test for skin sensitivity assessment. Nylon monofilaments of different diameters (from the thinnest to the thickest) are applied perpendicularly to the skin three times for about 1.5 s while the patient’s eyes are covered. The caliber noted is that of the thinnest monofilament felt by the patient (Fig. 11.2a).

Fig. 11.2
Sensitivity tests. (a) Semmes-Weinstein monofilaments. (b) graduated stick: two-point discrimination test
Two-Point Discrimination
Only the finger pulps and middle phalanges can be evaluated. This test measures the discriminative ability of two stationary points (Fig. 11.2b). Two small, sharp points are spaced with a variable distance around a disc (Weber’s compass) or a graduated stick. The therapist touches the patient with the two points on the pulp, until the skin turns white. The patient feels that one or two points have touched the skin. This test is relatively rough, but it allows for discriminative sensitivity (normal 0–5 mm, moderate 6–10 mm, low 11–15 mm).
The Hot/Cold Test
This test is performed using two test tubes containing water at 10 and 40 °C and assesses thermal sensitivity. The stimulus must be applied for 1 s on each random area.
11.1.2.3 Measurement of Mobility
A goniometer (Fig. 11.3) can be used to measure the range of motion in a reliable and reproducible manner. The measurements (in degrees) are done for each joint in active and passive modes, to distinguish joint stiffness from stiffness due to soft tissue adhesions.
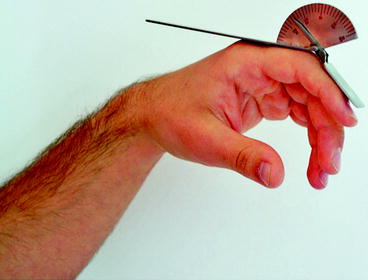
Fig. 11.3
Measuring the range of motion using a goniometer
11.1.2.4 Measurement of Swelling
The water displacement method can be used to quantitatively measure the edema in a reproducible manner. The hand is immersed in a water bath and blocked at the level of the third web space. Excess water is measured. This technique indirectly measures the hand “volume.” The technique is contraindicated in the presence of a wound and cannot be used for fingers.
The finger circumference can be measured using sewing tape and marking on each phalanx or joint.
11.1.2.5 Functional Tests of Dexterity
Many tests (Fig. 11.4) have been developed to assess hand and finger dexterity. All consist of speed exercises performed with the dominant hand and then with the opposite hand or with both hands simultaneously and symmetrically.
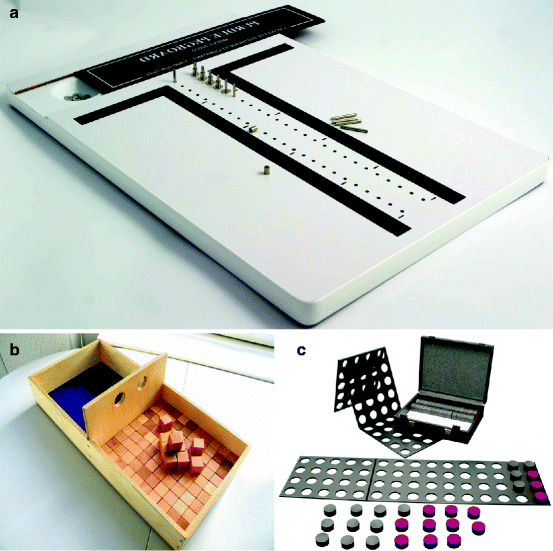
Fig. 11.4
Examples of functional tests of dexterity. (a) The Purdue pegboard test. (b) The box and block test. (c) The Minnesota rate of manipulation test
11.1.2.6 Prehensile Grasp Ability
One of the most common tests to assess the prehensile grasp ability is the 400-point test. Using everyday life objects (key, glass, comb, etc.), the patient is evaluated on 400 grasps (bidigital, pollicidigital, multidigital, etc.), in 57 activities. The score is then scaled to 100 points.
11.1.3 Results Assessment
The results should be simple to report (assessment sheets), accurate, comprehensive, and comparative for easy interpretation, thus facilitating communication between stakeholders and allowing closer monitoring of the patient. A number of parameters must be reported:
Joint mobility: the passive and active ranges of motion are measured.
Muscle state: grip and pinch strength are recorded, muscle viability is noted, and muscle function classified into six stages:
0: Complete lack of muscle contraction
1: Slight contraction, but no visible movement of body part
2: Contraction allowing movement in gravity-eliminated position
3: Contraction allowing movement against gravity
4: Contraction allowing movement against resistance
5: Normal muscle strength
Sensitivity: Different sensory areas of the hand (Semmes-Weinstein monofilaments, hot/cold test) are tested with the patient’s eyes closed.
Pain: Pain is mapped on a diagram of the hand. Trigger points, type of pain (pulsating, throbbing, burning, tingling, etc.), intensity (visual analogue scale from 1 to 10), duration and periods, and triggering or aggravating factors are noted.
Trophic changes: General appearance of the hand, extent of edema (measured with tape or with the water displacement method), trophic changes of the skin, hair, nails, skin color, skin temperature, and condition of the scars (adherences, keloids) are noted.
Functional assessment: the following are recorded:
The opposition of the thumb column: Kapandji score in ten stages (Fig. 11.5a).
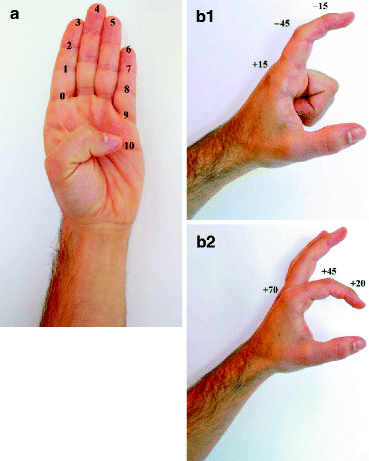
Fig. 11.5
Functional Assessment. (a) Measurement of thumb column opposition (Kapandji score). (b1, b2) Global mobility of digital segments (total active motion)
The flexion of digital segments: Digitopalmar grips using cylinders of different diameters (Kapandji score in five stages).
The web space opening and finger spacing (contours of the hand and handprints on paper).
The global mobility of digital segments by measuring the TPM (total passive motion) and TAM (total active motion), which is the sum of the degrees of flexion of the MCP/PIP/DIP joints associated with the sum of the degrees of extension (Fig 11.5b).
The global hand function using the DASH score (disabilities of the arm, shoulder, and hand). This questionnaire is completed by the patient and assesses the patient’s symptoms and ability to perform certain activities. It consists of 30 questions and two additional modules related to sports and music. Each question is scored from 1 (no difficulty) to 5 (inability to perform the task). The final score is scaled to 100 (0: no difficulty, 100: complete disability).
11.1.4 Protocols
Sports-specific rehabilitation programs are developed by the care team (surgeon, hand therapist, coach, etc.) based on protocols established by different scientific societies (the GEMMSOR, “Groupe d’étude de la main en orthèse et rééducation”; the BAHT, or British Association of Hand Therapists; the EFSHT, or European Federation of Societies for Hand Therapy; the SSRM, Swiss Society for Hand Rehabilitation; the ASHT, or American Society of Hand Therapists, etc.), as well as the works of the specific sports federations concerned. These protocols include recommended dates of return to partial, fractionated, and complete training.
The protocols depend on the type of lesion:
Type 1: These are temporary, symptomatic lesions requiring short treatment, no rehabilitation, and little or no splinting. Their management is essentially exercises performed by the athlete himself repeated several times a day.
Type 2: These are specific lesions requiring orthopedic and/or surgical treatment with total ARREST of training for at least 1 month. Rehabilitation sessions are performed twice daily, with active mobilization, workout, splinting, electrotherapy, and physiotherapy, which is paramount.
Type 3: These are advanced lesions, often involving the joint or cartilage. Specific management of the sequel is the essential point.
The different protocols should also take into account the patient’s health, age and comorbidities, involvement of dominant hand, and the types of recreational or competitive sport practiced. The aim is to preserve function and protect the structural consolidation of bone or soft tissues during immobilization.
Additional key precautions in athletes are:
Immediate management, with multiple daily rehabilitation sessions in the first few days.
Immediate mobilization of joints left free in a protective brace, if necessary.
Anti-inflammatory measures with icing or physiotherapy.
Prevention of adhesions and scarring, to avoid retractile capsulitis, calcification, and flexion contractures.
Quick responsiveness and speed of execution is essential; it should be kept in mind that an injured finger can lead to clumsiness of the entire hand.
11.1.5 Stages of Rehabilitation in Athletes
11.1.5.1 During Immobilization
Rehabilitation aims to establish behavior patterns without interfering with surgery or immobilization. Free joints must be solicited, and the image of the movement must be preserved. Different exercises should be performed several times daily to avoid consequences associated with nonfunctioning limbs such as exclusion, muscle atrophy, and loss of motor skills. The athlete should mimic the movement for a few seconds on the healthy side and then do it simultaneously on both sides. The value of the bilateral imitation of movements is to make use of any proprioceptive input of the healthy side to assist the invalid side: This is referred to as “mirror work.” Transcutaneous vibratory stimulation can be used on the tendons of the antagonistic muscles, with the aim to stimulate the proprioceptive system and thus maintain a good body image. Psychological conditioning is more important when dealing with athletes than with regular patients.
11.1.5.2 After Immobilization
The immobilization of one or more joints can lead to stiffness [2]. When the splint is removed, the athlete perceives the immobilized part as stiff and nonfunctional, resulting in an altered body image [1]. After first removal, the therapist’s role is to guide the patient to perform active or passive movements and to care for the skin. Passive mobilization is very important; the therapist should extend the wrist, with the thumb in abduction, and the palm hollow (tenodesis effect) (Fig. 11.6); the movement sought is the curving of the fingers and closing of the hand. It will be passive at first, involving the traumatized finger ray. This then progresses to active assisted mobilization by the hand therapist, then active work, and finally active resistance exercises (universal therapeutic program). These rolling movements are alternated with extension exercises, as well as spreading the fingers wide apart and then bringing them close together. Active shoulder and elbow exercises should also be encouraged.
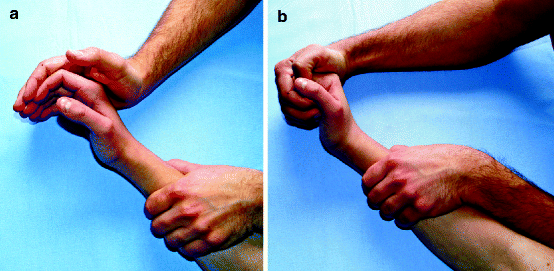
Fig. 11.6
Passive mobilization of the hand. (a) Grip after mobilization. (b) Flexion exercise
11.1.5.3 Return to Sports
This step involves blocking movements, speed of execution, swinging movements, or the association of movements involving the shoulder, neck, or half the body.
Strength conditioning exercises target the extrinsic and intrinsic systems of the fingers. The hand therapist should remember that each ray includes three extrinsic muscles and three intrinsic muscles. The first three allow rolling the finger and unfolding in extension with strength. The intrinsic system is responsible for the coordination of the proximodistal and distoproximal movements, with perfect axial stability and radial and ulnar rotational stability. During this period, the athlete must be educated to use his hand while protecting it; he must be taught, shown, and conditioned to the “hitting hand” (Fig. 11.7). This involves 20 to 30° of wrist extension and 40° of MCP flexion where the fingers should be firmly outstretched and slightly spread apart, with the palm hollowed, bringing the thenar and hypothenar eminences closer together. The thumb column should be 4 cm away from the second ray.
Fig. 11.7
The hitting hand. (a) Side view. (b) Volar view
The learning process may require several sessions; otherwise return to sports will be delayed.
Progress requires sagittal, then lateral exercises, and finally rotatory constraints. The exercises are first fractionated and sequenced with increasing loads (deformable tiles molded on the finger with adhesive fabric or weighted metal rings fixed at the level of the nail). The range of motion is gradually increased. Circumduction exercises or “scissoring” movements with elastic resistance can then be implemented, either manually or using a Canadian board with a multicenter ring. In all ball sports, perfect mastery of the hand gesture and throwing is essential. The therapist should emphasize exercising the extrinsic muscles as well as the intrinsics, to achieve optimal ball grip (Fig. 11.8).
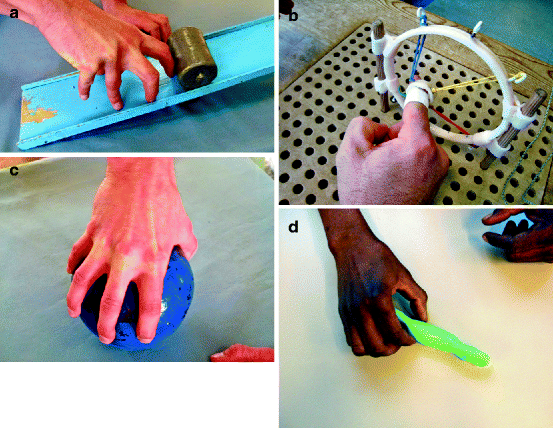
Fig. 11.8
Example of exercises aimed at improving ball grip: (a) exercises for the extrinsic apparatus, (b) exercises with multicenter rings with elastic resistance, (c) exercises for the intrinsic muscles with a ballasted ball, and (d) exercises of opposition and strengthening of the intrinsic system using silicone paste
11.1.6 Therapeutic Modalities
11.1.6.1 Splints and Immobilization
Splints
Principles
Hand braces should be perfectly adapted and comfortable while fully maintaining their function. A splint may be one of the conservative treatment modalities or can be placed after surgery. It can be used strictly for reduction, similar to a cast, or for protection during the return to sports phase, accompanying the patient throughout the rehabilitation process.
Four symptoms may indicate a splint [3]: pain, instability, stiffness (posture brace), and trophic changes (compression effect).
Thermoformed splints require a medical prescription, which must clearly define the therapeutic goals, site of application, and conditions of use.
Splints should allow the use of the hand, without causing too much constraint, and the pressure zones should be limited.
Main Criteria for Choice of Materials
Thickness: It is directly correlated to the rigidity of the splint and working time: the thicker the material, the greater the working and cooling times. The finest plates (1.6 or 2 mm), with low rigidity, are easy to adapt to the fingers. Those of 2.4 mm are generally used for dynamic splints, because their rigidity is useful for counter-support. The thicker plates (3.2 mm) are used for static wrist splints, where rigidity is the key aspect.
Perforations: Some thermoplastics can be perforated at a percentage varying from 1 to 42 %, to facilitate cutaneous respiration. The higher the percentage, the lower the splint rigidity.
Comfort: It is a guarantee of compliance, but splints must also be made in accordance with their properties.
Ease of maintenance and aging: Sometimes, patients have to wear splints for several weeks. The material must be easy to wash and maintain.
Autoadhesion and adjustment: These criteria should also be taken into account when making the splint. Today, shape-memory materials allow modifying a splint after molding.
From a mechanical point of view, a splint will exert pressure over three points [3]: two support and one counter-support points (Fig. 11.9). A good distribution of these support/counter-support points is determinant for the splint stability. The perforation/thickness ratio should be evaluated in advance to better meet the treatment objectives [4].
Fig. 11.9
Stress distribution during the preparation of a splint: two support (A) and one counter-support (B) points, whether in flexion (a) or extension (b) postures
Precautions
To prevent stiffness, joints upstream and downstream of the injured segment should be left free for immediate mobilization. The splints should be regularly replaced, depending on the evolution of the edema and gains in mobility. The hand therapist must check the pressure points and protect bony prominences with foam pads during molding. Thus, knowing the hand pressure zones (Fig. 11.10) will facilitate this and decrease the risk of tissue necrosis at these zones [5].
Fig. 11.10
Pressure points on the volar side of the hand
Static Splints
Static splints are designed to segmentally immobilize the hand or fingers. They act as an external support for the consolidation of tissue (bony or soft). They can be volar, dorsovolar, dorsal, or open circular (Fig. 11.11). Splints must maintain a position that will limit stiffness.
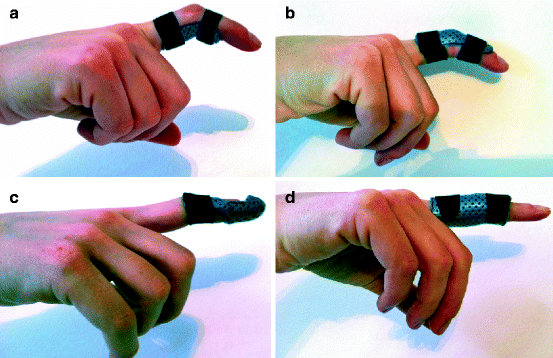
Fig. 11.11
Types of static splints: (a) volar, (b) dorsal, (c) dorsovolar, and (d) open circular
Static Thumb Splint
It can be long, blocking the wrist, or short (Fig. 11.12b, c). The functional position must be respected, leaving the IP joint free. The long model allows for the immobilization of the scaphoid, trapezium, and for De Quervain’s tendinitis. The short model is used for fractures of the metacarpal or base of the proximal phalanx and MCP sprains. For more distal lesions, a dorsal IP splint is preferred, maintained by elastic, adhesive tape, leaving the MCP joint and the tip of the thumb free.


