Chapter 4 Principles of fabrication
Data collection: measurements and impressions
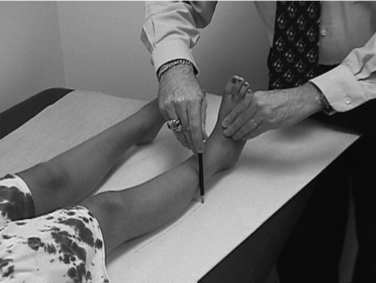
Fabrication of a metal structure usually begins with anatomical measurements to obtain the required dimensions of the body segment to be supported. These measurements will give the orthotist the appropriate circumferences and diameters for the metal frame of the orthosis and the locations of the mechanical joints. Physical measurements are followed by a tracing of the profile of the torso or the limb. Tracings can be made with the patient supine (Fig. 4-1), but tracings also can be made with the patient standing against the wall, as when a profile of the torso is required for a spinal orthosis. Care must be taken to keep the tracing tool both perpendicular to the paper surface and parallel to the body, or the resulting diameter will be either too wide or too narrow, and the orthosis will not fit correctly. Typically, for fabrication the tracing must be reversed to provide a posterior view of the body because the bands of the orthosis usually are located behind the leg.
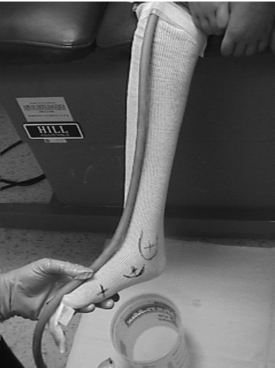
Physical assessment and measurements also are required when a total contact orthosis is being made. In general, a three-dimensional model of the limb or torso is required to create such an intimately fitting orthosis. Historically this is made by molding a plaster of Paris bandage around the body segment. A thin layer of stockinette is slipped over the body segment to protect the skin, then plaster rolls are applied to create a thin and accurate impression. Unlike fracture management, no web roll or other padding material is applied under the cast because such padding would distort the dimensions of the mold. Because a cast saw is often used to remove the mold after the plaster hardens, 0.5-inch tubing typically is incorporated to protect the patient’s skin from the blade (Fig. 4-2). An indelible pencil is used to mark bony prominences and joint axes before the plaster is applied. This water-soluble pencil allows the marks to transfer to the interior of the plaster impression and later transfer a second time to the liquid plaster, which will fill the mold to produce a positive model. The orthotist will have not only a dimensionally stable model but also accurate delineations of the critical location for mechanical joints and areas requiring pressure relief (e.g., fibular head and peroneal nerve).
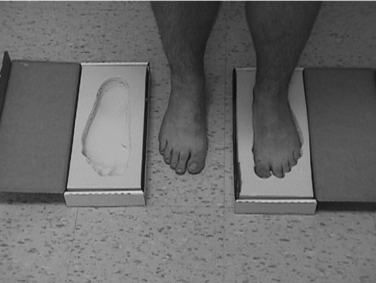
Low-density polyurethane foam can be used to make the impression when only a replica of the plantar surface of the feet is necessary. The foam is compressed under partial weight-bearing as the patient gently pushes into the material, which retains the foot’s plantar contour (Fig. 4-3). The orthotist may need to guide the dorsum of the instep, metatarsal heads, and toes to ensure an accurate mold. The orthotist can modify the foam impression to create further relief in the negative before it is filled with liquid plaster. The foam is easily removed once the plaster has hardened, forming the positive model.
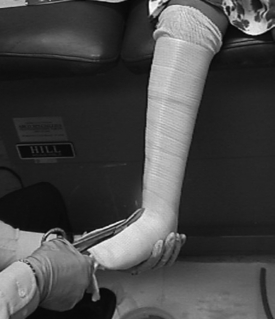
Use of synthetic casting tape for three-dimensional molds is increasingly common because the noise of the cast saw and the cleanup required with plaster bandage can be avoided with use of water-activated resins. The body segment is prepared in the same manner as for a plaster cast with the stockinette and the indelible markings. The flexible tube is placed on the anterior surface of the body, and the casting material is wrapped and molded to the segment. After the resin has gelled but before it has completely hardened, the tube is pulled out from under the mold, forming a channel. A pair of heavy-duty bandage scissors or cast shears can be used to open the mold and remove it from around the body, thus avoiding the need for a cast saw (Fig. 4-4). The synthetic tape impression is sealed and filled with liquid plaster, and the pencil marks transfer to the positive plaster model.
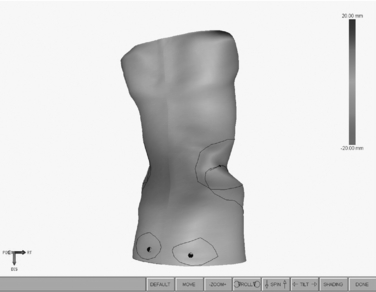
Spinal orthoses can be made from measurement data. The circumferences and diameters of the torso are processed by a software program to create a three-dimensional model that is viewed on the computer screen. The images then are modified to more closely match the clinical needs of the patient (Fig. 4-5). Derotation and scoliosis corrective forces can be specified on the computer model to create the desired orthotic design. Once the orthotist is satisfied with the image(s), the data are sent to the CAM equipment, which produces a positive model. The custom-made orthosis is vacuum formed over the model.
< div class='tao-gold-member'>
Stay updated, free articles. Join our Telegram channel

Full access? Get Clinical Tree


