18
Posterior Cruciate Ligament Reconstruction Using Bone-Patellar Tendon-Bone Autograft or Allograft
There has been increasing interest in the biomechanics and reconstruction of the posterior cruciate ligament (PCL). Injury to the PCL, isolated or combined, is rare compared with other ligamentous injuries of the knee, accounting for 5 to 20%.1 In addition, the natural history of isolated injury to the PCL is still debated. Definite episodes of instability are uncommon with chronic PCL deficiency as opposed to the more commonly seen anterior cruciate ligament (ACL)—deficient knee. Patients are reported to experience chronic pain and frequently exhibit degenerative changes late.2–5 Most authors would agree that isolated injuries to the PCL are best treated nonoperatively with adequate results.4, 6, 7, 10 Furthermore, operative treatment of isolated PCL injuries has had inconsistent results.4, 7, 10
Nonetheless, there is a subset of patients for whom reconstruction of the PCL is indicated: patients with chronic, isolated grade 3 abnormal laxity of the PCL who have failed nonoperative treatment as well as patients with acute or chronic PCL injury with combined ligamentous injury.2, 3, 6 Identifying this subset of patients is the key to a successful outcome from reconstruction of the PCL.
Physical Examination
In addition to history and radiographic studies, a physical examination is most critical in identifying patients requiring reconstruction of the PCL. Patients with an acute isolated injury to the PCL usually present with mild to moderate effusion, and often have vague anterior or posterior soreness, particularly with flexion. Patients with acute combined injuries may have a more tense effusion. Gait and lower extremity alignment are observed, if possible. Varus alignment and varus thrust with ambulation suggests a combined PCL-posterolateral corner injury.
The posterior drawer test should be performed with the patient’s knee in 70 to 90 degrees of flexion. Before performing this test, the normal stepoff of the anterior tibia in relation to the femur should be assessed by comparing it to the contralateral leg. Posterior subluxation of the tibia secondary to PCL insufficiency can give a false impression on the posterior drawer test. If this is the case, an anterior drawer test should be performed first to reduce the tibia to its normal position followed by the posterior drawer test. Key information is obtained by performing the posterior drawer test at 90 degrees in neutral and internal and external rotation. An isolated injury to the PCL will show a substantial decrease in the posterior drawer with internal rotation.7 Ritchie et al8 found the drawer to decrease from 10 mm in neutral rotation to 4 mm with internal rotation in an isolated PCL injury. This decrease is not seen with most combined injuries. The posterior drawer performed with external rotation, if positive, is suggestive of a combined PCL-posterolateral corner injury.
Knees with isolated PCL injuries should also not exhibit increased varus or valgus laxity at 0 or 30 degrees of flexion. If present, this also suggests a combined posteromedial or posterolateral injury.
Although we rely heavily on the posterior drawer, other important tests include the quadriceps active test, posterior sag test, reverse pivot shift, external rotation recurvatum, and external tibial rotation at 0 and 30 degrees. Again, the key is to differentiate isolated from combined PCL injuries.
Surgical Indications
Current treatment options can be categorized as operative and nonoperative. Nonoperative treatment is recommended for patients with acute isolated PCL injury, chronic isolated PCL injury that has not undergone rehabilitation, and isolated or combined PCL injuries in which the patient is noncompliant or unable to participate in the postoperative rehabilitation program. Operative treatment is recommended for patients with acute and chronic combined PCL-capsuloligamentous injuries, and patients with isolated chronic PCL injuries that have failed attempts at rehabilitation and who are having pain, disability, and instability with activities that are important to them.
Various options exist regarding reconstruction of the PCL, and no consensus exists as to which procedure is best at restoring normal laxity patterns. Techniques include single-bundle versus double-bundle (femoral) reconstruction using a posterior tibial inlay technique or a drilled tibial tunnel. We currently prefer a single-bundle reconstruction using a posterior inlay technique.5, 9, 10 Bergfeld et al’s group3 demonstrated that the inlay technique results in less anteroposterior laxity at 30 to 90 degrees compared with a tibial tunnel technique using a single-bundle reconstruction. There also appeared to be less evidence of mechanical wear in the graft where it makes the turn around the posterior articular surface of the tibia. Bone-patellar tendon-bone, as an autograft or allograft, is often used as a graft source. Other options include Achilles’ tendon allograft, quadriceps, and hamstring grafts.
Surgical Technique
Positioning and Anesthesia
The surgery begins with the patient supine on the operating table. After induction of anesthesia, an exam is performed of both knees, again looking for associated capsuloligamentous injuries. Before the prep and drape an intraarticular injection of 0.25% bupivacaine with 1:400,000 epinephrine and 2 mg of morphine sulfate is given. The procedure begins with a diagnostic arthroscopy without elevating the touniquet. Articular cartilage and meniscal pathology are addressed at this time. The PCL injury is documented as well as the status of the ACL. The ACL usually appears lax secondary to the posterior tibial subluxation. An anterior drawer will restore its normal appearance.
Once these steps are completed, attention is turned to the PCL. The PCL remnant and the medial wall of the intercondylar notch are debrided. This allows for identification of the femoral anatomic attachment site (FAAS). The FAAS is located anterior and distal in the notch, about 8 to 10 mm from the articular margin at the 11 o’clock position in a left knee and the 1 o’clock position in a right knee. This spot is marked with a curette. The FAAS is only marked at this stage, as it will be rechecked later through a small medial arthrotomy at the time of guide pin placement. If concomitant ACL surgery is planned, the ACL femoral and tibial anatomic attachment sites are identified and drilled at this time.
Tibial Tunnel and Tibial Inlay Techniquesd
If performing a tibial tunnel technique (Fig. 18-1), the tibial tunnel is now drilled with the knee flexed 90 degrees. An arthroscopic PCL tibial drill guide is used through the anterolateral portal. The guide tip is placed 10 to 12 mm below the joint line in the PCL attachment site. The guide should also be oriented 60 degrees to the tibial articular surface to avoid an excessively acute angle as the graft passes over the posterior tibia. Prior to drilling the tunnel the PCL stump is debrided off the posterior tibia. Specially designed back-cutting curettes and rasps may assist with this step. A 70-degree scope or a 30-degree scope placed through a posteromedial portal may also be necessary to visualize the area. The posterior capsule should be elevated to expose the entire PCL facet. When drilling the guide pin, care should be taken not to over-drill, risking injury to the neurovascular structures. This can be prevented by setting the length of the guide pin 1 cm shorter than the distance to reach the guide tip. The pin can be tapped in the rest of the way. Image intensification is also useful to secure accurate and safe placement. A 10 mm tunnel is drilled over the guide pin.
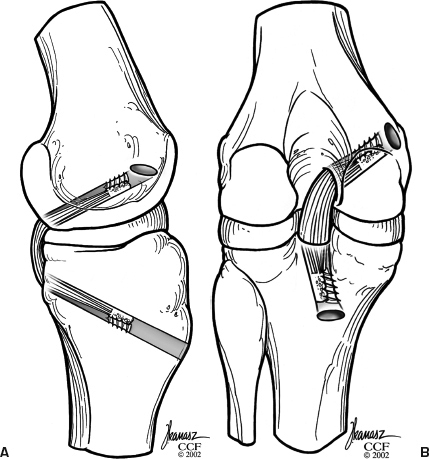
Figure 18-1 (A) Posterior cruciate ligament (PCL) reconstruction using tibial tunnel technique (lateral view). (B) PCL reconstruction using tibial tunnel technique [anteroposterior (AP) view].
The next step is to harvest the central third bone–patellar tendon-bone graft, or if an allograft is being used prepare the graft. Once harvested, the autograft and allograft should be prepared the same way. For autografts a 1 cm curvilinear incision is made beginning along the medial border of the patella and extending distally to a point 1 cm distal to the tibial tuberosity. The subcutaneous tissue and paratenon are incised in line with the incision. The central third patellar tendon should be harvested.
When performing a tibial inlay technique (Fig. 18-2), the bone plug from the patella is usually 10 mm wide × 30 mm long. The bone plug from the tibia should be 10 mm wide × 20 mm long and about 5 mm thick (Fig. 18-3). The patellar bone plug should pass easily through a 10 mm sizer and fashioned to fit in the femoral tunnel. The tibial bone plug should be fashioned to fit in a trough made at the tibial attachment site of the PCL. The trough will correspond to the size of the tibial bone plug. Once this is completed, use a 2 mm drill to make two holes in the patellar bone plug, 5 mm and 15 mm from the distal tip, respectively. A No. 5 nonabsorbable suture is passed through each hole for later graft passage and tensioning. The tibial plug should be fashioned into a rectangle 10 mm wide × 20 mm long. A drill hole should be made with a 3.2 mm drill through the center of this bone plug. The hole should be angled slightly distal to make up for the slope of the posterior tibia, which will cause the screw to angle toward the joint otherwise. The hole should be drilled from the cancellous side to avoid injury to the soft tissue portion of the graft. The hole should be overdrilled with a 4.5 mm drill and tapped. Next, a 6.5 mm partially threaded screw, 35 mm in length, and washer should be inserted until it protrudes about, 5 mm past the cancellous surface.
If a tibial tunnel technique is to be used, both of the graft’s bone plugs should be fashioned to fit in tunnels and should pass through the 10 mm sizer. Both plugs should be 10 mm wide × 30 mm in length. A 2 mm drill should be used to make two holes in each bone plug, and No. 5 suture is passed as described above.
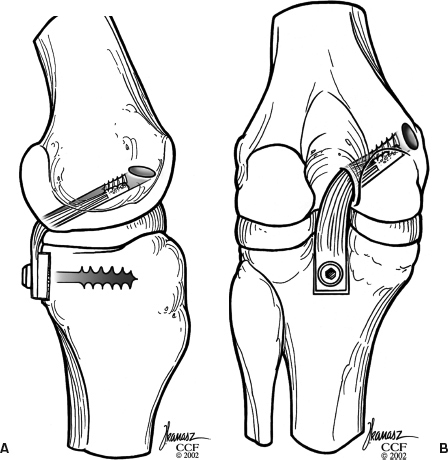
Figure 18-2 (A) Posterior cruciate ligament (PCL) reconstruction using tibial inlay technique (lateral view). (B) PCL reconstruction using tibial inlay technique (AP view).
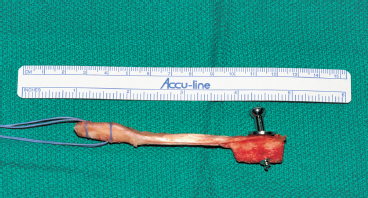
Figure 18-3 Bone-patellar tendon-bone graft prepared for tibial inlay technique.
While the graft is being prepared on the back table by an assistant, the femoral tunnel is made through a medial arthrotomy. If an autograft is being used, it can be done through the same incision as for graft harvest. The vastus medialis obliquus is elevated off the medial femoral condyle, and the intercondylar notch is visualized by retracting the patella laterally. The previously marked FAAS is identified and checked for accurate placement. Through the arthrotomy the PCL femoral guide tip is placed at the FAAS, about 8 mm proximal to the articular margin. This should leave the edge of the tunnel 2 to 3 mm from the articular edge after drilling. The tunnel should be angled proximally and posteriorly to decrease the obliquity of the femoral tunnel, which decreases the stress on the graft as it enters the tunnel. After the guidewire is placed, it is overdrilled with the appropriate-size cannulated drill according to the size of the graft (usually 10 mm). The edges are smoothed with a rasp. Next, an 18-gauge wire loop or commercially available graft passer is placed through the femoral tunnel and directed posteriorly into the notch. This facilitates graft passage through the posterior approach. (If performing a tibial tunnel technique, a Gore (Smith Nephew Endoscopy, Andover, MA) smoother can be placed through the tibial tunnel. It is retrieved through the notch and brought out through the femoral tunnel. It can be used to smooth the edges of the tunnels, as well as pass the graft.)
Once the femoral tunnel is prepared, the wound is loosely approximated, and the tourniquet deflated if employed. A sterile circumferential dressing is placed, and the entire leg is covered in a sterile bag (Mayo stand cover). This is overwrapped with a long Ace wrap. Next, a second operating room table is positioned beside the patient. The patient is turned to the prone position on this table under the direction of the surgeon and anesthesiologist. We have found the extra 10 to 15 minutes to perform this transfer to be well worth the effort. The previous operating table should be cleaned and prepared to place the patient back in the supine position after posterior dissection and graft placement. (If performing a tibial tunnel technique, this step of repositioning is not necessary.)
Once the patient is in the prone position, the entire leg is reprepped and draped. A modified Burk’s approach to the posterior tibia is performed. The landmarks for the incision are the medial border of the medial head of the gastrocnemius, the lateral border of the semitendinosus, the popliteal crease, and the midline of the distal thigh.11 This portion of the procedure is performed without elevating the tourniquet to ensure adequate hemostasis is achieved. The skin is incised and the fascia exposed. The medial sural cutaneous nerve is vulnerable near the midline at this level and should be avoided if possible. The fascia is incised, and the interval between the medial head of the gastrocnemius and semitendinosus is developed. A broad blunt retractor is placed in this interval, and the medial head of the gastrocnemius is retracted laterally, protecting the neurovascular bundle. A portion of the medial gastrocnemius origin can be released if extra exposure is needed, but we have usually found this unnecessary. Care should be taken at this point to identify and ligate the medial and middle geniculate vessels lying over the capsule. Next, the capsule is incised longitudinally and reflected medially and laterally. This exposes the tibial insertion of the PCL and the PCL facet. The remaining scar tissue and PCL remnants are excised with care to avoid the meniscofemoral ligaments. Once the insertion site is marked, a cortical window is made with an osteotome. The window is about 11 mm × 20 mm and corresponds to the bone plug previously prepared. The graft is now brought into the operative field. The femoral plug is passed through the intercondylar notch and into the femoral tunnel using the previously placed graft passer. Next, the tibial bone plug is fitted into the prepared trough on the back of the tibia. The 6.5 mm screw is tightened, securing the bone plug to the posterior tibia. It is not necessary to predrill the cancellous bone. Tension is then placed on the femoral end of the graft to ensure adequate fixation is present. Intraoperative radiographs can be used to check screw placement. Once adequate tibial fixation is achieved, the capsule is closed with No. 1 nonabsorbable suture, as well as the fascia. The subcutaneous tissue is closed with No. 2 nonabsorbable suture, and the skin is closed with a subcuticular closure. The leg is again covered with a sterile Mayo stand cover, and the patient is placed supine on the original operating table.
The leg is reprepped and draped as described earlier. With the knee flexed 90 degrees in neutral rotation, an anterior drawer is applied to the proximal tibia. The graft is tensioned in this position by pulling on the sutures in the femoral bone plug. If 20 to 25 mm of bone is in the femoral tunnel, the graft is fixed with a 9 × 20 mm interference screw placed proximally to secure the bone plug distally in the tunnel (closest to the articular surface). If <20 mm of bone plug is within the femoral tunnel, a trough is made in the medial femoral condyle, and the graft is fixed with either two staples or the sutures are tied over a 6.5 mm screw and washer in the medial femoral condyle. (Fixation of the graft using a tibial tunnel technique is the same as for the inlay technique on the femoral side. The tibial side can be fixed with an interference screw also if there is sufficient length of the graft. Otherwise, the tibial side should be fixed by tying the suture through the bone plug over a 6.5 mm screw and washer, as previously mentioned.) After fixation, the knee is flexed and extended to ensure an adequate range of motion. A gentle posterior drawer at 90 degrees can be performed, and the anterior tibial stepoff should be restored.
Closure
When the surgeon is satisfied with stability, the wounds are irrigated, and a layered closure is performed. A cryotherapy pad and compressive stocking are applied, and the knee is immobilized in full extension.
Tips and Tricks
Inlay Technique
- When using a bone-patellar tendon-bone graft, careful attention should be paid to the tibial fixation site because the graft is a fixed length. Once the graft is fixed on the posterior tibia, it is tensioned on the femoral side, and the position of the bone plug in the femoral tunnel is assessed. If 25 mm or more of the bone plug is within the femoral tunnel at this point, the tibial attachment site is accepted. On the other hand, if less than 25 mm of bone is within the femoral tunnel, the tibial attachment site can be adjusted distally. The tibial side of the graft can be distalized 10 mm without affecting the mechanical properties of the reconstruction. If it is felt that more than 10 mm of distalization is needed, do not move the tibial attachment site, and fix the femoral end in a trough, as described earlier.
- As mentioned earlier, when placing the 6.5 mm screw in the tibial bone plug, it is helpful to angle distally slightly (Fig. 18-4). Otherwise, when the graft is placed on the posterior slope of the tibia, the screw will angle toward the articular surface.
- It is helpful when identifying the FAAS of the PCL on the femur to use an angled curette to mark the site. To locate a spot 8 to 10 mm from the articular margin, the tip of the curette is placed at the articular margin. Next, the surgeon’s thumb can be placed on the curette 8 to 10 mm from the edge of the skin where the curette enters the medial portal. The surgeon advances the curette until the surgeon’s thumb touches the skin. This places the curette tip 8 to 10 mm off the articular margin, and this spot can be marked.
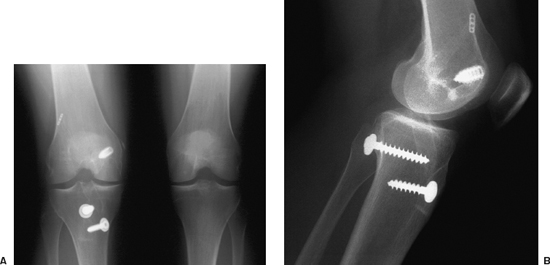
Figure 18-4 (A) AP and (B) lateral radiograph showing screw placement in posterior tibia for inlay technique.
Pitfalls
- If an ACL reconstruction is being performed in conjunction with a PCL reconstruction, care must be taken not to damage the tibial tunnel for the ACL. This problem can occur in the inlay technique if the 6.5 mm screw securing the bone plug to the tibia is directed into the ACL tibial tunnel. The problem can be avoided by directing the screw slightly lateral. With the tibial tunnel technique, the starting points for the ACL and PCL tibial tunnels are close. Care should be taken that these tunnels do not intersect. To avoid this, a drill can be placed and left in one tunnel while the other is being drilled.
- As previously mentioned, excess penetration with a guide pin while drilling a tibial tunnel can cause injury to the posterior neurovascular structures. This can be avoided by locking the pin into the drill 1 cm shorter than the distance required to reach the guide tip. It can be advanced slowly the rest of the way by hand. Also, a curette can be placed over the tip of the pin through the posteromedial portal while reaming to avoid advancement of the pin.
Conclusion
Reconstructions of the PCL are uncommon compared with other knee procedures. This procedure is generally reserved for patients with acute or chronic combined PCL-capsuloligamentous injuries, as well as isolated PCL injuries that have failed nonoperative treatment. Isolated PCL injuries are not routinely operated on otherwise. Key components of the history, physical exam, and diagnostic studies are utilized to identify candidates for PCL reconstruction. There is a great deal of technical difficulty with this procedure and a relative lack of knowledge about the natural history and reconstructive biomechanics of PCL injuries compared with ACL injuries. In light of this, reconstruction of the PCL is currently an evolving process.
References
1 Markolf KL, Slauterbeck JR, Armstrong KL, Shapiro MS, Finerman GAM. A biomechanical study of the replacement of the posterior cruciate ligament with a graft. J Bone Joint Surg Am 1997;79:375–387
2 Boynton MD, Tietjens BR. Long term followup of the untreated isolated posterior cruciate ligament deficient knee. Am J Sports Med 1996;24:306–310
3 Lipscomb AB, Jr, Anderson AF, Norwig ED, Hovis WD, Brown DL. Isolated posterior cruciate ligament reconstruction. Long term results. Am J Sports Med 1993;21:490–496
4 Parolie JM, Bergfeld JA. Long term results of nonoperative treatment of isolated posterior cruciate ligament injuries in the athlete. Am J Sports Med 1986;14:35–38
5 Graham SM, Parker RD, McAllister DR, Calabrese GJ. Tibial inlay technique for posterior cruciate ligament reconstruction. Techniques in Orthopaedics 2001; 16 (2):136–147
6 Burks RT, Schaffer JJ. A simplified approach to the tibial attachment of the posterior cruciate ligament. Clin Orthop Relat Res 1990;254:216–219
7 Bergfeld JA, McAllister DR, Parker RD, Valdevit ADC, Kambic H. The effects of tibial rotation on posterior translation in knees in which the posterior cruciate ligament has been cut. J Bone Joint Surg Am 2001;83:1339–1343
8 Ritchie JR, Bergfeld JA, Kambic H, Manning T. Isolated sectioning of the medial and posteromedial capsular ligaments in the posterior cruciate ligamentdeficient knee. Influence on posterior tibial translation. Am J Sports Med 1998;26:389–394
9 Berg EE. Posterior cruciate ligament tibial inlay reconstruction. Arthroscopy 1995;11:69–76
10 Miller MD, Gordon WT. Posterior cruciate ligament reconstruction: tibial inlay technique-principles and procedure. Oper Tech Sports Med. 1999;7:127–133
11 Bergfeld JA, McAllister DR, Parker RD, Valdevit ADC, Kambic H. A biomechanical comparison of posterior cruciate ligament reconstruction techniques. Am J Sports Med 2001;29:129–136
< div class='tao-gold-member'>


