Chapter 56 Posterior Cruciate Ligament Reconstruction
Posterior Inlay Technique

Injuries to the posterior cruciate ligament (PCL) occur much less frequently than injuries to the anterior cruciate ligament (ACL). PCL injuries are present in up to 3% of knee injuries in the general population and as many as 37% of knee injuries in trauma patients with acute hemarthrosis.9,28 Isolated injuries of the PCL can lead to progressive instability and degenerative joint disease when left untreated. Although PCL reconstruction has become more common with improved diagnostic and surgical techniques, operative management of PCL injuries remains a controversial subject. There is a considerable amount of debate regarding the preferred technique of tibial graft fixation. The tibial inlay technique is advantageous in that it avoids the “killer turn,” which is thought to be a major drawback of the transtibial tunnel technique.1 Additionally, proponents have argued that the tibial inlay technique facilitates less anteroposterior (AP) laxity, greater biomechanical strength, and less risk to neurovascular structures.2,19,23 This chapter describes the traditional tibial inlay technique for PCL reconstruction using a single-bundle autograft.
Anatomy
The PCL is approximately 32 to 38 mm long, measuring 11 mm2 in cross section at its midpoint.11 The ligament originates from the anterolateral aspect of the medial femoral condyle approximately 1 cm proximal to the articular surface. The PCL inserts in a central sulcus on the posterior aspect of the tibia approximately 1 to 1.5 cm distal to the posterior edge of the tibial plateau. Despite being present within the joint capsule of the knee, the PCL is considered extra-articular because it is enclosed within a synovial sheath.
The ligament is functionally divided into an anterolateral (AL) bundle and a posteromedial (PM) bundle, referencing the location of the division’s femoral origin (anterior or posterior) to its tibial insertion (lateral or medial). The thicker and stronger AL bundle is taut with knee flexion, whereas the smaller PM bundle is taut with knee extension.8,14,16 Although the AL bundle provides the greatest resistance to posterior tibial translation,18 research has verified the importance of the PM bundle as well as the meniscofemoral ligaments.
The meniscofemoral ligaments (ligaments of Humphrey and Wrisberg) commonly remain intact following PCL rupture. These ligaments may provide additional knee stability following PCL injury. The meniscofemoral ligaments contribute as much as 28% of the resistive forces to posterior tibial displacement in intact knees.13
History and Physical Examination
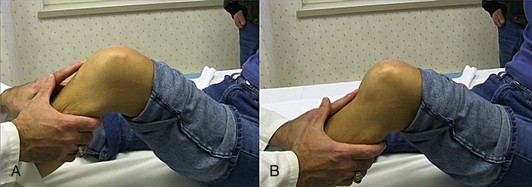
When a PCL injury is suspected, the possibility of additional knee pathology must be considered prior to conducting a physical examination. Although injury to the ACL and collateral ligaments can occur in conjunction with PCL injury, combined PCL and posterolateral corner (PLC) injuries are more common. The physical examination is an important tool in the diagnosis of these injuries. The gold standard examination for the diagnosis of PCL injury is the posterior drawer test22 (Fig. 56-1). When performing this test, the examiner must consider the concept of the starting point to assess PCL and ACL integrity properly. ACL pseudolaxity, occurring during posterior tibial sagging, can be deceptive to the examiner, resulting in a false-positive anterior drawer test and subsequently misdiagnosed ACL injury (Fig. 56-2). PCL tears can be classified by measuring the amount of posterior tibial displacement in comparison to the uninjured contralateral knee (grade I, 1 to 5 mm; grade II, 6 to 10 mm; grade III, >10 mm).27 Because grade III injuries rarely represent isolated PCL tears, additional ligamentous injuries must be considered. Injury to the PLC is frequently associated with grade III PCL laxity. An external rotation asymmetry of more than 15 degrees at 30 and 90 degrees of knee flexion supports the diagnosis of combined PCL and PLC injury.
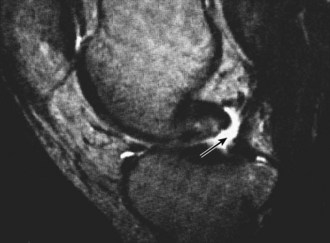
Plain films, stress views, and magnetic resonance imaging (MRI) scans have all been used to confirm clinical suspicion of PCL injury. Plain films may reveal subtle posterior tibial subluxation, bony avulsions, or fibular head fractures suggestive of PLC injury (Fig. 56-3). Stress views, used to quantify the degree of posterior tibial subluxation, are taken with the knee in 90 degrees of flexion (Fig. 56-4). The sensitivity of MRI in diagnosing acute PCL tears is approximately 100%4 (Fig. 56-5). Although MRI better facilitates the visualization of associated soft tissue injuries, PLC injuries may be overdiagnosed as a result of substantial local edema.
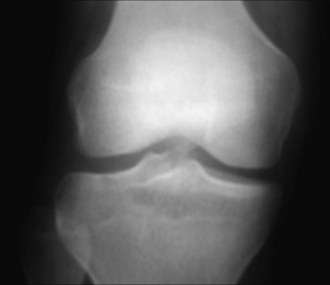
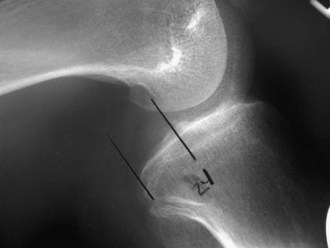
Figure 56-4 PCL stress radiograph demonstrating posterior tibial translation suggestive of PCL injury.
Low-grade isolated PCL injuries are typically treated nonoperatively with an emphasis on reducing inflammation, reestablishing knee motion, and strengthening the quadriceps to counteract the tendency toward posterior tibial subluxation. Return to activity within 3 to 6 weeks is dependent on the goals of the patient as well as the severity of the injury.26,27 Operative indications following PCL injury include multiligamentous injuries, symptomatic chronic grade II or III injuries that fail rehabilitation, PCL avulsions, and PCL injuries in active patients who are unwilling to change their lifestyle to comply with conservative treatment options.
Posterior tibial avulsion injuries involving the PCL insertion are repaired anatomically with lag screws or suture fixation. Midsubstance tears of the PCL require ligamentous reconstruction. Proponents prefer the tibial inlay technique for PCL reconstruction because it reproduces the most anatomic PCL reconstruction while avoiding the killer turn associated with tibial tunneling. Patients with tibial osteopenia or a history of prior osteotomies or fractures may require the tibial inlay procedure instead of the transtibial tunneling procedure to prevent proximal graft migration.25 Contraindications to PCL reconstruction using the tibial inlay technique include a history of vascular repair or bypass grafting procedures.
Tibial Inlay Technique
Examination Under Anesthesia, Patient Positioning, and Diagnostic Arthroscopy
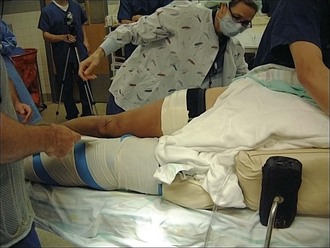
A general anesthetic is preferred to facilitate patient positioning and an examination under anesthesia. Prior to beginning the procedure, the patient is examined under anesthesia to confirm PCL injury and rule out any additional unrecognized ligamentous injuries. The patient is then placed in the lateral decubitus position with the uninjured leg against the table in extension. The uninjured leg is padded in its entirety, paying special attention to the bony prominences. The fibular head is padded to prevent peroneal nerve injury. The foot and ankle of the operative extremity are placed in a commercially available leg holder, with plenty of padding. A tourniquet is applied to the proximal operative thigh and the patient is prepped and draped in typical sterile fashion (Fig. 56-6).
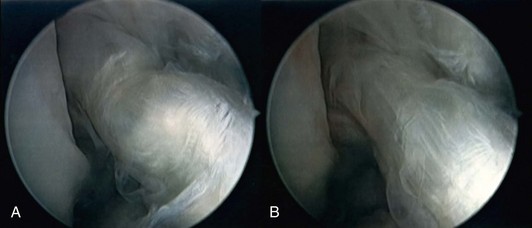
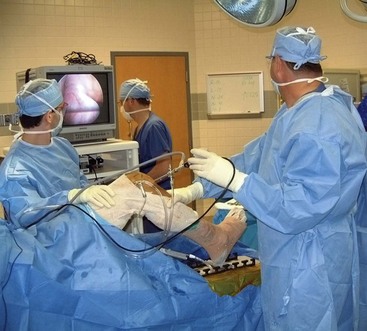
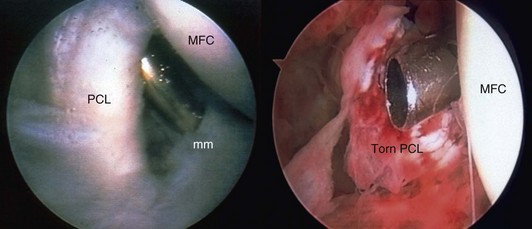
The leg is then positioned for graft harvest and arthroscopy by abducting and externally rotating the hip, flexing the knee, and locking the operative extremity in place using the leg holder. Diagnostic arthroscopy is performed using standard arthroscopic portals (Fig. 56-7). Bony avulsions, degenerative changes, and complete versus partial PCL tears can be visualized during arthroscopy. The joint is visually inspected, addressing any meniscal or cartilage pathology prior to PCL reconstruction. The presence of a torn PCL is confirmed before proceeding on to graft harvest (Fig. 56-8). Indicators of PCL injury include hemorrhage and ACL pseudolaxity. After identifying the torn PCL, the stump is débrided using a combination of biting rongeurs, suction shaver, and thermal ablation. Residual PCL fibers remaining in continuity should be maintained. The anterior edge of the PCL footprint may be preserved to serve as a reference point for the inlay.5
Graft Preparation
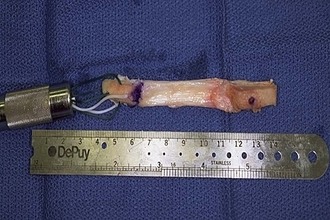
Patellar tendon autograft preparation is performed on a side table while the knee is being prepared for graft incorporation. The patellar portion of the graft is contoured into a cylinder with a rounded tip, mimicking the shape of a bullet. The contoured patellar bone plug is sized to fit through a 10- to 12-mm wide femoral tunnel and should be at least 18 mm long. Two perpendicular drill holes are placed approximately 5 and 10 mm from the tip of the patellar bone plug. Two no. 5 sutures are passed through the drill holes to assist in graft placement. Additionally, a no. 2 Ethicon or Ticron suture may be placed at the junction of the tendon and patellar bone plug to facilitate easier entry into the femoral tunnel. The tibial bone block is shaped into a trapezoid, creating a flat surface on the side that will lay directly on the tibia (Fig. 56-9).
Femoral Tunnel Placement
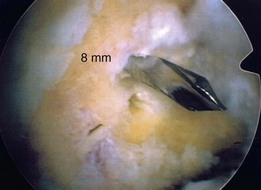
Prior to femoral tunnel placement, the lateral aspect of the medial femoral condyle, in addition to any remaining soft tissue in the notch, is débrided arthroscopically. A standard PCL femoral guide is introduced into the knee through the anteromedial portal. The PCL femoral guide is placed approximately 8 mm from the articular surface of the anteromedial portion of the intercondylar notch at the 1 o’clock position for the right knee, and the 11 o’clock position for the left knee. An adequate bone bridge separating the articular cartilage of the femur from the bone tunnel will minimize the risk of avascular necrosis of the medial femoral condyle. A 2-cm incision is made along Langer’s lines over the medial portion of the knee at the medial femoral condyle. The incision is carried down through the subcutaneous tissue and along the inferior border of the vastus medialis muscle to the level of the condyle. An external tunnel guide is then placed on the cortical surface of the condyle, away from the articular surface of the femur. A guide pin is drilled from outside in and pin placement within the femoral footprint is verified arthroscopically (Fig. 56-10). Using a cannulated drill bit reamer appropriately sized for the harvested graft, the guide pin is overdrilled from outside in, creating the femoral tunnel. The margins of the tunnel are then rasped to reduce graft abrasion. After the femoral tunnel is fully prepared, a looped, smooth, 18-gauge wire, or commercially available graft passer, is placed into the tunnel from outside to inside. The guide wire is passed into the posterior aspect of the knee joint to facilitate graft passage at a later stage. The arthroscopic equipment is then removed from the knee to begin the tibial inlay portion of the case.
Related posts:
 Articular Cartilage: Biology, Biomechanics, and Healing Response
Advanced Technologies in Performing Total Knee Arthroplasty: Roundtable Discussion
In Vivo Mechanics and Vibration of the Knee Joint
Secondary, Spontaneous, and Postarthroscopy Osteonecrosis of the Knee: Diagnosis and Management
Advances in Mechanical Compression Devices
Articular Cartilage Injury and Adult OCD: Treatment Options and Decision Making
Articular Cartilage: Biology, Biomechanics, and Healing Response
Advanced Technologies in Performing Total Knee Arthroplasty: Roundtable Discussion
In Vivo Mechanics and Vibration of the Knee Joint
Secondary, Spontaneous, and Postarthroscopy Osteonecrosis of the Knee: Diagnosis and Management
Advances in Mechanical Compression Devices
Articular Cartilage Injury and Adult OCD: Treatment Options and Decision Making
Stay updated, free articles. Join our Telegram channel

Full access? Get Clinical Tree


