Fig. 9.1
The piriformis tendon and gluteus medius reclined by the Hohmann
Surgical Access
A straight incision is performed along the previously determined line; the final length depends on the amount of fat and the compliance of the tissues; the subcutaneous tissue is cut perpendicularly with particular care to avoid detachments and to control haemostasis. The gluteal fascia is incised following the axis of gluteus maximus fibres (Fig. 9.2). The gluteus maximus muscle is bluntly splitted in the direction of its fibres, beginning from its femoral part where the muscle is thin; the fascia lata must be always preserved. An autostatic retractor is carefully placed. The short internal rotators are hidden by an adipose layer but the fig may be easily palpated, just beneath the gluteus medius (Fig. 9.3). The fat layer is cut along a line that goes along the piriformis up to the femur and then shows a slight posterior curve (Fig. 9.4).
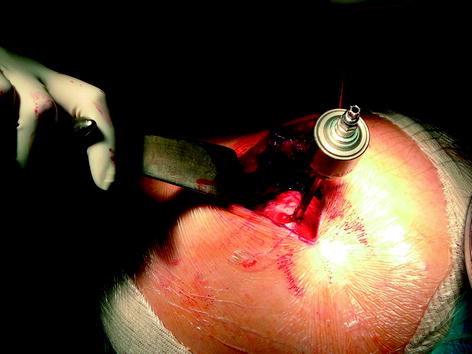
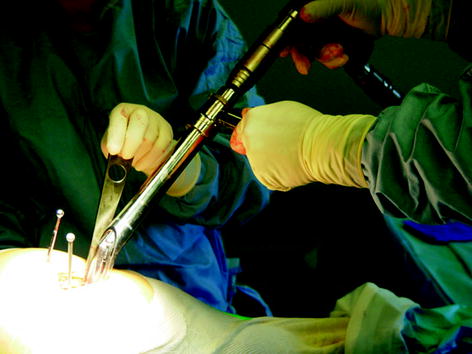
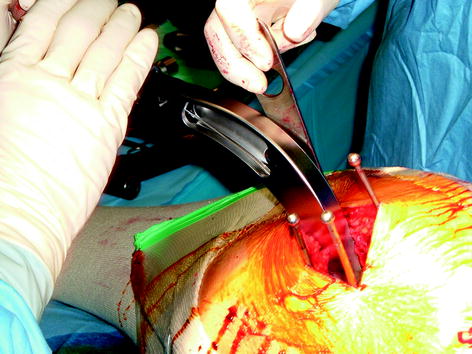
Fig. 9.2
Head removal
Fig. 9.3
Some necessary tools for acetabular preparation
Fig. 9.4
Acetabular implantation
A Hohmann retractor is placed under the gluteus medius. The piriformis is stretched by an internal rotation of the hip until it is adequately tensed, and then it is detached at the place of its femoral insertion in the piriformis fossa (if it appears retracted) or preserved. The posterior capsular joint is then opened following the axis of the piriformis tendon, after the femoral insertion (Fig. 9.5). External rotators (superior gemelli and even the internal obturator) are detached from their insertion but must remain adherent to the capsular flap; the inferior gemelli and the quadratus femoris are preserved. If the hip is not too stiff, this may be sufficient to allow femoral dislocation (flexion, adduction, internal rotation) while preserving the median circumflex pedicle. A threaded pin (external fixator) is drilled in the femoral head for future atraumatic extraction after section of the femoral neck, so as to avoid the placement of cumbersome instruments inside the incision. At this stage, the dislocation remains difficult due to the tension of the capsular reinforcement ligament (which protects the inferior gemelli and quadratus femoris, hence the median circumflex vascular pedicle that circulates in the quadratus femoris); its femoral insertion, clearly visualised, is cut, liberating the femur.
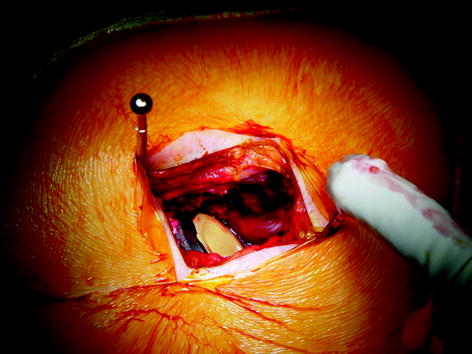
Fig. 9.5
Final view of the implant
This step-by-step muscular disinsertion helps to preserve a maximum of muscles.
Femoral Neck Sectioning, Acetabular Exposure
The femoral neck osteotomy is performed in accordance with the preoperative schedule, using a minimum of retractors in order to reduce tissular tensions.
After extraction of the femoral head, the autostatic retractor is taking-off; the acetabulum is exposed by posterior reclination of the tendinous-capsular flap which is maintained by two pins. The first is placed in the posterior inferior iliac spine and the second is placed higher in the posterior spine, the sciatic nerve being protected by this flap. To achieve the exposure, another pin is placed above the acetabulum in order to move the superior capsula and suprajacent muscles apart. Acetabular labrum, osteophytes, pathologic tissues or a thickened capsular joint are excised. A Hohmann retractor is placed above the anterior spine and maintains anterior femoral dislocation [7]. The acetabulum is exposed; its bottom is cleaned from the pulvinar and osteophytes; finally, the acetabular transverse ligament is systematically excised.
Drilling
The drilling may begin lightly, in a centred manner, so as to obtain a hemispheric cavity. The use of a staggered drill support helps this action in accordance with the necessary orientation without tension or rubbing in the distal part of the wound and cancels the risk of mechanical burning of the skin. The last drilling gives visual information on the acetabular covering and the tactile sensation helps to tell on the quality of the bone, which gives an estimation of the primary stability of the implant.
Acetabular Implantation
When the cavity reaches the bleeding subchondral bone, the acetabular component is implanted using a curve impactor that prevents orientation errors (it does not press on the wound edges or on the femur). With the posterior access, the posterior part of the cupula is introduced first by a sliding movement. By helicoid rotation, it is placed into the acetabulum by a sliding of potentially interposing soft tissues. The correct position of the cupula is based on the external benchmarks constituted by the orthogonal lines of the operating room and the orientation stems fixed on the impactor; these are useful when setting the inclination and the anteversion of the component. At this stage, impinging osteophytes are excised, which definitively liberates the joint. Then, the definitive insert (admitting the larger diameter head) is installed and impacted using a staggered tool.
Femoral Preparation
In order to expose the proximal extremity of the femur, it must be positioned in compliance with the incision axis: the knee is bent at 90° and the tibia is vertical. This position is the reference for the stem orientation. A lip retractor is placed under the neck and a small Hohmann retractor is inserted under the gluteus, so as to clear the site of instrumental penetration at the trochanteric level. Classical femoral preparation is carried out: the femoral duct is opened by a dedicated box chisel, starting the perforation into the greater trochanter to avoid varisation of the stem, followed by successive rasping with the smallest rasp indicating the working axis, and also introduced into the greater trochanter. When the final rasp is correctly seated, tests are performed using testing components with different neck lengths and offsets, and the access permits easily the use of larger head diameter; the stability and the length of the limb are estimated by another knee palpation (starting reference). All retractors are removed in order to facilitate testing and liberate soft tissues. Once testing components are removed and sizes are selected, the definitive components are implanted on the same basic principle of retraction and tissue preservation.
Suture/Closure
After achievement of the femoral reduction (if the hip anatomy is restored), the posterior capsular flap with its adherent tendons spontaneously takes its initial anatomic position. Capsula, piriformis tendon and superior gemellus are fixed up and ahead, using several absorbable sutures passing under the greater trochanter and through the gluteus medius tendon. The whole apparatus is covered by the repositioned adipose flap. We recommend the use of an intra-/extra-articular suction drainage. Then, absorbable suture is performed on the gluteus maximus, the fascia and the subcutaneous tissues. The skin is coapted by an intradermic continuous suture that prevents secondary problems of clip or stitch ablation and allows the use of hyaluronic acid dressings that accelerate healing.
Postoperative Management
The primary goals are, for patients, no pain and regain their healthware quickly, a rapid recovery program with a preoperative education achive those [8]. Pain may easily be controlled by IV perfusions that combine Prodafalgan and ketoprofen during 24–48 h and then by oral stage II analgesic agents. Drainage is stopped after 48 h. The preoperative education about physical therapy accelerates the patient’s recovery [9]. A complete standing posture the next day and passive and active rehabilitation start immediately. The patient’s autonomy is not restrained and the hospital stay duration is limited to strict security requirements and recovery of sufficient autonomy for returning home.
Related posts:
 Smith-Petersen Approach and Lateral Position with Mini-Stem
Mini-Invasive Approach and Navigation in Total Prosthesis of the Hip
The Anterolateral Watson Jones Approach in Total Hip Replacement in the Supine Position
Anterior Approach for Total Hip Arthroplasty: Technique Without Fracture Table
Navigation and the Square Angle Pointer in Hip Resurfacing
Navigated Modular Short-Stemmed Total Hip Arthroplasty by a Less Invasive Technique
Smith-Petersen Approach and Lateral Position with Mini-Stem
Mini-Invasive Approach and Navigation in Total Prosthesis of the Hip
The Anterolateral Watson Jones Approach in Total Hip Replacement in the Supine Position
Anterior Approach for Total Hip Arthroplasty: Technique Without Fracture Table
Navigation and the Square Angle Pointer in Hip Resurfacing
Navigated Modular Short-Stemmed Total Hip Arthroplasty by a Less Invasive Technique
Stay updated, free articles. Join our Telegram channel

Full access? Get Clinical Tree


