Fig. 5.1
The Smith-Petersen or Hueter approach uses the interval between the TFL (4) and the sartorius (1). The TFL (4) and the abductors, gluteus minimus (5), and gluteus medius (6) are retracted laterally and the sartorius (1), rectus femoris (3), and iliopsoas (2) are all retracted medially to expose the capsule (Figure Courtesy of ICON)
Most authors using the direct anterior approach describe the technique in conjunction with a special orthopedic table to enable hyperextension and external rotation of the operative leg to improve the exposure for the proximal femur [12, 14, 15]. Another advantage of these orthopedic tables, if desired, is the added option of using intraoperative fluoroscopy to assist in the placement of components [14]. Several studies demonstrate excellent outcomes with this approach, with minimal complications reported. Follow-up studies report that patients are able to ambulate more quickly postoperatively [16] and have dislocation rates less than 1 % [14, 17] with the anterior approach technique. The tables used for this technique can be expensive and may prevent surgeons from adopting this technique because of cost. In this report, we describe the muscle sparing direct anterior approach for total hip arthroplasty using a standard operating room table.
Patients and Methods
Patients
During the calendar year of 2007, from January through December, 141 total hip replacements were performed in 128 patients.
The minimally invasive direct anterior approach was used for all patients. The senior author (ML) performed all procedures at the Schulthess Clinic in Zurich, Switzerland. Two types of acetabular components were used with this approach, the EP-Fit® (Plus Orthopedics Ltd., Rotkreuz, Switzerland) and the Allofit™ (Zimmer, Warsaw, USA). Press fit stems ML-Taper® (Zimmer, Warsaw, USA) and Polarstem® (Plus Orthopedics Ltd., Rotkreuz, Switzerland) as well as cemented stems Weber® (Zimmer, Warsaw, USA) were implanted depending upon the proximal femoral morphology and the patient age. The type of stem used was a clinical decision made by surgeon preference and on a case-to-case basis.
Radiographs were evaluated for acetabular component abduction angle and anteverions as well as for the presence of heterotopic ossification. Measurements were performed on the most recent AP pelvic film and the most recent lateral radiograph. The most recent radiographs were used because these were usually the highest quality radiographs available, and both the AP and lateral were taken on the same day. Postoperatively, the regular practice is to take an AP pelvis or an AP hip radiograph in the recovery room and is of lower quality. Abduction angle or inclination angle was measured on the AP pelvis radiograph, using the tangential to the opening of the acetabular component and an inter-teardrop line. The version was measured on the lateral radiograph between and line marking the anterior opening of the acetabular component and the horizontal line [18]. Both the AP pelvis and the lateral radiograph were used to evaluate for the presence of any heterotopic ossification (HO) according to the Brooker classification [19].
Technique
Positioning
The patient is placed supine on a regular OR table and the ipsilateral arm in placed across the chest and supported by an arm holder. Both lower extremities are fully prepped out with inclusion of the entire lower abdominal quadrant on the operative side to include the ASIS and to ensure accurate assessment of pelvic rotation. The skin is marked to identify the ASIS, the iliac crest, the tip of the greater trochanter and the ipsilateral fibular head (Fig. 5.2).
Fig. 5.2
(a) The patient is supine on regular OR table. The ipsilateral arm is placed across the patients’ chest and held by an arm holder attached to the opposite side of the table. The surgeon stands on the operative side with one assistant and a second assistant is on the contralateral side of the table. (b) The skin incision is approximately 8–10 cm starting 2 cm lateral and distal to ASIS and directed toward ipsilateral fibular head
Incision and Approach
The skin incision is a straight line drawn out starting 2 cm lateral and 1–2 cm distal to the ASIS and directed toward the fibular head on the ipsilateral leg. The location of the incision is chosen to prevent damaging the lateral femoral cutaneous nerve, which is located in the interval between the TFL and the sartorius. The optimal placement of the incision is over the lateral aspect of the tensor fascia lata muscle. Once down to the fascia, it is incised in line with the skin incision. Care should be taken as to not injure the underlying muscle fibers of the TFL. The TFL is peeled off of the intermuscular septum either sharply with a knife or bluntly (Fig. 5.3) until the deep fascia is identified and the muscle belly of the rectus femoris can be recognized. The fascia is incised, and the vessels supplying the TFL pedicle (branches of the lateral circumflex arteries) are identified, ligated with a suture, and divided (Fig. 5.4). These vessels tend to be in the middle of a well-positioned incision. The superior aspect of the rectus muscle is identified. There is usually a layer of fat in this region that covers the lateral aspect of the rectus and lies on top of the capsule. This fat is excised.
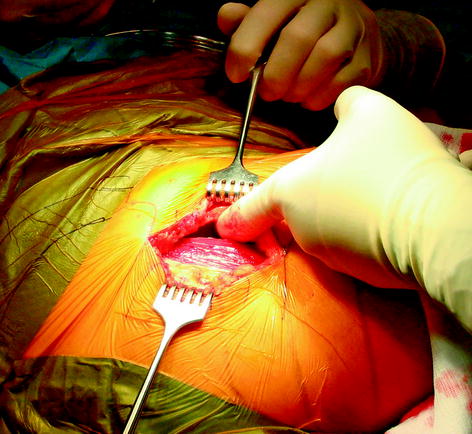
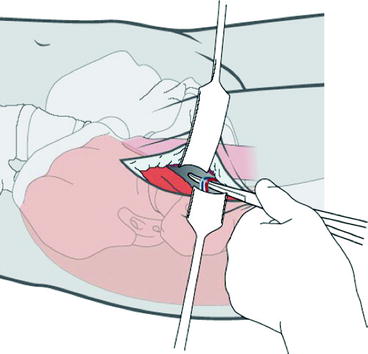
Fig. 5.3
The TFL is peeled off of the intramuscular septum, and the index figure of the surgeon is demonstrating the space between the muscle fibers of the TFL and the intramuscular septum. Langenbeck retractors are placed into this space to expose the rectus femoris muscle and tendon
Fig. 5.4
Once the TFL is retracted laterally and the intramuscular septum and sartorios are retracted medially, the pedicle to the TFL from the lateral femoral circumflex vessels is identified in the middle of the wound. The pedicle is dissected out, clamped, and suture ligated
At this point, the anterior portion of the capsule should be seen with the rectus muscle medially, the tendon of the reflected head cranially, and the fibers of the gluteus minimus visible laterally. Distal to the greater trochanter, a curved Hohmann retrator is inserted at the level of the vastus lateralis ridge to allow for further lateral retraction of the TFL. With the use of a Cobb elevator, the plane between the capsule and the minimus is developed taking care not to injure the muscle fibers of the minimus or the TFL (Fig. 5.5). A blunt eva retractor is placed into this interval. The process is repeated anteromedially between the rectus and the capsule. The Cobb should stay along the capsule around the medial aspect of the capsule toward the obturator foramen to free the psoas off the capsule. It is important to recognize and palpate the femoral artery medially, and care needs to be taken to prevent injury to the vessel. Again, an eva retractor is placed between the capsule and the rectus and placed into the obturator foramen. Dividing the reflected head of the rectus can be performed at this stage if the patient is very tight and there is poor exposure.
Fig. 5.5
A Cobb elevator is used to separate the gluteus minimus off of the capsule laterally. And anteriorly, the iliacus muscle is separated from the capsule. This maneuver creates space for placement of the eva retractors to expose the capsule prior to making the capsulotomy
The capsule is then incised parallel to the orientation of the femoral neck to expose the femoral head and neck (Fig. 5.6). This should be performed as lateral as possible to ensure a large anterior capsular flap remains attached to the acetabular rim. This flap is used to protect the rectus from the retractors used to expose the acetabulum. Decreasing excessive damage to the rectus will help prevent heterotopic ossification formation. Once the capsulotomy is performed, the eva rectors are then placed intracapsular, and further release of the capsule is performed along the intertrochanteric ridge forming a reverse T capsulotomy (Fig. 5.6b). An 8-mm Hohmann retractor is used to elevate the capsule off the femoral head. When enough exposure has been created, a corkscrew is placed fairly medially into the femoral head, and large flat freer is placed into the joint to assist in dislocating the femoral head. To ensure an easier removal of the femoral head following the femoral neck osteotomy, the hip is dislocated at this point with an assistant pulling traction and externally rotating the leg, while the surgeon distracts with the corkscrew and uses the freer as a shoehorn to assist in levering out the femoral head (Fig. 5.7). After dislocation, the femoral head is then relocated into the acetabulum. With confirmation of a dislocatable head, the joint is reduced, and the femoral neck is then cut with an oscillating saw (long standard blade) perpendicular to the axis of the femoral neck. If the hip is not able to be dislocated, the femoral head can be removed in a piece meal manner by sectioning the femoral head with an osteotome. This or a wedge osteotomy of the neck is almost never required for delivering the femoral head.
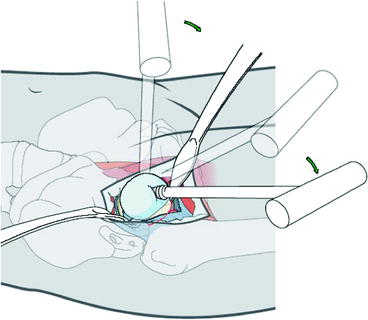
Fig. 5.6
(a) With the eva retractors in place, a third rectactor is placed at the level of the vastus ridge. An inverted T-shaped capsulotomy is made, with one limb being in line with the femoral neck and the second along the introchanteric ridge. It is recommended to leave a large flap of capsule on the acetabular side. This is used to protect the rectus from the rectactors, in an effort to help prevent heterotopic ossification. A smaller cuff of capsule is also left on the femoral side allowing for partial closure of the capsulectomy. (b) Clinical picture with eva retractors with the capsule exposing the arthritic femoral head
Fig. 5.7
 Smith-Petersen Approach and Lateral Position with Mini-Stem
Mini-Invasive Approach and Navigation in Total Prosthesis of the Hip
The Anterolateral Watson Jones Approach in Total Hip Replacement in the Supine Position
Minimally Invasive Posterior Approach: Technical Evaluation, Initial Results and Follow-Up at Two Years
Navigation and the Square Angle Pointer in Hip Resurfacing
Navigated Modular Short-Stemmed Total Hip Arthroplasty by a Less Invasive Technique
Smith-Petersen Approach and Lateral Position with Mini-Stem
Mini-Invasive Approach and Navigation in Total Prosthesis of the Hip
The Anterolateral Watson Jones Approach in Total Hip Replacement in the Supine Position
Minimally Invasive Posterior Approach: Technical Evaluation, Initial Results and Follow-Up at Two Years
Navigation and the Square Angle Pointer in Hip Resurfacing
Navigated Modular Short-Stemmed Total Hip Arthroplasty by a Less Invasive Technique


The corkscrew is placed firmly into the femoral head as medial as possible. By dislocating, the femoral head facilitates the removal of the femoral head following femoral neck osteotomy. Often a large flat freer is placed intra-articularly to assist in levering out the femoral head. Additionally an assistant can pull some gentle traction and externally rotate the femur
Related posts:
Smith-Petersen Approach and Lateral Position with Mini-Stem
Mini-Invasive Approach and Navigation in Total Prosthesis of the Hip
The Anterolateral Watson Jones Approach in Total Hip Replacement in the Supine Position
Minimally Invasive Posterior Approach: Technical Evaluation, Initial Results and Follow-Up at Two Years
Navigation and the Square Angle Pointer in Hip Resurfacing
Navigated Modular Short-Stemmed Total Hip Arthroplasty by a Less Invasive Technique
Stay updated, free articles. Join our Telegram channel
Full access? Get Clinical Tree
