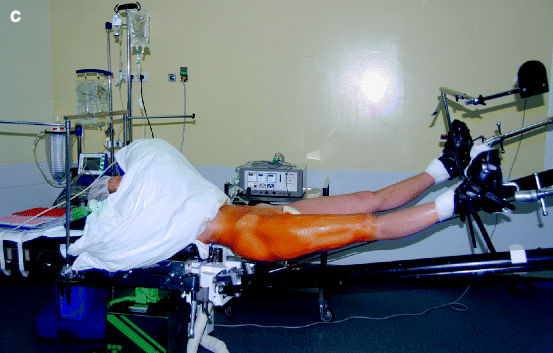
Fig. 1.1
(a–c) Judet’s orthopedic table allowing a stable position of the pelvis and of the operated lower limb in the desired position
The sacrum rests on a scooped out pelvic support. This pelvic support stabilizes the pelvis and also allows for an efficient transmission of the orthopedic table’s traction forces.
Iliac counterpressure on the opposite side helps to stabilize the pelvis regardless of the position of the limb being treated.
The opposite upper limb rests on a support, with the extended elbow. The operating side upper limb is positioned in front of the patient’s chest, with a flexed forearm, in a way so as not to interfere with the surgeon’s and first assistant’s liberty of movements. Installation must be checked by the surgeon.
Two assistants help with surgery, but it can be done with just one assistant. The first assistant is positioned on the left of the surgeon for surgery on a right hip and on the right of the surgeon for surgery on a left hip. The second assistant is positioned opposite the surgeon. The operative field must expose the iliac crest in its anterior half and the anteroexternal surface of the thigh over approximately 20 cm.
For didactic purposes, the approach to the hip will be described in three planes.
Plane 1
The skin is incised parallel to an imaginary line joining the anterosuperior iliac spine to the head of the fibula. The incision is made approximately 2 cm behind this line (Fig. 1.2). The length of the skin incision ranges from 6 to 8 cm for a patient with normal body weight and can be increased in size if it does not provide sufficient comfort during surgery, particularly in obese or very muscular patients. It is rare to need an incision more than 10 cm long. With reference to the apex of the greater trochanter, which can be identified easily by palpation, the incision is made 2/3 above the apex and 1/3 below the apex (on the line described previously), that is, in front of the greater trochanter (Fig. 1.3). After incising the subcutaneous fat and hemostasis, a buttonhole incision is made along the direction of the incision on the superficial aponeurosis of the tensor fasciae latae on the part which is most mobile on palpation. The correct location of the buttonhole incision is confirmed by the appearance of the muscle fibers, which are characterized because of their oblique path from above downward and from front to back (Fig. 1.4). The incision of the superficial aponeurosis of the tensor fasciae latae then is to be continued over the entire length of the skin incision and beyond, sliding the superior and inferior angles of the incision upward and then downward successively using a small retractor. The internal edge of the superficial aponeurosis of the tensor fasciae latae then is grasped with dissecting forceps and raised with a firm hand to allow a rasp to release the entire tensor fasciae latae from its aponeurosis over its anterointerior side (Fig. 1.5). A retractor held by the first assistant then is used to displace the tensor fasciae latae muscle laterally, and another retractor held by the second assistant is used to displace the sartorius muscle medially. Correctly balanced retraction then will allow the second plane to be exposed perfectly.
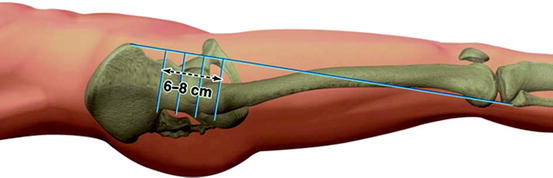
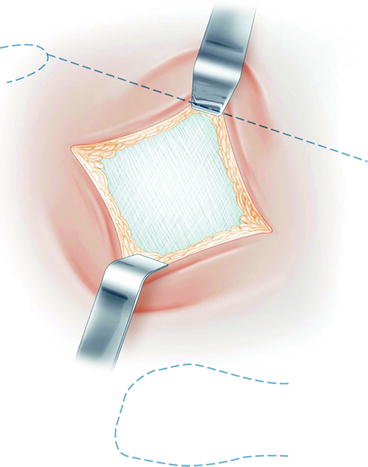
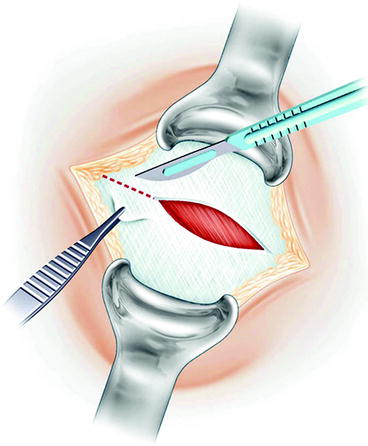
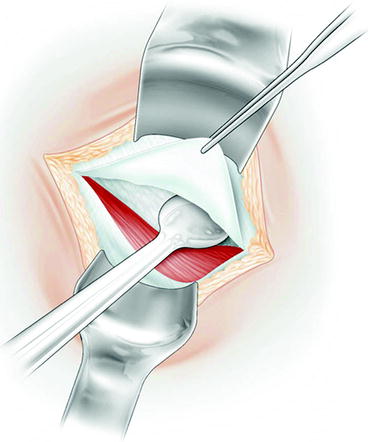
Fig. 1.2
The skin incision is positioned in reference to the apex of the greater trochanter and 2 cm behind an imaginary line joining the anterosuperior iliac spin to the head of the fibula
Fig. 1.3
The skin and fat tissue are incised to the superficial aponeurosis of the tensor fasciae latae
Fig. 1.4
A buttonhole incision is made on the superficial aponeurosis of the tensor fasciae latae along the direction of the incision
Fig. 1.5
The tensor fasciae latae muscle is released from its superficial aponeurosis after completely incising it
Plane 2: Innominate Aponeurosis and Anterior Circumflex Vessels
This plane is located immediately on the deeper surface of the tensor fasciae latae that is pulled aside by the first assistant. The innominate aponeurosis may be more or less thick. The anterior circumflex vessels, which are visible beneath this aponeurosis, must be identified to tie them off or coagulate them. The presence of one or two “sentinel” veins emerging at the superficial surface of the deep innominate aponeurosis helps identify the bundle of circumflex vessels which vary in number, volume, and location among patients. After these have been controlled (Fig. 1.6), complete incision of the innominate aponeurosis may be done easily over the entire length of the incision. The incision begins upward at the level of the reflected tendon of the rectus femoris, which is preserved. Below, the aponeurosis becomes thinner and disappears. Complete incision of the innominate aponeurosis reveals a fatty space leading to the third plane.
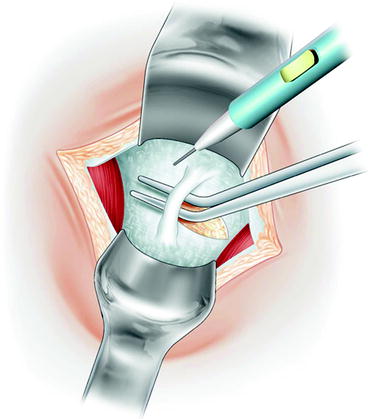
Fig. 1.6
The innominate aponeurosis and the anterior circumflex vessels are correctly exposed between the posterior retractor removing the tensor fasciae latae muscle and the anterior retractor removing the anterior rectus femoris muscle. The anterior circumflex vessels are ligated or coagulated
Plane 3: Anterior Capsular Plane
The fatty tissue located beneath the innominate aponeurosis is incised from the top downward and from the outside inward to identify (without damaging) the aponeurosis of the iliacus muscle, which covers the anterior surface of the joint capsule to a greater or lesser extent depending on the patient. As soon as the external edge of the iliacus muscle has been identified, the thin perimysium which surrounds it is incised, and a first pointed retractor, held by the second assistant, is slid to the inferior surface of the neck of the femur, preserving the attachment of the iliacus muscle to the anterior joint capsule as much as possible. In its upper part, slightly beneath the reflected tendon of the anterior rectus, the external edge of the iliacus muscle is pulled upward with dissecting forceps, and a small white avascular space—the attachment of the direct tendon of the anterior rectus femoris onto the joint capsule—then can be dissected. A second pointed retractor, also held by the second assistant, is slid into this space. This then pulls aside the iliacus and rectus femoris muscles pressing on the anterior wall of the acetabulum. The retractor must be level with the anterior capsule and its insertion onto the anterior wall, beneath the two muscles described previously and not in the body of the muscle, to avoid the risk of damaging the femoral nerve with the pointed tip. Tilting the retractor exposes the inferior part of the anterior aspect of the joint capsule, sparing the area of attachment between the iliacus muscle and the anterior surface of the capsule. A third pointed retractor, held by the first assistant, will slide easily to the superior edge of the neck of the femur, between gluteus minimus and capsule, to clearly expose the anterior surface of the neck. The exposure can be improved even more: the first assistant who still has one free hand can pull aside the internal edge of the tensor, outward, with an American retractor (Fig. 1.7). The full surgical approach to the hip then is complete.
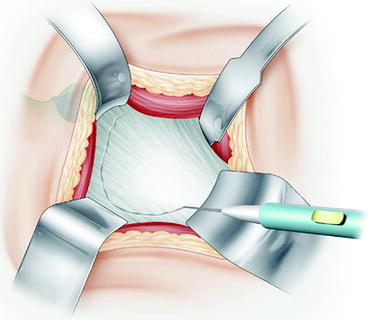
Fig. 1.7
The exposed anterior capsule of the hip and the anterior capsulectomy are shown. The anterior retractor pulls aside the iliacus and rectus femoris muscles. The inferior retractor is slid to the inferior surface of the neck of the femur. The superior retractor is slid to the superior surface of the neck of the femur
The methods of exposure and details that allow a total replacement to be done comfortably using this minimally invasive approach will be described.
Anterior Capsulectomy or Anterior Capsulotomy
Whether anterior capsulectomy is done with conventional or diathermal scalpel, a small lip must be fashioned on the anterior edge of the acetabulum. An internal flap which remains adherent to the deep surface of the iliacus muscle and protects it also must be made. This capsulectomy approximates 40 % of the surface of the whole capsule (Fig. 1.8).
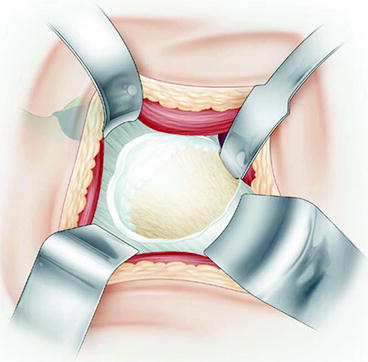
Fig. 1.8
The femoral head and neck are exposed after the partial anterior capsulectomy. The portion of excised anterior capsule is shown in the dissecting forceps
The anterior capsulectomy can be deliberately chosen by the surgeon. However, the capsulectomy must be performed in case of preoperative stiffness in extension, important stiffness, or in case of a planned shortening correction.
An anterior capsulotomy with a capsular repair at the end of the procedure can be done in all other cases. The capsulotomy will then be performed in a U-form with a superior acetabular hinge (Fig. 1.9). The exposure is made easier by the positioning of the curve retractor under the capsular flap, in contact with the anterior acetabulum’s wall. This capsular flap protects the anterior muscles from the retractor. Capsular repair at the end of the procedure will allow to keep a protector tissue between the implanted prosthesis and the anterior muscles. However, even a reduced anterior approach allows a good acetabular exposure, hence an appropriate cup positioning without any edging, avoiding therefore a potential anterior conflict between the cup and the iliopsoas muscle.
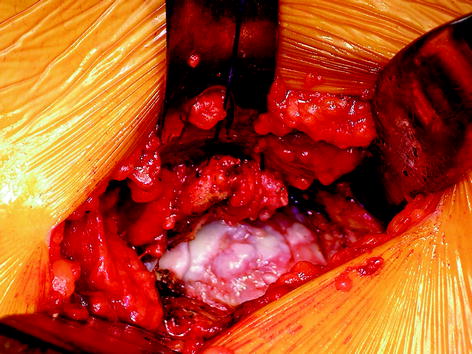
Fig. 1.9
Anterior capsulotomy performed in a U-form with a superior acetabular hinge
A thick capsule can be preserved and tinned out by the resection of its deep articular side. The capsular repair, at the end of the procedure, is undertaken with an external rotation of the capsular flap sutured on the external capsulotomy zone, with the hip in external rotation. Such a capsular repair does not interfere with full hip movement, particularly in extension and in external rotation.
Anterior Dislocation
The femoral head is dislocated by external rotation after applying sufficient traction by means of the orthopedic table to insert a Lambotte spoon (Hospitalia, Fontenay les Briis, France) between the acetabulum and the femoral head (Fig. 1.10). After the Lambotte spoon has been inserted between the head and acetabulum, it is essential that the traction be released and that the limb is rotated with an assistant applying the rotation forces at the level of the knee, holding the knee below the surgical fields. The surgeon assists in dislocation by levering on the femoral head using the Lambotte spoon. A 90° external rotation must be obtained to estimate the anteversion of the femoral neck (Fig. 1.11). Femoral neck’s cut is only performed after having checked that a 90° rotation is obtained by knee palpation. A condylar palpation is more precise to assess rotation than a patellar palpation, especially where obese patients are concerned.
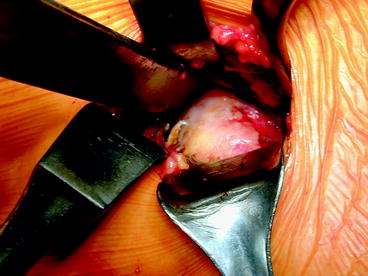
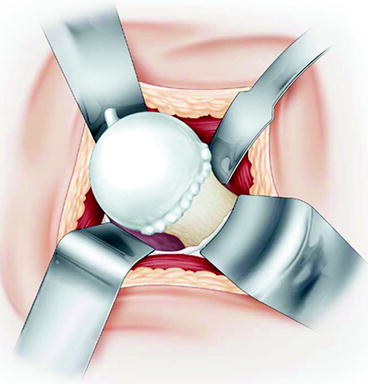
Fig. 1.10
A Lambotte spoon is inserted between the acetabulum and the femoral head before dislocation
Fig. 1.11
The anterior dislocation is accomplished by external rotation and by levering onto the femoral head using the Lambotte spoon
Femoral Neck’s Cut
Identification of the height of the desired cut on the neck is achieved keeping the leg in 90° external rotation by comparing the length of the calculated resection from the preoperative template against the apex of the head using a caliper (Fig. 1.12). It is straight forward to reproduce the ideal length on a sterile caliper and to compare the length of resection calculated from preoperative radiographs with the apex of the head using the trial prosthesis. After the cut has been made (with the caliper locked at the desired length), correct concordance between the actual cut and the planned cut can be confirmed to be certain that no error in length has been made.
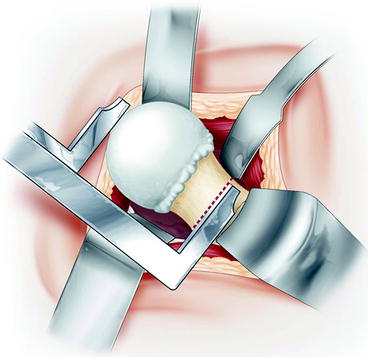
Fig. 1.12
The level of femoral neck section is determined with a caliper
Each surgeon can keep his planning and corresponding usual anatomical landmarks. The level of the planned femoral neck’s section remains easy to assess according to the surgeon habits as all the usual landmarks are easily accessible (tip of the femoral head, great trochanter, lesser trochanter).
Related posts:
 Smith-Petersen Approach and Lateral Position with Mini-Stem
Mini-Invasive Approach and Navigation in Total Prosthesis of the Hip
The Anterolateral Watson Jones Approach in Total Hip Replacement in the Supine Position
Anterior Approach for Total Hip Arthroplasty: Technique Without Fracture Table
Minimally Invasive Posterior Approach: Technical Evaluation, Initial Results and Follow-Up at Two Years
Navigation and the Square Angle Pointer in Hip Resurfacing
Smith-Petersen Approach and Lateral Position with Mini-Stem
Mini-Invasive Approach and Navigation in Total Prosthesis of the Hip
The Anterolateral Watson Jones Approach in Total Hip Replacement in the Supine Position
Anterior Approach for Total Hip Arthroplasty: Technique Without Fracture Table
Minimally Invasive Posterior Approach: Technical Evaluation, Initial Results and Follow-Up at Two Years
Navigation and the Square Angle Pointer in Hip Resurfacing
Stay updated, free articles. Join our Telegram channel

Full access? Get Clinical Tree


