Fig. 4.1
Positioning of the operative leg in a standard circumferential leg holder proximal to the knee
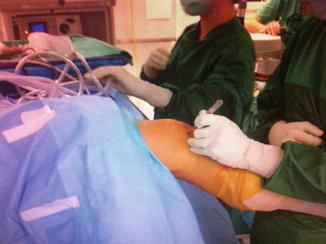
Fig. 4.2
A knee undergoing valgus stress which allows for opening and visualization of the medial compartment
Technique and Portal Placement
After appropriate positioning, prepping, and draping of the patient, the knee is typically examined under anesthesia. The purpose of this examination is to establish the anatomical landmarks of the knee and to assess any possible instability from ligamentous injury. Findings from examination should correlate with the arthroscopic findings—i.e. a suspected varus injury should be accompanied by increased visualization of the lateral compartment. Following examination, the knee is positioned over the side of the table for presurgical marking of the surface anatomy and arthroscopic portal placement. The soft tissue and bony landmarks of interest for the standard anteromedial and anterolateral portals include the following: the inferior border of the patella, the patellar tendon, and the tibial plateau.
The surgeon is best able to assess the edges of these structures by rolling a thumb or index finger along their borders. Once properly located, a marking pen is used to mark the inferomedial and inferolateral borders of the patella continuing down to the respective medial and lateral edges of the patellar tendon. Lastly, the edges of the medial and lateral tibial plateau are palpated and marked. Although not all surgeons will choose to mark out these anatomical landmarks, doing so can prevent errant portal placement, injury to structures, and allow for proper adjustment to variations in patient anatomy. Next, the projected anteromedial and anterolateral portals can be marked.
There are various philosophies for choosing portal placement. A standard method is marking the anterolateral portal 1 cm off the lateral edge of the patellar tendon and the anteromedial portal 1.5 cm off the medial edge of the patellar tendon with both halfway between the inferior border of the patella and superior border of the tibial plateau. Another method is based on individual patient anatomy and involves feeling for the “soft spot” at the apex of “Joyce Hardy Triangle” which is bound by the patellar tendon, tibial plateau, and edge of the femoral condyle. The senior author ascribes to two basic arthroscopic principles: (1) look high, work low and (2) create portals in the position with which they will be employed. In a medial meniscectomy, for example, a high lateral portal is best created at the “vertex” of the junction of the lateral femoral condyle and the patella. This high placement allows the arthroscope to traverse the medial tibial spine and afford an excellent view of the posterior horn of the medial meniscus. A “low” working medial portal is created approximately 5 mm medial to the patella tendon and just above the joint surface (Fig. 4.3). A high lateral viewing portal also affords excellent instrument access to the posterior medial horn when the viewing portal is switched to the medial side. Both portals are created in slight flexion and valgus: the positions used for the procedure. Similarly, for a lateral meniscal resection, the leg is placed in a “figure of four” position on a padded Mayo stand, and a “high” medial viewing portal is created in the medial “vertex” of the junction of the patella and medial femoral condyle. A low lateral working portal is made under direct vision just lateral to the patella tendon at the joint line. Whichever method is chosen, it is important to remember that the anterolateral portal tends to be placed slightly higher than the anteromedial portal for medial meniscectomy. This accounts for the slightly higher border of the lateral tibial plateau compared to the medial plateau.
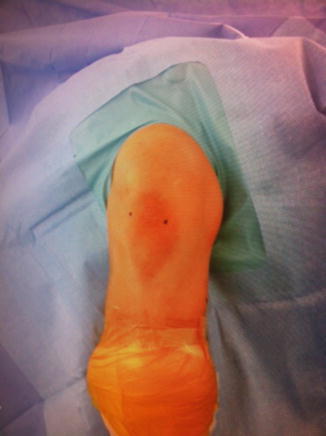
Fig. 4.3
Standard portal placement for knee arthroscopy with higher placement of the lateral portal compared to the medial portal
After marking out the surface anatomy and projected portal sites, local anesthetic with epinephrine can be injected into the portal sites to help decrease the amount of capsular bleeding (Fig. 4.4). The use of a tourniquet is optional but is favored by the senior author to help decrease bleeding and subsequently increase visualization. An 11-blade is first used to create the anterolateral portal, which serves as the primary visualization portal. The blade is introduced into the skin in a vertical fashion with the bevel facing up to prevent inadvertent injury to the anterior horn of the meniscus. As the blade is passed through the skin, it is aimed towards the notch of the femur and continued about 1.5 cm deep to incise the capsule. This incision can then be dilated with the use of a hemostat introduced into the same path. The blunt trocar for the arthroscope is then introduced into the joint by first aiming towards the notch in the same pathway as the incision and then medially towards the medial compartment. Once in the medial hemijoint, the blunt trocar is removed from the cannulae, and the camera is introduced with saline inflow attached.
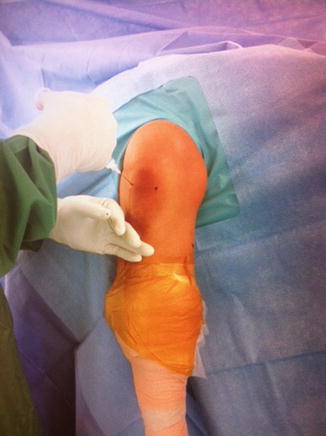
Fig. 4.4
Before incision, local anesthetic injection of the portal sites with epinephrine additive helps to decrease the bleeding caused by incisional wounds
Typically, an entire knee arthroscopy can be performed using a 30° scope. The senior author favors the usage of the 2.9 mm sheath as it allows enhanced posterior access in tighter knees. This 30° objective allows for visualization of the majority of the knee and is certainly capable of helping perform basic meniscectomy. It is important to remember throughout the process of the knee arthroscopy that turning the objective prior to advancing the camera towards a certain region allows for better visualization. Much like one would turn their head in the direction they are heading prior towards walking in that direction, the use of the 30° objective allows for safe passage through the knee. With the scope placed in the anterolateral portal, the objective is turned to face medially to help with direct visual placement of the anteromedial portal. An 18-gauge spinal needle is placed at the site of the proposed anteromedial portal. The direct visualization from the arthroscope ensures that the anterior meniscus and articular surfaces are protected during portal creation. Once the spinal needle is placed in the proper projection into the knee, the 11-blade is then inserted in a vertical fashion with the bevel up directly along the path of the needle. At this point, the primary working anteromedial has been created and the surgical arthroscopy can begin.
Diagnostic Arthroscopy
Prior to performing any part of the meniscectomy, it is imperative to always perform a systematic diagnostic arthroscopy of the knee. This practice allows for confirmation of findings noted on physical exam and imaging as well as an opportunity to find any pathology that may have otherwise been missed. The diagnostic arthroscopy should survey seven sections of the knee: medial compartment, lateral compartment, intercondylar notch (cruciate ligaments), patellofemoral articulation, suprapatellar pouch, medial gutter, and lateral gutter. Arthroscopic photographs should be taken of each one of these areas to allow for proper documentation of all damaged tissue. An arthroscopic probe can be utilized in the medial portal to assess the tissues for stability and allow for multiple photographic angles to be taken of found pathology.
With the scope already placed in the medial compartment during its initial introduction into the knee, a valgus force is applied to the leg using the lateral post. This helps to open up the medial compartment and allow for better assessment of the hemijoint. With this valgus force applied, the knee can be flexed or extended appropriately to allow better visualization of various areas within the medial compartment. Once fully assessed, the camera is slowly withdrawn from the medial compartment and driven laterally to assess the notch. The scope is driven into the posterior medial compartment under direct vision. For tighter knees, the posterior medial compartment is more easily entered “blindly” by feel with the blunt obturator. While applying a valgus force and usually moderate flexion, the medial notch is palpated and the obturator is driven into the posterior medial compartment between the medial femoral condyle and the PCL. The presence of peripheral “ramp” type tears may only be appreciated with access through the notch. Once view of the posteromedial compartment is complete, the scope is slowly drawn back in order to visualize the notch. In the notch, the anterior and posterior cruciate ligaments are probed to assess their integrity. After assessing the cruciates, the arthroscope is continued laterally into the lateral hemijoint. In order to open this joint space, a varus stress needs to be applied much in same fashion as a valgus stress helped to open the medial hemijoint. The figure-of-four position is very helpful to achieve this. In addition to the lateral meniscus, the popliteus tendon can be seen in the posterior aspect of the lateral compartment. The popliteal hiatus in this region is a common place to find loose bodies. Similar to medial inspection, the scope may be driven directly into the posterior lateral compartment. For tighter knees, this compartment is best accessed via the contralateral side. Once fully assessed, the camera is again slowly brought back to the region of the intercondylar notch.
Related posts:

Stay updated, free articles. Join our Telegram channel

Full access? Get Clinical Tree


