Fig. 7.1
Inside-out repair: (a) the posteromedial counterincision is created perpendicular to the knee joint line and just posterior to the MCL and anterior the saphenous nerve; (b) posterolateral counterincision is created perpendicular to the joint line and just posterior to the LCL. (Reprinted from Johnson D, Weiss B: Meniscal repair using the inside-out suture technique. Sports Med Arthrosc. 2012 Jun;20(2):68–76, with permission from Wolters Kluwer Health)
With lateral meniscal repairs, the principal structure at risk when creating the posterolateral counterincision is the common peroneal nerve (Fig. 7.1b). This approach begins with palpating the joint line and the lateral collateral ligament. A vertical, 4–5 cm incision is created parallel to and just posterior to LCL. Again, one-third of the incision should be proximal to the joint line, and two-thirds should be distal. Dissection is carried down to the fascia of the iliotibial band. The fibular head is then palpated followed by identification of the anterior edge of the biceps femoris, which inserts broadly atop the head of the fibula. Defining the location of the biceps tendon is of utmost importance, as the common peroneal nerve lies just posteriorly. Once the location of the biceps femoris and iliotibial band is confirmed, the dissection is continued in the soft spot at the posterolateral joint line in the interval between the iliotibial band and biceps tendon. A retractor is placed within this interval, retracting the biceps posteriorly and ensuring protection of the common peroneal nerve. The lateral collateral ligament as well as the lateral head of the gastrocnemius becomes visualized, and the interval between the gastrocnemius and the capsule is then developed. A scalpel is used to perforate the thin fascia that lies laterally to the gastrocnemius tendon. Bluntly, a finger is inserted through this perforation, and the lateral gastrocnemius muscle is gently freed from the posterolateral capsule. A retractor is then placed in this interval, thereby retracting the lateral head of the gastrocnemius, the biceps femoris, and the common peroneal posteriorly, and thus giving exposure to the posterolateral capsule.
Once the desired counterincision is created, suture can be passed into the joint through the contralateral working portal in a variety of different configurations (Fig. 7.2). A single-barreled cannula is used to direct passage of the suture and to facilitate tear reduction. Meticulous attention must always be paid to the cannula once in the joint, as the sharp tips used for meniscal purchase can cause damage to the articular cartilage. Nonabsorbable 2.0 suture, such as Tevdek (Deknatel, Mansfield, MA) or Ticron (Covidien, Mansfield, MA) is preferred, and newer super-strength sutures like OrthoCord (Depuy Mitek, Raynham, MA) and FiberWire (Arthrex, Naples, FL) can also be used. Delivery is accomplished via double-armed needles or reuseable nitinol needles. The first limb of the suture is passed across the tear as an assistant holding the retractor in the counterincision retrieves the exiting needle. The cannula is then repositioned to create the desired repair configuration (vertical, horizontal, or hybridization) and the second arm of the suture is passed in a similar fashion. The needles are cut off, and a hemostat is used to tag each suture pair. The process is repeated, typically spacing sutures about 5 mm, until the repair is stable. Once all sutures are passed, the suture limbs are tensioned and the fixation is evaluated arthroscopically. When satisfied, the sutures are tied extracapsularly, verifying through direct visualization that no vital structures become imbricated within the knots.

Fig. 7.2
Variations in meniscal suture configuration: (a–c) vertical configurations; (d) horizontal mattress configuration. (Modified from Farng E, Sherman O: Meniscal repair devices: A clinical and biomechanical literature review. Arthroscopy. 2004 Mar;20(3):273–8, with permission from Elsevier)
Outside-In Repair
The outside- in technique was developed as a means of minimizing the chance of neurovascular injury that was often seen with inside-out repairs [7]. First described by Warren et al in 1985, this arthroscopically guided technique involves the percutaneous passage of suture into the joint through a cannulated needle placed across the tear [16, 17]. The suture is subsequently retrieved through a second needle, and final fixation is performed extracapsularly via a small portal-sized counterincision. It is most suited for repairing anterior horn tears and middle third tears, and advantages of this method stem from the fact that it is simple, minimally invasive, and inexpensive [18, 19].
There are variations in outside-in repair technique. In its most simple form, all that is required is an 18-gauge needle, suture, and an arthroscopic grasper [20] (Fig. 7.3). Simple “Mulberry Knots” can be created using absorbable suture; however, the authors favor the creation of a vertical mattress configuration. A small needle is percutaneously inserted at the joint line across the tear. If the location is satisfactory, then a small portal like incision is made. First, a 15 blade is used to open the skin and then a hemostat is used to spread down to the capsule. An 18-gauge needle is preloaded with a long (40 cm) suture, either braided or mono-filament, making sure that approximately 10 cm of the suture extends passed the tip of the needle. This will affect a loop when the meniscal tissue is penetrated. While visualizing the tear through the contralateral portal, the needle is passed from the new portal into the joint percutaneously. It should cross the inner and outer rim of the tear, making sure that it ultimately exits the superior surface of the inner rim. A probe can be used to aid in reduction of the tear during passage of the needle while keeping the inner rim from being pushed away from the needle. Once the needle is passed, a grasper is used to grab the created loop of suture at the meniscal inner rim. The needle is then carefully removed from the joint, unloading the remaining suture, making sure not to pull the suture loop from the joint. The 18-gauge needle is then reinserted along the same portal, this time perforating just the outer meniscal rim and again exiting across the superior meniscal surface. This needle should be directed so that it perforates the meniscus to create a vertical or oblique mattress configuration. A separate suture is then passed through the needle and into the joint. A grasper is inserted in the ipsilalteral portal and directed through the loop of the first suture to grab the protruding limb of the second suture. The needle is carefully removed and then the suture is delivered out of the ipsilateral portal. The suture creating the loop is pulled out of the joint, and in effect, the second suture is shuttled through the path of the first insertion, thereby creating a vertical mattress configuration with the second suture. The suture is then tied under arthroscopic visualization to ensure proper tension on the knots.
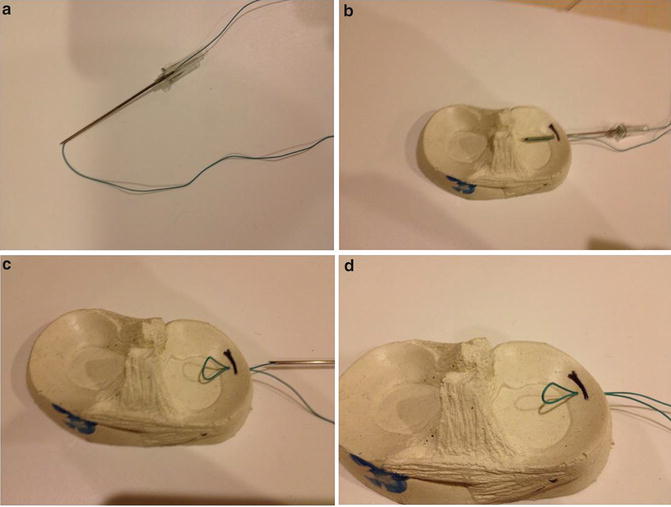
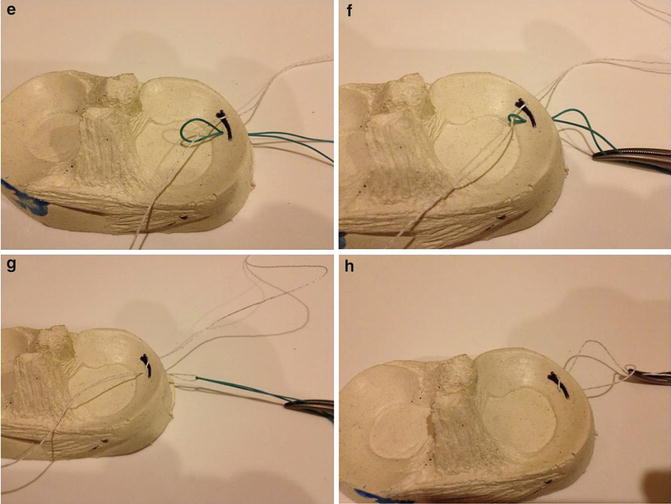
Fig. 7.3
Outside-in repair: (a) An 18-gauge needle is loaded with suture, ensuring that 10 cm extends passed the needle tip. (b) The needle is inserted across the tear, crossing the inner and outer rim. (c) The needle is carefully pulled back. (d) An intra-articular suture loop is created. (e) A separate suture is reinserted across the outer meniscal rim and through the previous suture loop. (f) A hemostat is used to pull the suture loop from the joint. (g) The suture loops is completely withdrawn. (h) A vertical mattress configuration is created
Commercial kits, such as the Meniscus Mender II (Smith and Nephew Endoscopy, Andover, MA), have also become available for outside-in techniques. With this repair system, two needles are again placed in and outside-to in fashion across the desired sites of fixation. Wire loop stylets are then inserted into the needles. Suture is introduced into the joint via the ipsilateral anterior portal and subsequently fed through one of the loops. The loop stylet is pulled back, capturing the suture, and the loop and needle are carefully removed from the joint. The process is repeated again for the free suture limb within the joint. A knot is similarly tied down extracapsularly using a small portal-sized counterincision.
Smaller counterincisions in the outside-in technique have minimized risk to the neurovascular structures. However, these neurovascular structures must be respected: the common peroneal nerve in the lateral aspect of the knee and the saphenous nerve/vein in the medial aspect. The outside-in technique has proven to be successful in the tears of anterior meniscal tears; however, it is more difficult for tears in the posterior horns of the menisci.
All-Inside Repair
The all-inside repair, otherwise known as the “all-arthroscopic” technique, was first introduced to the field of orthopaedics by Morgan et al in 1991 [21]. In this study, the authors utilized posterior accessory portals and suture hooks to shuttle absorbable suture through posterior horn meniscal tears. Subsequent all-inside techniques obviated the need for posterior portals by using meniscal fixators. The orthopedic world has since seen the rapid evolution of the all-inside repair, from rigid devices with barbs to suture-based configurations that allow tensioning after when inserting. Owing to their ease of use, decreased operative time, and lesser risk to neurovascular structures, these all-arthroscopic meniscal fixators have revolutionized the way in which meniscal repairs are performed. Furthermore, newer generations afford pull out strength comparable to inside-out repairs [22–25].
The evolution of fixators came about as a response to the difficulties that arose with the first-generation suture hooks. Many orthopedic surgeons found the tools to be cumbersome and the technique technically demanding [26]. Additionally, given the necessity of creating accessory, posterior portals for passage of instruments, the neurovascular structures were still deemed to be at risk. Thus, the second generation of constructs relied on the use “suture anchors”—implants placed across the tear and affixed along the outer meniscal rim. One such device is the T-fix (Smith & Nephew), an implant comprised of a 3 mm polyethylene bar connected to a 2.0 braided suture at its midpoint. Using a spinal needle, the implant is delivered across the meniscal tear, and to the other surface of the meniscus. A second anchor is passed and deployed adjacent to the first anchor, and a knot pusher is used to tie the two sutures arthroscopically. This technique represented the first all-inside suture technique that did not require the use of any accessory portals. Though results from use of the T-Fix were favorable, the desire for improved compression paved the way for the next generation of fixators [26].
Related posts:

Stay updated, free articles. Join our Telegram channel

Full access? Get Clinical Tree


